rock space AC2100 Dual-band Wi-Fi Range Extender User guide
- Type
- User guide

WPS
PWR
WPS
Signal
Method 1:Via a Web Browser
1. Connect your computer or smart phone to the extender’s
network "rockspace_EXT " . When you are using a computer,
unplug the ethernet cable if any. When you are using a
smart phone, ensure the mobile data is disabled.
Power On
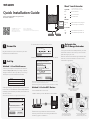
1. Plug in the extender about halfway between your router
and the Wi-Fi dead zone. The location you choose must be
within the range of your router.
2. Wait for about 2 minutes until the Signal LED turns blue.
If it doesn't, relocate the extender closer to the router to
achieve better signal quality.
3. Select the Wi-Fi network you want to extend.
4. Enter the password of the Wi-Fi network you want to extend.
WLAN
rockspace_EXT
2. The login window pops up automatically. If it doesn't, launch a web
browser and enter 192.168.0.254 or www.rockspacewifi.com
manually to get started. Create your admin password and record
it down for later use.
*Note: If the login window does not appear, refer to FAQ > Q1.
Admin password
Conrm admin password
Next Not Now
www.rockspacewifi.com
Your existing Wi
WiFi password
-Fi network
The password is the same as your exsiting
WiFi network
The extended WiFi network
Extended SSID
Cancel Completed
Wait until the page shows you “Wireless network extended successfully"!
Note: By default, the extended network uses the same wireless network name (SSID)
as your router. Change the extended SSID if you need.
Suitable location, at a halfway
point between your router
and the dead zone.
Too close to the router,
extended Wi-Fi signal can
not cover the dead zone.
Too far away from the router,
the extender will lose
connection with your router.
Method 2: Via the WPS Button
1. Press the WPS button on the router.
2. Within 2 minutes, press the WPS button on the extender.
3. Wait until the Signal LED on the extender turns blue,
indicating successful connection. If the Signal LED does not
turn blue, try again or use Method 1.
WPS
PWR
WPS
Signal
Press
1Relocate the
Wi-Fi Range Extender
3
2 Set Up
Reset PinholeEthernet Port
WPS Button
Meet Your Extender
Red
Blue
Signal LED
WPS LED
Blinking
Power LED
On
This LED indicates the connection
between the extender and the router.
Best connection.
Poor connection.
No connection.
WPS connection is in progress.
O Wi-Fi security is not enabled.
The extender is powered on.
The extender is powered o.
Quick Installation Guide
AC2100 Dual Band Wi-Fi Range Extender
Model No. RSD0623
Plug the extender into a power outlet next to your router.
Wait until its Power LED turns blue.
Hot-line: +1 (833) 816-6558
Email: [email protected]
Service Time: EST 10:00-21:00 from Monday to Friday
Need FREE technical support?
Scan the QR code or visit
https://rockspaceworld.com
24/7 Online After-sales Service
Method 1: Via a Web Browser
1. Connect your computer or smartphone to the extender’s
network "rockspace_EXT ". When you are using a computer,
unplug the Ethernet cable if any. When you are using a
mobile phone, ensure the mobile data is disabled.
WPS LED
Power LED
Signal LED
Please select a Wi-Fi network you
want to extend
Connect
WPS
PWR
WPS
Signal
WPS
PWR
WPS
Signal
WPS
PWR
WPS
Signal

Q2: How do I reset the extender?
With the extender powered on, use a pin to press the Reset Button for 8 seconds. The extender
will reboot to its default factory settings. Reset pinhole is on the bottom of the extender
(refer to picture shown in Meet Your Extender).
FAQ
Q1: What should I do if I cannot access the extender's web management page?
Q3: What should I do if the extender can not be connected successfully to the router?
A1. Check the Signal LED. Blue light refers to A2. Red light refers to A3. No light refers to A4.
A2. A blue light shows the extender has been connected to the router successfully and within
the router's Wi-Fi coverage. If the network is working normally on other devices by connecting
to the router's Wi-Fi, you might have overloaded the router by connecting too many devices.
Disconnect some of the devices and ensure the Wi-Fi extender's priority connection to the router.
If your extender still fails to connect, refer to A5.
Our only ocial website: https://rockspaceworld.com
We provide you with FREE technical support and a 24-month warranty!
Please do not trust any other website.
Enjoy the internet!
Wi-Fi router
Manage Your Extender
1. Connect your computer or smart phone to the extender’s
network.
2. Launch a web browser and enter www.rockspacewi.com in
the address bar and log in.
*Note: If the login window does not appear, refer to FAQ > Q1.
3. Manage the extender as needed.
Method 2: Ethernet-Enabled Devices
You can connect a wired device to the extender using an Ethernet
cable. The device can then access your existing network through
the extender’s Wi-Fi connection.
Method 1: Wireless Devices
Find the SSID of the extender in your Wi-Fi network list to connect.
The password of the extended network is the same as your current
Wi-Fi network.
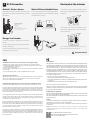
1. If the extender is used in a single-storey building, point the
upper antennas straight up and uptilt the lower antennas as
shown below.
2. If the extender is used in a multi-storey building, point the
upper antennas straight up and the lower antennas straight
down as shown below.
Note: For the best Wi-Fi performance, please follow the above advice
and try not to block ventilation holes on the antennas.
Wi-Fi Connection How to place the antennas
4
Extended Network Name:
Same as your router
Password:
Same as your router
Note: If you want to change the extended network
name, refer to Manage Your Extender.
Make sure your computer or smart phone has connected to the extender's network.
Verify that www.rockspacewifi.com is correctly entered in the web browser and press Enter.
Use another web browser and try again.
Reset the extender and try again.
If you are using a computer, make sure it is set to obtain an IP address and DNS server address
automatically.
If you are still having problems, contact us for FREE 24/7 technical support.
Ethernet Port
FCC Statement
This equipment has been tested and found to comply with the limits for a Class B digital device,
pursuant to Part 15 of the FCC Rules. These limits are designed to provide reasonable protection
against harmful interference in a residential installation. This equipment generates, uses and
can radiate radio frequency energy and, if not installed and used in accordance with the
instructions, may cause harmful interference to radio communications. However, there is no
guarantee that interference will not occur in a particular installation. If this equipment does
cause harmful interference to radio or television reception, which can be determined by turning
the equipment o and on, the user is encouraged to try to correct the interference by one or
more of the following measures:
> Reorient or relocate the receiving antenna.
> Increase the separation between the equipment and receiver.
> Connect the equipment into an outlet on a circuit dierent from that to which the receiver
is connected.
> Consult the dealer or an experienced radio/TV technician for help.
This device is restricted to be used in the indoor.
Operation is subject to the following two conditions: (1) this device may not cause harmful
interference, and (2) this device must accept any interference received, including interference
that may cause undesired operation.
Radiation Exposure Statement
This device complies with FCC radiation exposure limits set forth for an uncontrolled environment
and it also complies with Part 15 of the FCC RF Rules.
This equipment should be installed and operated with minimum distance 20cm between the
radiator & your body.
Caution:
Any changes or modications not expressly approved by the party responsible for compliance
could void the user's authority to operate this equipment.
This transmitter must not be co-located or operating in conjunction with any other antenna
or transmitter.
NOTE: (1) The manufacturer is not responsible for any radio or TV interference caused by unauthorized
modications to this equipment. (2) To avoid unnecessary radiation interference, it is recommended to use
a shielded RJ45 cable.
PWR
A3. A red light indicates the need to change your extender's location until the light turns blue.
The light is always red no matter how you re-locate it? Make sure there are no metal objectives,
closed doors or electromagnetic waves that could interfere with the signal transmission. If your
extender still fails to connect, refer to A5.
A4. If the signal LED is o, it shows there is no connection between the extender and the router.
Make sure you have not turned o or hidden the router's Wi-Fi signal. Also make sure you have
not initiated encryption mode, MAC lter, Blacklist of the router. Don't know how to manage
your router? Reset your router to its factory settings or contact your network provider. If your
extender still fails to connect, refer to A5.
A5. Reset both your extender and router to clear their cache and then undertake all the connection
and checking procedures again.‘ Reset and re-start’ is one of the ultimate diagnostic actions you
can perform at any time. If you still have problem, contact us for FREE 24/7 technical support and
describe your problem including router model no., extender model no. and the solutions you
have tried and failed.
AC2100
Wi-Fi router
AC2100
Wi-Fi router
-
 1
1
-
 2
2


