Page is loading ...

FRONT PAGE
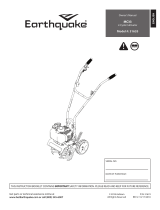
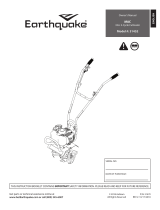
R36XCLV10
R36XCLV16

2
Original Instructions
IMPORTANT!
It is essential that you read the instructions in this manual
before assembling, operating, and maintaining the
product.
Subject to technical modication.
Safety, performance, and dependability have been given top
priority in the design of your cordless cultivator.
INTENDED USE
The cordless cultivator is intended only for outdoor use by
a standing operator walking with the product. For safety
reasons, the product must be adequately controlled by using
two-handed operation at all times.
The product is designed for cultivating or loosening soil
in an open domestic garden area. The maximum working
capacity of the product is 20 cm deep and 40 cm wide.
The product should be used only as described in this
manual.
Do not use the product for any other purpose.
GENERAL PRODUCT SAFETY WARNINGS
WARNING! Read all safety warnings, instructions,
illustrations, and specifications provided with this
power tool. Failure to follow all instructions listed below
may result in electric shock, re, and/or serious injury.
Save all warnings and instructions for future reference.
The term “power tool” in the warnings refers to your mains-
operated (corded) or battery-operated (cordless) product.
WORK AREA SAFETY
■Keep work area clean and well lit. Cluttered or dark
areas invite accidents.
■Do not operate power tools in explosive
atmospheres, such as in the presence of flammable
liquids, gases or dust. Power tools create sparks
which may ignite the dust or fumes.
■Keep children and bystanders away while operating
a power tool. Distractions can cause you to lose control.
PERSONAL SAFETY
■Stay alert, watch what you are doing and use
common sense when operating a power tool. Do not
use a power tool while you are tired or under the
influence of drugs, alcohol or medication. A moment
of inattention while operating power tools may result in
serious personal injury.
■Use personal protective equipment. Always wear
eye protection. Protective equipment such as a dust
mask, non-skid safety shoes, hard hat or hearing
protection used for appropriate conditions will reduce
personal injuries.
■Prevent unintentional starting. Ensure the switch
is in the off-position before connecting to power
source and/or battery pack, picking up or carrying
the tool. Carrying power tools with your finger on the
switch or energising power tools that have the switch on
invites accidents.
■Remove any adjusting key or wrench before turning
the power tool on. A wrench or a key left attached to
a rotating part of the power tool may result in personal
injury.
■Do not overreach. Keep proper footing and balance
at all times. This enables better control of the power tool
in unexpected situations.
■Dress properly. Do not wear loose clothing or
jewellery. Keep your hair and clothing away from
moving parts. Loose clothes, jewellery or long hair can
be caught in moving parts.
■If devices are provided for the connection of dust
extraction and collection facilities, ensure these are
connected and properly used. Use of dust collection
can reduce dust-related hazards.
■Do not let familiarity gained from frequent use of
tools allow you to become complacent and ignore
tool safety principles. A careless action can cause
severe injury within a fraction of a second.
POWER TOOL USE AND CARE
■Do not force the power tool. Use the correct power
tool for your application. The correct power tool will
do the job better and safer at the rate for which it was
designed.
■Do not use the power tool if the switch does not turn
it on and off. Any power tool that cannot be controlled
with switch is dangerous and must be repaired.
■Disconnect the plug from the power source and/
or remove the battery pack, if detachable, from
the power tool before making any adjustments,
changing accessories, or storing power tools. Such
preventive safety measures reduce the risk of starting
the power tool accidentally.
■Store idle power tools out of the reach of children
and do not allow persons unfamiliar with the power
tool or these instructions to operate the power tool.
Power tools are dangerous in the hands of untrained
users.
■Maintain power tools and accessories. Check for
misalignment or binding of moving parts, breakage
of parts and any other condition that may affect the
power tool’s operation. If damaged, have the power
tool repaired before use. Many accidents are caused
by poorly maintained power tools.
■Keep cutting tools sharp and clean. Properly
maintained cutting tools with sharp cutting edges are
less likely to bind and are easier to control.
■Use the power tool, accessories and tool bits etc.
in accordance with these instructions, taking into
account the working conditions and the work to
be performed. Use of the power tool for operations
different from those intended could result in a hazardous
situation.
■Keep handles and grasping surfaces dry, clean
and free from oil and grease. Slippery handles and
grasping surfaces do not allow for safe handling and
control of the tool in unexpected situations.
BATTERY TOOL USE AND CARE
■Recharge only with the charger specified by the
manufacturer. A charger that is suitable for one type
of battery pack may create a risk of fire when used with
another battery pack.

3
Original Instructions
■Use power tools only with specifically designated
battery packs. Use of any other battery packs may
create a risk of injury and fire.
■When battery pack is not in use, keep it away from
other metal objects, like paper clips, coins, keys,
nails, screws or other small metal objects, that can
make a connection from one terminal to another.
Shorting the battery terminals together may cause burns
or a fire.
■Under abusive conditions, liquid may be ejected from
the battery; avoid contact. If contact accidentally
occurs, flush with water. If liquid contacts eyes,
additionally seek medical help. Liquid ejected from
the battery may cause irritation or burns.
■Do not use a battery pack or tool that is damaged or
modified. Damaged or modified batteries may exhibit
unpredictable behaviour resulting in fire, explosion or
risk of injury.
■Do not expose a battery pack or tool to fire or
excessive temperature. Exposure to fire or temperature
above 130°C may cause explosion.
■Follow all charging instructions and do not charge
the battery pack or tool outside the temperature
range specified in the instructions. Charging
improperly or at temperatures outside the specified
range may damage the battery and increase the risk of
fire.
SERVICE
■Have your product serviced by a qualified repair
person using only identical replacement parts. This
will ensure that the safety of the product is maintained.
■Never service damaged battery packs. Service
of battery packs should only be performed by the
manufacturer or authorised service providers.
CULTIVATOR SAFETY WARNINGS
■Use the product across the face of slopes; never up
and down. Exercise extreme caution when changing
direction on slopes.
■Exercise extreme caution when reversing or pulling the
product towards you.
■Never pick up or carry the product while the motor is
running.
■Use the product only in daylight or with good artificial
light.
■Keep proper footing and balance at all times, especially
on slopes. Walk, never run.
■Do not use the product near drop-offs, ditches,
excessively steep slopes, or embankments. Poor footing
could cause a slip-and-fall accident.
■Avoid working the soil when soggy or wet. Wait a day or
two after heavy rain for the ground to dry.
■Keep hands and feet away from the rotating tines at all
times and especially when turning on the motor.
■Turn off the product, and remove the battery pack. Make
sure that all moving parts have come to a complete stop:
●before leaving the product unattended
●before cleaning the product or clearing a blockage
●before checking for any damage after hitting an
object
●if the machine starts to vibrate abnormally (check
immediately)
●before performing maintenance
■Read the instructions carefully. Be familiar with the
controls and the correct use of the product.
■Never allow children or people unfamiliar with these
instructions to use the product. Local regulations may
restrict the age of the operator.
■Never operate the product while people, especially
children, or pets are nearby. Keep in mind that the
operator or user is responsible for accidents or hazards.
■While operating the product, always wear substantial
footwear and long trousers. While operating the product
always wear substantial footwear and long trousers.
■Thoroughly inspect the area where the product is to be
used and remove all objects which can be thrown by the
product.
■Before each use, always visually inspect to see, that
the housing is undamaged and that guards and handles
are in place and properly secured. Replace worn or
damaged components in sets to preserve balance.
■Store the product in a location where the ambient
temperature is between -10°C and 50°C.
■Operate the product only in temperatures between 0°C
and 40°C
ADDITIONAL BATTERY SAFETY WARNINGS
■To reduce the risk of fire, personal injury, and product
damage due to a short circuit, never immerse the
product, battery pack, or charger in fluid or allow fluid
to flow inside them. Corrosive or conductive fluids, such
as seawater, certain industrial chemicals, and bleach
or bleach-containing products, etc., can cause a short
circuit.
■Charge the battery pack in a location where the ambient
temperature is between 10 °C and 38°C.
■Store the battery pack in a location where the ambient
temperature is between 0°C and 20°C.
■Use the battery pack in a location where the ambient
temperature is between 0°C and 40°C.
TRANSPORTATION AND STORAGE
■Turn off the product, and remove the battery pack. Make
sure that all moving parts have come to a complete
stop. Allow the product to cool down before storing or
transporting.
■Remove all foreign materials from the product. Store the
product in a cool, dry, and well-ventilated place that is
inaccessible to children. Keep the product away from
corrosive agents, such as garden chemicals and de-
icing salts. Do not store the product outdoors.
■For transportation in a vehicle, secure the product
against movement or falling to prevent injury to persons
or damage to the product.
TRANSPORTING LITHIUM BATTERIES
Transport the battery pack in accordance with local and
national provisions and regulations. Follow all special
requirements on packaging and labelling when transporting
batteries by a third party. Ensure that no batteries can
come in contact with other batteries or conductive materials
while in transport by protecting exposed connectors with

4
Original Instructions
insulating, non-conductive caps or tape. Do not transport
battery packs that are cracked or leaking. Check with the
forwarding company for further advice.
MAINTENANCE
■Use only original manufacturer’s replacement parts,
accessories, and attachments. Failure to do so can cause
possible injury, can contribute to poor performance, and
may void your warranty.
■Servicing requires extreme care and knowledge
and should be performed only by a qualified service
technician. Have the product serviced by an authorised
service centre only.
■Check all nuts, bolts, and screws at frequent intervals
for proper tightness to ensure that the product is in safe
working condition.
SYMBOLS ON THE PRODUCT
Safety alert
Beware of thrown or ying objects.
Keep all bystanders, especially children
and pets, at least 15 m away from the
operating area.
Read and understand all instructions
before operating the product. Follow all
warnings and safety instructions.
Wear eye protection.
Wear hearing protection.
Keep hands away from rotating tines.
Keep feet away from rotating tines.
To prevent serious injury, do not touch
the rotating tines.
Do not expose the product to rain or
damp conditions.
Regulatory Compliance Mark.
Product meets applicable regulatory
requirements.
93
Guaranteed sound power level
Waste electrical products should not
be disposed of with household waste.
Please recycle where facilities exist
Check with your local authority or
retailer for recycling advice.
SYMBOLS IN THIS MANUAL
Parts or accessories sold separately
Note
Warning

5
Know your product
R36XCLV16
R36XCLV10
x2 x8 x12
x12 x10 x2
Bail
Speed selector
switch
On/Off button
Battery cover
Tine shield
Wrench
Left middle tube
Right middle tube
Drag stake bracket
Drag stake
Outer left tine C
Operator's manual
Outer right tine D
Hub cap
Nut
Lock pin
Bolt
Hitch pin
Wheel
Battery pack
Charger
Inner left tine A
Inner right tine B

6Getting started
Insert tine C over the left tine shaft until it
reaches tine A. The stamped side of the
tine should face towards tine A. Insert
a lock pin through tine C and the outer
hole on the tine shaft. Insert a hitch pin
into the lock pin.
Insert the drag stake inside the metal frame between the wheels. To secure the
stake to the frame, insert the drag stake bracket through the holes of the metal
frame and drag stake. Connect both ends of the drag stake bracket to secure the
drag stake.
Attach the middle tubes to the lower
handle shafts using bolts and nuts. Turn
the nuts clockwise using the wrench to
secure both middle tubes.
Insert a lock pin into the inner hole of the right tine shaft. Insert a hitch pin into
the lock pin to secure the lock pin in place. Insert tine B over the right tine shaft
until it reaches the lock pin. The stamped side of the tine should face towards the
gearbox. Insert a lock pin through tine B and the center hole on the tine shaft.
Insert a hitch pin into the lock pin to secure tine B.
Wear full eye and ear protection,
gloves, substantial footwear, and long
trousers at all times while operating the
product.
On the left side of the metal frame, install the wheel into the axle. Insert and turn
the nut clockwise using the wrench to secure the wheel. On the right side of the
metal frame, install the wheel into the axle. Insert and turn the nut clockwise using
the wrench to secure the wheel.
2
C
1
3
3
1
24
1
2
3
1
10
2
9
5
4
1
2
3
B
6
1
3
2
4
5

7
Getting started
1
2
5
9
Open the battery door. Insert the
battery pack into the battery slot.
Press the on/off button and pull up the
bail towards the handle.
Insert tine D over the right tine shaft until
it reaches tine B. The stamped side of
the tine D should face towards tine B.
Insert a lock pin through tine D and the
outer hole on the tine shaft. Insert a hitch
pin into the lock pin to secure tine D.
Insert a lock pin into the inner hole of the left tine shaft. Insert a hitch pin into the
lock pin to secure the lock pin in place. Insert tine A over the left tine shaft until
it reaches the lock pin. The stamped side of the tine should face towards the
gearbox. Insert a lock pin through tine A and the center hole on the tine shaft.
Insert a hitch pin into the lock pin to secure tine A.
Install a hub cap on both sides of the
metal frame.
Attach the right middle tube to the upper handle shaft using bolts and nuts. Turn
the nuts clockwise using the wrench to secure the right middle tube. Attach the
left middle tube to the upper handle shaft using bolts and nuts. Turn the nuts
clockwise using the wrench to secure the upper left middle tube.
1
A
4
23
5
1
3
4
2
D
1
3
2
2
1
1
2
8
3 4
131211
7
Close the battery door.

8
p.13
p.9
Four-tine operation
Cleaning the
product
Two-tine operation Storing the product
p.12p.11

9
Operation
1
2
3
1
2
1
FOUR-TINE OPERATION
WARNING: Keep hands and feet away from
the rotating tines at all times.
WARNING: The product must be adequately
controlled by using a two-handed operation
at all times.
WARNING: Never operate the product on
rocky surfaces.
1. Insert the drag stake inside the metal
frame. To secure the stake to the frame,
insert the drag stake bracket through the
holes on the metal frame and drag stake.
Adjust the tilling depth according to the
holes on the drag stake.
NOTE: For transport and surface tilling,
set the drag stake to the first hole from the
bottom. Adjust the wheel so that the drag
stake can reach the soil's surface.

10
Operation
1
2
2
3
2
1
3
4
5
NOTE: For medium tilling, set the drag stake
to the third hole from the bottom. For deep
tilling, set the drag stake to the sixth hole
from the bottom.
2. Open the battery door. Slide in the battery
pack into the battery slot.
3. Close the battery door.
4. Press the on/off button and pull up the
bail towards the handle. Use the speed
selector switch to increase the power
when necessary.
WARNING: Avoid running the product
at low speeds for extended periods
of time. Running at low speeds under
constant usage may cause the product
to overheat.
5. Push the product while it is digging on the
soil’s surface.
NOTE: Several passes over the same
path may be required to reach the
preferred depth. Do not try to dig too
deeply in the first pass. If the product
jumps or bucks, allow the product to
move forward at a slightly faster rate or
adjust the position of the wheel assembly.

11
Operation
1
2
3
4
D
1
2
3
2
1
3
C
1
2
1
2
3
3
2
1
3
4
5
TWO-TINE OPERATION
1. Open the battery door. Press the latch on
the side, and remove the battery pack.
Close the battery door.
2. On the right tine shaft, unlock the hitch
pin and lock pin from the inner hole.
Remove tine D.
3. On the left tine shaft, unlock the hitch pin
and lock pin from the inner hole. Remove
tine C.
4. Open the battery door and insert the
battery pack into the battery slot. Close
the battery door.
5. Press the on/off button and pull up the
bail towards the handle. Use the speed
selector switch to increase the power
when necessary.
WARNING: Avoid running the product
at low speeds for extended periods
of time. Running at low speeds under
constant usage may cause the product
to overheat.
NOTE: Several passes over the same
path may be required to reach the
preferred depth. Do not try to dig too
deeply in the first pass. If the product
jumps or bucks, allow the product to
move forward at a slightly faster rate or
adjust the position of the wheel assembly.

12
Maintenance
1
1
2
3
2
3
CLEANING THE PRODUCT
1. Open the battery door.
2. Slide out the battery pack from the battery
slot. Close the battery door.
3. Clean the product with a soft, dry cloth.
Remove the debris from the tines with a
stiff brush.
WARNING: Do not use water to clean the
tines.

13
Storage
20221213v3
1
1
2
3
2
3
STORING THE PRODUCT
WARNING: Clean and remove all foreign
materials from the product before storing.
1. Open the battery door.
2. Slide out the battery pack from the battery
slot. Close the battery door.
3. Store the product in a cool, dry, and well-
ventilated place that is inaccessible to
children and well away from sources of
ignition.

PRODUCT SPECIFICATIONS
Cordless cultivator
Model R36XCLV10
Weight 28.11 kg
Rated voltage 36 V d.c.
No-load speed
High 230-260 /min
Medium 207-243 /min
Low 185-225 /min
Tine diameter 25.4 cm
Working width 28 cm or 40 cm
Working depth 20 cm
Noise emission values determined according to EN
709:1997+A4:2009
A–weighted sound pressure level
at the operator position
83.2 dB(A)
Uncertainty 3.0 dB
A–weighted sound power level 91.2 dB(A)
Uncertainty 1.9 dB
Guaranteed sound power level 93 dB(A)
Vibration values
determined according to EN
709+1997+A4:2009
0.6 m/s²
Uncertainty 1.5 m/s²
BATTERY AND CHARGER
Model R36XCLV10 R36XCLV16
Battery pack - BPL3660D
Charger - R36CHA4A0
Compatible battery
packs
BPL3620D, BPL3660D, BPL3690D,
BPL3626D2, BPL3640D2, BPL3650D2,
BPL3660D, BPL3612D, R36BTY2,
R36BTY4, R36BTY5, R36BTY6, R36BTY8
WARNING! The declared vibration total values and the
declared noise emission values given in this instruction
manual have been measured in accordance with a
standardised test and may be used to compare one tool with
another. They may be used for a preliminary assessment of
exposure.
The declared vibration and noise emission values represent
the main applications of the tool. However, if the tool is used
for dierent applications, used with dierent accessories,
or poorly maintained, the vibration and noise emission
may dier. These conditions may signicantly increase the
exposure levels over the total working period.
An estimation of the level of exposure to vibration and noise
should take into account the times when the tool is turned o
or when it is running idle. These conditions may signicantly
reduce the exposure level over the total working period.
Identify additional safety measures to protect the operator
from the eects of vibration and noise, such as maintaining
the tool and the accessories, keeping the hands warm (in
case of vibration), and organising work patterns.


BACK PAGE
Imported by:
Techtronic Industries Australia Pty Ltd
31 Gilby Road, Mount Waverley, VIC 3149
Melbourne, Australia
Techtronic Industries N.Z. Limited
Unit C, 70 Business Parade South,
Highbrook, Auckland 2013, New Zealand
RYOBI is a trade mark of Ryobi Limited, and is used under license.
961479079-01
/