Page is loading ...

Dell Networking W-Series ArubaOS 6.3
Quick Start Guide
0511309-01 | June 2013 1
This document describes the initial setup of a Dell user-centric network that consists of a Dell controller and Dell
Access Points (APs). The installation consists of the following steps:
1. Launch the WebUI or Console Setup Wizard to configure the controller.
2. Connect the controller to the wired network.
3. Configure the controller to allow APs, when installed and powered on, to able to locate and connect to the
controller. If you are configuring mesh, define the mesh cluster profile, mesh radio profile, before installing
APs in a mesh networking environment.
4. Install and connect your APs to the network.
Before you begin, review the contents of your controller shipment to ensure that you have received the following
items, then read the Dell Software License Agreement.
The Dell controller with its appropriate power cord and accessories
The Dell Networking W-Series ArubaOS 6.3 Quick Start Guide
The Dell Software License Agreement
Install the Controller
The WebUI Startup Wizard allows you to configure access to the controller, install software licenses, and
configure wireless local area networks (WLANs) for internal or guest users. The Startup Wizard is available the
first time you connect to and log into the controller or whenever the controller is reset to its factory default
configuration. The serial console setup dialog allows you to configure basic controller settings through a serial
port connection to the controller. After you complete the Startup Wizard or serial console setup procedure, the
controller reboots using the new configuration information you entered.
Do not connect the controller to your network when running the Setup Wizard or serial console setup dialog. The
factory-default controller boots up with a default IP address and both DHCP server and spanning tree functions
enabled. Once you have completed setup and rebooted the controller, you can use the controller CLI or WebUI
to complete its configuration before connecting the controller to your network.
Initial Setup Using the WebUI Setup Wizard
The following browsers are officially supported for use with the Dell Networking W-Series ArubaOS 6.3 Setup
wizard and WebUI:
Microsoft Internet Explorer
Mozilla Firefox on Windows XP, Windows Vista, Windows 7, and MacOS
Apple Safari on MacOS
You can launch the setup wizard using any PC or workstation that can run a supported Web browser. The PC or
workstation must either be configured to obtain its IP address using DHCP, or configured to have a static IP
address on the 172.16.0.0/24 subnetwork. The default IP address of the controller is 172.16.0.254. Connect a PC
or workstation to a line port on the controller, then enter this IP address into a supported Web browser to launch
the Setup Wizard.
To run the Setup Wizard:
1. Determine values for the required configuration settings described in Table 1.

2 Dell Networking W-Series ArubaOS 6.3 | Quick Start Guide
2. Make sure that the controller is not connected to any device on your network.
3. Boot up the controller.
4. Connect your PC or workstation to a line port on the controller.
5. On your PC or workstation, open a Web browser and connect to https://172.16.0.254.
6. The controller contains a default server certificate to validate the device on the network. At the Security Alert,
click Yes to proceed with the Setup Wizard.
7. The initial window of the Mobility Controller Setup Wizard asks you to select one of the following
deployment modes. Select Standalone, Master or Local, then click Continue.
Standalone: This is the only controller on the network.
Master: This controller will manage other controllers on the network.
Local: This controller will be managed by a master controller.
8. If you selected Standalone or Master in the step above, you will be prompted to select the Campus WLAN
deployment mode. The Remote Access Points deployment mode allows you to configure additional settings
specific to remote APs.
9. Enter the information described in Table 1, and, if desired, the optional configuration information described
in “Optional Information” on page2.
Optional Information
The Setup Wizard to also allows you to:
Create virtual local area networks (VLANs) into which wireless users are placed after authentication.
NOTE: The default certificate installed in the controller does not guarantee security in production networks. Dell strongly
recommends replacing the default certificate with a custom certificate issued for your site or domain by a trusted Certificate
Authority. See the
Dell Networking W-Series ArubaOS 6.3 User Guide
for information about certificates.
Table 1
Required Information for the Setup Wizard
Requirement Description
System Name A user-defined name by which the controller will be referenced. You can specify a name of up to
63 characters.
Country Code The country in which the controller will operate. The country code determines the 802.11
wireless transmission spectrum. You cannot change the country code for controllers designated
for certain countries, such as the U.S. or Israel. Improper country code assignment can disrupt
wireless transmissions. Most countries impose penalties and sanctions for operators of wireless
networks with devices set to improper country codes.
Admin Password Password of up to 32 characters for the admin user to log in to the controller.
Enable Mode Password Password of up to 15 characters for the admin user to access the Enable mode in the CLI.
Date and Time You can either manually set the date, time, and GMT time zone or specify the IP address of an
NTP server from which the controller will obtain its date and time settings.
Connectivity Settings Enter the controller IP address and default gateway.The gateway is usually the IP address of the
interface on the upstream switch or router to which you will connect the controller. The default
gateway and the VLAN 1 IP address need to be in the same network.
Authentication
Settings
If you are configuring a master or local controller that uses pre-shared key authentication,
enter the pre-shared key.
If you are configuring a master controller to use certificate authentication, enter the MAC
addresses of the local controllers.
If you are configuring a local controller to use certificate authentication, enter the MAC
address of the master controller.

Dell Networking W-Series ArubaOS 6.3 | Quick Start Guide 3
Modify default port settings.
Enable the Uplink firewall, and configure the following Management and Dell interface types.
Management Interfaces: SSH, HTTPS, SNMP and DHCP.
Dell Interfaces: RAP, VIA, VIA Mac and Site-to-Site VPN
Install licenses for ArubaOS software modules.
Configure internal and guest WLANs.
Specify IP address pools to define the inner IP addresses assigned to VPN clients and access points connecting
to a local controller, or to a standalone or master controller with remote APs.
If you plan on adding controller licenses or configuring additional VLANs, WLANs, or port settings on your
controller, make a note of the desired licenses or settings before you launch the Setup wizard.
Initial Setup on a Serial Port Connection
The serial port is located on the front panel of the controller. You can start the Initial Setup dialog when you
connect a terminal, PC or workstation running a terminal emulation program to the serial port on the controller.
The serial port connection only allows you to configure the basic configuration required to connect the controller
to the network. The recommended browser-based Setup Wizard allows you to also install software licenses and
configure internal and guest WLANs (see ““Initial Setup Using the WebUI Setup Wizard” on page1). If you use
the Initial Setup dialog to configure the controller, the browser-based Setup Wizard will not be available unless
you reset the controller to its factory default configuration.
To run the Initial Setup dialog from a serial connection:
1. Configure your terminal or terminal emulation program to use the following communication settings:
2. Connect your terminal or PC/workstation to the serial port on the controller using an RS-232 serial cable. All
accessory kits shipped with Dell controllers contain an RJ-45 cable and DB-9 to RJ-45 adapter. You may need
to provide a USB adapter to connect the serial cable to your PC.
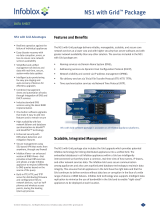
3. Boot up the Dell controller. After the controller has booted up, you should see a screen similar to the
following:
Figure 1
Initial Setup for Serial Port Connection
NOTE: The optional configuration settings described in the section above cannot be configured when running initial setup on a
serial port connection.
Table 2
Terminal Communication Settings
Baud Rate Data Bits Parity Stop Bits Flow Control
9600 8 None 1 None
***************** Welcome to the Dell Networking W-3600 setup dialog *****************
This dialog will help you to set the basic configuration for the switch.
These settings, except for the Country Code, can later be changed from the
Command Line Interface or Graphical User Interface.
Commands: <Enter> Submit input or use [default value], <ctrl-I> Help
<ctrl-B> Back, <ctrl-F> Forward, <ctrl-A> Line begin, <ctrl-E> Line end
<ctrl-D> Delete, <BackSpace> Delete back, <ctrl-K> Delete to end of line
<ctrl-P> Previous question <ctrl-X> Restart beginning

4 Dell Networking W-Series ArubaOS 6.3 | Quick Start Guide
4. The Serial Port Configuration Dialog displays the configuration prompts described in Table 3. The prompts
may vary, depending upon the switch role you choose. Enter the required information at each prompt, then
press Enter to continue to the next question.
5. At the end of the Initial Setup, you are asked to review and confirm your configuration changes. Enter y to
accept the changes. The controller reboots.
Table 3
Serial Console Configuration Dialog
Console Prompt Description
Enter System Name Enter a name for the controller, or press Enter to use the default system name. You can specify
a name of up to 63 characters.
Enter VLAN 1 interface IP
address
The controller takes its IP address from VLAN 1 and uses this IP address to communicate with
other controllers and with APs. Enter the VLAN 1 interface IP address, or press Enter without
specifying an IP address to use the default address 172.16.0.254.
Enter VLAN 1 interface subnet
mask
Enter the VLAN 1 interface IP subnet mask, or press Enter without specifying an IP address to
use the default address 255.255.255.0.
Enter IP Default gateway This is usually the IP address of the interface on the upstream switch or router to which you
will connect the controller. The default gateway and the VLAN 1 IP address need to be in the
same network. To continue without specifying an IP gateway, press Enter.
Enter Switch Role,
(master|local|standalone)
Specify one of the following switch roles:
Master: This controller manages other controllers on the network. You are prompted to
specify the type of authentication to be used by the master controller. If you are
configuring a master controller that uses pre-shared key authentication to communicate
with local controllers, enter the pre-shared key. If you are configuring a master controller
to use certificate authentication, specify the MAC addresses of the local controllers.
Local: This controller will be managed by a master controller.You are prompted to specify
the type of authentication to be used by the controller. If you are configuring a local
controller to use pre-shared key authentication to communicate with the master
controller, enter the IP address of the master controller and the pre-shared key. If you are
configuring a local controller to use certificate authentication, specify the MAC addresses
of the master controller.
Standalone: This is the only controller on your network.
(For US controllers only)
This controller is restricted to
Country code US for United
States, please confirm (yes|no)
If your controller has a country code that restricts its usage, enter yes to confirm this code.
Enter Time Zone Enter the time zone for the controller, or press Enter to select the default time zone.
Enter Time in UTC Enter the current time in UTC format, or press Enter to select the default time.
Enter Date (MM/DD/YYYY) Enter the current date, or press Enter to select the default date.
Enter Password for admin login
(up to 32 chars)
Enter a password to allow the admin user to login to the controller WebUI, CLI and console
interfaces. This password can be up to 32 alphanumeric characters long.
Enter Password for enable
mode (up to 15 chars
Enter a password for the admin user to access Enable mode in the controller WebUI, CLI and
console interfaces. This password can be up to 15 alphanumeric characters.
Do you wish to shutdown all the
ports (yes|no)? [no]
Enter yes to shut down all ethernet ports on the controller, or press Enter to allow all ports to
remain active.
NOTE: If you want to complete optional configuration options (e.g. disabling spanning tree or installing software licenses) before
connecting the controller to the network, refer to the
Dell Networking W-Series ArubaOS 6.3 User Guide
.

Dell Networking W-Series ArubaOS 6.3 | Quick Start Guide 5
Connect the Controller to the Wired Network
Once controller setup is complete, connect a port on the controller to the appropriately-configured port on a
Layer-2 switch or router. Make sure that you have the correct cables and that the port LEDs indicate proper
connections. Refer to the Installation Guide for your controller for port LED and cable descriptions.
Configure the Controller to Support APs
Before you install APs in a network environment, you must ensure that the APs will be able to locate and connect
to the controller when powered on. Specifically, you need to ensure the following:
When connected to the network, each AP is assigned a valid IP address
APs are able to locate the controller
Each Dell AP requires a unique IP address on a subnetwork that has connectivity to a controller. Dell
recommends using the Dynamic Host Configuration Protocol (DHCP) to provide IP addresses for APs; the
DHCP server can be an existing network server or a Dell controller configured as a DHCP server.
If an AP is on the same subnetwork as the master controller, you can configure the controller as a DHCP server to
assign an IP address to the AP. The controller must be the only DHCP server for this subnetwork.
Enable DHCP Server Capability
Use the following procedure to use the controller WebUI to enable DHCP server capability.
1. Enter the IP address of the controller in the URL of a browser window to access the controller WebUI.
2. At the WebUI login page, enter the admin user name and the password you entered during the Initial Setup.
3. Navigate to the Configuration > Network > IP > DHCP Server page.
4. Select the Enable DHCP Server checkbox.
5. In the Pool Configuration section, click Add.
6. Enter information about the subnetwork for which IP addresses are to be assigned. Click Done.
7. If there are addresses that should not be assigned in the subnetwork:
a. Click Add in the Excluded Address Range section.
b. Enter the address range in the Add Excluded Address section.
c. Click Done.
8. Click Save Configuration at the top of the page to save the configuration to the controller’s flash memory.
Controller Discovery
A Dell AP can discover the IP address of the controller in one of several ways. The Aruba Discovery Protocol
(ADP) is enabled by default on all Dell APs and controllers. If all APs and controllers are connected to the same
Layer-2 network, APs will use ADP to discover their controllers. If the devices are on different networks, you must
configure the AP to use a Layer-3 compatible discovery mechanism such as DNS, DHCP, or IGMP forwarding
after installing the AP on the network. For details, refer to the Dell Networking W-Series ArubaOS 6.3 User Guide.
With ADP, APs send out periodic multicast and broadcast queries to locate the master controller. If the APs are
in the same broadcast domain as the master controller, the controller automatically responds to the APs’ queries
with its IP address. If the APs are not in the same broadcast domain as the master controller, you need to enable
multicast on the network. If multicast is not an option, then the APs can be configured to use DNS or DHCP
based provisioning to contact the controller.

6 Dell Networking W-Series ArubaOS 6.3 | Quick Start Guide
Plan for a Mesh Network Environment
Before you install APs in a mesh networking environment, you must do the following:
Define and configure the mesh cluster profile and mesh radio profile before configuring an AP to operate as a
mesh node. An AP configured for mesh is also known as a mesh node.
Provision one of the following mesh roles on the AP:
Mesh portal: The gateway between the wireless mesh network and the enterprise wired LAN.
Mesh point: APs that can provide traditional Dell WLAN services (such as client connectivity, intrusion
detection system (IDS) capabilities, user roles association, LAN-to-LAN bridging, and Quality of Service
(QoS) for LAN-to-mesh communication) to clients on one radio and perform mesh backhaul/network
connectivity on the other radio. Mesh points provides LAN-to-LAN bridging through their Ethernet
interfaces. It can now provide backhaul and access BSSIDs on the same radio.
For detailed provisioning guidelines, caveats, and instructions, see the “Secure Enterprise Mesh” chapter in the
Dell Networking W-Series ArubaOS 6.3 User Guide.
Install the APs
Refer to the AP placement map generated by RF Plan to identify the locations in which to physically install your
APs. You can either connect the AP directly to a port on the controller, or connect the AP to another switch or
router that has Layer-2 or Layer-3 connectivity to the controller. If the Ethernet port on the controller is an
802.3af Power over Ethernet (PoE) port, the AP automatically uses it to power up. If a PoE port is not available,
contact your Dell vendor to obtain an AC adapter for the AP.
Once an AP is connected to the network and powered up, it will automatically attempt to locate the controller.
You can view a list of all APs connected to the controller by accessing the Configuration > Wireless > AP
Installation page in the controller WebUI. An AP installed on the network advertises its default SSID. Wireless
users can connect to this SSID, but will not have access to the network until you configure authentication policies
and user roles for your wireless users. For complete details on authentication policies and user roles, refer to the
Dell Networking W-Series ArubaOS 6.3 User Guide.
Contacting Support
NOTE: The information in this section applies only if you are configuring and deploying APs in a mesh networking environment. If
you are not, proceed to “Install the APs” on page6.
Web Site Support
Main Website dell.com
Support Website dell.com/support
Documentation Website dell.com/support/manuals

Dell Networking W-Series ArubaOS 6.3 | Quick Start Guide 7
Copyright
© 2013 Aruba Networks, Inc. Aruba Networks trademarks include , Aruba Networks
®
, Aruba
Wireless Networks
®
, the registered Aruba the Mobile Edge Company logo, and Aruba Mobility Management Sys-
tem
®
. Dell™, the DELL™ logo, and PowerConnect™ are trademarks of Dell Inc.
All rights reserved. Specifications in this manual are subject to change without notice.
Originated in the USA. All other trademarks are the property of their respective owners.
Open Source Code
Certain Aruba products include Open Source software code developed by third parties, including software code
subject to the GNU General Public License (GPL), GNU Lesser General Public License (LGPL), or other Open
Source Licenses. Includes software from Litech Systems Design. The IF-MAP client library copyright 2011
Infoblox, Inc. All rights reserved. This product includes software developed by Lars Fenneberg, et al. The Open
Source code used can be found at this site:
http://www.arubanetworks.com/open_source
Legal Notice
The use of Aruba Networks, Inc. switching platforms and software, by all individuals or corporations, to terminate
other vendors’ VPN client devices constitutes complete acceptance of liability by that individual or corporation for
this action and indemnifies, in full, Aruba Networks, Inc. from any and all legal actions that might be taken against
it with respect to infringement of copyright on behalf of those vendors.

8 Dell Networking W-Series ArubaOS 6.3 | Quick Start Guide
/