Dell OpenManage Network Manager Version 5.0 Web Client Guide
- Category
- Software
- Type
- Web Client Guide
This manual is also suitable for

Dell OpenManage Network Manager version 5.0
Web Client Guide

Notes, and Cautions
A NOTE indicates important information that helps you make better use of your computer or software.
A CAUTION indicates potential harm to your data or hardware if you proceed as indicated.
____________________
Information in this document is subject to change without notice.
© 2012 Dell Inc. All rights reserved.
Reproduction of these materials in any manner whatsoever without the written permission of Dell Inc. is strictly forbidden.
Trademarks used in this text: Dell™, the DELL logo, PowerEdge™, PowerVault™, PowerConnect™, OpenManage™, EqualLogic™,
KACE™, FlexAddress™ and Vostro™ are trademarks of Dell Inc. Microsoft
®
, Windows
®
, Windows Server
®
, MS-DOS
®
and Windows
Vista
®
are either trademarks or registered trademarks of Microsoft Corporation in the United States and/or other countries. Red Hat Enterprise
Linux
®
and Enterprise Linux
®
are registered trademarks of Red Hat, Inc. in the United States and/or other countries.
Other trademarks and trade names may be used in this publication to refer to either the entities claiming the marks and names or their products.
Dell Inc. disclaims any proprietary interest in trademarks and trade names other than its own.
2012-5 Rev. A02

3
1 Preface . . . . . . . . . . . . . . . . . . . . . . . . . . . . . . . . . . . . . . . . . . . . . . .9
Why Dell OpenManage Network Manager?. . . . . . . . . . . . . . . . . . . . . . . . . 9
Key Features
. . . . . . . . . . . . . . . . . . . . . . . . . . .
9
Networks with Dell OpenManage Network Manager
. . . . . . .
11
Additional Products
. . . . . . . . . . . . . . . . . . . . . . .
11
Online Help / Filter
. . . . . . . . . . . . . . . . . . . . . . . .
12
How to: Use “How To” . . . . . . . . . . . . . . . . . . . . . . . . . . . . . . . . . . . . . . . 12
Feedback. . . . . . . . . . . . . . . . . . . . . . . . . . . . . . . . . . . . . . . . . . . . . . . . . . . . . . 13
A Note About Performance . . . . . . . . . . . . . . . . . . . . . . . . . . . . . . . . . . . . . . 13
2 Getting Started with Dell OpenManage Network Manager .15
Overview . . . . . . . . . . . . . . . . . . . . . . . . . . . . . . . . . . . . . . . . . . . . . . . . . . . . . . 15
System Basics
. . . . . . . . . . . . . . . . . . . . . . . . . .
15
Single Server Sizing . . . . . . . . . . . . . . . . . . . . . . . . . . . . . . . . . . . . . . . . . . . . 20
Sizing for Standalone Installations. . . . . . . . . . . . . . . . . . . . . . . . . . . . . . . . 21
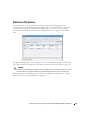
Network Basics
. . . . . . . . . . . . . . . . . . . . . . . . .
22
Authentication
. . . . . . . . . . . . . . . . . . . . . . . . . .
24
Supported PowerConnect Models
. . . . . . . . . . . . . . . .
24
Windows Management Interface
. . . . . . . . . . . . . . . . .
24
Getting Started. . . . . . . . . . . . . . . . . . . . . . . . . . . . . . . . . . . . . . . . . . . . . . . . . 27
Installation and Startup . . . . . . . . . . . . . . . . . . . . . . . . . . . . . . . . . . . . . . . . . 28
How to: Set Linux Permissions . . . . . . . . . . . . . . . . . . . . . . . . . . . . . . 31
Perl
. . . . . . . . . . . . . . . . . . . . . . . . . . . . . . . .
32
Starting Web Client
. . . . . . . . . . . . . . . . . . . . . . . .
32
Control Panel . . . . . . . . . . . . . . . . . . . . . . . . . . . . . . . . . . . . . . . . . . . . . . . . . . 33
Search Indexes
. . . . . . . . . . . . . . . . . . . . . . . . . .
34
[My Account]
. . . . . . . . . . . . . . . . . . . . . . . . . . .
34
RCSynergy / [Domain]
. . . . . . . . . . . . . . . . . . . . . .
35
Portal > Users and Organizations
. . . . . . . . . . . . . . . . .
35
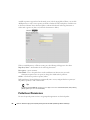
How to: Add Users and connect them to Roles . . . . . . . . . . . . . . . . 36
How to: Configure Organizations . . . . . . . . . . . . . . . . . . . . . . . . . . . . 38
Public / Private Page Behavior
. . . . . . . . . . . . . . . . . .
40
How to: Add and Configure User Roles / Permissions . . . . . . . . . . 40
Portal > Roles
. . . . . . . . . . . . . . . . . . . . . . . . . .
41
Portal > Portal Settings
. . . . . . . . . . . . . . . . . . . . . .
41
Portal > [Other]
. . . . . . . . . . . . . . . . . . . . . . . . . .
42
Redcell > Permission Manager
. . . . . . . . . . . . . . . . . .
42
Redcell > Data Configuration
. . . . . . . . . . . . . . . . . . .
45
Redcell > Mediation
. . . . . . . . . . . . . . . . . . . . . . .
45
Redcell > Filter Management
. . . . . . . . . . . . . . . . . . .
48
Server
. . . . . . . . . . . . . . . . . . . . . . . . . . . . . .
49
Redcell > Database Aging Policies (DAP). . . . . . . . . . . . . . . . . . . . . . . . . . 50
Contents

4
How to: DAP Workflow . . . . . . . . . . . . . . . . . . . . . . . . . . . . . . . . . . . . . 51
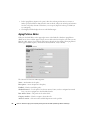
Aging Policies Editor
. . . . . . . . . . . . . . . . . . . . . . .
52
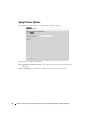
Aging Policies Options
. . . . . . . . . . . . . . . . . . . . . .
54
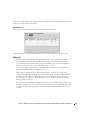
Sub-Policies
. . . . . . . . . . . . . . . . . . . . . . . . . . .
55
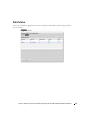
Repositories
. . . . . . . . . . . . . . . . . . . . . . . . . . .
57
Portlet Level Permissions
. . . . . . . . . . . . . . . . . . . . .
58
How to: Configure Portlet Permissions . . . . . . . . . . . . . . . . . . . . . . . 59
How to: Configure Resource Level Permissions . . . . . . . . . . . . . . . . . . 59
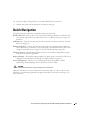
Quick Navigation . . . . . . . . . . . . . . . . . . . . . . . . . . . . . . . . . . . . . . . . . . . . . . . 61
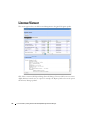
License Viewer. . . . . . . . . . . . . . . . . . . . . . . . . . . . . . . . . . . . . . . . . . . . . . . . . 62
How to: Register a License . . . . . . . . . . . . . . . . . . . . . . . . . . . . . . . . . 63
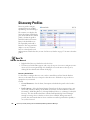
Discovery Profiles . . . . . . . . . . . . . . . . . . . . . . . . . . . . . . . . . . . . . . . . . . . . . . 64
How to: Discover Your Network . . . . . . . . . . . . . . . . . . . . . . . . . . . . . 64
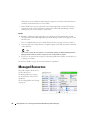
Managed Resources. . . . . . . . . . . . . . . . . . . . . . . . . . . . . . . . . . . . . . . . . . . . 66
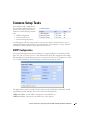
Common Setup Tasks . . . . . . . . . . . . . . . . . . . . . . . . . . . . . . . . . . . . . . . . . . . 67
SMTP Configuration
. . . . . . . . . . . . . . . . . . . . . . .
67
Netrestore File Servers
. . . . . . . . . . . . . . . . . . . . . .
69
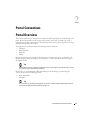
3 Portal Conventions . . . . . . . . . . . . . . . . . . . . . . . . . . . . . . . . . . . .71
Portal Overview . . . . . . . . . . . . . . . . . . . . . . . . . . . . . . . . . . . . . . . . . . . . . . . . 71
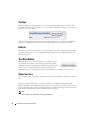
Tooltips
. . . . . . . . . . . . . . . . . . . . . . . . . . . . . .
72
Refresh
. . . . . . . . . . . . . . . . . . . . . . . . . . . . . .
72
The Back Button
. . . . . . . . . . . . . . . . . . . . . . . . .
72
Show Versions
. . . . . . . . . . . . . . . . . . . . . . . . . .
72
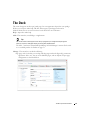
The Dock . . . . . . . . . . . . . . . . . . . . . . . . . . . . . . . . . . . . . . . . . . . . . . . . . . . . . . 73
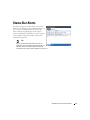
Status Bar Alerts . . . . . . . . . . . . . . . . . . . . . . . . . . . . . . . . . . . . . . . . . . . . . . . 75
Chat / Conferencing
. . . . . . . . . . . . . . . . . . . . . . .
76
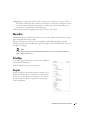
Menu Bar
. . . . . . . . . . . . . . . . . . . . . . . . . . . .
77
Site Map
. . . . . . . . . . . . . . . . . . . . . . . . . . . . .
77
Graphs
. . . . . . . . . . . . . . . . . . . . . . . . . . . . . .
77
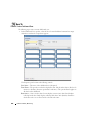
Portlets
. . . . . . . . . . . . . . . . . . . . . . . . . . . . . .
78
Expanded Portlets
. . . . . . . . . . . . . . . . . . . . . . . .
82
How to: Show / Hide / Reorder Columns . . . . . . . . . . . . . . . . . . . . . . 84
How to: Filter Expanded Portlet Displays . . . . . . . . . . . . . . . . . . . . . . 85
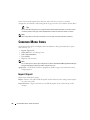
Common Menu Items . . . . . . . . . . . . . . . . . . . . . . . . . . . . . . . . . . . . . . . . . . . 86
Import / Export
. . . . . . . . . . . . . . . . . . . . . . . . . .
86
Sharing
. . . . . . . . . . . . . . . . . . . . . . . . . . . . . .
87
How to: Share a Resource . . . . . . . . . . . . . . . . . . . . . . . . . . . . . . . . . . 88
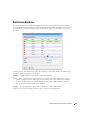
Edit Custom Attributes
. . . . . . . . . . . . . . . . . . . . . .
89
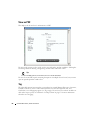
View as PDF
. . . . . . . . . . . . . . . . . . . . . . . . . . .
90
Tag
. . . . . . . . . . . . . . . . . . . . . . . . . . . . . . . .
90
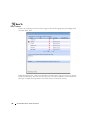
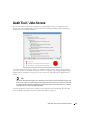
Audit Trail / Jobs Screen . . . . . . . . . . . . . . . . . . . . . . . . . . . . . . . . . . . . . . . . 91
Audit Trail Viewer
. . . . . . . . . . . . . . . . . . . . . . . . .
92

5
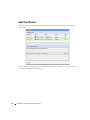
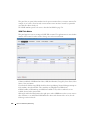
Audit Trail Portlet. . . . . . . . . . . . . . . . . . . . . . . . . . . . . . . . . . . . . . . . . . . . . . . 93
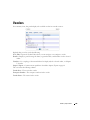
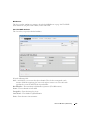
Schedules . . . . . . . . . . . . . . . . . . . . . . . . . . . . . . . . . . . . . . . . . . . . . . . . . . . . . 95
Schedules Portlet
. . . . . . . . . . . . . . . . . . . . . . . .
95
4 Key Portlets . . . . . . . . . . . . . . . . . . . . . . . . . . . . . . . . . . . . . . . . . .99
Overview of Key Portlets . . . . . . . . . . . . . . . . . . . . . . . . . . . . . . . . . . . . . . . . 99
Alarms . . . . . . . . . . . . . . . . . . . . . . . . . . . . . . . . . . . . . . . . . . . . . . . . . . . . . . . 100
Expanded Alarm Portlet
. . . . . . . . . . . . . . . . . . . .
102
Event History. . . . . . . . . . . . . . . . . . . . . . . . . . . . . . . . . . . . . . . . . . . . . . . . . . 106
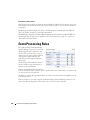
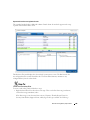
Event Processing Rules . . . . . . . . . . . . . . . . . . . . . . . . . . . . . . . . . . . . . . . . 108
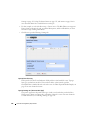
How to: Create Event Processing Rules . . . . . . . . . . . . . . . . . . . . . 109
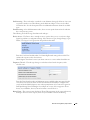
Rule Editor
. . . . . . . . . . . . . . . . . . . . . . . . . . .
111
Event Definitions . . . . . . . . . . . . . . . . . . . . . . . . . . . . . . . . . . . . . . . . . . . . . . 128
Event Definition Editor
. . . . . . . . . . . . . . . . . . . . .
128
Contacts . . . . . . . . . . . . . . . . . . . . . . . . . . . . . . . . . . . . . . . . . . . . . . . . . . . . . 133
Locations. . . . . . . . . . . . . . . . . . . . . . . . . . . . . . . . . . . . . . . . . . . . . . . . . . . . . 135
Tag
. . . . . . . . . . . . . . . . . . . . . . . . . . . . . . .
138
Vendors . . . . . . . . . . . . . . . . . . . . . . . . . . . . . . . . . . . . . . . . . . . . . . . . . . . . . . 139
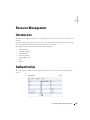
5 Resource Management . . . . . . . . . . . . . . . . . . . . . . . . . . . . . . .143
Introduction . . . . . . . . . . . . . . . . . . . . . . . . . . . . . . . . . . . . . . . . . . . . . . . . . . 143
Authentication . . . . . . . . . . . . . . . . . . . . . . . . . . . . . . . . . . . . . . . . . . . . . . . . 143
Container Manager . . . . . . . . . . . . . . . . . . . . . . . . . . . . . . . . . . . . . . . . . . . . 146
Container Manager Expanded
. . . . . . . . . . . . . . . . .
146
Container View. . . . . . . . . . . . . . . . . . . . . . . . . . . . . . . . . . . . . . . . . . . . . . . . 147
How to: Use Containers . . . . . . . . . . . . . . . . . . . . . . . . . . . . . . . . . . . 147
Container Editor
. . . . . . . . . . . . . . . . . . . . . . . .
148
Map Context . . . . . . . . . . . . . . . . . . . . . . . . . . . . . . . . . . . . . . . . . . . . . . . . . . 151
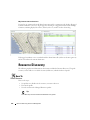
Resource Discovery . . . . . . . . . . . . . . . . . . . . . . . . . . . . . . . . . . . . . . . . . . . 152
How to: Discover Resources . . . . . . . . . . . . . . . . . . . . . . . . . . . . . . . 152
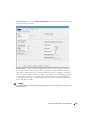
Discovery Profiles . . . . . . . . . . . . . . . . . . . . . . . . . . . . . . . . . . . . . . . . . . . . . 153
Discovery Profile Editor
. . . . . . . . . . . . . . . . . . . . .
154
How to: Edit Discovery Profiles . . . . . . . . . . . . . . . . . . . . . . . . . . . . . 154
Managed Resource Groups. . . . . . . . . . . . . . . . . . . . . . . . . . . . . . . . . . . . . 162
Static Group
. . . . . . . . . . . . . . . . . . . . . . . . . .
164
Dynamic Group
. . . . . . . . . . . . . . . . . . . . . . . . .
165
Managed Resources. . . . . . . . . . . . . . . . . . . . . . . . . . . . . . . . . . . . . . . . . . . 166
New Link
. . . . . . . . . . . . . . . . . . . . . . . . . . . .
175
Link Discovery
. . . . . . . . . . . . . . . . . . . . . . . . .
176
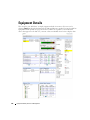
Equipment Details . . . . . . . . . . . . . . . . . . . . . . . . . . . . . . . . . . . . . . . . . . . . . 178
Performance Indicators
. . . . . . . . . . . . . . . . . . . .
179
Interfaces
. . . . . . . . . . . . . . . . . . . . . . . . . . .
180
Alarms
. . . . . . . . . . . . . . . . . . . . . . . . . . . . .
181
Ports
. . . . . . . . . . . . . . . . . . . . . . . . . . . . . .
181

6
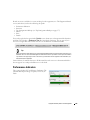
Details
. . . . . . . . . . . . . . . . . . . . . . . . . . . . .
185
How to: Schedule Actions . . . . . . . . . . . . . . . . . . . . . . . . . . . . . . . . . . . 186
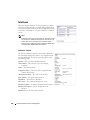
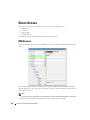
Direct Access. . . . . . . . . . . . . . . . . . . . . . . . . . . . . . . . . . . . . . . . . . . . . . . . . 188
MIB Browser
. . . . . . . . . . . . . . . . . . . . . . . . . .
188
Term in al
. . . . . . . . . . . . . . . . . . . . . . . . . . . .
190
Ping (ICMP)
. . . . . . . . . . . . . . . . . . . . . . . . . .
191
HTTP / HTTPS
. . . . . . . . . . . . . . . . . . . . . . . . .
191
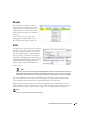
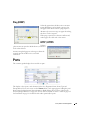
Ports. . . . . . . . . . . . . . . . . . . . . . . . . . . . . . . . . . . . . . . . . . . . . . . . . . . . . . . . . 191
Port Editor
. . . . . . . . . . . . . . . . . . . . . . . . . . .
194
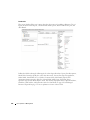
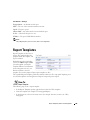
Report Templates. . . . . . . . . . . . . . . . . . . . . . . . . . . . . . . . . . . . . . . . . . . . . . 195
How to: Create a Report Template . . . . . . . . . . . . . . . . . . . . . . . . . . 195
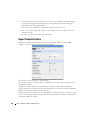
Report Template Editors
. . . . . . . . . . . . . . . . . . . .
196
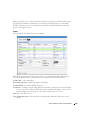
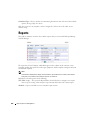
Reports . . . . . . . . . . . . . . . . . . . . . . . . . . . . . . . . . . . . . . . . . . . . . . . . . . . . . . 200
How to: Generate a Report . . . . . . . . . . . . . . . . . . . . . . . . . . . . . . . . . 204
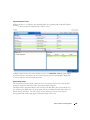
Report Editor
. . . . . . . . . . . . . . . . . . . . . . . . . .
204
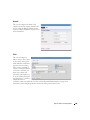
Branding Reports
. . . . . . . . . . . . . . . . . . . . . . . .
206
6 Visualize . . . . . . . . . . . . . . . . . . . . . . . . . . . . . . . . . . . . . . . . . . . .207
Visualize My Network. . . . . . . . . . . . . . . . . . . . . . . . . . . . . . . . . . . . . . . . . . 207
How to: Create a Visualization . . . . . . . . . . . . . . . . . . . . . . . . . . . . . . 207
Configuring Views
. . . . . . . . . . . . . . . . . . . . . . .
208
Control and Styles
. . . . . . . . . . . . . . . . . . . . . . .
210
Data / Node Finder
. . . . . . . . . . . . . . . . . . . . . . .
213
Layout
. . . . . . . . . . . . . . . . . . . . . . . . . . . . .
216
OVERVIEW
. . . . . . . . . . . . . . . . . . . . . . . . . . .
219
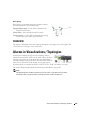
Alarms in Visualizations / Topologies. . . . . . . . . . . . . . . . . . . . . . . . . . . . . 219
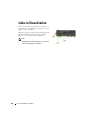
Links in Visualization. . . . . . . . . . . . . . . . . . . . . . . . . . . . . . . . . . . . . . . . . . . 220
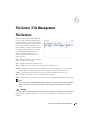
7 File Server / File Management . . . . . . . . . . . . . . . . . . . . . . . . .221
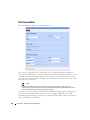
File Servers. . . . . . . . . . . . . . . . . . . . . . . . . . . . . . . . . . . . . . . . . . . . . . . . . . . 221
File Server Editor
. . . . . . . . . . . . . . . . . . . . . . . .
222
File Management. . . . . . . . . . . . . . . . . . . . . . . . . . . . . . . . . . . . . . . . . . . . . . 223
How to: Backup Configurations . . . . . . . . . . . . . . . . . . . . . . . . . . . . . 225
How to: Restore Configurations . . . . . . . . . . . . . . . . . . . . . . . . . . . . 227
Configuration Files
. . . . . . . . . . . . . . . . . . . . . . .
229
Image Repository. . . . . . . . . . . . . . . . . . . . . . . . . . . . . . . . . . . . . . . . . . . . . . 233
Firmware Image Editor
. . . . . . . . . . . . . . . . . . . . .
235
Configuration Image Editor
. . . . . . . . . . . . . . . . . . .
236
Deploy Firmware . . . . . . . . . . . . . . . . . . . . . . . . . . . . . . . . . . . . . . . . . . . . . . 238
How to: Deploy Firmware . . . . . . . . . . . . . . . . . . . . . . . . . . . . . . . . . . 239
Deploy Configuration. . . . . . . . . . . . . . . . . . . . . . . . . . . . . . . . . . . . . . . . . . . 240
How to: Restore a single configuration to many target devices . 241

7
8 Monitoring . . . . . . . . . . . . . . . . . . . . . . . . . . . . . . . . . . . . . . . . . .243
How to’s. . . . . . . . . . . . . . . . . . . . . . . . . . . . . . . . . . . . . . . . . . . . . . . . . . . . . . 243
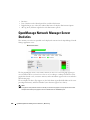
OpenManage Network Manager Server Statistics. . . . . . . . . . . . . . . . . 244
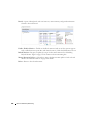
Resource Monitors . . . . . . . . . . . . . . . . . . . . . . . . . . . . . . . . . . . . . . . . . . . . 245
Retention Policies
. . . . . . . . . . . . . . . . . . . . . . .
248
Monitor Editor
. . . . . . . . . . . . . . . . . . . . . . . . .
251
How to: Create an SNMP Interface Monitor . . . . . . . . . . . . . . . . . 262
How to: Create an ICMP Monitor . . . . . . . . . . . . . . . . . . . . . . . . . . . 263
How to: Create a Key Metrics Monitor . . . . . . . . . . . . . . . . . . . . . . 264
How to: Create a Monitor Report . . . . . . . . . . . . . . . . . . . . . . . . . . . 265
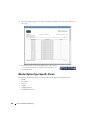
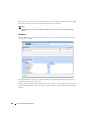
Monitor Options Type-Specific Panels
. . . . . . . . . . . . .
266
Scheduling Refresh Monitor Targets
. . . . . . . . . . . . . .
276
Top [Asset] Monitors. . . . . . . . . . . . . . . . . . . . . . . . . . . . . . . . . . . . . . . . . . . 276
Top Configuration Backups
. . . . . . . . . . . . . . . . . . .
277
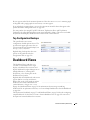
Dashboard Views. . . . . . . . . . . . . . . . . . . . . . . . . . . . . . . . . . . . . . . . . . . . . . 277
How to: Create a Simple Dashboard View . . . . . . . . . . . . . . . . . . . 279
Performance Dashboard
. . . . . . . . . . . . . . . . . . . .
279
Dashboard Editor
. . . . . . . . . . . . . . . . . . . . . . . .
281
How to: Create a Custom Dashboard View . . . . . . . . . . . . . . . . . . . . . 282
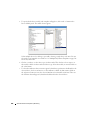
Show Performance Templates . . . . . . . . . . . . . . . . . . . . . . . . . . . . . . . . . . 286
How to: Create A Performance Template . . . . . . . . . . . . . . . . . . . . 286
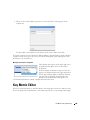
Key Metric Editor. . . . . . . . . . . . . . . . . . . . . . . . . . . . . . . . . . . . . . . . . . . . . . 289
9 Traffic Flow Analyzer . . . . . . . . . . . . . . . . . . . . . . . . . . . . . . . . .293
How does it work?. . . . . . . . . . . . . . . . . . . . . . . . . . . . . . . . . . . . . . . . . . . . . 294
Setup
. . . . . . . . . . . . . . . . . . . . . . . . . . . . . .
294
How to: Use Traffic Flow Analyzer . . . . . . . . . . . . . . . . . . . . . . . . . . 295
Exporter Registration
. . . . . . . . . . . . . . . . . . . . . .
296
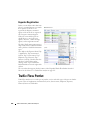
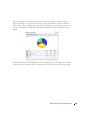
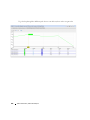
Traffic Flow Portlet . . . . . . . . . . . . . . . . . . . . . . . . . . . . . . . . . . . . . . . . . . . . 296
Drill Down
. . . . . . . . . . . . . . . . . . . . . . . . . . .
299
Search
. . . . . . . . . . . . . . . . . . . . . . . . . . . . .
301
Traffic Flow Analyzer - Example . . . . . . . . . . . . . . . . . . . . . . . . . . . . . . . . . 301
10 Change Management / ProScan . . . . . . . . . . . . . . . . . . . . . . .303
Introducing ProScan and Change Management . . . . . . . . . . . . . . . . . . . 303
How to: Use ProScan / Change Management . . . . . . . . . . . . . . . . . . 303
How to: Configure ProScan Groups . . . . . . . . . . . . . . . . . . . . . . . . . 304
How to: Do Change Management (Example) . . . . . . . . . . . . . . . . . 305
ProScan Portlet . . . . . . . . . . . . . . . . . . . . . . . . . . . . . . . . . . . . . . . . . . . . . . . 306
Compliance Policy Summary
. . . . . . . . . . . . . . . . . .
308
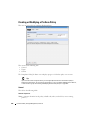
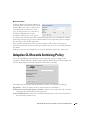
Creating or Modifying a ProScan Policy
. . . . . . . . . . . .
310
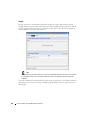
How to: Create Source Group Criteria . . . . . . . . . . . . . . . . . . . . . . . 316
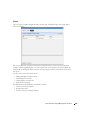
Creating or Modifying ProScan Policy Groups
. . . . . . . . .
326

8
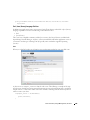
Change Determination Process . . . . . . . . . . . . . . . . . . . . . . . . . . . . . . . . . 327
Change Determination Process Workflow
. . . . . . . . . . .
328
How to: Run Change Determination . . . . . . . . . . . . . . . . . . . . . . . . . 330
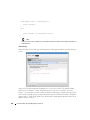
Change Determination Defaults
. . . . . . . . . . . . . . . . .
330
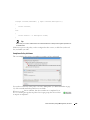
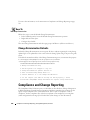
Compliance and Change Reporting . . . . . . . . . . . . . . . . . . . . . . . . . . . . . . 330
How to: Report on Change Determination . . . . . . . . . . . . . . . . . . . . 332
11 Actions and Adaptive CLI . . . . . . . . . . . . . . . . . . . . . . . . . . . . .335
Introducing Actions and Adaptive CLI . . . . . . . . . . . . . . . . . . . . . . . . . . . . 335
Using Adaptive CLI
. . . . . . . . . . . . . . . . . . . . . . .
336
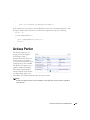
Actions Portlet . . . . . . . . . . . . . . . . . . . . . . . . . . . . . . . . . . . . . . . . . . . . . . . . 337
Adaptive CLI Editor
. . . . . . . . . . . . . . . . . . . . . . .
342
General
. . . . . . . . . . . . . . . . . . . . . . . . . . . . .
343
Attributes
. . . . . . . . . . . . . . . . . . . . . . . . . . . .
344
Scripts
. . . . . . . . . . . . . . . . . . . . . . . . . . . . .
350
Comparison
. . . . . . . . . . . . . . . . . . . . . . . . . .
355
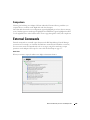
External Commands. . . . . . . . . . . . . . . . . . . . . . . . . . . . . . . . . . . . . . . . . . . . 355
Seeded Scripts
. . . . . . . . . . . . . . . . . . . . . . . . .
357
How to: Create a Monitor for an External Script . . . . . . . . . . . . . . 359
Adaptive CLI Script Language Syntax . . . . . . . . . . . . . . . . . . . . . . . . . . . . 361
Attributes
. . . . . . . . . . . . . . . . . . . . . . . . . . . .
361
Conditional Blocks
. . . . . . . . . . . . . . . . . . . . . . .
362
Perl Scripts . . . . . . . . . . . . . . . . . . . . . . . . . . . . . . . . . . . . . . . . . . . . . . . . . . . 363
Perl Example
. . . . . . . . . . . . . . . . . . . . . . . . . .
364
How to: Create Adaptive CLI Example . . . . . . . . . . . . . . . . . . . . . . . . . 365
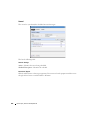
Scheduling Actions
. . . . . . . . . . . . . . . . . . . . . . .
365
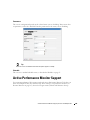
Active Performance Monitor Support . . . . . . . . . . . . . . . . . . . . . . . . . . . . 367
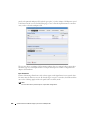
Adaptive CLI Records Archiving Policy . . . . . . . . . . . . . . . . . . . . . . . . . . . 369
Glossary. . . . . . . . . . . . . . . . . . . . . . . . . . . . . . . . . . . . . . . . . . . . . . . 371
Index
. . . . . . . . . . . . . . . . . . . . . . . . . . . . . . . . . . . . . .
377

Why Dell OpenManage Network Manager? | Preface
9
Preface
Dell OpenManage Network Manager can give you automated, consolidated configuration and
control of your network’s resources. It is customizable, unifying multiple systems while still
communicating with other software systems (like billing) in generic WSDL, XML and SOAP.
OpenManage Network Manager’s
Administration Section
describes security and some of the
runtime features supporting these applications. The OpenManage Network Manager
Administration Section of the User Guide and
Administration Section
discuss licensing. Consult
Release Notes for information about changes not covered in this
Synergy User Guide
.
Why Dell OpenManage Network Manager?
Dell OpenManage Network Manager’s benefits:
Productive
Discovery and wizard-driven configuration features within minutes of installing Dell OpenManage
Network Manager, you can monitor your network.
Easy
Dell OpenManage Network Manager provides the network information you need, and offers
advanced capabilities with minimal configuration overhead.
Valuable
Dell OpenManage Network Manager often costs less to use and maintain than most other
solutions.
Scalability
You can scale Dell OpenManage Network Manager to almost any size.
Key Features
The following are some key features of Dell OpenManage Network Manager:
Customizable and Flexible Web Portal
You can customize the web portal, even providing custom designed views of your data assigned to
individual users. You can even create web portal accounts for departments, geographic areas, or
other criteria.

10
Why Dell OpenManage Network Manager? | Preface
Automate and Schedule Device Discovery
Device discovery populates Dell OpenManage Network Manager’s database and begins network
analysis. You can also create network discovery schedules to automatically run Discovery whenever
you need them.
Dell OpenManage Network Manager Administration
You can now conduct administrative tasks—adding devices, user accounts, and web portal
displays—from a secure console on your network.
Open Integration
Dell OpenManage Network Manager supports industry standards. It comes with an open-source
MySQL database, and supports using Oracle
®
databases. It also uses industry-standard MIBs and
protocols, and even lets you install open-source screen elements like Google® gadgets to the web
portal.
Topology
The OpenManage Network Manager
topology screen lets you create multi-layered, fully
customizable, web-based maps of your network to track devices wherever they are in your network.
Alarms
You can configure custom alarms to respond to hundreds of possible network scenarios, including
multiple condition checks. Dell OpenManage Network Manager’s alarms help you recognize issues
before your network users experience productivity losses. Alarms can also trigger actions like email,
executing Perl
®
scripts, paging, SNMP traps, Syslog messaging, and external application execution.
Traps and Syslog
Dell OpenManage Network Manager lets you investigate network issues with traps and Syslog
messages. You can use Dell OpenManage Network Manager to set up events / alarms and then
receive, process, forward, and send syslog and trap messages.
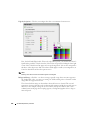
Reports and Graphs
Dell OpenManage Network Manager comes with many pre-configured reports and graphs to
display data from its database. You can archive and compare reports, or automate creating them
with Dell OpenManage Network Manager’s scheduler.
Modularity
With additional modules, Dell OpenManage Network Manager can analyze network traffic,
manage services and IP address and subnet allocations. OpenManage Network Manager modules
save time adding to existing Dell OpenManage Network Manager deployments to add feature
functionality without requiring additional standalone software.

Why Dell OpenManage Network Manager? | Preface
11
Networks with Dell OpenManage Network Manager
The beginning of network management with Dell OpenManage Network Manager is Discovery
Profiles of the resources on a network. After that occurs, you can configure
Visualize
(topology
views), Resource Monitors and Performance Dashboards.
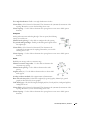
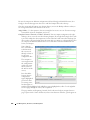
Once you have done these initial steps, Dell OpenManage Network Manager helps you understand
and troubleshoot your network. For example: Suppose a OpenManage Network Manager
Performance Dashboard displays something you want to troubleshoot. You can right-click the
impacted device in the
Visualize
topology view to access configuration and actions. The color of
the icon in this view indicates the highest severity alarm on the device or its sub-components. For
example, red indicates a
Critical
alarm.
Displays include right-click access to the Details screen (see Equipment Details on page 178),
where you can examine each section of device information and right-click to see further applicable
actions. For example right-click to Show Performance, and edit and/or save that view of
performance as another Performance Dashboard. Performance can also display portlets that Show
Top Talkers (the busiest devices) or Show Key Metrics.
From looking at Performance Dashboards or Top [Asset] Monitors you may conclude some
configuration changes made memory consumption spike. Right-click to access resource actions
under
File Management
that let you see the current configuration files on devices, and compare
current to previous. You can also back up devices (see Backup Configurations on page 225) and
restore previously backed up files (see Restore Configurations on page 227). Finally, you may simply
want to Resync (another right-click menu item) to insure the device and your management system
are up-to-date.
Tip
Alternatively, the Alarms portlet also lets you right-click to expose Alarm Actions.
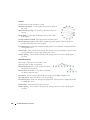
You can right click for Direct Access – Telnet or Direct Access – MIB Browser to display a command
line telnetting to the device, or an SNMP MIB browser to examine SNMP possibilities for it.
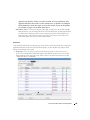
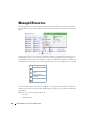
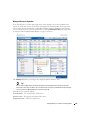
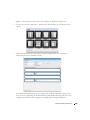
The Managed Resources portlet can display the anatomy of a Resource with its right-click actions
(see Equipment Details on page 178). Click the plus in the upper right corner to see Managed
Resources Expanded. This displays detail or “Snap-in” panels with additional information about a
selected resource.
Reports let you take snapshots of network conditions to aid in analysis of trends, and Audit Trail
Portlets track message traffic between Dell OpenManage Network Manager and devices.
Additional Products
The following describes how to increase the power of your Dell OpenManage Network Manager
installation. While the documents mentioned above describe everything available with Dell
OpenManage Network Manager, your installation may provide only a limited subset of those
features.

12
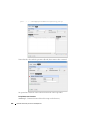
Why Dell OpenManage Network Manager? | Preface
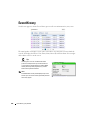
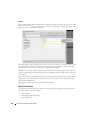
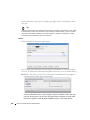
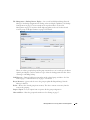
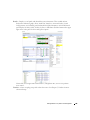
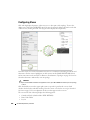
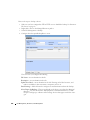
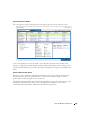
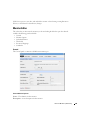
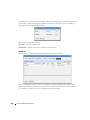
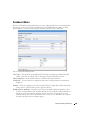
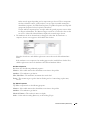
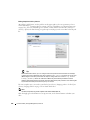
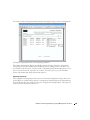
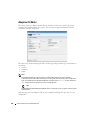
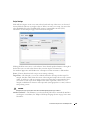
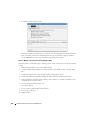
Updating Your License
If you have a limited license — for example OpenManage Network Manager may limit discovery to
a certain number of devices— then your application does not function outside those licensed
limits.
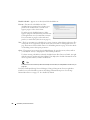
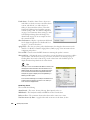
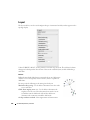
You can purchase additional capabilities, and can update your license for OpenManage Network
Manager by putting the updated license file in a convenient directory. Then click
License
Management
in the Quick Navigation portlet item to open a screen with a button leading to a file
browser (
Register License: Select File
). Locate the license file, and click the
Register License
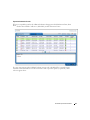
button. Your updated license should be visible in the
License Viewer
(See
License Viewer on page
62
for details.)
NOTE:
If you update your installation from a previous one where you upgraded license, you must also re-
register those licenses.
You must restart application server or wait up to 15 minutes before a license modification takes
effect. (see Installation and Startup on page 28). Licenses now support three expiration formats:
Never, Date certain, and a format that indicates the license will be valid for a number of days after
registration.
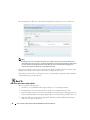
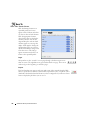
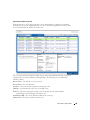
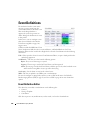
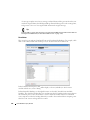
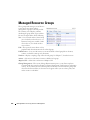
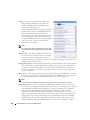
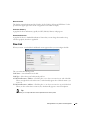
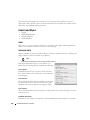
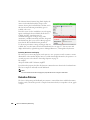
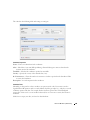
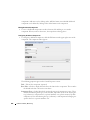
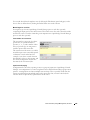
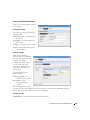
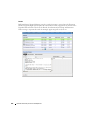
Online Help / Filter
Access general online help by clicking
Help
in the The Dock at the top of the screen. Help
appropriate to each portlet appears when you click question mark icon on the portlet title bar.
By default, this opens a separate browser window which is not necessarily always in front of the
screen that calls it. Because it is separate, you can arrange the display so the help screen does not
conceal the portlet it describes. Click the
Show
button to display the contents, index and search
tabs (
Hide
conceals them again), and the
Prev / Next
buttons, or clicking table of contents topics
moves to different topics within the helpset.
Tip
Sometimes your browser’s cache may interfere with help’s correct appearance. If you see a table of
contents node without contents, you can often repair it by refreshing the panel or whole screen.
How To:
Use “How To”
Several sections of what follows contain the “How to” instructions for use. These are typically steps
to follow to produce the desired result. For a look at all such steps available, refer to the
How to
section of the Index.

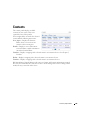
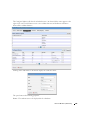
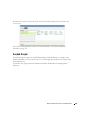
Feedback | Preface
13
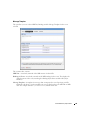
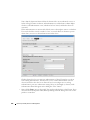
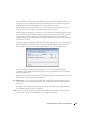
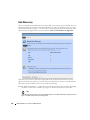
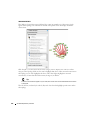
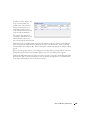
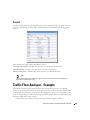
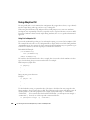
Feedback
To provide your input about this software click the
Feedback
link in the lower left corner of the Dell
OpenManage Network Manager screen. Provide your contact information, enter
Questions, Likes,
New Idea
s
,
or a
Problem,
in the screen that appears next, then click
Send.
Dorado Software
responds, and often uses customer suggestions in future versions of the software.
A Note About Performance
Dell OpenManage Network Manager is designed to help you manage your network with alacrity.
Unfortunately, the devices managed or the networks that communicate with those devices are not
always as fast as this software. If discovery takes a long time (it can), often network and device
latency is the culprit. You can also optimize installations to be faster (see the recommendations in
the Administration Section of the User Guide and
Administration Section
s), and limit device
queries with filters, but device and network latency limit how quickly your system can respond.
Tip
If you use management systems other than this one, you must perform a device level resync before
performing configuration actions. Best practice is to use a single management tool whenever possible.

14
A Note About Performance | Preface

Overview | Getting Started with Dell OpenManage Network Manager
15
1
Getting Started with Dell OpenManage
Network Manager
Overview
This chapter describes how to install and start Dell OpenManage Network Manager for basic
network monitoring and management. For more detailed descriptions of all this software’s features,
consult its other manuals (the OpenManage Network Manager Administration Section of the User
Guide,
Synergy User Guide
,
Administration Section
and
User Guide
) or the online help.
Tip
If you want to find something but are unsure about which manual it is in, you can search all text in the
Acrobat® files in a single directory. You can also click on the blue cross-references to go to the target
destination of cross-references in Acrobat, however for such electronic cross-references to the other
documents to work, they must be in the same directory. Cross-document links do not work between
documents for different versions of this software, but may provide an approximate location to consult.
If you are sure your hardware, software and network is correct and just want to get started
immediately, go to Getting Started on page 27.
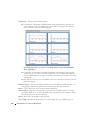
The Dell OpenManage Network Manager portal delivers powerful solutions to network problems,
and, in addition to the OpenManage Network Manager technology documented in the following
pages, Dell OpenManage Network Manager offers the following capabilities:
• Message Boards, Blogs, Wikis
• Shared Calendars
• Enterprise Chat / Messaging
• RSS Feeds
• Tagging, Ratings, Comments
The section Server on page 49 describes how to set up some of these features.
System Basics
System requirements depend on how you use the application and the operational environment.
Your specific network and devices may require something different from the recommendations for
typical installations.

16
Overview | Getting Started with Dell OpenManage Network Manager
Generally, base the minimum configuration of any system on its expected peak load. Your
installation should spend 95% of its time idle and 5% of its time trying to keep pace with the
resource demands.
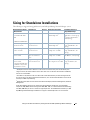
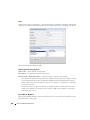
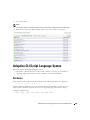
Upgrading from a Previous Version
When you upgrade your OpenManage Network Manager installation from a previous version, keep
the following in mind:
• Upgrading requires a new license to activate new features.
• Performance capabilities have been completely reconfigured. When upgrading from previous
versions, you must (re-)create dashboards from scratch.
• The following require manual migration (export, then import) from previous versions: SMTP
settings. Some scheduled items.
• You must re-create topologies as Visualizations. (suggestion: take a screenshot)
• Group Operations have been deprecated, replaced by Adaptive CLIs.
• Command monitors must be recreated, and monitors must be re-configured to monitor
Adaptive CLIs that run external scripts.
• User Names / Passwords, and User Groups (Roles) are not automatically reassigned and must
be created manually.
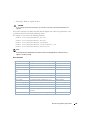
Supported Operating System Versions
The following are supported operating system versions:
Microsoft Windows
—The supported operating systems are: Windows 2003 (Standard,Enterprise
and Web) and Windows Server 2008 (including R2 and Enterprise Edition). This is a 64-bit
application, it has been tested for Windows on 64-bit operating system versions.
NOTE:
Windows Terminal Server is not supported. The installer becomes non-responsive with Data Execution
Prevention enabled. This option is disabled by default on Windows Server 2008, but is enabled on a
Windows Server 2008 machine running Terminal Server.
• You must disable User Account Control if you are installing Windows Server 2008.
• Installer may halt when pre-existing bash sessions or cmd sessions are left open. Close all such
sessions.
Linux
—This application supports Red Hat (Enterprise version 5.5 or 6.0) Linux, 64-bit only. (See
32-bit Linux Libraries on page 18 for additional requirements)
CAUTION:
For Linux, you must install no more than a single instance of MySQL
®
—the one installed with this
software. Before you install, remove any MySQL if it exists on your Linux machine.

Overview | Getting Started with Dell OpenManage Network Manager
17
Linux Installation Best Practices
How you install Linux has an impact on Dell OpenManage Network Manager’s installation. Here
are some tested best practices:
• You can install Linux in its Desktop option, or if you select Basic Server (default) - choose
additional packages: XWindows, Basic / Core Gnome Desktop without Gnome utilities,
although we suspect any Gnome will work).
• Turn off SE Linux in /etc/selinux/config. Change SELINUX=disabled. This typically requires
a reboot.
• You must install compatibility library from installation media (so it is compatible with
installation)
compat-libstdc++-33.x86_64 3.2.3-69.el6 @InstallMedia.
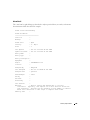
Also: verify that
/etc/hosts
points to new name-use the following command and you
should see similar output.
[qa@rh6Test Desktop]$ cat /etc/hosts
10.18.0.241rh6Test.localrh6Test# Added by NetworkManager
127.0.0.1localhost.localdomainlocalhost
::1 rh6Test.localrh6Testlocalhost6.localdomain6localhost6
Upgrading on Linux
The following are best practices for upgrading from a previous OpenManage Network Manager
version on a Linux machine:
1
Make sure Red Hat is not installed with a MySql database option (or remove the Linux MySql
first).
2
Ensure you have installed the 32-bit Linux Libraries, as described below.
3
Verify your previous version’s installation application server starts without excpetions
4
Back up the database, and any other resources that need manual installation. Consult Release
notes for a list of these.
5
Proceed with the upgrade.
Disable Firewalls
System->Administration->Firewall - You may be prompted to enter the root password; the
password dialog may be hidden behind the Firewall Configuration Startup dialog.
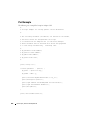
Directories and Permissions
Create the directory for the installation:
1
Open a terminal.
2
Change to Super User: su <enter> password: []
3
Create directory and configure its ownership and permissions:

18
Overview | Getting Started with Dell OpenManage Network Manager
mkdir /opt/
chown [your login name] /opt/[your installation directory]
chmod 775 /opt/[your installation directory]
NOTE:
[your login name] is the original non-root user available when you imported the machine. Replace [your
login name] with whichever user you are logged in as or will be installing as.
You may need to change the permissions on the installer in our package in order to give it execute
rights. If you have used the shared folder method from above, you can give the Linux installer
rights as follows:
chmod uga+x /[Install Media Path]/install/linux_install
Make sure that there is no other
my.cnf
file under the
/etc
directory. If there is, do the following:
mv /etc/my.cnf /etc/my.cnf.original
32-bit Linux Libraries
For Red Hat Enterprise 64 bit installations, you must identify the appropriate package containing
32-bit libtcl8.4.so (for the example below: tcl-8.4.13-3.fc6.i386.rpm for Red Hat).
NOTE:
Do not use any x86_x64 rpms; these would not install the 32-bit libraries.
Any 32-bit tcl rpm that is of version 8.4 and provides libtcl8.4.so works. You can download them
from Sourceforge:
http://sourceforge.net
. Download these, then issue the command:
rpm -ivh --force tcl-8.4.13-3.fc6.i386.rpm
This forces the installation of the 32-bit libraries on a 64-bit system. Ensure that your expect
executable in your installation directory is properly linked by issuing the following commands:
[someone@RHEL5-64bit ~]$ which expect
/opt/dorado/oware3rd/expect/linux/bin/expect
[someone@RHEL5-64bit ~]$ ldd /opt/dorado/oware3rd/expect/linux/bin/expect
linux-gate.so.1 => (0xffffe000)
libexpect5.38.so => /opt/dorado/oware3rd/expect/linux/bin/
libexpect5.38.so (0xf7fd2000)
libtcl8.4.so => /usr/lib/libtcl8.4.so (0x0094c000)
libdl.so.2 => /lib/libdl.so.2 (0x0033e000)
libm.so.6 => /lib/libm.so.6 (0x00315000)
libutil.so.1 => /lib/libutil.so.1 (0x00b8d000)
libc.so.6 => /lib/libc.so.6 (0x001ba000)
/lib/ld-linux.so.2 (0x0019d000)

Overview | Getting Started with Dell OpenManage Network Manager
19
Make sure that
libtcl8.4.so
maps to
/lib/libtcl8.4.so
An Alternative for Red Hat
Linux:
1
Copy
/usr/lib/libtcl8.4.so
from a 32-bit RH system to
/usr/local/lib/32bit
on your 64-bit Red Hat system
2
As root, execute:
ln –s /usr/local/lib/32bit/libtcl8.4.so /usr/lib/
libtcl8.4.so
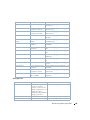
Supported Web Browsers
Supported web browsers include:
• Chrome (v 6 and above)
• Safari (v 5 and above)
• Firefox (v 3.6 and above)
• Internet Explorer (v 9 and above)
Screen resolution should equal or exceed 1280 x N pixels. Users running Safari on an Apple
machine must modify Java preference to run applets as their own process. Java Preferences are
under Applications > Utilities on OSX.
NOTE:
Internet Explorer versions 8 and older display alignment issues, have slower JavaScript and Flash
processing, and some transparencies do not work. Other anomalies include non-rounded corners, no
alpha rendering, scroll bars in performance indicators, non-working multi-level menus, a too-large OS
Images schedule form, and others. To fix these anomalies, install the Chrome plug-in at http://
code.google.com/chrome/chromeframe/. After it installs, close IE and re-open it. The look and feel
should improve.
Tip
You can often resolve problems by refreshing the browser’s display.
CAUTION:
Opening Dell OpenManage Network Manager, or links originating within it in multiple tabs on multi-tab
browsers is not supported. To see “multiple” screens, configure Dell OpenManage Network Manager’s
Menu Bar.
You can download and install updates if your browser or version varies from those supported. To
have all Dell OpenManage Network Manager functionality, you must also install the latest version
of Java (v.1.6 or later) Adobe’s Flash™ and Adobe’s Acrobat® that works with these browsers. Flash

20
Single Server Sizing | Getting Started with Dell OpenManage Network Manager
for 64-bit browsers is currently a preliminary version, but you can typically run a 32-bit browser
even in a 64-bit operating system, so Flash features will still be available even if you do not want to
run Adobe’s beta software.
NOTE:
If Flash is installed, but the screen still requests it, reload the page in the browser. Also: Your screen must
be at least 1250 pixels wide.
Tip
When no cursor or focus is onscreen, some browsers interpret backspace as the Previous button.
Single Server Sizing
The following describes hardware and sizing configuration for common Dell OpenManage
Network Manager deployments. Before any deployment, administrators should review and
understand the different deployment options and requirements. Consider future growth of the
network when estimating hardware sizing. You can generally expand modern systems running Dell
OpenManage Network Manager by adding more RAM to the host server(s). Selecting expandable
hardware may also be critical to future growth. For ease of management, deployments selection
best practice is to use the fewest possible servers. Standalone (single server) deployment offer the
simplest and easiest management solution. Where high availability (HA) is required, you can
produce the simplest deployment with as few as two servers.
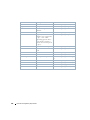
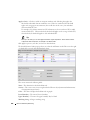
Minimum Hardware
The minimum hardware specification describes what Dell OpenManage Network Manager needs
at a minimum. In such minimum installations, traffic flowing from the network to OpenManage
Network Manager may exceed the capacity of the hardware. When estimating the size of a
deployment, it is important to understand the applications configurations in the target
environment. Applications that are typically the most demanding of resources are Traffic Flow
Analyzer (TFA), Event Management and Performance Monitoring.
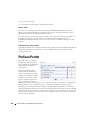
REQUIRED Minimum hardware
—6GB RAM, dual core CPU, 200 GB 7200 RPM Disk.
Supports
:
• Standalone installations (Single Server) is supported when high-resource demand
applications are used minimally.
RECOMMENDED Minimum hardware:
8GB RAM, quad core CPU, 400 GB 10,000 RPM Disk
Supports:
• Standalone installations (non-distributed).
Page is loading ...
Page is loading ...
Page is loading ...
Page is loading ...
Page is loading ...
Page is loading ...
Page is loading ...
Page is loading ...
Page is loading ...
Page is loading ...
Page is loading ...
Page is loading ...
Page is loading ...
Page is loading ...
Page is loading ...
Page is loading ...
Page is loading ...
Page is loading ...
Page is loading ...
Page is loading ...
Page is loading ...
Page is loading ...
Page is loading ...
Page is loading ...
Page is loading ...
Page is loading ...
Page is loading ...
Page is loading ...
Page is loading ...
Page is loading ...
Page is loading ...
Page is loading ...
Page is loading ...
Page is loading ...
Page is loading ...
Page is loading ...
Page is loading ...
Page is loading ...
Page is loading ...
Page is loading ...
Page is loading ...
Page is loading ...
Page is loading ...
Page is loading ...
Page is loading ...
Page is loading ...
Page is loading ...
Page is loading ...
Page is loading ...
Page is loading ...
Page is loading ...
Page is loading ...
Page is loading ...
Page is loading ...
Page is loading ...
Page is loading ...
Page is loading ...
Page is loading ...
Page is loading ...
Page is loading ...
Page is loading ...
Page is loading ...
Page is loading ...
Page is loading ...
Page is loading ...
Page is loading ...
Page is loading ...
Page is loading ...
Page is loading ...
Page is loading ...
Page is loading ...
Page is loading ...
Page is loading ...
Page is loading ...
Page is loading ...
Page is loading ...
Page is loading ...
Page is loading ...
Page is loading ...
Page is loading ...
Page is loading ...
Page is loading ...
Page is loading ...
Page is loading ...
Page is loading ...
Page is loading ...
Page is loading ...
Page is loading ...
Page is loading ...
Page is loading ...
Page is loading ...
Page is loading ...
Page is loading ...
Page is loading ...
Page is loading ...
Page is loading ...
Page is loading ...
Page is loading ...
Page is loading ...
Page is loading ...
Page is loading ...
Page is loading ...
Page is loading ...
Page is loading ...
Page is loading ...
Page is loading ...
Page is loading ...
Page is loading ...
Page is loading ...
Page is loading ...
Page is loading ...
Page is loading ...
Page is loading ...
Page is loading ...
Page is loading ...
Page is loading ...
Page is loading ...
Page is loading ...
Page is loading ...
Page is loading ...
Page is loading ...
Page is loading ...
Page is loading ...
Page is loading ...
Page is loading ...
Page is loading ...
Page is loading ...
Page is loading ...
Page is loading ...
Page is loading ...
Page is loading ...
Page is loading ...
Page is loading ...
Page is loading ...
Page is loading ...
Page is loading ...
Page is loading ...
Page is loading ...
Page is loading ...
Page is loading ...
Page is loading ...
Page is loading ...
Page is loading ...
Page is loading ...
Page is loading ...
Page is loading ...
Page is loading ...
Page is loading ...
Page is loading ...
Page is loading ...
Page is loading ...
Page is loading ...
Page is loading ...
Page is loading ...
Page is loading ...
Page is loading ...
Page is loading ...
Page is loading ...
Page is loading ...
Page is loading ...
Page is loading ...
Page is loading ...
Page is loading ...
Page is loading ...
Page is loading ...
Page is loading ...
Page is loading ...
Page is loading ...
Page is loading ...
Page is loading ...
Page is loading ...
Page is loading ...
Page is loading ...
Page is loading ...
Page is loading ...
Page is loading ...
Page is loading ...
Page is loading ...
Page is loading ...
Page is loading ...
Page is loading ...
Page is loading ...
Page is loading ...
Page is loading ...
Page is loading ...
Page is loading ...
Page is loading ...
Page is loading ...
Page is loading ...
Page is loading ...
Page is loading ...
Page is loading ...
Page is loading ...
Page is loading ...
Page is loading ...
Page is loading ...
Page is loading ...
Page is loading ...
Page is loading ...
Page is loading ...
Page is loading ...
Page is loading ...
Page is loading ...
Page is loading ...
Page is loading ...
Page is loading ...
Page is loading ...
Page is loading ...
Page is loading ...
Page is loading ...
Page is loading ...
Page is loading ...
Page is loading ...
Page is loading ...
Page is loading ...
Page is loading ...
Page is loading ...
Page is loading ...
Page is loading ...
Page is loading ...
Page is loading ...
Page is loading ...
Page is loading ...
Page is loading ...
Page is loading ...
Page is loading ...
Page is loading ...
Page is loading ...
Page is loading ...
Page is loading ...
Page is loading ...
Page is loading ...
Page is loading ...
Page is loading ...
Page is loading ...
Page is loading ...
Page is loading ...
Page is loading ...
Page is loading ...
Page is loading ...
Page is loading ...
Page is loading ...
Page is loading ...
Page is loading ...
Page is loading ...
Page is loading ...
Page is loading ...
Page is loading ...
Page is loading ...
Page is loading ...
Page is loading ...
Page is loading ...
Page is loading ...
Page is loading ...
Page is loading ...
Page is loading ...
Page is loading ...
Page is loading ...
Page is loading ...
Page is loading ...
Page is loading ...
Page is loading ...
Page is loading ...
Page is loading ...
Page is loading ...
Page is loading ...
Page is loading ...
Page is loading ...
Page is loading ...
Page is loading ...
Page is loading ...
Page is loading ...
Page is loading ...
Page is loading ...
Page is loading ...
Page is loading ...
Page is loading ...
Page is loading ...
Page is loading ...
Page is loading ...
Page is loading ...
Page is loading ...
Page is loading ...
Page is loading ...
Page is loading ...
Page is loading ...
Page is loading ...
Page is loading ...
Page is loading ...
Page is loading ...
Page is loading ...
Page is loading ...
Page is loading ...
Page is loading ...
Page is loading ...
Page is loading ...
Page is loading ...
Page is loading ...
Page is loading ...
Page is loading ...
Page is loading ...
Page is loading ...
Page is loading ...
Page is loading ...
Page is loading ...
Page is loading ...
Page is loading ...
Page is loading ...
Page is loading ...
Page is loading ...
Page is loading ...
Page is loading ...
Page is loading ...
Page is loading ...
Page is loading ...
Page is loading ...
Page is loading ...
Page is loading ...
Page is loading ...
Page is loading ...
Page is loading ...
Page is loading ...
Page is loading ...
Page is loading ...
Page is loading ...
Page is loading ...
Page is loading ...
Page is loading ...
Page is loading ...
Page is loading ...
Page is loading ...
Page is loading ...
Page is loading ...
Page is loading ...
Page is loading ...
Page is loading ...
Page is loading ...
Page is loading ...
Page is loading ...
Page is loading ...
Page is loading ...
Page is loading ...
Page is loading ...
Page is loading ...
Page is loading ...
Page is loading ...
Page is loading ...
Page is loading ...
Page is loading ...
Page is loading ...
Page is loading ...
Page is loading ...
Page is loading ...
Page is loading ...
Page is loading ...
Page is loading ...
Page is loading ...
Page is loading ...
Page is loading ...
Page is loading ...
Page is loading ...
Page is loading ...
Page is loading ...
Page is loading ...
-
 1
1
-
 2
2
-
 3
3
-
 4
4
-
 5
5
-
 6
6
-
 7
7
-
 8
8
-
 9
9
-
 10
10
-
 11
11
-
 12
12
-
 13
13
-
 14
14
-
 15
15
-
 16
16
-
 17
17
-
 18
18
-
 19
19
-
 20
20
-
 21
21
-
 22
22
-
 23
23
-
 24
24
-
 25
25
-
 26
26
-
 27
27
-
 28
28
-
 29
29
-
 30
30
-
 31
31
-
 32
32
-
 33
33
-
 34
34
-
 35
35
-
 36
36
-
 37
37
-
 38
38
-
 39
39
-
 40
40
-
 41
41
-
 42
42
-
 43
43
-
 44
44
-
 45
45
-
 46
46
-
 47
47
-
 48
48
-
 49
49
-
 50
50
-
 51
51
-
 52
52
-
 53
53
-
 54
54
-
 55
55
-
 56
56
-
 57
57
-
 58
58
-
 59
59
-
 60
60
-
 61
61
-
 62
62
-
 63
63
-
 64
64
-
 65
65
-
 66
66
-
 67
67
-
 68
68
-
 69
69
-
 70
70
-
 71
71
-
 72
72
-
 73
73
-
 74
74
-
 75
75
-
 76
76
-
 77
77
-
 78
78
-
 79
79
-
 80
80
-
 81
81
-
 82
82
-
 83
83
-
 84
84
-
 85
85
-
 86
86
-
 87
87
-
 88
88
-
 89
89
-
 90
90
-
 91
91
-
 92
92
-
 93
93
-
 94
94
-
 95
95
-
 96
96
-
 97
97
-
 98
98
-
 99
99
-
 100
100
-
 101
101
-
 102
102
-
 103
103
-
 104
104
-
 105
105
-
 106
106
-
 107
107
-
 108
108
-
 109
109
-
 110
110
-
 111
111
-
 112
112
-
 113
113
-
 114
114
-
 115
115
-
 116
116
-
 117
117
-
 118
118
-
 119
119
-
 120
120
-
 121
121
-
 122
122
-
 123
123
-
 124
124
-
 125
125
-
 126
126
-
 127
127
-
 128
128
-
 129
129
-
 130
130
-
 131
131
-
 132
132
-
 133
133
-
 134
134
-
 135
135
-
 136
136
-
 137
137
-
 138
138
-
 139
139
-
 140
140
-
 141
141
-
 142
142
-
 143
143
-
 144
144
-
 145
145
-
 146
146
-
 147
147
-
 148
148
-
 149
149
-
 150
150
-
 151
151
-
 152
152
-
 153
153
-
 154
154
-
 155
155
-
 156
156
-
 157
157
-
 158
158
-
 159
159
-
 160
160
-
 161
161
-
 162
162
-
 163
163
-
 164
164
-
 165
165
-
 166
166
-
 167
167
-
 168
168
-
 169
169
-
 170
170
-
 171
171
-
 172
172
-
 173
173
-
 174
174
-
 175
175
-
 176
176
-
 177
177
-
 178
178
-
 179
179
-
 180
180
-
 181
181
-
 182
182
-
 183
183
-
 184
184
-
 185
185
-
 186
186
-
 187
187
-
 188
188
-
 189
189
-
 190
190
-
 191
191
-
 192
192
-
 193
193
-
 194
194
-
 195
195
-
 196
196
-
 197
197
-
 198
198
-
 199
199
-
 200
200
-
 201
201
-
 202
202
-
 203
203
-
 204
204
-
 205
205
-
 206
206
-
 207
207
-
 208
208
-
 209
209
-
 210
210
-
 211
211
-
 212
212
-
 213
213
-
 214
214
-
 215
215
-
 216
216
-
 217
217
-
 218
218
-
 219
219
-
 220
220
-
 221
221
-
 222
222
-
 223
223
-
 224
224
-
 225
225
-
 226
226
-
 227
227
-
 228
228
-
 229
229
-
 230
230
-
 231
231
-
 232
232
-
 233
233
-
 234
234
-
 235
235
-
 236
236
-
 237
237
-
 238
238
-
 239
239
-
 240
240
-
 241
241
-
 242
242
-
 243
243
-
 244
244
-
 245
245
-
 246
246
-
 247
247
-
 248
248
-
 249
249
-
 250
250
-
 251
251
-
 252
252
-
 253
253
-
 254
254
-
 255
255
-
 256
256
-
 257
257
-
 258
258
-
 259
259
-
 260
260
-
 261
261
-
 262
262
-
 263
263
-
 264
264
-
 265
265
-
 266
266
-
 267
267
-
 268
268
-
 269
269
-
 270
270
-
 271
271
-
 272
272
-
 273
273
-
 274
274
-
 275
275
-
 276
276
-
 277
277
-
 278
278
-
 279
279
-
 280
280
-
 281
281
-
 282
282
-
 283
283
-
 284
284
-
 285
285
-
 286
286
-
 287
287
-
 288
288
-
 289
289
-
 290
290
-
 291
291
-
 292
292
-
 293
293
-
 294
294
-
 295
295
-
 296
296
-
 297
297
-
 298
298
-
 299
299
-
 300
300
-
 301
301
-
 302
302
-
 303
303
-
 304
304
-
 305
305
-
 306
306
-
 307
307
-
 308
308
-
 309
309
-
 310
310
-
 311
311
-
 312
312
-
 313
313
-
 314
314
-
 315
315
-
 316
316
-
 317
317
-
 318
318
-
 319
319
-
 320
320
-
 321
321
-
 322
322
-
 323
323
-
 324
324
-
 325
325
-
 326
326
-
 327
327
-
 328
328
-
 329
329
-
 330
330
-
 331
331
-
 332
332
-
 333
333
-
 334
334
-
 335
335
-
 336
336
-
 337
337
-
 338
338
-
 339
339
-
 340
340
-
 341
341
-
 342
342
-
 343
343
-
 344
344
-
 345
345
-
 346
346
-
 347
347
-
 348
348
-
 349
349
-
 350
350
-
 351
351
-
 352
352
-
 353
353
-
 354
354
-
 355
355
-
 356
356
-
 357
357
-
 358
358
-
 359
359
-
 360
360
-
 361
361
-
 362
362
-
 363
363
-
 364
364
-
 365
365
-
 366
366
-
 367
367
-
 368
368
-
 369
369
-
 370
370
-
 371
371
-
 372
372
-
 373
373
-
 374
374
-
 375
375
-
 376
376
-
 377
377
-
 378
378
-
 379
379
-
 380
380
-
 381
381
-
 382
382
-
 383
383
-
 384
384


Dell OpenManage Network Manager Version 5.0 Web Client Guide
- Category
- Software
- Type
- Web Client Guide
- This manual is also suitable for
Ask a question and I''ll find the answer in the document
Finding information in a document is now easier with AI
Related papers
-
Dell OpenManage Network Manager Version 5.0 Web Client Guide
-
-
-
-
-
-
-
-
-