HP P550 User manual

Category
Camcorders
Type
User manual

This manual is also suitable for

p550
Digital Camera
User Manual
1
• The contents of this manual and the bundled Basic Reference are subject to
change without notice.
• Note that the example screens and product illustrations shown in this User’s Guide
may differ somewhat from the screens and configuration of the actual camera.
• HP shall not be liable for technical or editorial errors or omissions contained herein.
LCD Panel
The liquid crystal panel of the monitor screen uses high-precision technology that
provides a pixel yield in excess of 99.99%. This means that some very small number
of pixels may not light or may remain lit at all times. This is due to the characteristics
of the liquid crystal panel, and does not indicate malfunction.
Take a few test shots
Before shooting your final image, shoot a test shot to ensure that the camera is
recording correctly.
2
•Copyrights
This manual contains proprietary information protected by copyright. All rights are
reserved. No part of this manual may be reproduced by any mechanical, electronic or
other means, in any form, without prior written permission of the manufacturer.
© Copyright 2012
• Federal Communications Commission (FCC) Compliance
This equipment has been tested and found to comply with the limits for a Class B
digital device, pursuant to Part 15 of the FCC Rules. These limits are designed to
provide reasonable protection against harmful interference in a residential
installation. This equipment generates, uses, and can radiate radio frequency energy
and, if not installed and used in accordance with the instructions, may cause harmful
interference to radio communications. However, there is no guarantee that
interference will not occur in a particular installation. If this equipment does cause
harmful interference to radio or television reception, which can be determined by
turning the equipment off and on, the user is encouraged to try to correct the
interference by one or more of the following measures:
• Reorient or relocate the receiving antenna.
• Increase the distance between the equipment and the receiver.
• Connect the equipment to an outlet on a circuit different from that to which the
receiver is connected.
• Consult the dealer or an experienced radio/TV technician for help.
• Declaration of Conformity
This device complies with Part 15 of the FCC rules. Operation is subject to the
following conditions:
• This device may not cause harmful interference.
• This device must accept any interference received, including interference that may
cause undesired operation.
• Trademark Recognition
Windows 2000/XP/Vista/7 are registered trademarks of Microsoft Corporation in
the United States and/or other countries. Windows is an abbreviated term referring to
the Microsoft Windows Operation System. All other companies or product names are
trademarks or registered trademarks of their respective companies.
Warning: A shielded-type power cord is required in order to meet FCC emission limits and to
prevent interference to radio and television reception. Use only shielded cable to connect I/O
devices to this equipment. Any changes or modifications not expressly approved by the
manufacturer may void your warranty and service agreement.
3
Any and all unauthorized commercial copying, distribution, and copying of the
bundled software over a network are prohibited.
• If the camera’s back lamp starts flashing red...
• Ambient temperature or the temperature of the battery may be either too high or
too low. Disconnect the USB cable and wait until temperature is within the
allowable charging range before trying again.
• Battery contacts may be dirty. Wipe them with a dry cloth.
• Try connecting to a different computer USB port. Depending on the setup of your
computer, you may not be able to charge the camera’s battery over a USB
connection.
1. Open the battery cover and remove
the current battery.
With the monitor screen side of the
camera facing upwards, slide the stopper
in the direction indicated by the arrow in
the illustration. After the battery pops out,
pull it the rest of the way out of the
camera.
2. Load a new battery.
Power Supply
Charging
To replace the battery
S
topper
4
• Rechargeable Battery
• Do not charge the battery by any unauthorized means. Attempting to charge the
battery by an unauthorized means creates the risk of battery overheating, fire, and
explosion.
• Do not expose or immerse the battery in fresh water or salt water. Doing so can
damage the battery, and cause deterioration of its performance and loss of service
life.
• Use only the provided battery or type of battery and charger that came with your
camera. Using other types of battery or charger may damage the equipment and
invalidate the warranty.
• Failure to observe any of the following precautions creates the risk of battery
overheating, fire, and explosion.
– Never use or leave the battery near open flame.
– Do not expose the battery to heat or fire.
– Never carry or store the battery together with items that can conduct electricity
(necklaces, pencil lead, etc.).
– Never disassemble the battery, pierce it with a needle, or expose it to strong
impact (hit it with a hammer, step on it, etc.), and never apply solder to it. Never
place the battery into a microwave oven, heater, high-pressure generating
device, etc.
• Should you ever notice leakage, strange odor, heat generation, discoloration,
deformation, or any other abnormal condition while using, charging, or storing a
battery, immediately remove it from the camera and keep it away from open flame.
• Do not use or leave the battery under direct sunlight, in an automobile parked in the
sun, or in any other area subject to high temperatures. Doing so can damage the
battery, and cause deterioration of its performance and loss of service life.
• Continued charging creates the risk of battery overheating, fire, and explosion.
• Battery fluid can damage your eyes. Should battery fluid get into your eyes
accidentally, immediately rinse them with clean tap water and then consult a
physician.
• Be sure to read the user documentation that comes with the camera and special
USB adapter before using or charging the battery.
• If a battery is to be used by young children, make sure that a responsible adult
makes them aware of the precautions and proper handling instructions, and make
sure that they handle the battery correctly.
• Should fluid from a battery accidentally get onto clothing or your skin, immediately
rinse it off with clean tap water. Prolonged contact with battery fluid can cause skin
irritation.
5
Contents
Read this first! . . . . . . . . . . . . . . . . . . . . . . . . . . . . . . . . . . . . . . . . . . . . . . . . . 1
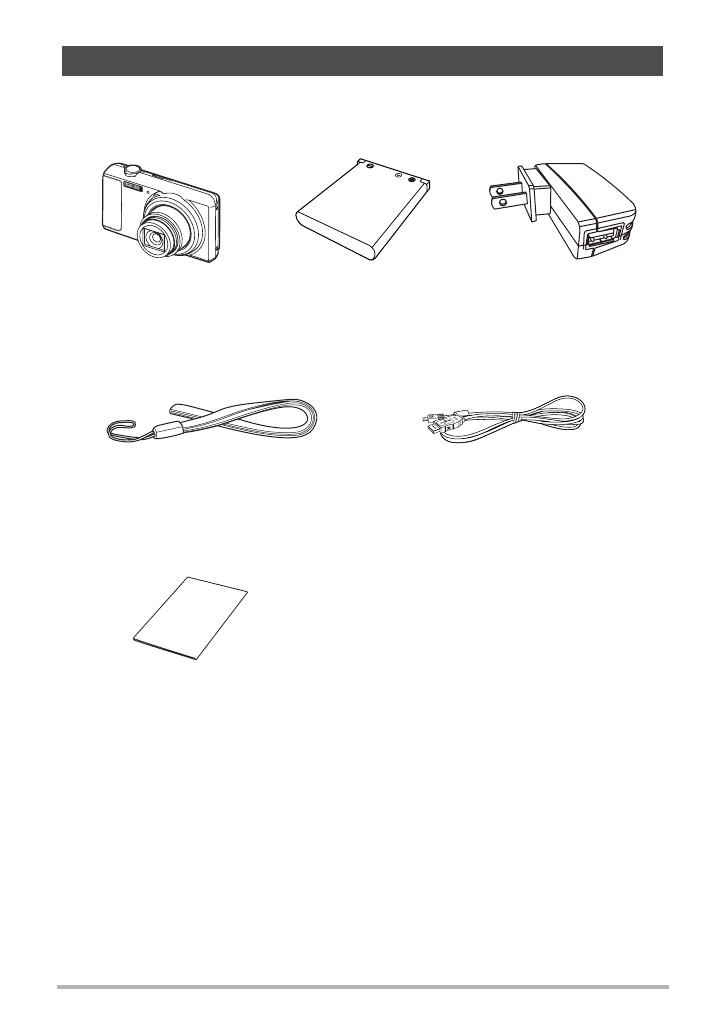
Unpacking . . . . . . . . . . . . . . . . . . . . . . . . . . . . . . . . . . . . . . . . . . . . . . . . . . . . 8
General Guide . . . . . . . . . . . . . . . . . . . . . . . . . . . . . . . . . . . . . . . . . . . . . . . . 9
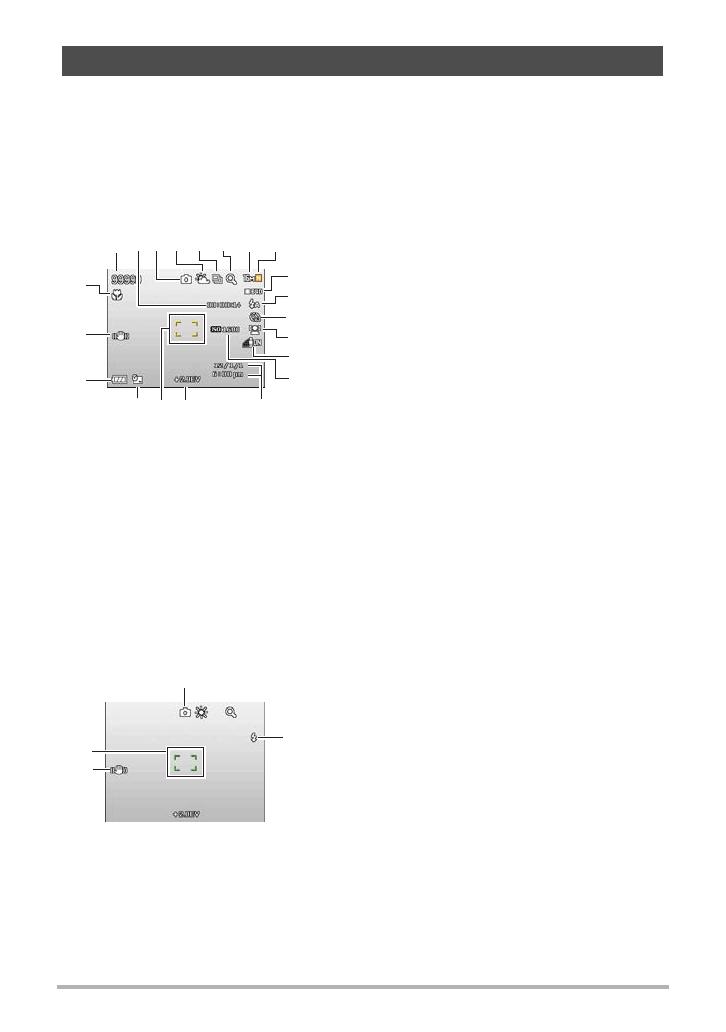
Monitor Screen Contents . . . . . . . . . . . . . . . . . . . . . . . . . . . . . . . . . . . . . . . .10
• Configuring Monitor Screen Settings . . . . . . . . . . . . . . . . . . . . . . . . . . . . . . . . . .12
• Quick Start Basics 13
What is a digital camera? . . . . . . . . . . . . . . . . . . . . . . . . . . . . . . . . . . . . . . . 13
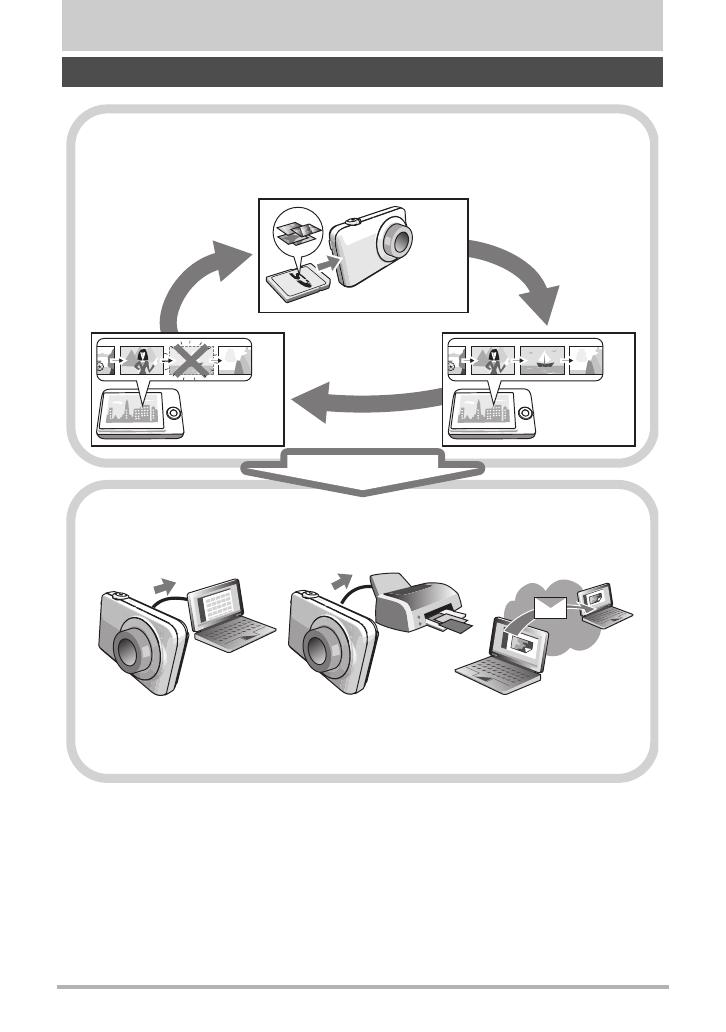
What you can do with your camera . . . . . . . . . . . . . . . . . . . . . . . . . . . . . . . 14
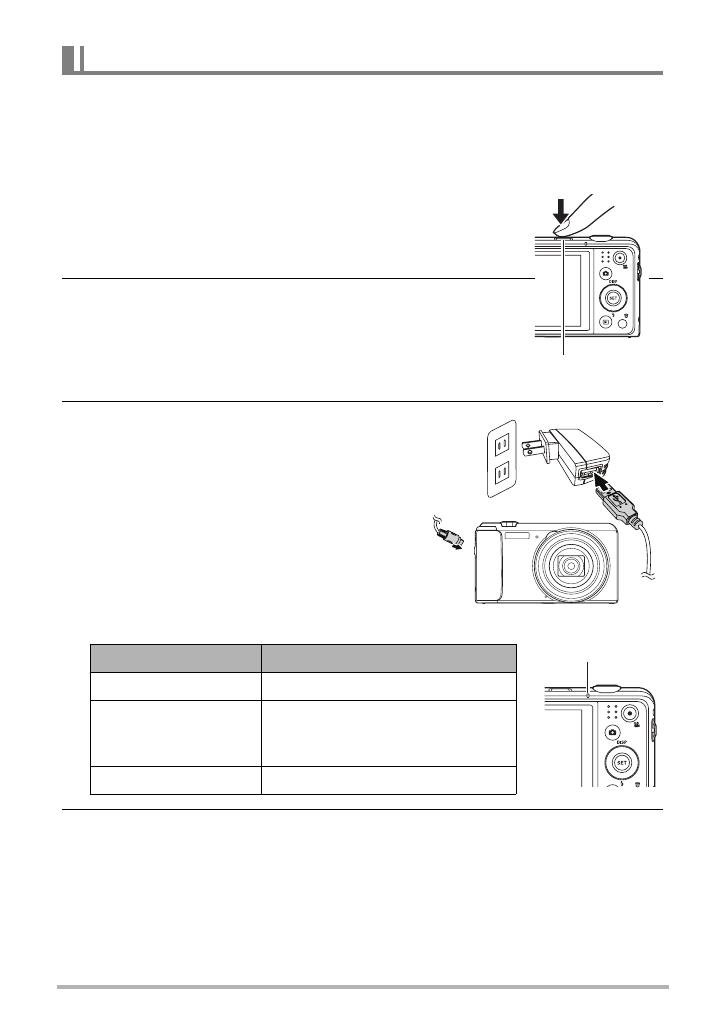
First, charge the battery prior to use. . . . . . . . . . . . . . . . . . . . . . . . . . . . . . . 15
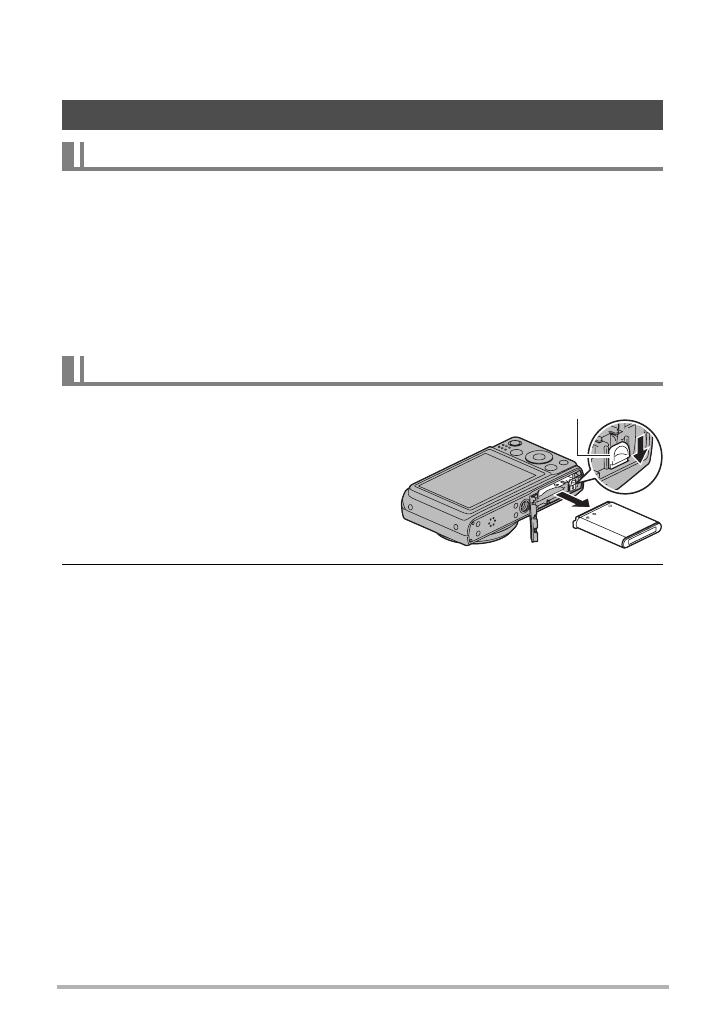
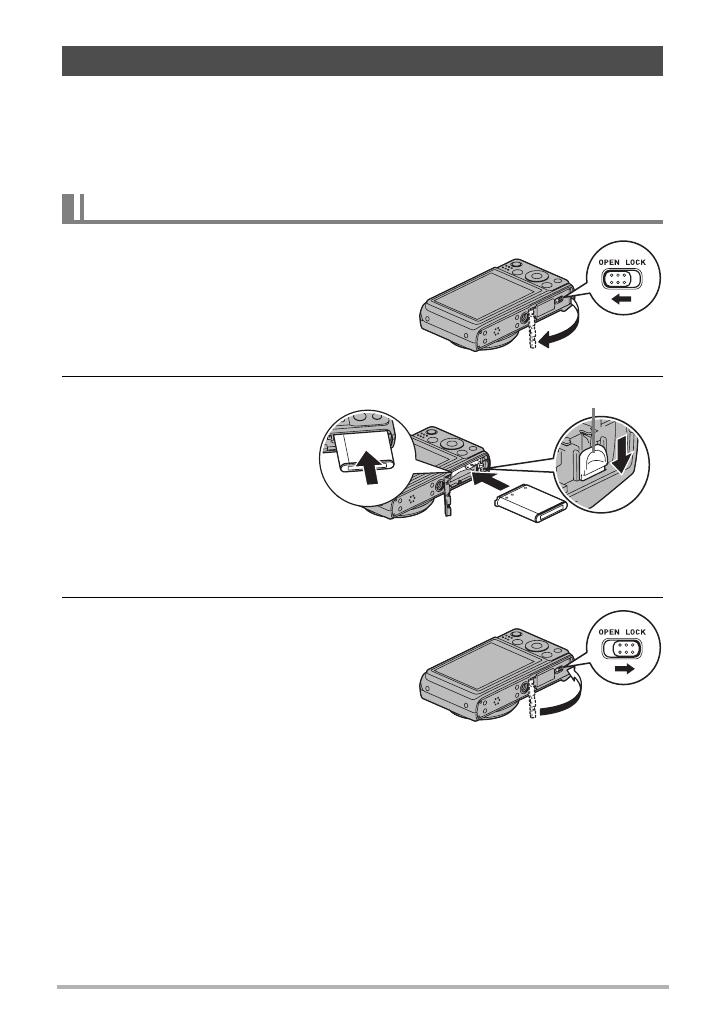
• To load the battery . . . . . . . . . . . . . . . . . . . . . . . . . . . . . . . . . . . . . . . . . . . . . . . 15
• Charge the Battery . . . . . . . . . . . . . . . . . . . . . . . . . . . . . . . . . . . . . . . . . . . . . . . 16
Configuring Basic Settings the First Time You Turn On the Camera . . . . . . 21
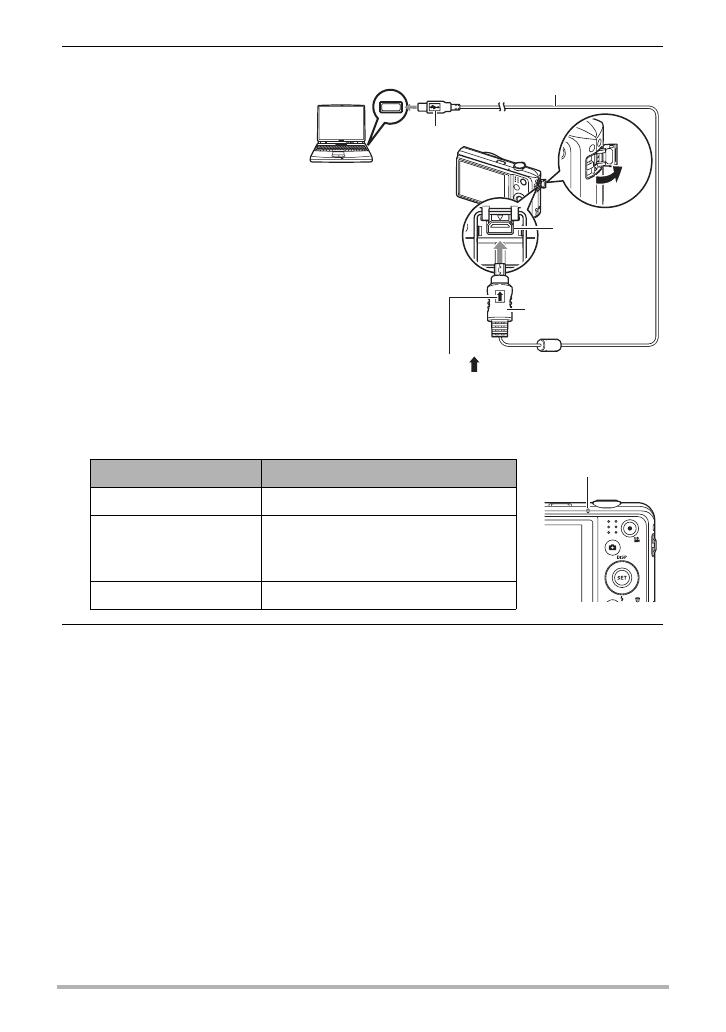
Preparing a Memory Card . . . . . . . . . . . . . . . . . . . . . . . . . . . . . . . . . . . . . . 22
• Supported Memory Cards . . . . . . . . . . . . . . . . . . . . . . . . . . . . . . . . . . . . . . . . .22
• To load a memory card . . . . . . . . . . . . . . . . . . . . . . . . . . . . . . . . . . . . . . . . . . 23
• To format (initialize) a new memory card . . . . . . . . . . . . . . . . . . . . . . . . . . . . . . 24
Powering the Camera On and Off . . . . . . . . . . . . . . . . . . . . . . . . . . . . . . . 25
• To turn power on . . . . . . . . . . . . . . . . . . . . . . . . . . . . . . . . . . . . . . . . . . . . . . . . 25
• To turn off the camera . . . . . . . . . . . . . . . . . . . . . . . . . . . . . . . . . . . . . . . . . . . . 25
Holding the Camera Correctly . . . . . . . . . . . . . . . . . . . . . . . . . . . . . . . . . . . 26
To shoot a photo . . . . . . . . . . . . . . . . . . . . . . .. .. . . . . . . . . . . . . . . . . . . . . . 27
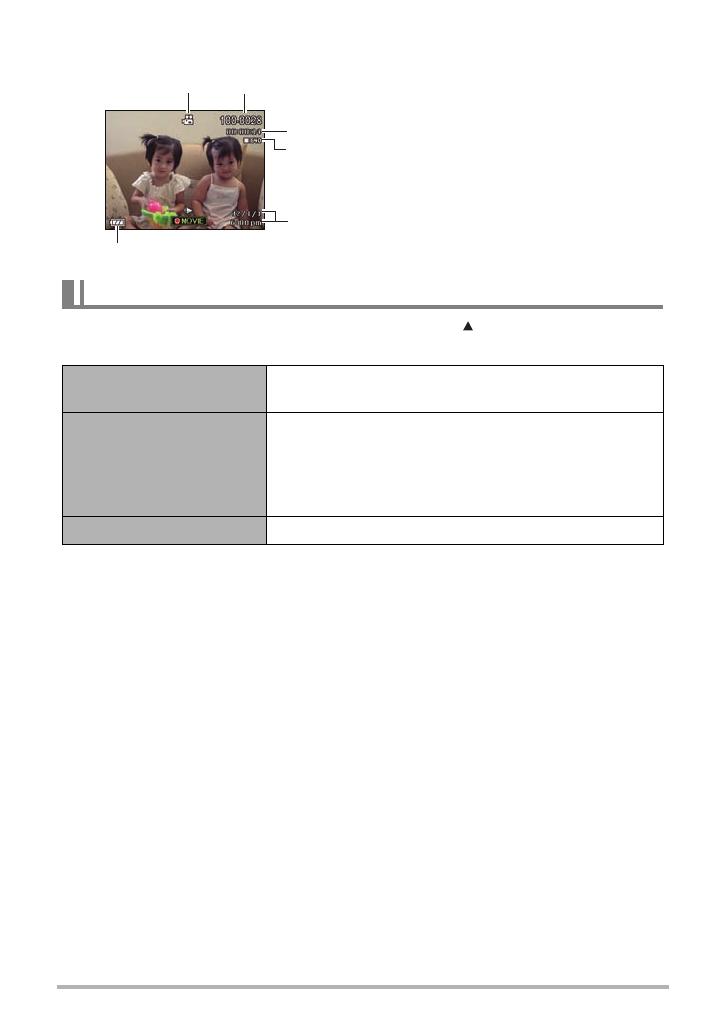
Viewing Photos . . . . . . . . . . . . . . . . . . . . . . . . .. .. . . . . . . . . . . . . . . . . . . . . 29
Deleting Photos and Videos . . . . . . . . . . . . . . . . . . . . . . . . . . . . . . . . . . . . . . .30
• To delete a single file . . . . . . . . . . . . . . . . . . . . . . . . . . . . . . . . . . . . . . . . . . . . . 30
• To delete specific files . . . . . . . . . . . . . . . . . . . . . . . . . . . . . . . . . . . . . . . . . . . . 31
• To delete all files . . . . . . . . . . . . . . . . . . . . . . . . . . . . . . . . . . . . . . . . . . . . . . . . 31
Photo Shooting Precautions . . . . . . . . . . . . . . . .. .. . . . . . . . . . . . . . . . . . . 32
• Auto Focus Restrictions . . . . . . . . . . . . . . . . . . . . . . . . . . . . . . . . . . . . . . . . . . . 32
• Photograph Tutorial 33
Using the Control Panel . . . . . . . . . . . . . . . . . . . . . . . . . . . . . . . . . . . . . . . . 33
Changing the Photo Size . . . . . . . . . . . . . . . . . . . . . . . . . . . . . . . . (Size) . . 34
Using Flash . . . . . . . . . . . . . . . . . . . . . . . . . . . . . . . . . . . . . . . . . . .(Flash) . . 37
Using the Self-timer . . . . . . . . . . . . . . . . . . . . . . . . . . . . . . . . (Self-timer) . . 39
Using Face Tracking . . . . . . . . . . . . . . . . . . . . . . . . . . . . . . . . . . . . . . . . . . . 40
Shooting without Disturbing Others . . . . . . . . . . . . . . . . . . .(Silent Mode) . . 41
Using the Simple Mode . . . . . . . . . . . . . . . . . . . . . . . . . . . . . . . . . . . . . . . . . 41
Shooting with Zoom . . . . . . . . . . . . . . . . . . . . . . . . . . . . . . . . . . . . . . . . . . . 44
• Optical Zoom and Digital Zoom Switch Point . . . . . . . . . . . . . . . . . . . . . . . . . . . 45
• Recording Video and Audio 46
To record a video . . . .. . . . . . . .. . . . .. . . . . . . . . . . . . . . . . . . . . . . . . . . . . . 46
Recording Audio Only . . . . . . . . . . . . . . . . . . . . . . . . . . . . . . (Voice REC) . . 48
• To play back an audio recording . . . . . . . . . . . . . . . . . . . . . . . . . . . . . . . . . . . . 49
6
• Using Scene Mode 50
What is Scene Mode? . . . . . . . . . . . . . . . . . . . . . . . . . . . . . . . . . . . . . . . . . . 50
• Some Sample Scenes . . . . . . . . . . . . . . . . . . . . . . . . . . . . . . . . . . . . . . . . . . . . 50
To shoot a photo with Scene Mode . . . . . . . . . . . . . . . . . . . . . . . . . . . . . . . 50
• Advanced Photo Settings 51
Using On-screen Menus . . . . . . . . . . . . . . . . . . . . . . . . . . . . . . . . . . . . . . . . 52
REC Mode Settings . . . . . . . . . . . . . . . . . . . . . . . . . . . . . . . . . . . . (REC) . . 54
• Selecting a Focus Mode . . . . . . . . . . . . . . . . . . . . . . . . . . . . . . . . .(Focus) . . . 55
• Changing the Focus Frame Shape . . . . . . . . . . . . . . . . . . . (Focus Frame) . . . 56
• Using Burst . . . . . . . . . . . . . . . . . . . . . . . . . . . . . . . . . . . . . . . . . . . . . . . . . . . . 57
• Reducing the Effects of Camera and Subject Movement
(Stabilizer) . . . . . . . . . . . . . . . . . . . . . . . . . . . . . . . . . . . . . . . . . . . . . . . . . . . . . 57
• Specifying the Auto Focus Area . . . . . . . . . . . . . . . . . . . . . . . . . . (AF Area) . . . 58
• Assigning Functions to the [ ] and [ ] Keys . . . . . . . . . . . . . . . (L/R Key) . . . 59
• Displaying the On-screen Grid . . . . . . . . . . . . . . . . . . . . . . . . . . . . . . (Grid) . . . 59
• Using Icon Help . . . . . . . . . . . . . . . . . . . . . . . . . . . . . . . . . . . . . (Icon Help) . . . 59
• Configuring Power On Default Settings . . . . . . . . . . . . . . . . . . . . (Memory) . . . 60
Photo Quality Settings . . . . . . . . . . . . . . . . . . . . . . . . . . . . . . . . (Quality) . . 61
• Specifying Photo Image Quality . . . . . . . . . . .. . . . . . . (Quality (Snapshot)) . . . 61
• Correcting Photo Brightness . . . . . . . . . . . . . . .. . . . . . (EV Compensation) . . . 61
• Controlling White Balance . . . . . . . . . . . . . . . . . . . . . . . . . (White Balance) . . . 62
• Specifying ISO Sensitivity . . . . . . . . . . . . . . . . . . . . . . . . . . . . . . . . . .(ISO) . . . 63
• Optimizing Photo Brightness . . . . . . . . . . . . . . . . . . . . . . . . . . (D-Lighting) . . . 63
• Using Built-in Color Mode . . . . . . . . . . . . . . . . . . . . . . . . . . . (Color Mode) . . . 63
• Viewing Photos and Videos 64
Viewing Photos . . . . . . . . . . . . . . . . . . . . . . . . . . . . . . . . . . . . . . . . . . . . . . . 64
Viewing a Video . . . . . . . . . . . . . . . . . . . . . . . . . . . .. . . . . . . . . . . . . . . . . . . 64
Zooming an On-screen Image . . . . . . . . . . . . . . . . . . . . . . . . . . . . . . . . . . . 65
Displaying the photo Menu . . . . . . . . . . . . . . . . . . . . . . . . . . . . . . . . . . . . . 65
• Other Playback Functions (PLAY) 66
Using the PLAY Panel . . . . . . . . . . . . . . . . . . . . . . . . . . . . . . . . . . . . . . . . . . 66
Playing a Slideshow on the Camera . . . . . . . . . . . . . . . . . . . . (Slideshow) . . 68
Performing Playback without Disturbing Others . . . . . . . . . .(Silent Mode) . . 69
Rotating a photo . . . . . . . . . . . . . . . . . . . . . . . . . . . . . . . . .... . . . (Rotate) . . 69
Selecting Photos for Printing . . . . . . . . . . . . . . . . . . . . . . . .. . . . . (DPOF) . . 70
Protecting a File Against Deletion . . . . . . . . . . . . . . . . . . .. . . . . . (Protect) . . 70
Resizing a Photo . . . . . . . . . . . . . . . . . . . . . . . . . . . . . . ....... . . . .(Resize) . . 71
Cropping a Photo . . . . . . . . . . . . . . . . . . . . . . . . . . . ....... . . . .(Trimming) . . 71
Adding Audio to a Photo . . . . . . . . . . . . . . . . . . .. . . . .. . . . (V
oice Memo) . . 72
• To play photo audio . . . . . . . . . . . . . . . . . . . . . . . . . . . . . . . . . . . . . . . . . . . . . 72
Copying Files . . . . . . . . . . . . . . . . . . . . . . . . . . . . . . . . . . . . . . . . . (Copy) . . 73
7
•Printing 74
Printing Photos . . . . . . . . . . . . . . . . . . . . . . . . . . . . . . . . . . . . . . . . .. . . .. .. . 74
Connecting Directly to a PictBridge Compatible Printer . . . . . . . . . . . . . ...... 76
Using DPOF to Specify Photos to be Printed and the Number of Copies . . 77
• Using the Camera with a Computer 79
Things you can do using a computer... . . . . . . . . . . . . . . . . . . . . . . . . . . . . . 80
• Viewing and Storing Photos on a Computer . . . . . . . . . . . . . . . . . . . . . . . . . . . 80
• Playing Videos . . . . . . . . . . . . . . . . . . . . . . . . . . . . . . . . . . . . . . . . . . . . . . . . . .82
• Transferring Photos Automatically and Managing Them on Your Macintosh . . 83
• Playing a Video . . . . . . . . . . . . . . . . . . . . . . . . . . . . . . . . . . . . . . . . . . . . . . . . . 85
Files and Folders . . . . . . . . . . . . . . . . . . . . . . . . . . . . . . . . . . . . . . . . . . . . . 86
• Other Settings (Set Up) 87
Configuring Camera Sound Settings . . . . . . . . . . . . . . . . . . . . . (Sounds) . . 87
Configuring a Startup Image . . . . . . . . . . . . . . . . . . . . . . . . . . . . . . . . . . . . . 88
Specifying the File Name Serial Number Generation Rule
. . . . . . . . . . . . . . . . . . . . . . . . . . . . . . . . . . . . . . . . . . . . . (File Numbering) . . 88
Configuring World Time Settings (World Time) . . . . . . . . . . . . . . . . . . . . . . . 89
Time Stamping Snapshots . . . . . . . . . . . . . . . . . . . . . . . . . .(Date Stamp) . . 90
Setting the Camera’s Clock . . . . . . . . . . . . . . . . . . . . . . . . . . . . . (Adjust) . . 90
Specifying the Date Format . . . . . . . . . . . . . . . . . . . . . . . . . . . . . . . . . . . . . 91
Specifying the Display Language . . . . . . . . . . . . . . . . . . . . . . (Language) . . 91
Configuring Sleep State Settings . . . . . . . . . . . . . . . . . . . . . . (LCD Save) . . 92
Configuring Auto Power Settings . . . . . . . . . . . . . . . . . . . (Power Saving) . . 92
Configuring [ ] and [ ] Settings . . . . . . . . . . . . . . . . . . . . (REC/PLAY) . . 93
Disabling File Deletion . . . . . . . . . . . . . . . . . . . . . . . . . . . . . ( Disable) . . 93
Configuring USB Protocol Settings . . . . . . . . . . . . . . . . . . . . . . . . . (USB) . . 94
Selecting the Screen Aspect Ratio and Video Output System . . (TV Out) . . 94
Formatting Built-in Memory or a Memory Card . . . . . . . . . . . . . . (Format) . . 95
Resetting the Camera to Factory Defaults . . . . . . . . . . . . . . . . . . (Reset) . . 95
• Appendix 96
Precautions during Use . . . . . . . . . . . . . . . . . . . . . . . . . . . . . . . . . . . . . . . . 96
Using a Memory Card . . . . . . . . . . . . . . . . . . . . . . . . . . . . . . . . . . . . . . . . . 101
• To replace the memory card . . . . . . . . . . . . . . . . . . . . . . . . . . . . . . . . . . . . . . 101
Reset Initial Default Settings . . . . . . . . . . . . . . . . . . . . . . . . . . . . . . . . . . . . 103
When things don’t go right... . . . . . . . . . . . . . . . . . . . . . . . . . . . . . . . . . . . . 105
• Troubleshooting . . . . . . . . . . . . . . . . . . . . . . . . . . . . . . . . . . . . . . . . . . . . . . . . 105
• Display Messages . . . . . . . . . . . . . . . . . . . . . . . . . . . . . . . . . . . . . . . . . . . . . . 110
Specifications . . . . . . . . . . . . . . . . . . . . . . . . . . . . . . . . . . . . . . . . . . . . . . . 112
8
As you unpack your camera, check to make sure that all items shown below are
included. If anything is missing, contact your original retailer.
Unpacking
Digital camera
Rechargeable lithium ion
battery
USB adapter
Strap USB cable
Quick Start Guide
9
The numbers in parentheses indicate the pages where each item is explained.
• Camera
General Guide
42135
67
[ ]
[
SET
]
[ ]
[ ]
[ ]
bk9 bl bm bn8
bqbr bp bobs
1 Zoom controller
(pages 27, 44, 55, 62)
2 Shutter button (page 27)
3 Flash (page 37)
4 [ON/OFF] (Power)
(page 25)
5 Front lamp (page 39)
6 Lens
7 Microphone
(pages 47, 72)
8 [ ] (REC) button
(pages 25, 27)
9Back lamp
(pages 16, 18, 25, 37)
10 [ ] (Video) button
(page 46)
11 Strap hole
12 [USB/AV] port
13 Connector cover
14 [SET] button (page 33)
15 [ ] (Delete) button
(page30)
16 [ ] (PLAY) button
(pages 25,29)
17 Control button
([ ][ ][ ][ ])
(pages12,30, 33, 37,
52)
18 Monitor screen
(pages10,12)
Back
19 Battery/memory card slots (pages 15, 23, 104, 107)
20 Tripod hole
Use this hole when attaching to a tripod.
21 Speaker
Front
btckcl
Bottom
10
The monitor screen uses various indicators, icons, and values to keep you informed
of the camera’s status.
• The sample screens in this section are intended to show you the locations of all the
indicators and figures that can appear on the monitor screen in various modes.
They do not represent screens that actually appear on the camera.
• Photo Recording
• Shutter Button Half-pressed
Monitor Screen Contents
1 Remaining photo memory capacity
2 Remaining video memory capacity (page 46)
3 Recording mode (page 27)
4 White balance setting (page62)
5 Burst (page 57)
6 Image deterioration indicator (page 45)
7 Photo image size (page 34)
8 Photo image quality (page 61)
9 Video image quality (page 36)
10Flash (page 37)
11Self-timer (page 39)
12Face Tracking (
page 40)
13D-
Lighting (page 63)
14ISO sensitivity (page 63)
15Date/time (page 91)
16EV Compensation (page 61)
17Focus frame (pages 28, 58)
18Date Stamp indicator (page 90)
19Battery level indicator (page 20)
20Stabilizer indicator (page 57)
21Focus Mode (page 54)
1 Recording mode (page 27)
2 Flash (page 37)
3 Stabilizer indicator (page 57)
4 Focus frame (pages 28, 57)
9
bk
bl
bm
bp
834165
bs
2
bq
ck
bt
br
cl
7
bn
bo
3
4
1
2
11
• Simple Mode
• Movie Recording
• Snapshot Viewing
1 Remaining photo memory capacity
2 Photo size (page 34)
3 Flash (page 37)
4 Self-timer (page 39)
5 D-Lighting (page 63)
6 Date/time (page 90)
7 Date Stamp indicator (page 90)
8 Battery level indicator (page20)
9 Focus frame (pages 28, 58)
10Remaining video memory capacity (page 50)
11 Video image quality (page 36)
1 Recording mode (page 46)
2 Remaining video memory capacity (page 46)
3 Video recording time (page 46)
4 EV value (page 61)
5 Battery level indicator (page 20)
6 Video recording indicator (page 46)
1 File type
2 Protect indicator (page 72)
3 Folder name/file name (page
86
)
4 Photo image quality (page 61)
5 Photo image size (page 34)
6 ISO sensitivity (page 6
3)
7 Aperture value
8
Shutter speed
9 Date/time (page 90)
10Battery level indicator (page20)
1
2
3
6
7
8
9
bk
bl
4
5
1
2
5
6
3
4
1 3
4
5
6
7
8
9
2
bk
12
• Movie Playback
You can turn display information on and off by pressing [ ] (DISP). You can
configure separate settings for the REC mode and PLAY mode.
1 File type
2 Folder name/file name (page 86)
3 Video recording time (page 46)
4 Video image quality (page 36)
5 Date/time (page 90)
6 Battery level indicator (page 20)
Configuring Monitor Screen Settings
Information display on
Displays information about photo settings, etc. (REC
mode only).
Information display +
Date/Time on
In addition to information about photo settings,
displays video setting information and the date/time
screen.
• You can specify the date format you want to use
(page 91).
Information display off No information displayed
2
1
3
4
5
6
13
Quick Start Basics
What is a digital camera?
Delete
A digital camera stores photos on a memory card, so you can record and
delete photots a countless number of times.
Play
Record
You can use the photos you record in a variety of different ways.
Store photos on your
computer.
Print photos Attach photots to e-mail.
14
Your camera is packed with a powerful selection of features and functions to make
recording of digital photos easier, including the following three main functions.
What you can do with your camera
Scene Mode
Simply select the sample scene you want and the
camera sets up automatically. Then all you need
to do is press the shutter button for great photos.
Silent
The Silent mode disables flash, mutes camera
operation tones, and changes other settings to
help ensure that operation does not bother others
around you.
See page
41
for more information.
See page
50 for more information.
See page
40 for more information.
Face Tracking
Point the camera at a person and it automatically
detects the person’s face for beautiful portrait.
15
Note that the battery of a newly purchased camera is not fully charged. Perform the steps
below to load the battery into the camera and charge it.
• Use only the provided battery or type of battery and charger that came with your
camera. Using other types of battery or charger may damage the equipment and
invalidate the warranty.
1. Open the battery cover.
Slide the battery cover slider towards
OPEN and then open it as indicated by
the arrows in the illustration.
2. Load the battery.
Insert the battery into the
compartment with the terminal
facing inside the camera with
correct orientation as shown.
Press the battery in until the
stopper secures it in place.
3. Close the battery cover.
Close the battery cover and then shift the
slider towards LOCK.
• For information about how to replace
the battery, see page 3.
First, charge the battery prior to use.
To load the battery
2
1
Stopper
1
2
16
You can use either of the two following methods to charge the camera’s battery.
• USB adapter
• USB connection to a computer
• To charge with the USB adapter
1. Power off the camera.
Check to make sure that the camera’s monitor screen is
blank. If it isn’t, press [ON/OFF] (Power) to turn off the
camera.
2. Connect the camera with the USB cable as shown.
3. Connect the other end with the USB
adapter and plug it into a power outlet
or with the USB port of PC directly for
charging.
Back Lamp Operation
4. After charging is complete, disconnect the USB cable from the camera
and then unplug the power cord from the power outlet.
Charge the Battery
Lamp Status Description
Lit Red Charging
Flashing Red
Abnormal ambient temperature,
USB adaptor problem, or battery
problem (page 3)
Off Charging complete
[ON/OFF] (Power)
Back lamp
17
• To charge using a USB connection to a computer
The battery loaded in the camera is charged whenever the camera is connected
directly to a computer with the USB cable.
• Depending on the setup of your computer, you may not be able to charge the
camera’s battery over a USB connection. If this happens, use of the USB adapter
that comes with the camera is recommended.
1. Power off the camera.
Check to make sure that the camera’s monitor
screen is blank. If it isn’t, press [ON/OFF]
(Power) to turn off the camera.
IMPORTANT!
• The first time you connect the camera to your computer with the USB cable, an
error message may appear on your computer. If this happens, disconnect and then
reconnect the USB cable.
Monitor screen
[ON/OFF] (Power)
18
2. With your computer
turned on, connect the
camera to it.
The back lamp should light
red, indicating that charging
has started.
The back lamp will go out
when charging is complete.
It takes about 130 minutes to
achieve a full charge.
Charging may take longer
depending on charging
conditions.
Back Lamp Operation
3. After charging is complete, disconnect the USB cable from the camera
and then from the computer.
Lamp Status Description
Lit Red Charging
Flashing Red
Abnormal ambient temperature,
charging taking abnormally long,
or battery problem (page 3)
Off Charging complete
USB port
USB cable
(included with camera)
[USB/AV] port
Large connector
Small connector
Making sure that the mark on the USB cable
connector is towards the lens side, connect the
cable to the camera.
Back lamp
19
NOT
E
• Even if you power on the camera, the battery will continue to charge if there is a USB
connection with a computer. In this case, however, back lamp operation will
change as described below.
Back Lamp Operation
IMPORTANT!
• Charging is not performed while the connected computer is in the hibernate mode.
• When charging the camera by connecting it to a computer, you may need to replug
the USB cable if rebooting the computer.
• A charging error can occur immediately after charging begins or some time after
charging begins. A charging error is indicated by the back lamp flashing red.
Other Charging Precautions
• Never use any other type of charger device. Attempting to use a different charger
can result in unexpected accident.
• A battery that is still warm due to normal use may not charge fully. Give the battery
time to cool before charging it.
• A battery discharges slightly even when it is not loaded in the camera. Because of
this, it is recommended that you charge the battery immediately before you need to
use it.
• Charging the camera’s battery may cause interference with TV and radio reception.
If this happens, plug the charger into an outlet that is further away from the TV or
radio.
• Actual charging time depends on current battery capacity and charging conditions.
• Do not use the USB adapter with any other device.
Lamp Status Description
Lit/Flashing Amber Charging
Flashing Red
Abnormal ambient temperature, charging taking
abnormally long, or battery problem (page 101)
Lit Green Charging complete
  • Page 1 1
  • Page 2 2
  • Page 3 3
  • Page 4 4
  • Page 5 5
  • Page 6 6
  • Page 7 7
  • Page 8 8
  • Page 9 9
  • Page 10 10
  • Page 11 11
  • Page 12 12
  • Page 13 13
  • Page 14 14
  • Page 15 15
  • Page 16 16
  • Page 17 17
  • Page 18 18
  • Page 19 19
  • Page 20 20
  • Page 21 21
  • Page 22 22
  • Page 23 23
  • Page 24 24
  • Page 25 25
  • Page 26 26
  • Page 27 27
  • Page 28 28
  • Page 29 29
  • Page 30 30
  • Page 31 31
  • Page 32 32
  • Page 33 33
  • Page 34 34
  • Page 35 35
  • Page 36 36
  • Page 37 37
  • Page 38 38
  • Page 39 39
  • Page 40 40
  • Page 41 41
  • Page 42 42
  • Page 43 43
  • Page 44 44
  • Page 45 45
  • Page 46 46
  • Page 47 47
  • Page 48 48
  • Page 49 49
  • Page 50 50
  • Page 51 51
  • Page 52 52
  • Page 53 53
  • Page 54 54
  • Page 55 55
  • Page 56 56
  • Page 57 57
  • Page 58 58
  • Page 59 59
  • Page 60 60
  • Page 61 61
  • Page 62 62
  • Page 63 63
  • Page 64 64
  • Page 65 65
  • Page 66 66
  • Page 67 67
  • Page 68 68
  • Page 69 69
  • Page 70 70
  • Page 71 71
  • Page 72 72
  • Page 73 73
  • Page 74 74
  • Page 75 75
  • Page 76 76
  • Page 77 77
  • Page 78 78
  • Page 79 79
  • Page 80 80
  • Page 81 81
  • Page 82 82
  • Page 83 83
  • Page 84 84
  • Page 85 85
  • Page 86 86
  • Page 87 87
  • Page 88 88
  • Page 89 89
  • Page 90 90
  • Page 91 91
  • Page 92 92
  • Page 93 93
  • Page 94 94
  • Page 95 95
  • Page 96 96
  • Page 97 97
  • Page 98 98
  • Page 99 99
  • Page 100 100
  • Page 101 101
  • Page 102 102
  • Page 103 103
  • Page 104 104
  • Page 105 105
  • Page 106 106
  • Page 107 107
  • Page 108 108
  • Page 109 109
  • Page 110 110
  • Page 111 111
  • Page 112 112
  • Page 113 113
  • Page 114 114

HP P550 User manual

Category
Camcorders
Type
User manual
This manual is also suitable for

Ask a question and I''ll find the answer in the document

Finding information in a document is now easier with AI