Harbor Freight Tools 93781 User manual
- Category
- Car battery chargers
- Type
- User manual

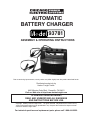
ASSEMBLY & OPERATING INSTRUCTIONS
AUTOMATIC
BATTERY CHARGER
93781
3491 Mission Oaks Blvd., Camarillo, CA 93011
Visit our Web site at http://www.harborfreight.com
'LVWULEXWHGH[FOXVLYHO\E\
+DUERU)UHLJKW7RROV
Copyright
©
2005 by Harbor Freight Tools
®
. All rights reserved. No portion of this manual or any
artwork contained herein may be reproduced in any shape or form without the express written
consent of Harbor Freight Tools.
For technical questions and replacement parts, please call 1-800-444-3353.
TO PREVENT SERIOUS INJURY,
READ AND UNDERSTAND ALL WARNINGS
AND INSTRUCTIONS BEFORE USE.
Due to continuing improvements, actual product may differ slightly from the product described herein.

SKU 93781 For technical questions please call 1-800-444-3353. Page 2
THANK YOU for choosing a HARBOR FREIGHT TOOLS product. For future reference, please
complete the owner’s record below:
Model______________ Serial No.____________ Purchase Date_______________
SAVE THE RECEIPT, WARRANTY AND THESE INSTRUCTIONS. It is important that you read the
entire manual to become familiar with the unit BEFORE you begin assembly.
Technical Specifications
Input Voltage: 115V
Output Voltage: 13.5V
Charging Current: 1.1 Amps
Battery Cables: 6 Foot long
Overall Dimensions: 3-1/2” W X 6-5/8” L X 7” H
Power Cord: 18 Gauge X 2 Wire UL
®
listed
Net Weight: 2.5 Lbs.
Automatic charging: Battery Charger will not overcharge.
Multiple LED indicator lights: Red LED (on left) = reversed polarity,
Red LED (center) = “charging” mode,
Green LED (on right) = fully charged – trickle charge mode.
For best results, the capacity of the battery should be below 24 Ah.
Safety Warnings and Precautions
WARNING: When using product, basic safety precautions should always be followed to
reduce the risk of personal injury and damage to equipment.
Read all instructions before using this product!
WORK AREA
1. Keep your work area clean and well lit. Cluttered benches and dark areas invite
accidents.
2. Do not operate the Battery Charger in explosive atmospheres, such as in the
presence of flammable liquids, gases, or dust. Electrical products create sparks which
may ignite the dust or fumes.
3. Keep bystanders, children, and visitors away while operating the Battery Charger.
Distractions can cause you to lose control. Protect others in the work area from sparks.
Provide barriers or shields as needed.
ELECTRICAL SAFETY
4. Grounded products must be plugged into an outlet properly installed and grounded in
accordance with all codes and ordinances. Never remove the grounding prong or
modify the plug in any way. Do not use any adapter plugs. Check with a qualified
electrician if you are in doubt as to whether the outlet is properly grounded. If a
grounded product should electrically malfunction or break down, grounding provides a low
resistance path to carry electricity away from the user.

SKU 93781 For technical questions please call 1-800-444-3353. Page 3
5. Double insulated products are equipped with a polarized plug (one blade is wider
than the other). This plug will fit in a polarized outlet only one way. If the plug does
not fit fully in the outlet, reverse the plug. If it still does not fit, contact a qualified
electrician to install a polarized outlet. Do not change the plug in any way.
Double insulation eliminates the need for the three wire grounded power cord and
grounded power supply system.
6. Avoid body contact with grounded surfaces such as pipes, radiators, ranges, and
refrigerators. There is an increased risk of electric shock if your body is grounded.
7. Do not abuse the Power Cord. Never use the Power Cord to carry the Battery Charger
or pull the Plug from an outlet. Keep the Power Cord away from heat, oil, sharp
edges, or moving parts. Replace damaged Power Cords immediately. Damaged Power
Cords increase the risk of electric shock.
8. When operating a power tool outside, use an outdoor extension cord marked “W-A”
or “W”. These extension cords are rated for outdoor use, and reduce the risk of electric
shock.
PERSONAL SAFETY
9. Stay alert. Watch what you are doing, and use common sense when operating the
Battery Charger. Do not operate the Battery Charger while tired or under the
influence of drugs, alcohol, or medication.
10. Dress properly. Do not wear loose clothing or jewelry. Contain long hair. Keep your
hair and clothing away from the Battery Charger. Loose clothes, jewelry, or long hair can
be caught in the Battery Charger, causing personal injury.
11. Use safety equipment. Always wear eye protection during assembly, use, and mainte-
nance.
TOOL USE AND CARE
12. Do not overload the Battery Charger. Use the correct Battery Charger for your
application. The Battery Charger will do the job better and safer at the speed and capacity
for which it is designed.
13. Disconnect the Power Cord Plug from the power source before making any
adjustments, changing accessories, or storing the Battery Charger. Such
preventive safety measures reduce the risk of turning on the product accidentally.
14. Store idle tools out of reach of children and other untrained persons. The Battery
Charger is dangerous in the hands of untrained users.
15. Maintain the Battery Charger with care. Do not use a damaged Battery Charger. Tag
damaged Battery Charger “Do not use” until repaired.
SERVICE
16. Battery Charger service must be performed only by qualified repair personnel.
Service or maintenance performed by unqualified personnel could result in a risk of injury.

SKU 93781 For technical questions please call 1-800-444-3353. Page 4
SERVICE (Cont’d)
17. When servicing the Battery Charger, use only identical replacement parts. Use of
unauthorized parts or failure to follow maintenance instructions may create a risk of electric
shock or injury.
18. Always unplug the Battery Charger from its electrical outlet before performing any
inspection, maintenance, or cleaning procedures.
19. WARNING! People with pacemakers should consult their physician(s) before
using this product. Operation of electrical equipment in close proximity to a heart
pacemaker could cause interference or failure of the pacemaker.
20. Do not expose the Battery Charger equipment to rain or wet conditions. Water
entering electrically powered equipment will increase the risk of electric shock.
GROUNDING
WARNING!
Improperly connecting the grounding wire can result in the risk of electric shock. Check
with a qualified electrician if you are in doubt as to whether the outlet is properly grounded.
Do not modify the power cord plug provided with the Battery Charger. Never remove the
grounding prong from the plug. Do not use the Battery Charger if the power cord or plug is
damaged. If damaged, have it repaired by a service facility before use. If the plug will not fit
the outlet, have a proper outlet installed by a qualified electrician.
GROUNDED TOOLS: TOOLS WITH THREE PRONG PLUGS
1. Tools marked with “Grounding Required” have a three wire cord and three prong grounding
plug. The plug must be connected to a properly grounded outlet. If the Battery Charger
should electrically malfunction or break down, grounding provides a low resistance path to
carry electricity away from the user, reducing the risk of electric shock. (See Figure A.)
2. The grounding prong in the plug is connected through the green wire inside the cord to the
grounding system in the tool. The green wire in the cord must be the only wire connected to
the Battery Charger’s grounding system and must never be attached to an electrically “live”
terminal. (See Figure A.)
3. A grounded appliance must be plugged into an appropriate outlet, properly installed and
grounded in accordance with all codes and ordinances. The plug and outlet should look like
those in the following illustration. (See Figure A.)
Figure A

SKU 93781 For technical questions please call 1-800-444-3353. Page 5
DOUBLE INSULATED APPLIANCES: APPLIANCES WITH TWO PRONG PLUGS
Note: The Battery Charger has a Two Prong Plug.
1. Appliances marked “Double Insulated” do not require grounding. They have a special double
insulation system which satisfies OSHA requirements and complies with the applicable
standards of Underwriters Laboratories, Inc., the Canadian Standard Association, and the
National Electrical Code. (See Figure B.)
2. Double insulated tools may be used in either of the 120 volt outlets shown in the following
illustration. (See Figure B.)
Figure B
EXTENSION CORDS
1. Grounded appliances require a three wire extension cord. Double Insulated products can
use either a two or three wire extension cord.
2. As the distance from the supply outlet increases, you must use a heavier gauge extension
cord. Using extension cords with inadequately sized wire causes a serious drop in voltage,
resulting in loss of power and possible tool damage. (See Figure C, next page.)
3. The smaller the gauge number of the wire, the greater the capacity of the cord. For
example, a 14 gauge cord can carry a higher current than a 16 gauge cord. (See Figure C.)
4. When using more than one extension cord to make up the total length, make sure each cord
contains at least the minimum wire size required. (See Figure C.)
5. If you are using one extension cord for more than one tool, add the nameplate amperes and
use the sum to determine the required minimum cord size. (See Figure C.)
6. If you are using an extension cord outdoors, make sure it is marked with the suffix “W-A”
(“W” in Canada) to indicate it is acceptable for outdoor use.
7. Make sure your extension cord is properly wired and in good electrical condition. Always
replace a damaged extension cord or have it repaired by a qualified electrician before using
it.
8. Protect your extension cords from sharp objects, excessive heat, and damp or wet areas.

SKU 93781 For technical questions please call 1-800-444-3353. Page 6
Specific Safety Rules for the Battery Charger
1. Maintain labels and nameplates on the Battery Charger. These carry important
information. If the labels are unreadable or missing, contact Harbor Freight Tools for
replacement.
2. Always place the Battery Charger on a dry, flat, level, sturdy nonflammable work
surface capable of supporting the weight of the Battery Charger. Make sure to place
the Battery Charger in a location that is out of reach of children.
3. The Battery Charger is not a toy and should not be used by children.
WARNING! Risk of explosive gases:
1. Working in the vicinity of lead-acid batteries is dangerous. Batteries generate
explosive gases during normal battery operation. For this reason, it is of utmost
importance that each time before using this Battery Charger you read and under-
stand all safety warnings and precautions as outlined in this manual and those
manuals published by the battery and vehicle manufacturers and manufacturers
of any equipment you intend to use in the vicinity of the battery.
Personal Precautions:
1. ALWAYS wear ANSI approved safety impact eye goggles when working with lead-acid
batteries.
2. Make sure someone is within range of your voice and close enough to come to
your aid when you work near a lead-acid battery.
RECOMMENDED MINIMUM WIRE GAUGE FOR EXTENSION CORDS*
NAMEPLATE
AMPERES
(At Full Load)
EXTENSION CORD LENGTH
25 Feet 50 Feet 75 Feet 100 Feet 150 Feet
0 - 2.0 18 18 18 18 16
2.1 - 3.4 18 18 18 16 14
3.5 - 5.0 18 18 16 14 12
5.1 - 7.0 18 16 14 12 12

SKU 93781 For technical questions please call 1-800-444-3353. Page 7
3. Keep plenty of fresh water and soap nearby in case battery acid contacts skin,
clothing, or eyes. Avoid touching eyes while working near a lead-acid battery. If battery
acid contacts skin or clothing, wash immediately with soap and water. If acid enters the
eyes, immediately flood eyes with running cold water for at least 10 minutes and get medical
attention immediately.
4. NEVER smoke or allow a spark or flame in the vicinity of a lead-acid battery or vehicle
engine.
5. Use caution to reduce the risk of dropping a metal tool onto a lead-acid battery. The
tool may spark or short circuit the battery or other electrical part that may cause an
explosion.
6. Remove personal metal items such as rings, bracelets, necklaces, and watches when
working with a lead-acid battery. A lead-acid battery can produce a short circuit current
high enough to weld a ring or other metal item, causing a severe burn.
7. Use the Battery Charger for charging lead-acid batteries only. This Battery Charger is
not intended to supply power to a low voltage electrical system other than in a starter motor
application. Do not use this Battery Charger for charging dry-cell batteries. Dry-cell
batteries may burst and cause serious personal injury and/or property damage. NEVER
charge a frozen battery.
Preparing To Charge:
1. If it is necessary to remove the battery from a vehicle to charge, always remove the
grounded terminal from the battery first. Make sure all accessories in the vehicle are off,
so as not to cause an arc.
2. Make sure the area around the battery is well ventilated while the battery is being
charged.
3. Clean the battery terminals prior to charging the battery.
4. Add distilled water in each cell until the battery acid reaches the level specified by the
battery manufacturer. This helps purge excessive gas from the cells. Do not overfill. For
a battery without cell caps, carefully follow the battery manufacturer’s recharging instruc
tions.
5. Determine the voltage of the battery by referring to the vehicle owner’s manual, con-
firm it is 12 volt.
Charger Location:
1. Always locate the Battery Charger as far away from the battery as the Charger’s DC
cables permit.
2. Never place the Battery Charger directly above the battery being charged. Gases from
the battery will corrode and damage the Battery Charger.
3. Never allow battery acid to drip on the Battery Charger.

SKU 93781 For technical questions please call 1-800-444-3353. Page 8
4. Do not operate the Battery Charger in a closed-in area, or restrict ventilation in any
way.
5. Do not set a battery on top of the Battery Charger.
DC Connection Precautions:
1. Connect and disconnect DC output clamps only after removing the AC power cord
from the electrical outlet.
2. Never allow the DC output clamps to touch each other.
3. Attach the DC output clamps to the battery posts and twist or rock the clamps back
and forth several times to make a good connection. This helps keep the clamps from
slipping off the terminals, and helps to reduce the risk of sparking.
To Reduce Risk Of Sparking - When The Battery Is In The Vehicle:
1. Carefully position the AC input and DC output cords to reduce the risk of damage by
hood, door, or moving engine parts.
2. Stay clear of fan blades, belts, pulleys, and other moving parts that can cause
personal injury and/or property damage.
3. Check the polarity of the battery posts. A POSITIVE (+) battery post usually has a
larger diameter than a NEGATIVE (–) battery post.
4. To reduce explosion risk, never connect both Battery Charger DC output clamps
directly to the battery.
Symbology

SKU 93781 For technical questions please call 1-800-444-3353. Page 9
WARNING! The warnings, precautions, and instructions discussed in this manual cannot
cover all possible conditions and situations that may occur. The operator must understand
that common sense and caution are factors which cannot be built into this product, but
must be supplied by the operator.
Unpacking
When unpacking the Automatic Battery Charger, check to make sure parts on page 11 are included.
If any parts are missing or broken, please call HARBOR FREIGHT TOOLS at 1-800-444-3353.
Operation
1. Determine which post of the battery is grounded (connected) to the chassis of the
vehicle.
If the NEGATIVE (–) post is grounded to the chassis (as in most vehicles), attach the
POSITIVE (+) DC output clamp to the POSITIVE (+) battery post and connect the NEGATIVE
(–) DC output clamp to a clean, thick, metal area on the vehicle chassis or engine block away
from the battery. Do not connect the NEGATIVE (–) DC output clamp to the carburetor, fuel
lines, or thin sheet metal body parts.
If the POSITIVE (+) post is grounded to the chassis, attach the NEGATIVE (–) DC output clamp
to the NEGATIVE (–) battery post and connect the POSITIVE (+) DC output clamp to a clean,
thick, metal area on the vehicle chassis or engine block away from the battery. Do not connect
the POSITIVE (+) DC output clamp to the carburetor, fuel lines, or thin sheet metal body parts.
2. When disconnecting the Battery Charge from the battery, turn all switches of the
Battery Charger to their “OFF” position. Unplug the AC input power cord from its
electrical outlet. Remove the DC output clamp from the vehicle chassis. Then, remove the
DC output clamp from the battery.
To Reduce Risk Of Sparking - When The Battery Is Outside The Vehicle:
1. Check the polarity of the battery posts. A POSITIVE (+) battery post usually has a
larger diameter than a NEGATIVE (–) battery post.
2. Attach at least a 24 inch long, 6 gauge (AWG), insulated battery cable to the
NEGATIVE (–) battery post-see Figure A below.
3. Connect the POSITIVE (+) DC output clamp to the POSITIVE (+) post of the battery.
4. Position yourself and the free end of the 24 inch long, 6 gauge (AWG), insulated
battery cable as far away from the battery as possible. Connect the NEGATIVE (–) DC
output clamp to the free end of the cable. Do not face the battery when making this final
connection. (See Figure A.)
FIGURE A
NEGATIVE (--)
DC OUTPUT CLAMP
POSITIVE (+)
DC OUTPUT CLAMP
24 INCH, 6 GAUGE BATTERY CABLE
(NOT INCLUDED)

SKU 93781 For technical questions please call 1-800-444-3353. Page 10
Note: The monitoring voltage of the Battery Charger is 10.5V; if the voltage is below 10.5V, the
Battery Charger will not work. A battery must be properly connected to the charger to
allow it to work. For best results, the capacity of the battery should be below 24 Ah.
Operation (cont’d)
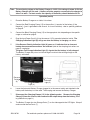
1. Place the Battery Charger on a stable, flat surface.
2. Connect the Red Charging Clamp (15) to the positive (+) terminal of the battery (if the
Negative [–] post is grounded to the chassis, as in most vehicles) -refer to specific guidelines
on page 9.
3. Connect the Black Charging Clamp (15) to the appropriate site, depending on the specific
usage as outlined on page 9.
4. Plug the Input Power Cord (14) into the nearest 115V, grounded, electrical outlet. The
Charging Indication Light (B) will go on when the battery is charging-see below.
5. If the Reverse Polarity Indication Light (A) goes on, it indicates that an incorrect
hookup has occurred/connections are reversed (refer to the clamping instructions on
page 9)- see below.
The green Full Charge Indication Light (C) signals that the battery is fully charged.
The Battery Charger will put out a trickle charge to maintain the existing charge on the
battery -see below.
6. Leave the Automatic Battery Charger plugged in to the nearest outlet and attached to the
battery until the battery is to be used. Then unplug and remove the Battery Charger.
7. Disconnect the Charging Clamps (15) in the following order: Remove the Charging
Clamp (15) from the chassis, then remove the DC output clamp from the battery. (Refer
to guidelines on page 9.)
8. The Battery Charger has two Storage Posts (7) on the side opposite the LED lights. Wrap all
cords around the two Posts (7).
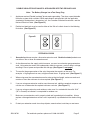
Charging Indication
Light (4)
Reverse
Polarity
(3)
Full Charge
Indication
Light (5)
3
4
5

SKU 93781 For technical questions please call 1-800-444-3353. Page 11
Inspection, Maintenance and Cleaning
1. Before each use inspect the general condition of the Battery Charger. Check for cracked or
broken parts, damaged power cords, clamps, and any other condition that may affect the safe
operation of the Battery Charger.
2. With a dry cloth, remove any oil and residue from the Battery Charger after each use. Do not
clean with flammable or corrosive liquids.
3. Store in a secure, safe and dry location. Store in a location that can be locked and that is out of
the reach of children.

SKU 93781 For technical questions please call 1-800-444-3353. Page 12
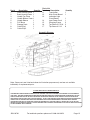
Parts List
Assembly Diagram
Note: Some parts are listed and shown for illustration purposes only and are not available
individually as replacement parts.
PLEASE READ THE FOLLOWING CAREFULLY
THE MANUFACTURER AND/OR DISTRIBUTOR HAS PROVIDED THE PARTS DIAGRAM IN THIS MANUAL AS A REFERENCE
TOOL ONLY. NEITHER THE MANUFACTURER NOR DISTRIBUTOR MAKES ANY REPRESENTATION OR WARRANTY OF ANY
KIND TO THE BUYER THAT HE OR SHE IS QUALIFIED TO MAKE ANY REPAIRS TO THE PRODUCT OR THAT HE OR SHE IS
QUALIFIED TO REPLACE ANY PARTS OF THE PRODUCT. IN FACT, THE MANUFACTURER AND/OR DISTRIBUTOR EXPRESSLY
STATES THAT ALL REPAIRS AND PARTS REPLACEMENTS SHOULD BE UNDERTAKEN BY CERTIFIED AND LICENSED
TECHNICIANS AND NOT BY THE BUYER. THE BUYER ASSUMES ALL RISK AND LIABILITY ARISING OUT OF HIS OR HER
REPAIRS TO THE ORIGINAL PRODUCT OR REPLACEMENT PARTS THERETO, OR ARISING OUT OF HIS OR HER INSTALLATION
OF REPLACEMENT PARTS THERETO.
Part # Description Quantity Part # Description Quantity
1 Front Housing Cover 1 11 Transformer 1
2 Back Housing Cover 1 12 Main Circuit Board 1
3 Handle Top Cover 1 13 Indication Light
4 Handle Bottom Cover 1 Circuit Board 1
5 Handle Sleeve 1 14 Input Power Cord 1
6 PVC Base 1 15 Charging Clamp 2
7 Storage Posts 2 16 Tap Screw 2.5 X 10 2
8 Cable Clip 1 1 17 Tap Screw 3 X 12 9
9 Cable Clip 2 1
-
 1
1
-
 2
2
-
 3
3
-
 4
4
-
 5
5
-
 6
6
-
 7
7
-
 8
8
-
 9
9
-
 10
10
-
 11
11
-
 12
12


Harbor Freight Tools 93781 User manual
- Category
- Car battery chargers
- Type
- User manual
Ask a question and I''ll find the answer in the document
Finding information in a document is now easier with AI
Related papers
-
Harbor Freight Tools 98475 User manual
-
-
Chicago Electric 66783 User manual
-
-
-
-
-
-
-
Other documents
-
-
ANSMANN ALCS 2-24 A User manual
-
 VBENLEM 24'' Built-in Stainless Steel Beverage Cooler 5.5 cu.ft. Soda & Beer Small Reversible Door Refrigerator 142 Can Fridge for Home Bar Office Commercial Indoor Outdoor Use (150L,Silver) User manual
-
-
-
-
Total TBC1601 Owner's manual
-
CEN-TECH 60581 Owner's manual
-
 Centech 69368 Owner's manual
-

