Page is loading ...

113362-2-EA (9532)
Copyright 1995 Kohler Co.
SAN RAPHAEL
PRESSURE LITE
VITREOUS CHINA
SIPHON JET TOILET
BEFORE YOU BEGIN
HOW TO USE THESE INSTRUCTIONS
Please read these instructions carefully to familiarize
yourself with the required tools, materials, and installation
sequences. Follow the sections that pertain to your
particular installation. This will help you avoid costly
mistakes. In addition to proper installation, read all
operating and safety instructions.
All information in this manual is based on the latest
product information available at the time of
publication. Kohler Co. reserves the right to make
changes in product characteristics, packaging, or
availability at any time without notice.
These instructions contain important care, cleaning, and
warranty information – please leave for the consumer
INSTALLER HAZARD NOTIFICATION
WARNING: Risk of injury or water damage.
Contents of reservoir under pressure can cause
severe injury. Do not open or service before reading
installation instructions or service instructions. Turn
off water supply and flush unit to release pressure
before attempting any service.
CAUTION: Risk of product damage. Do not use
any oils or lubricants on the Pressure Lite system.
CAUTION: Risk of product damage. The fittings
in this toilet require no adjustment. The fittings in this
toilet are preset. Any adjustment or modifications of
the product are not normal usage and void the
warranty.
WARNING: Risk of injury or product damage.
Handle vitreous china products very carefully.
Vitreous china can break and chip if you overtighten
bolts and nuts.
NOTICE:
Follow all
local plumbing and electrical codes.
PRODUCT PROPERTIES
Vitreous china siphon jet toilet.
Pressure Lite
system.
Water depth from rim is 5-3/4”.
2-1/4” passageway.
For roughing-in and overall dimensions, See
Fig. #3 .
Fixture dimensions are nominal and conform to
tolerances by ANSI/ASME standards
(A112.19.2).
PRODUCT REQUIREMENTS
The supply stop must be 2-5/8” above floor-line and
7-3/4” left of the closet flange centerline.
Since all toilets do not have the same supply
rough-in, you may have to change the location of
the supply stop to install this toilet.
Closet flange must be 12” on-center from wall.
Seat post holes are on 5-1/2” centers.
For most satisfactory operation, the toilet requires
20 p.s.i. static pressure at the supply stop.
Maximum static pressure is not to exceed 80 p.s.i.
ORDERING INFORMATION
Toilet K-3394. . . . . . . . . . . . . . . . . . . . . . . . . . . . . . . . . . . . .
When specified:
3/8” supply K-7637. . . . . . . . . . . . . . . . . . . . . . . . . . . . .
Floor bolts 21401. . . . . . . . . . . . . . . . . . . . . . . . . . . . . .
NOTE: For service parts ordering information, see the
separate Service Parts document enclosed with the product.

2
113362-2-EA (9532)
Kohler Co., Kohler, WI
MATERIALS REQUIRED
Supply stop (3/8” recommended)
Closet flange
Toilet gasket (wax seal)
Toilet T-bolts 1/2” or 5/16” diameter (2 required)
Toilet supply tubing
TOOLS REQUIRED
10” adjustable wrench
12” pipe wrench
Tubing cutter
Hacksaw
Level
Putty knife
Metal file
Tape measure
Screwdriver
NOTE: Site preparation may require additional tools.
SITE PREPARATION
REMOVE EXISTING TOILET
NOTICE: Carefully inspect the new fixture for any
sign of damage before removing the existing toilet.
If any damage to the vitreous china or Pressure Lite
system components is discovered, stop the installation
and call your dealer for assistance.
Inspect the complete toilet to ensure that the:
Components and outlet manifold are attached
securely.
Trip lever and piston actuation arm move freely.
Reservoir is securely mounted.
Vitreous china is not damaged.
Turn off the water supply.
Flush the toilet, and sponge out the remaining water from
the tank and bowl.
Disconnect the supply stop, and remove the existing tank
and bowl.
Remove the old gasket from the floor and closet flange
with a putty knife.
Remove the old T-bolts (the T-shaped bolts in the closet
flange) and discard.
NOTICE:
Fig. #1
Closet Flange

3Kohler Co., Kohler, WI
113362-2-EA (9532)
ROUGH-IN PLUMBING
Turn off the main water supply.
Install or relocate the supplies and outlets as necessary
to conform to roughing-in dimensions. See Fig. #3 . For
supply stop location, See Fig. #4 .
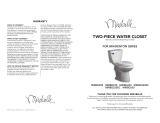
CAUTION: Risk of trap seal loss in
back-to-back installations. See Fig. #2 . To
prevent possible trap seal loss, the back-to-back
Pressure Lite toilet should be connected to a vertical
stack using one of the following three fittings:
Double fixture fitting
Double combination wye and 1/8 bends
Double wye and 1/8 bends
Fig. #2
Double
Fixture
Fitting
Double
Combination
Wye and 1/8
Bends
Double Wye
and 1/8
Bends
ROUGHING-IN DIMENSIONS
Fig. #3
116
3/4”
30-1/2”
3-1/16”
12”
2-3/4”
14-3/4”
19-3/8”
2-5/8”
7-3/4”
10”
16-1/4”
4-5/8”
C
L OF OUTLET
3/8” I.P.S. SUPPLY
FRONT OF BOWL
19-1/4”
INSTALL SUPPLY STOP
For supply installation, refer to the instructions packed
with the supply stop.
Locate the supply stop so it is 2-5/8” above the floor line,
and 7-3/4” to the left of the centerline of the closet flange.
Fig. #4
Supply Stop
2-5/8”
7-3/4”
12”

4
113362-2-EA (9532)
Kohler Co., Kohler, WI
Install new 1/4” or 5/16” diameter T-bolts.
Fig. #5
T-Bolts
Closet Flange
INSTALLATION
INSTALL TOILET GASKET
Carefully set the new toilet upside down on padding.
Firmly install the gasket onto the toilet outlet. If using a
gasket with an integral plastic sleeve, position the gasket
with sleeve facing away from the toilet.
If a rag or other plug is in the closet flange, remove the rag
from the closet flange before setting the toilet.
Fig. #6
Toilet Outlet
Gasket
ALIGN AND SET TOILET
Carefully align and lower the toilet over the closet flange
and T-bolts.
CAUTION: Risk of external leakage. Do not lift or
rock the toilet after placement – a new toilet gasket
must be installed if you break the watertight seal.
Apply full body weight to toilet rim to set seal.
Fig. #7
SECURE TOILET
Install the bolt cap bases, washers, and nuts onto the
exposed T-bolts.
CAUTION: Risk of personal injury or product
damage. Overtightening may cause breakage or
chipping of the vitreous china.
Handtighten the nuts, then tighten them an additional
1/2-turn with a wrench. If the T-bolts extend more than
1/4” above the top of the nut, cut off the excess with a
hacksaw, and file the cut edges. Wipe away any residue.
Install the bolt caps.
Fig. #8
Bolt Cap
Nut
Washer
Bolt Cap Base

5Kohler Co., Kohler, WI
113362-2-EA (9532)
CONNECT SUPPLIES
Carefully bend the supply stop tubing to fit. Measure for
required penetration into the supply stop. Cut and de-burr
the tubing. Position the connection hardware onto the
tubing, as shown. Handtighten the coupling nut first, then
the compression nut.
CAUTION: Risk of property damage. Do not
overtighten any of these nuts, or you may deform
the connections and cause leakage. Do not use
tools to tighten plastic nuts.
Fig. #9
Supply Stop
Ferrule
Compression
Nut
Coupling Nut
Tubing
Washer
Supply Shank
PRESSURE LITE SYSTEM
WARNING: Risk of injury or water damage.
Contents of reservoir under pressure can cause
severe injury. Do not open or service before reading
the installation instructions or service instructions.
Turn off the water supply, and flush the unit to
release pressure before attempting any
service.
CAUTION: Risk of product damage. Do not use
any oils or lubricants on the Pressure Lite system.
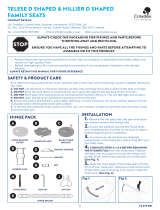
OPERATION
The vitreous china bowl directs the flushing water flow and
houses the Pressure Lite system.
The reservoir contains the complete operating cartridge
assembly and is the container for the pressurized 1.6
gallons of water used for each flush.
The control components consist of the screen adapter,
backflow preventer, pressure regulator, and aspirator.
These components work with the incoming pressurized
supply line water to provide a regulated pressure flush to
the toilet bowl.
A complete flush cycle is two separate functions.
When the trip lever is operated, the reservoir piston
assembly is lifted. This allows pressurized water to be
directed to the siphon jet bowl for complete flushing
action. As the water level in the reservoir drops the piston
will close, stopping water flow to the bowl.
After flushing, a charge cycle takes place. Supply line
water flows into the reservoir through the screen adapter,
backflow preventer and pressure regulator. The water
then flows across the aspirator, which mixes a small
amount of air with the water. This fills the reservoir until a
pressure of approximately 20 p.s.i. is reached. The toilet
will be ready for the next flush within 60 to 90 seconds. If
the toilet is not ready for the next flush within that time,
refer to the troubleshooting chart.
Fig. #10
Trip Lever
Reservoir
Backflow
Preventer
Pressure Regulator
Piston Assembly
Outlet Manifold
Valve Cartridge
Aspirator
Screen
Adapter
Supply
Hose

6
113362-2-EA (9532)
Kohler Co., Kohler, WI
START-UP
Turn on the water supply to bring the Pressure Lite system
to operating pressure (approximately 1 minute).
Check for leaks. Slight retightening of leaking connec-
tions should stop any seal leaks.
Flush and repressurize the toilet three times to stabilize
the system. Some water may appear in the outlet manifold
during the flush, but constant remaining water in the outlet
manifold after flushing indicates a malfunction.
GAP CLEARANCE
If toilet does not activate, the gap between the trip lever
and piston actuation arm may need to be reset. Make sure
the trip lever handle is installed and trip lever nut is tight.
This is a left-hand thread; turn it counterclockwise to
tighten.
Make sure the water supply is on, and supply line water
has stopped flowing into the toilet.
Turn the piston nut until there is a 1/32” to 1/16” gap
between the trip lever and piston actuation arm. Turn the
piston nut clockwise to reduce the gap.
NOTE: Loss of gap clearance adjustment could cause
leakage into the toilet bowl due to the piston not sealing
properly. This condition could cause a continuous flow of
water. If the problem is not corrected after adjustment,
refer to the troubleshooting chart.
Fig. #11
Piston Actuation Arm
Trip Lever
Piston Assembly
Piston Nut
Gap Clearance
SCREEN CLEANING
Shut off the water supply. Flush the toilet. Hold the trip
lever down for approximately one minute to drain the
water from the tank assembly. Disconnect the water
supply line.
To clean any remaining water from the screen adapter,
backflow preventer, and pressure regulator, disconnect
the supply hose from the backflow preventer by turning
the nut counterclockwise. Disassemble the screen
adapter, and clean the screen with a medium to hard
bristle brush. Replace the screen if necessary. After the
screen is clean, reassemble in reverse order making sure
the screen is assembled correctly.
Supply Hose
Nut
Screen Adapter
Screen
Backflow Preventer
Fig. #12
INSTALL SEAT
To install the toilet seat, use the special seat attachment
hardware and instructions packed with the toilet.

7Kohler Co., Kohler, WI
113362-2-EA (9532)
TROUBLESHOOTING CHART
The troubleshooting guide below is mean to for general aid only. All fittings in this toilet except for the piston nut are preset
by the manufacturer to prevent adjustment. Any attempt to adjust the fittings (except the piston nut and winterizing) may
damage the toilet. Such adjustments for modifications of this product are not normal usage and will void the warranty.
For proper trip lever adjustment procedures, refer to Gap Clearance on Page 6 in these instructions. Any problems not
covered in this chart should be referred to your installer/dealer.
SYMPTOM POSSIBLE CAUSE CORRECTIVE ACTION
1. No flush.
A. Supply stop closed. A. Fully open supply stop.
B. Trip lever loose. B. Tighten trip lever nut (turn
counterclockwise to tighten).
C. Trip lever does not actuate piston. C. Adjust piston nut (refer to Page
6).
D. Obstruction within water inlet
components.
D. Replace inlet components (refer to
installer/dealer for assistance).
E. Screen adapter is clogged. E. Disassemble screen adapter and
clean the screen with a medium to
hard bristle brush. (Refer to
installer/dealer or Screen Cleaning,
on Page 6.) Replace the screen if
necessary.
2. Poor flush.
A. Bowl rim holes clogged. A. Clean under bowl rim.
B. Trapway or drain line clogged. B. Plunge bowl, auger trap, auger
drain to clear blockage.
C. System not pressure charged. C. Adjust piston nut for proper
actuation arm gap (refer to Page
6).
D. Supply stop not opened. D. Fully open supply stop.
E. Drain line vent clogged. E. Refer to installer/dealer for
assistance.
F. Screen adapter is clogged. F. Disassemble screen adapter and
clean the screen with a medium to
hard bristle brush. (Refer to
installer/dealer or Screen Cleaning,
on Page 6.) Replace the screen if
necessary.
3. Bowl water
continues to flow or
tank fill water will not
shut off
A. Piston assembly not seating
properly.
A. Adjust gap between trip lever and
piston actuation arm (refer to
Page 6).
shut
off
.
B. Piston actuation arm binding. B. Repair or replace actuation arm
(refer to installer/dealer for
assistance).
C. Pressure regulator not working. C. Replace unit (refer to
installer/dealer for assistance).

8
113362-2-EA (9532)
Kohler Co., Kohler, WI
IMPORTANT CONSUMER INFORMATION
CONSUMER RESPONSIBILITIES
CAUTION: Risk of product damage. Do not
use any oil or lubricants on the Pressure Lite
system. This may result in damage to the system.
NOTE: Cleaning of the Pressure Lite system is not
necessary. If cleaning is desired, use only mild soap
and water.
If you live in a hard water area, you should make certain
that the holes in the rim are kept clean for proper bowl
flushing. Toilet bowl cleaners should be used at least
once a week. Use a long-handled brush to clean the rim
holes and to clean as far into the trap as possible to
prevent mineral deposits from forming.
Do not use abrasive cleaners or solvents.
WARNING: Do not use in-tank cleansers.
Products containing chlorine (calcium hypochlorite)
can seriously damage fittings in the tank. This
damage can cause leakage and property damage.
Kohler Company shall not be responsible or liable for any
damage to these tank fittings caused by the use of
cleansers containing chlorine (calcium hypochlorite).
REQUESTING SERVICE LIMITED ONE-YEAR WARRANTY
Please take a moment to familiarize yourself with the
Kohler Warranty, its benefits, and limitations. Kohler Co.
and its distributors support you with one of the largest
Service Networks of its type. Here’s what you need to do
if you require service:
FIRST: Contact the dealer or contractor who sold and
installed the product. They should be able to
solve any problems you may have.
SECOND: If your dealer or contractor cannot solve the
problem, they will contact or supply you with
the name of the local Kohler Distributor and
the:
Kohler plumbing fixtures and fittings are warranted free of
manufacturing defects.
Kohler Co. will, at its election repair, replace, or make
appropriate adjustment where Kohler Co. inspection
discloses any such defects occurring in normal usage
within one year after installation. Kohler Co. is not
responsible for installation costs.
To obtain warranty service, contact Kohler Co. either
through your Dealer or Plumbing Contractor or by writing
Kohler Co., Attn: Consumer Affairs Department, Kohler,
WI 53044 U.S.A.
Implied warranties, including that of merchantability, are
expressly limited in duration to the duration of this
KOHLER TECHNICAL SPECIALIST
ex ressly
limited
in
duration
to
the
duration
of
this
warranty. Kohler Co. disclaims any responsibility for
consequential damages.
Some states do not allow limitations on how lon
g
an
THIRD: If you are unable to obtain warranty service
through either your contractor or Kohler Co.
distributor, please write us directly at Kohler
Co., Consumer Affairs, Kohler, Wisconsin
53044
FOURTH: Include all pertinent information regarding
your claim, including a complete description of
the product, model numbers, colors, finishes,
and the date the product was installed.
Include a description of the problem, and a
photocopy of your invoice for the products
involved. Also give us the name of the
contractor and distributor.
Some
states
do
not
allow
limitations
on
how
long
an
implied warranty lasts or the exclusion or limitation of
incidental or consequential damages, so this limitation
and exclusion may not apply to you. This warranty gives
you specific legal rights. You may also have rights which
vary from state to state.
This is our exclusive written warranty.
KOHLER CO., KOHLER, WISCONSIN 53044
/