Page is loading ...

INSTRUCTION MANUAL
Customer Experience Center
phone: (646) 435-8726
email: [email protected]
DCP-IM-08132020-V3
www.DeltaChildren.com
STYLES AND COLORS MAY VARY
WARNING:
Adult assembly required because of
small parts. Keep assembly parts
out
of reach of children under 3 years.
CHOKING HAZARD
CITY SLEEPER
BASSINET
Read all instructions BEFORE assembly and USE of product
KEEP INSTRUCTIONS FOR FUTURE USE.
25601
ADULT ASSEMBLY REQUIRED
Required Tools: 4 "AA" Batteries (Not included), Screwdriver (Not included)

2
Customer Service Tel. (646) 435-8726 www.DeltaChildren.com
Consumer Information
WARNING
WARNING: Do not use this bassinet if you cannot exactly follow the accompanying instructions. Failure to follow these
warnings and instructions could result in serious injury or death.
• Read all instructions before assembling unit.
KEEP INSTRUCTIONS FOR FUTURE USE.
DO NOT USE THIS UNIT IF THE INSTRUCTIONS CANNOT BE STRICTLY FOLLOWED.
• Before each usage or assembly, inspect unit for damaged hardware, loose joints, missing parts or sharp edges.
• NEVER use this product if there are any loose or missing fasteners, loose joints, broken parts, or torn mesh/fabric.
Check before assembly and periodically during use. Contact Delta Children Customer Service Department at
1-646-435-8726 for replacement parts, repair or instructions.
SUFFOCATION HAZARD: Infants have suffocated:
• On soft bedding.
• In gaps between an extra padding, a mattress (too small or too thick) and product sides.
• Use only the pad provided by the manufacturer that is no thicker than 25 mm (1 In) and is of such a size that, when
pushed against any side of the product,it does not leave a gap of more than 25 mm (1 in) between the mattress and
sides.
• NEVER add a pillow, comforter or another mattress for padding.
• Remove any tools or excess parts including plastic packaging from bassinet vicinity after assembly.
• If a sheet is used with the pad, use only the one provided by the manufacturer or one specifically designed to fit the
dimensions of the bassinet/cradle.
• To reduce the risk of SIDS, pediatricians recommend healthy infants be placed on their back to sleep,
unless otherwise advised by your physician.
• Never use plastic shipping bags or other plastic film as a mattress covers not sold and intended for
that purpose. They can cause suffocation.
• DO NOT place bassinet near a window where cords from blinds or drapes may strangle a child.
Child may fall out of window.
• DO NOT place cords, straps or similar items that could become wound around a child’s neck in or
near the bassinet.
FALL HAZARD: To help prevent falls, DO NOT use this product when the infant begins to push up on hands and
knees or has reached manufacturer’s recommended maximum weight of 6.8kg (15lbs), whichever comes first.
• To reduce the risk of SIDS, pediatricians recommend healthy infants be placed on their backs to sleep, unless
otherwise advised by your physician.
• Always attach all provided fasteners tightly according to the instructions. Check frequently. Do not use if there are any
loose or missing parts or signs of damage. Do not substitute parts. Contact the manufacturer for replacement parts.
• Use bassinet with only one child at a time.
• Strings can cause strangulation! DO NOT place items with a string around a child’s neck, such as hood
strings or pacifier cords. DO NOT suspend strings over a product or attach strings to toys.
• Toys are not to be “mouthed” by the baby and should be positioned clearly out of reach of the baby’s face and mouth.
• DO NOT place medication, small toys, small items, cords, straps or similar items that could become wound around
the child’s neck in or near this product and do not place product near a window, patio door, heater, or power outlet.

3
Customer Service Tel. (646) 435-8726 www.DeltaChildren.com
Read all instructions BEFORE assembly and USE of product. KEEP INSTRUCTIONS FOR FUTURE USE.
CAUTION - Changes or modifications not expressly approved by the party responsible for compliance could void the
user’s authority to operate the equipment.
NOTE: This equipment has been tested and found to comply with the limits for a class B digital device. pursuant to
Part 15 of the FCC Rules. These limits are designed to provide reasonable protection against harmful interference in
a residential installation. This equipment generates, uses and can radiate radio frequency energy and, if not installed
and used in accordance with the instructions, may cause harmful interference to radio communications. However,
there is no guarantee that interference will not occur in a particular installation. If this equipment does cause harmful
interference to radio or television reception, which can be determined by tuning the equipment off and on, the user is
encouraged to try to correct the interference by one or more of the following measures:
• Reorient or relocate the receiving antenna.
• Increase the separation between the equipment and receiver.
• Connect the equipment into an outlet on a circuit different from that to which the receiver is connected.
• Consult the dealer or experienced radio/TV technician for help.
Consumer Information
WARNING

4
Customer Service Tel. (646) 435-8726 www.DeltaChildren.com
Before returning this product to the store!
Let’s see if we can assist you!
• Not sure how to assemble our product?
Visit our site for easy to follow instructions along with some Tricks and Tips assembly video’s
https://www.deltachildren.com/pages/instructions
• If you are missing a piece or have a damaged part
Please contact our Consumer Experience Center for assistance at 646-435-8726.
To better assist you please have your Style #, Lot # and Manufacturer Date information available
along with the part number that you need assistance with.
• In the event we do not have a replacement part available
You may need to return your product to the retailer for an exchange or refund.
• Warranty
In order to protect your investment, don’t forget to register your product.
You may also wish to consider purchasing our extended warranty.
Visit https://www.deltachildren.com/pages/extended-warranty for more details.
• Please note:
“All Final”, “As Is” or Third Party/Liquidator sales are not covered under our Limited Manufacturer
Warranty..

5
Customer Service Tel. (646) 435-8726 www.DeltaChildren.com
LIMITED MANUFACTURER WARRANTY
This Delta product is warranted to be free from defects for a period of 90 days from the
date of purchase under normal use. This warranty extends only to the original retail
purchaser and is valid only when supplied with proof of purchase, or if received as a gift, when the
registration is on file with Delta. This limited manufacturer warranty does not cover the following:
• Products purchased as floor models or samples.
• Items purchased on an “as-is” basis, as a second hand product, or as a resale product.
• Items purchased at a Final sale, a “Going out of Business” sale, or a Liquidation sale.
TO REGISTER YOUR PRODUCT for important safety alerts and updates to your product please
visit www.deltachildren.com
TO REPORT A PROBLEM, please log on to www.deltachildren.com and click the Consumer
Care Tab, or contact us by phone at 646-435-8726
Date of Purchase: _____________ (you should also keep your receipt)
DON’T MISS YOUR CHANCE TO BE COVERED FOR ALL OF LIFES MISHAPS!
With Delta’s Extended Warranty, you’re covered for mechanical failure from normal use or if your item
stops working due to normal wear and tear, plus all those unexpected surprises.
2 YEARS OF PROTECTION
For Additional Information:
Simply visit our Website, register your product, and add the Extended Warranty
https://www.deltachildren.com/pages/product-registration
Extended Warranty only available in the following States: Arkansas, Colorado, Delaware, District of Columbia, Georgia, Idaho, Illinois, Indiana,
Iowa, Kansas, Kentucky, Louisiana, Maryland, Michigan, Mississippi, Missouri, Nebraska, Nevada, New Hampshire, New York, North Carolina,
North Dakota, Pennsylvania, Rhode Island, South Dakota, Tennessee, Utah, West Virginia
EXTENDED WARRANTY

6
Customer Service Tel. (646) 435-8726 www.DeltaChildren.com
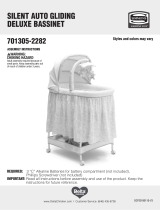
Mattress Support Board
Fabric Storage Liner
Fabric Liner
Base Legs
Clip On Mobile Arm
Top Support Tube
Canopy Toy Mobile
Mattress Pad
Sheet
Canopy
M5 - 1.7cm x 4pcs
PARTS
IMPORTANT! Please remove all parts from the package and identify them before assembly.

7
Customer Service Tel. (646) 435-8726 www.DeltaChildren.com
Locate the top support tube and LEFT base leg.
Center Joint
Base Leg 1
Top Support
Tube
4
Align the base leg “A” to “A” on the top support bassinet
and insert it into the center joint until the valco pin
“CLICKS” into a fully locked position.
3
Locate the RIGHT base leg.
Insert the base leg “B” to “B” on the top support
bassinet and insert it into the center joint until the valco
pin “CLICKS” into a fully locked position.
Center Joint
Base Leg 2
FRAME ASSEMBLY

8
Customer Service Tel. (646) 435-8726 www.DeltaChildren.com
M5 Screw – 1.7cm – 4x – Actual
Size
Top View of Bassinet Frame
Close up View
of the Mattress
Support Nuts
Locate the mattress support board, four (x4) M5 X 1.7cm
screws, and a Phillips screwdriver (not included).
Align and attach the left two holes of the mattress support board
onto the plastic mattress board support nuts until fully fastened.
Repeat on opposite side.
NOTE: If the holes of the mattress support board are not aligining
correctly, try to squeeze both ends of the base legs until they are
aligned.
3
Using a Phillips screwdriver and four (x4) M5 X
1.7cm screws, tighten the mattress board onto the
plastic mattress board support nuts.
Mattress Support Board Fully
Attached to Bassinet Frame
MATTRESS BOARD ASSEMBLY

9
Customer Service Tel. (646) 435-8726 www.DeltaChildren.com
Start BACK SIDE zipper pull tab
is located on left side
Start FRONT SIDE zipper pull
tab is located on right side
Fabric Liner
Clip on mobile arm
attachment joints
Canopy
Attachment
Holes
Correct Placement
Locate the fabric liner.
NOTE: One side of the fabric liner has the canopy attachment
holes and should face the opposite side of the clip on mobile
arm attachment joints.
Place the back bassinet fabric over the
back rail tube. Align and fasten zipper to
top rail (Fig. 1A).
FRONT SIDE
BACK SIDE
Top Support
Tube
Zipper pull
tab slider
BACK
START
END
Back Bassinet Fabric
FRONT
Fig. 1A
FABRIC LINER ASSEMBLY

10
Customer Service Tel. (646) 435-8726 www.DeltaChildren.com
Canopy
Attachment
Holes
Clip on Mobile Arm
Attachment Joints
Fig. 1B
Top Support Tube
Zipper pull
tab slider
3
Place the front bassinet fabric over the front rail tube. Align and
fasten zipper to top rail (Fig. 1B) until fully zipped.
4 5
Stretch the pockets on the bottom of the fabric liner around
the ends of the mattress support board.
Snaps
Mattress Support Board
Pocket
Locate the four (4) snaps on the underside of the mattress
support board and snap them in.
BACK
START
END
FRONT
NOTE: One side of the fabric liner has the canopy attachment holes and
should face the opposite side of the clip on mobile arm attachment joints.
Pocket
FABRIC LINER ASSEMBLY

11
Customer Service Tel. (646) 435-8726 www.DeltaChildren.com
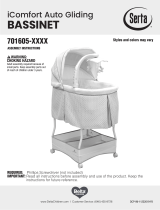
MATTRESS PAD & FABRIC STORAGE LINER ASSEMBLY
Mattress Pad with Sheet
Place the sheet over the mattress pad.
Place the covered mattress pad into the fabric liner.
3
Align the bottom storage button holes to the eight (8) storage
plastic nubs located on the base legs to secure the entire fabric
liner in place.
4
Fully insert plastic nubs through fabric button holes.
Plastic Nub
Button Hole
Fully Inserted Plastic
Nub Through Storage
Button Hole
Fully Assembled
Fabric Storage Liner
Fabric
Liner

12
Customer Service Tel. (646) 435-8726 www.DeltaChildren.com
Position the canopy over the top end of the bassinet, opposite
the clip on mobile attachment joints.
Locate the canopy attachment holes and insert canopy ratchet onto
the frame on both sides of the bassinet.
3
Fasten the hook and loop fasteners on the back edge of the
canopy to the liner. Then fasten the hook and loop patches on
each canopy ap to the side of the liner.
CANOPY & CLIP ON MOBILE ARM ASSEMBLY
Fit the canopy toy mobile to the mobile arm. Push the
canopy toy mobile up rmly to lock in place.
Locate the clip on mobile arm and canopy toy mobile.
Canopy Toy Mobile Correctly
Attached to Clip On Mobile Arm
Canopy Ratchet
Hook and
Loop Patch
Completed Canopy Attachment
Canopy
Attachment
Holes

13
Customer Service Tel. (646) 435-8726 www.DeltaChildren.com
Completed Assembly
Clip on Mobile Arm
Align the clip on mobile arm to one of the clip on
mobile arm attachment joints on the front side of the
frame and push down to lock in place.
NOTE: Slide mobile arm horizontally to remove.
CLIP ON MOBILE ARM ASSEMBLY
90°
Clip on Mobile Arm
Attachment Joints

14
Customer Service Tel. (646) 435-8726 www.DeltaChildren.com
BATTERY INSTALLATION
1
• Protect the environment by not disposing of this product with
household waste (2002/96/EC). Check your local authority for
recycling advice and facilities.
In exceptional circumstances, batteries may leak fluids that can
cause a chemical burn injury or ruin your product. To avoid battery
leakage:
• Do not mix old and new batteries or batteries of different types:
alkaline, standard (carbon-zinc) or rechargeable (nickel-cadmium).
• Insert batteries as indicated inside the battery compartment.
• Remove batteries during long periods of non-use. Always remove
exhausted batteries from the product. Dispose of batteries safely.
• Never short-circuit the battery terminals.
• Use only batteries of the same or equivalent type, as recommended.
• Do not charge non-rechargeable batteries.
• Remove rechargeable batteries from the product before charging.
• If removable, rechargeable batteries are used, they are only to be
charged under adult supervision.
• When discarding batteries, be sure to dispose of them in the proper
manner, according to your state and local regulations.
1.5V x 4
"AA" (LR6)
Locate battery compartment on the back of the mobile arm base. Loosen
screw in battery compartment with Phillips Head screwdriver.
• Lift to remove door. Insert four (4) "AA" alkaline batteries.
• Replace door and tighten screw.
NOTE: We recommend using alkaline batteries for longer battery life.
Battery
Compartment
Loosen
Screws

15
Customer Service Tel. (646) 435-8726 www.DeltaChildren.com
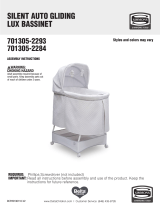
OnOff
Rotate Mobile Toys
Twinkling Lights
Music
Vibration
Night Light
Mobile Functions On/Off
Vibrations
Switch
Music Volume
Switch
Mobile Functions On/Off Switch
• Push the Mobile Functions On/Off button at the base of the mobile arm to turn on power. This is the main power switch to the mobile arm and also
turns on the power LED on the Night Light button. The LED will stay on in the dark.
Rotate Mobile Toys Button
• Press to begin a 5 minute cycle of rotation.
• Press again to stop the mobile.
• Press to start a new 5-minute cycle. If this button is pressed while mobile is operating, the rotation cycle will restart.
Twinkling Lights Button
• Press to start a 5 minute light show.
• Press again to stop the light show.
Music Button
• Press to start cycle of music.
• Press again to stop the music.
Vibration Button
• Press to start 5-minute cycle of vibration.
• Press again to stop vibration.
Night Light
• Press to turn on mobile light for 5 minutes.
• Press again to turn light off.
Vibration Switch
• Push toward + to increase vibration.
• Push toward – to decrease vibration.
Music Volume Switch
• Push toward + to increase volume.
• Push toward – to decrease volume.
MOBILE ARM OPERATION

16
Customer Service Tel. (646) 435-8726 www.DeltaChildren.com
NOTES

17
Customer Service Tel. (646) 435-8726 www.DeltaChildren.com
NOTES

Delta Children's Products Corp.
114 West 26
th
Street
New York, NY 10001
646-435-8726
www.DeltaChildren.com
© 2020 Delta Children's Products. All rights reserved.
/