
EB E A EN EU
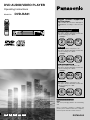
DVD AUDIO/VIDEO PLAYER
Operating Instructions
Model No. DVD-RA61
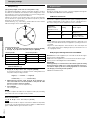
Region number supported
by this player
Region numbers are allocated to DVD players
and DVD-Video according to where they are
sold.
≥The region number of this player is “2”.
≥The player will play DVD-Video marked with
labels containing “2” or “ALL”.
Example:
≥The region number of this player is “3”.
≥The player will play DVD-Video marked with
labels containing “3” or “ALL”.
Example:
≥The region number of this player is “4”.
≥The player will play DVD-Video marked with
labels containing “4” or “ALL”.
Example:
≥The region number of this player is “5”.
≥The player will play DVD-Video marked with
labels containing “5” or “All”.
Example:
AUDIO
/
VIDEO
2
2
4
1
ALL
3
3
6
2
ALL
4
4
6
2
ALL
5
3
5
2
ALL
[Only\for\the\United\Kingdom]
Note:
“EB” on the packaging indicates the United King-
dom.
Before connecting, operating or adjusting this
product, please read these instructions completely.
Please keep this manual for future reference.
RQT6043-B
For the United Kingdom and
Continental Europe
For Asia
For Australia and N.Z.
For Russia

2
RQT6043
Getting started
Dear customer
Thank you for purchasing this product.
For optimum performance and safety, please read these instructions care-
fully.
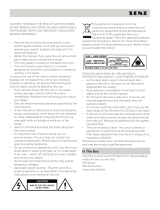
CAUTION!
THIS PRODUCT UTILIZES A LASER.
USE OF CONTROLS OR ADJUSTMENTS OR
PERFORMANCE OF PROCEDURES OTHER THAN
THOSE SPECIFIED HEREIN MAY RESULT IN HAZ-
ARDOUS RADIATION EXPOSURE.
DO NOT OPEN COVERS AND DO NOT REPAIR
YOURSELF. REFER SERVICING TO QUALIFIED
PERSONNEL.
(Inside of product)
(Produktets innside)
(Tuotteen sisällä)
Operations in these instructions are described mainly with
the remote control, but you can do the operations on the main
unit if the controls are the same.
RQLS0233
-
-
-
-
-
-
-
-
-
-
VISIBLE AND INVISIBLE LASER RADIATION WHEN OPEN.
AVOID DIRECT EXPOSURE TO BEAM.
DANGER
(FDA 21 CFR)
(IEC60825-1)
VISIBLE AND INVISIBLE LASER RADIATION WHEN OPEN.
AVOID EXPOSURE TO BEAM.
CAUTION
RAYONNEMENT LASER VISIBLE ET INVISIBLE EN CAS D’OUVERTURE.
EXPOSITION DANGEREUSE AU FAISCEAU.
ATTENTION
SYNLIG OG USYNLIG LASERSTRÅLING VED ÅBNING.
UNDGÅ UDSÆTTELSE FOR STRÅLING.
ADVARSEL
AVATTAESSA OLET ALTTIINA NÄKYVÄÄ JA NÄKYMÄTÖN
LASERSÄTEILYLLE. ÄLÄ KATSO SÄTEESEEN.
VARO!
SYNLIG OCH OSYNLIG LASERSTRÅLNING NÄR DENNA DEL
ÄR ÖPPNAD. BETRAKTA EJ STRÅLEN.
VARNING
SYNLIG OG USYNLIG LASERSTRÅLING NÅR DEKSEL ÅPNES.
UNNGÅ EKSPONERING FOR STRÅLEN.
ADVARSEL
SICHTBARE UND UNSICHTBARE LASERSTRAHLUNG, WENN ABDECKUNG
GEÖFFNET. NICHT DEM STRAHL AUSSETZEN.
VORSICHT
WARNING:
TO REDUCE THE RISK OF FIRE, ELECTRIC SHOCK
OR PRODUCT DAMAGE, DO NOT EXPOSE THIS AP-
PARATUS TO RAIN, MOISTURE, DRIPPING OR
SPLASHING AND THAT NO OBJECTS FILLED WITH
LIQUIDS, SUCH AS VASES, SHALL BE PLACED ON
THE APPARATUS.
SUOMI
VAROITUS!
LAITTEEN KÄYTTÄMINEN MUULLA KUIN TÄSSÄ
KÄYTTÖOHJEESSA MAINITULLA TAVALLA SAAT-
TAA ALTISTAA KÄYTTÄJÄN TURVALLISUUSLUO-
KAN 1 YLITTÄVÄLLE NÄKYMÄTTÖMÄLLE
LASERSÄTEILYLLE.
VAROITUS:
TULIPALO-, SÄHKÖISKUVAARAN TAI TUOTETTA
KOHTAAVAN MUUN VAHINGON VÄHENTÄMISEKSI
EI LAITETTA SAA ALTISTAA SATEELLE, KOS-
TEUDELLE, VESIPISAROILLE TAI ROISKEELLE, EIKÄ
NESTETTÄ SISÄLTÄVIÄ ESINEITÄ, KUTEN ESIM-
ERKIKSI MALJAKOITA, SAA ASETTAA LAITTEEN
PÄÄLLE.
VAROITUS!
≥ÄLÄ ASENNA TAI LAITA TÄTÄ LAITETTA KABINET-
TITYYPPISEEN KIRJAKAAPPIIN TAI MUUHUN
SULJETTUUN TILAAN, JOTTA TUULETUS ONNIS-
TUISI. VARMISTA, ETTÄ VERHO TAI MIKÄÄN MUU
MATERIAALI EI HUONONNA TUULETUSTA, JOTTA
VÄLTETTÄISIIN YLIKUUMENEMISESTA JOHTUVA
SÄHKÖISKU- TAI TULIPALOVAARA.
≥ÄLÄ PEITÄ LAITTEEN TUULETUSAUKKOJA SA-
NOMALEHDELLÄ, PÖYTÄLIINALLA, VERHOLLA TAI
MUULLA VASTAAVALLA ESINEELLÄ.
≥ÄLÄ ASETA PALAVAA KYNTTILÄÄ TAI MUUTA
AVOTULEN LÄHDETTÄ LAITTEEN PÄÄLLE.
≥HÄVITÄ PARISTOT LUONTOA VAHINGOITTAMAT-
TOMALLA TAVALLA.
CAUTION!
≥DO NOT INSTALL, OR PLACE THIS UNIT, IN A
BOOKCASE, BUILT-IN CABINET OR IN ANOTHER
CONFINED SPACE. ENSURE THE UNIT IS WELL
VENTILATED. TO PREVENT RISK OF ELECTRIC
SHOCK OR FIRE HAZARD DUE TO OVERHEATING,
ENSURE THAT CURTAINS AND ANY OTHER MATE-
RIALS DO NOT OBSTRUCT THE VENTILATION
VENTS.
≥DO NOT OBSTRUCT THE UNIT’S VENTILATION
OPENINGS WITH NEWSPAPERS, TABLECLOTHS,
CURTAINS, AND SIMILAR ITEMS.
≥DO NOT PLACE SOURCES OF NAKED FLAMES,
SUCH AS LIGHTED CANDLES, ON THE UNIT.
≥DISPOSE OF BATTERIES IN AN ENVIRONMENTAL-
LY FRIENDLY MANNER.
NORSK
ADVARSEL!
DETTE PRODUKTET ANVENDER EN LASER.
BETJENING AV KONTROLLER, JUSTERINGER
ELLER ANDRE INNGREP ENN DE SOM ER BE-
SKREVENT I DENNE BRUKSANVISNING, KAN FØRE
TIL FARLIG BESTRÅLING.
DEKSLER MÅ IKKE ÅPNES, OG FORSØK ALDRI Å
REPARERE APPARATET PÅ EGENHÅND. ALT SER-
VICE OG REPARASJONSARBEID MÅ UTFØRES AV
KVALIFISERT PERSONELL.
ADVARSEL:
FOR Å REDUSERE FAREN FOR BRANN, ELEKTRISK
STØT ELLER SKADER PÅ PRODUKTET, MÅ DETTE
APPARATET IKKE UTSETTES FOR REGN, FUK-
TIGHET, VANNDRÅPER ELLER VANNSPRUT. DET MÅ
HELLER IKKE PLASSERES GJENSTANDER FYLT
MED VANN, SLIK SOM BLOMSTERVASER, OPPÅ AP-
PARATET.
ADVARSEL!
≥APPARATET MÅ IKKE PLASSERES I EN
BOKHYLLE, ET INNEBYGGET KABINETT ELLER ET
ANNET LUKKET STED HVOR VENTILASJONSFOR-
HOLDENE ER UTILSTREKKELIGE. SØRG FOR AT
GARDINER ELLER LIGNENDE IKKE FORVERRER
VENTILASJONSFORHOLDENE, SÅ RISIKO FOR
ELEKTRISK SJOKK ELLER BRANN FORÅRSAKET
AV OVERHETING UNNGÅS.
≥APPARATETS VENTILASJONSÅPNINGER MÅ IKKE
DEKKES TIL MED AVISER, BORDDUKER , GARDI-
NER OG LIGNENDE.
≥PLASSER IKKE ÅPEN ILD, SLIK SOM LEVENDE LYS,
OPPÅ APPARATET.
≥BRUKTE BATTERIER MÅ KASSERES UTEN FARE
FOR MILJØET.
TÄMÄ LAITE ON TARKOITETTU KÄYTETTÄVÄKSI
LEUDOSSA ILMASTOSSA.
DETTE APPARATET ER BEREGNET TIL BRUK UNDER
MODERATE KLIMAFORHOLD.

3
RQT6043
Getting started
LUOKAN 1 LASERLAITE
KLASS 1 LASER APPARAT
CLASS 1
LASER PRODUCT
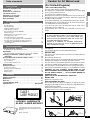
Table of contents
Getting started
Caution for AC Mains Lead . . . . . . . . . . . . . . . . . . . . . . . . . 03
Accessories . . . . . . . . . . . . . . . . . . . . . . . . . . . . . . . . . . . . . . 04
Connection to a television . . . . . . . . . . . . . . . . . . . . . . . . . . 04
The remote control . . . . . . . . . . . . . . . . . . . . . . . . . . . . . . . . 05
Selecting TV screen type . . . . . . . . . . . . . . . . . . . . . . . . . . 05
Control reference guide . . . . . . . . . . . . . . . . . . . . . . . . . . . . 06
Disc information . . . . . . . . . . . . . . . . . . . . . . . . . . . . . . . . . . 06
Basic operations
Basic play . . . . . . . . . . . . . . . . . . . . . . . . . . . . . . . . . . . . . . . 07
Resume function . . . . . . . . . . . . . . . . . . . . . . . . . . . . . . . . . . . . . . . . 07
Playing MP3 discs . . . . . . . . . . . . . . . . . . . . . . . . . . . . . . . . . . . . . . . 08
Skipping chapters or tracks . . . . . . . . . . . . . . . . . . . . . . . . . . . . . . . . 09
Frame-by-frame viewing . . . . . . . . . . . . . . . . . . . . . . . . . . . . . . . . . . 09
Fast forward and rewind—SEARCH . . . . . . . . . . . . . . . . . . . . . . . . . 09
Slow-motion play . . . . . . . . . . . . . . . . . . . . . . . . . . . . . . . . . . . . . . . . 09
Starting play from a selected title or track . . . . . . . . . . . . . . . . . . . . . 09
Selecting groups to play . . . . . . . . . . . . . . . . . . . . . . . . . . . . . . . . . . 09
Selecting still pictures—Page Skip . . . . . . . . . . . . . . . . . . . . . . . . . . 10
To enjoy even higher quality sound—AUDIO ONLY . . . . . . . . . . . . . 10
Enjoying virtual surround effects with 2 speakers or
headphones (ADVANCED SURROUND V.S.S.) . . . . . . . . . . . . . . 10
Using headphones . . . . . . . . . . . . . . . . . . . . . . . . . . . . . . . . . . . . . . 10
Advanced operations
Changing the play sequence . . . . . . . . . . . . . . . . . . . . . . . . 11
All group play/Program play/Random play . . . . . . . . . . . . . . . . . . . . 11
Repeat play . . . . . . . . . . . . . . . . . . . . . . . . . . . . . . . . . . . . . . 12
A-B repeat play/Repeat play/Marking places to play again—MARKER . . . .
12
Changing soundtracks, subtitle languages
and angles . . . . . . . . . . . . . . . . . . . . . . . . . . . . . . . . . . . . . 13
Using Graphical User Interface (GUI) screens . . . . . . . . . . 14
Common procedures . . . . . . . . . . . . . . . . . . . . . . . . . . . . . . . . . . . . . 14
Disc information . . . . . . . . . . . . . . . . . . . . . . . . . . . . . . . . . . . . . . . . . 14
Unit information/Shuttle screen . . . . . . . . . . . . . . . . . . . . . . . . . . . . . 15
Home Theater . . . . . . . . . . . . . . . . . . . . . . . . . . . . . . . . . . . . 16
Changing settings . . . . . . . . . . . . . . . . . . . . . . . . . . . . . . . . . 18
Common procedures . . . . . . . . . . . . . . . . . . . . . . . . . . . . . . . . . . . . . 19
Entering a password (Ratings) . . . . . . . . . . . . . . . . . . . . . . . . . . . . . 19
Speaker setting . . . . . . . . . . . . . . . . . . . . . . . . . . . . . . . . . . . . . . . . . 19
Digital output . . . . . . . . . . . . . . . . . . . . . . . . . . . . . . . . . . . . . . . . . . . 20
Reference
Safety precautions . . . . . . . . . . . . . . . . . . . . . . . . . . . . . . . . 21
Maintenance . . . . . . . . . . . . . . . . . . . . . . . . . . . . . . . . . . . . . 21
Glossary . . . . . . . . . . . . . . . . . . . . . . . . . . . . . . . . . . . . . . . . . 21
Troubleshooting guide . . . . . . . . . . . . . . . . . . . . . . . . . . . . . 22
Specifications . . . . . . . . . . . . . . . . . . . . . . . . . . . . Back cover
Caution for AC Mains Lead
(For United Kingdom)
(“EB” area code model only)
For your safety, please read the following text carefully.
This appliance is supplied with a moulded three pin mains plug
for your safety and convenience.
A 5-ampere fuse is fitted in this plug.
Should the fuse need to be replaced please ensure that the re-
placement fuse has a rating of 5-ampere and that it is approved
by ASTA or BSI to BS1362.
Check for the ASTA mark
Ï
or the BSI mark
Ì
on the body of the fuse.
If the plug contains a removable fuse cover you must ensure that
it is refitted when the fuse is replaced.
If you lose the fuse cover the plug must not be used until a
replacement cover is obtained.
A replacement fuse cover can be purchased from your local
dealer.
CAUTION!
IF THE FITTED MOULDED PLUG IS UNSUITABLE FOR
THE SOCKET OUTLET IN YOUR HOME THEN THE
FUSE SHOULD BE REMOVED AND THE PLUG CUT
OFF AND DISPOSED OF SAFELY.
THERE IS A DANGER OF SEVERE ELECTRICAL
SHOCK IF THE CUT OFF PLUG IS INSERTED INTO
ANY 13-AMPERE SOCKET.
If a new plug is to be fitted please observe the wiring code as
stated below.
If in any doubt please consult a qualified electrician.
IMPORTANT
The wires in this mains lead are coloured in accordance with the
following code:
Blue: Neutral, Brown: Live.
As these colours may not correspond with the coloured markings
identifying the terminals in your plug, proceed as follows:
The wire which is coloured Blue must be connected to the termi-
nal which is marked with the letter N or coloured Black or Blue.
The wire which is coloured Brown must be connected to the ter-
minal which is marked with the letter L or coloured Brown or Red.
WARNING: DO NOT CONNECT EITHER WIRE TO THE
EARTH TERMINAL WHICH IS MARKED WITH THE LETTER E,
BY THE EARTH SYMBOL Ó OR COLOURED GREEN OR
GREEN/YELLOW.
THIS PLUG IS NOT WATERPROOF—KEEP DRY.
Before use
Remove the connector cover.
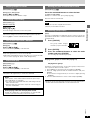
How to replace the fuse
The location of the fuse differ according to the type of AC mains
plug (figures A and B). Confirm the AC mains plug fitted and fol-
low the instructions below.
Illustrations may differ from actual AC mains plug.
1. Open the fuse cover with a screwdriver.
2. Replace the fuse and close or attach the fuse cover.
Fuse cover
Figure A Figure B
Fuse
(5 ampere)
Figure A
Fuse
(5 ampere)
Figure B
(The illustration shows the model for the
United Kingdom, Continental Europe and
Russia.)
(Back of product)

4
RQT6043
Getting started
∏ AC mains lead . . . 1
[For\the\United\Kingdom]
(RJA0053-2X)
[For\others]
(RJA0019-2X)
Accessories
Please check and identify the supplied accessories. Use numbers indicated in parentheses when asking for replacement parts.
∏ Remote
control . . . . . . . . . 1
(N2QAJB000018)
∏ Batteries . . . . . . . 2
for remote control
[For\Australia\and\N.Z.]
(RJA0035-1X)
∏ Audio/video
cable . . . . . . . . . . . 1
(VJA0788-D)
Note
The included AC mains lead is for use with this unit only. Do not use it with other equipment.
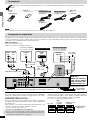
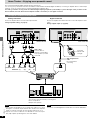
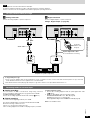
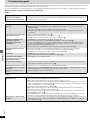
Connection to a television
Although the audio on most DVDs is designed to be played through six speakers and this unit’s factory settings assume this setup, the following describes
connections that allow you to enjoy sound through your television’s speakers. To get the full benefit from the powerful 5.1-channel audio found on DVDs,
you should connect an amplifier and six speakers (➡ page 16).
Before connection
≥Disconnect the AC mains lead.
≥Refer to the television’s operating instructions.
AUDIO
IN
L
R
VIDEO
IN
VCR
SCART
IN
S VIDEO
COMPONENT
VIDEO OUT
Y
P
B
P
R
COMPONENT
VIDEO IN
Y
P
B
PR
DIGITAL AUDIO OUT
(
PCM/BITSTREAM
)
CENTER
AUDIO OUT
SUB-
WOOFER
R
R
FRONT
R
SURROUND
VIDEO
OUT
S VIDEO
OUT
AC IN
~
OPTICAL
SURROUND
L
FRONT
L
L
AV1
AV2
2ch5.1ch
Audio/video cable (included)
AC mains lead (included)
FOR UNITED KING-
DOM ONLY
READ THE CAUTION
FOR THE AC MAINS
LEAD ON PAGE 3 BE-
FORE CONNECTION.
AV2
AV1
AV2
AV1
TV
VCR
SCART terminal
≥To improve picture quality, you can change the video signal output from
the AV1 terminal from “Video” to either “S-Video” or “RGB” to suit the type
of television you are using (➡ page 18, Video—AV1 Output).
≥You can also connect other equipment to AV2.
red white yellow
Connection to AUDIO IN
also necessary (see left)
[For\Australia.\N.Z.\and\Asia]
Connection to AUDIO IN
also necessary (see left)
21-pin SCART
cable
(not included)
This unit
Video
cassette
recorder
SCART terminal
of television
Satellite receiver
or decoder
S VIDEO OUT terminal
The S-video terminal achieves a more vivid picture than the VIDEO OUT
terminal by separating the chrominance (C) and luminance (Y) signals.
(Actual results depend on the television.)
COMPONENT VIDEO OUT terminal
Connection using these terminals outputs the color difference signals (PB/
P
R) and luminance signal (Y) separately in order to achieve high fidelity in
reproducing colors.
≥The description of the component video input terminals depends on the
television or monitor (e.g. Y/P
B/PR, Y/B-Y/R-Y, Y/CB/CR).
Connect to terminals of the same color.
Connect Your Unit Directly To Your Television.
Do not connect the unit through your video cassette recorder when
setting up your home entertainment system, because the picture may
not be played correctly due to the copy guard.
S video cable
(not included)
red white yellow
Video cable
(not included)
For the United Kingdom,
Continental Europe and Russia
(The illustration shows the model for the United Kingdom, Continental Europe and Russia.)
To household
mains socket

5
RQT6043
Getting started
Do not;
≥mix old and new batteries.
≥use different types at the same time.
≥heat or expose to flame.
≥take apart or short circuit.
≥attempt to recharge alkaline or manganese batteries.
≥use batteries if the covering has been peeled off.
Mishandling of batteries can cause electrolyte leakage which can damage
items the fluid contacts and may cause a fire.
Remove if the remote control is not going to be used for a long period of
time. Store in a cool, dark place.
Aim at the sensor, avoiding obstacles, at a maximum range of 7 m directly
in front of the unit.
≥Insert so the poles (i and j) match those in the remote control.
≥Do not use rechargeable type batteries.
R6, AA, UM-3
1
2
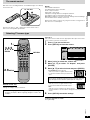
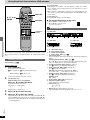
Preparation
Turn on the television and select the appropriate video input on the televi-
sion to suit the connections for the player.
1 Press [Í] to turn on the unit.
2 Press [SETUP] to show the menus.
3 Move [2, 1] to select the “Video” tab.
4 Move [3, 4] to select “TV Aspect” and press
[ENTER].
5
Move [
3, 4
] to select the item and press [ENTER].
≥4:3 Pan&Scan (Factory preset)
≥Select if you have a regular television and
to view 16:9 software in the pan and scan
style.
Disc
SELECT
Audio
Subtitle
Menus
Ratings
English
English
Automatic
Level 8
SETUP
Selecting TV screen type
ENTER
3, 4, 2, 1/
GROUP
PAG E
SUBTITLE
SKIP
STOP
CANCEL
HP-V.S.S.
SETUP
SP-V.S.S.
AUDIO
ONLY
REPEAT
MODE
A-B
REPEAT
PLAY
MODE
ANGLE
123
456
789
0
PAUSE PLAY
SLOW/SEARCH
AUDIO
RETURN
MARKER
ENTER
OPEN/CLOSE
T
O
P
M
E
N
U
M
E
N
U
D
I
S
P
L
A
Y
10
>
=
Í
SETUP
RETURN
1
3·4·5
2·6
Remote control only
Change the setting to suit your television.
≥4:3 Letterbox
≥Select if you have a regular television and
to view 16:9 software
in the letterbox style.
≥16:9
≥Select if you have a widescreen (16:9) television.
≥Use the television’s screen modes to change the way the picture is
shown.
6 Press [SETUP] to end the settings.
To return to the previous screen
Press [RETURN].
16:9 software prohibited from being shown in the pan and scan
style will appear in the letterbox style despite the setting here.
The menu language is set to English, but you can change it
(➡ page 18, Display—Menu Language). English is used in the
examples.
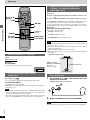
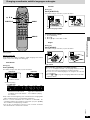
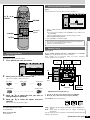
The remote control

6
RQT6043
Getting started
Playing DVDs and Video CDs
The producer of these discs can control how they are played so
you may not always be able to control play as described in these
operating instructions. Read the disc’s instructions carefully.
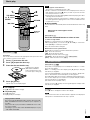
Control reference guide
Page
1 Standby/on switch (Í/I) . . . . . . . . . . . . . . . . . . . . . . . . . . . . . . . . 5
Press to switch the unit from on to standby mode or vice versa. In
standby mode, the unit is still consuming a small amount of power.
2 Display button (DISPLAY) . . . . . . . . . . . . . . . . . . . . . . . . . . . . . . 14
3 Top menu button (TOP MENU) . . . . . . . . . . . . . . . . . . . . . . . . . . 7
4 Joystick (3, 4, 2, 1)/Enter button (ENTER) . . . . . . . . . . . . . . 5
5 Group button (GROUP) . . . . . . . . . . . . . . . . . . . . . . . . . . . . . . . . 9
6 Page button (PAGE) . . . . . . . . . . . . . . . . . . . . . . . . . . . . . . . . . . . 10
7 Subtitle button (SUBTITLE) . . . . . . . . . . . . . . . . . . . . . . . . . . . . . 13
8 Skip buttons (:, 9 SKIP) . . . . . . . . . . . . . . . . . . . . . . . . . . . 9
9 Stop button (∫ STOP) . . . . . . . . . . . . . . . . . . . . . . . . . . . . . . . . . 7
: Numbered buttons (1–9, 0, S10) . . . . . . . . . . . . . . . . . . . . . . . . . 7
; Cancel button (CANCEL) . . . . . . . . . . . . . . . . . . . . . . . . . . . . . . . 9
< Headphone and Speaker V.S.S. buttons
(HP-V.S.S., SP-V.S.S.) . . . . . . . . . . . . . . . . . . . . . . . . . . . . . . . . . . 10
= Setup button (SETUP) . . . . . . . . . . . . . . . . . . . . . . . . . . . . . . . 5, 19
> Repeat mode button (REPEAT MODE) . . . . . . . . . . . . . . . . . . . . 12
? Open/Close button (< OPEN/CLOSE) . . . . . . . . . . . . . . . . . . . . 7
@ Menu button (MENU) . . . . . . . . . . . . . . . . . . . . . . . . . . . . . . . . . . 7
A Marker button (MARKER) . . . . . . . . . . . . . . . . . . . . . . . . . . . . . . . 12
B Return button (RETURN) . . . . . . . . . . . . . . . . . . . . . . . . . . . . . . . 5
C Audio button (AUDIO) . . . . . . . . . . . . . . . . . . . . . . . . . . . . . . . . . 13
D Slow/Search buttons (6, 5 SLOW/SEARCH) . . . . . . . . . . . 9
E Play button (1 PLAY) . . . . . . . . . . . . . . . . . . . . . . . . . . . . . . . . . . 7
F Pause button (; PAUSE) . . . . . . . . . . . . . . . . . . . . . . . . . . . . . . . 7
G Audio only button (AUDIO ONLY) . . . . . . . . . . . . . . . . . . . . . . . . 10
H Angle button (ANGLE) . . . . . . . . . . . . . . . . . . . . . . . . . . . . . . . . . 13
I Play mode button (PLAY MODE) . . . . . . . . . . . . . . . . . . . . . . . . . 11
J A-B repeat button (A-B REPEAT) . . . . . . . . . . . . . . . . . . . . . . . . 12
K Remote control signal sensor . . . . . . . . . . . . . . . . . . . . . . . . . . . 5
L Disc tray . . . . . . . . . . . . . . . . . . . . . . . . . . . . . . . . . . . . . . . . . . . . . 7
M Shuttle dial (6, 5) . . . . . . . . . . . . . . . . . . . . . . . . . . . . . . . . . 9
N Headphone jack . . . . . . . . . . . . . . . . . . . . . . . . . . . . . . . . . . . . . . 10
O Headphone level control (PHONES) . . . . . . . . . . . . . . . . . . . . . . 10
P FL Display
Q Standby indicator (Í)
When the unit is connected to the AC mains supply, this indicator lights
up in standby mode and goes out when the unit is turned on.
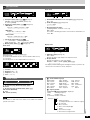
∫ Discs that cannot be played
DVD-ROM, DVD-RAM, CD-ROM, CDV, CD-G, iRW, DVD-RW, CVD,
SVCD, SACD, Divx Video Discs and Photo CD.
∫ DVDs that can be played
This unit has a Dolby Digital decoder so you can play
DVDs with this mark.
This unit has a DTS decoder so you can play DVDs with
this mark.
∫ DVD-R discs
Panasonic DVD-R recorded and finalized on a Panasonic DVD video re-
corder are played as DVD-Video on this unit.
It may not be possible to play these discs in all cases due to the type of disc
or condition of the recording.
∫ Video systems
This unit can play both the PAL and NTSC video systems.
To view PAL or NTSC, however, your television must match the system
used on the disc.
PAL discs cannot be correctly viewed on an NTSC television.
NTSC can be correctly viewed on a PAL television by converting the video
signal to PAL 60 (➡ page 18, Video–NTSC Disc Output).
Do not use irregularly shaped discs (e.g. heart-shaped), as these can
damage the unit.
DVD-Audio DVD-Video DVD-R Video CD
∫ Discs that can be played
Buttons such as 5 function the same as the controls on the remote control.
Disc information
[DVD-V] [VCD] [CD][DVD-A]
Indication used in instructions
∫ Handling precautions
≥Do not write on the label side with a ball-point pen or other writing instru-
ment.
≥Do not use record cleaning sprays, benzine, thinner, static electricity pre-
vention liquids or any other solvent.
≥Do not attach labels or stickers to discs. (Do not use discs with exposed
adhesive from tape or left over peeled-off stickers.)
≥Do not use scratch-proof protectors or covers.
≥Do not use discs printed with label printers available on the market.
GROUP
PA GE
SUBTITLE
SKIP
STOP
CANCEL
HP-V.S.S.
SETUP
SP-V.S.S.
AUDIO
ONLY
REPEAT
MODE
A-B
REPEAT
PLAY
MODE
ANGLE
123
456
789
0
PAUSE PLAY
SLOW/SEARCH
AUDIO
RETURN
MARKER
ENTER
OPEN/CLOSE
T
O
P
M
E
N
U
M
E
N
U
D
I
S
P
L
A
Y
10
>
=
1
2
3
4
6
7
8
9
:
;
<
=
>
5
?
@
A
B
C
D
E
F
G
H
I
J
67890
9:
56
/ I
OPEN/CLOSE
GROUP
PHONES
AUDIO
ONLY
ADVANCED
SURROUND
HP
12345
S
10
SP
MIN MAX
AUDIO
/
VIDEO
V.S.S.
1 K < G L ? 5 8 M
N
: P Q 9 F EO
Audio CD

7
RQT6043
Basic operations
[DVD-A] [DVD-V] [VCD] [CD]
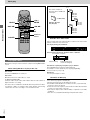
Preparation
Turn on the television and select the appropriate video input on the televi-
sion to suit the connections for the player.
1 Press [Í] to turn on the unit.
2 Press [<] to open the disc tray.
3 Place the disc on the disc tray.
4 Press [1] (PLAY).
The disc tray closes and play begins.
∫ To stop play
Press [∫] (➡ Resume function at right).
∫ To pause play
Press [;] during play.
Press [1] (PLAY) to restart play.
Note
≥If “$” appears on the television
The operation is prohibited by the unit or disc.
≥The disc continues to rotate while the menu is displayed even after you
finish playing an item. Press [∫] when you finish to preserve the unit’s
motor and your television screen.
≥Volume may be lower when playing DVDs than when playing other discs
or during television broadcasts.
If you turn the volume up on the television or amplifier, be sure to reduce
the volume again before playing other sources so that a sudden increase
in output does not occur.
∫ Auto standby
The unit switches to the standby mode after about 30 minutes in the stop
mode.
When a menu screen appears on the
television
[DVD-A] [DVD-V] [VCD]
Press the numbered buttons to select an item.
To select a 2-digit number
Example: To select item 23, press [S10] ➡ [2] ➡ [3].
≥When playing DVDs, you can also use [3, 4, 2, 1] to select items.
Press [ENTER] to confirm your selection.
Play of the selected item now begins.
Other buttons used to operate menus
Read the disc’s instructions for further details about operation.
[9]: Shows the next menu.
[:]: Shows the previous menu.
[RETURN]: Shows the menu screen. [VCD]
[TOP MENU]: Shows the first menu screen. [DVD-A] [DVD-V]
[MENU]: Shows the menu screen. [DVD-V]
Resume function
[DVD-A] [DVD-V] [VCD] [CD]
The position you stopped play at is recorded by the unit when “!” is flash-
ing on the unit’s display.
While “!” is flashing on the unit’s display, press [1] (PLAY) to start play
from where you stopped it.
If you are playing DVD-Video, the message “Press PLAY to Chapter Re-
view” or “Press PLAY to Preview Chapters” (for Asia) appears.
Press [1] (PLAY) while the message is displayed and the beginning por-
tions of each chapter up to the current one are played. Full play resumes
from the point where you stopped play.
(This feature works only within a title.)
If you do not press [1] (PLAY), the message disappears and play starts
from where you stopped it.
To cancel
Press [∫] until “!” disappears from the unit’s display.
Note
≥The resume function does not work if the disc’s play time is not displayed.
≥The position is cleared when the disc tray is opened.
Label must face upward.
(With double-sided discs,
load so the label for the side
you want to play is facing up.)
Basic play
:
,
9
GROUP
PAG E
SUBTITLE
SKIP
STOP
CANCEL
HP-V.S.S.
SETUP
SP-V.S.S.
AUDIO
ONLY
REPEAT
MODE
A-B
REPEAT
PLAY
MODE
ANGLE
123
456
789
0
PAUSE PLAY
SLOW/SEARCH
AUDIO
RETURN
MARKER
ENTER
OPEN/CLOSE
T
O
P
M
E
N
U
M
E
N
U
D
I
S
P
L
A
Y
10
>
=
Í
TOP MENU
RETURN
1
;
MENU
<
∫
ENTER
3, 4, 2, 1/
1
2
4
Numbered
buttons
Playing CD-R and CD-RW
This unit can play CD-DA (digital audio) and video CD format audio
CD-R and CD-RW that have been finalized
§
upon completion of
recording.
It may not be able to play some CD-R or CD-RW due to the condi-
tion of the recording.
§
Finalizing is a process that enables CD-R/CD-RW players to play
audio CD-R and CD-RW.

8
RQT6043
Basic operations
Basic play
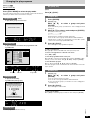
Playing MP3 discs
MP3 refers to the type of music file that is compressed using MPEG audio
layer 3.
When making MP3 discs to play on this unit
Disc format
Conform to ISO9660 level 1 and level 2
File format
MP3 files that have the suffix “.MP3” or “.mp3”.
To play in a certain order
Prefix the folder and file names with numbers with the same number of
digits at the time of recording.
Files may not be recorded in the numbered order if the prefixes have differ-
ent numbers of digits, for example 1.mp3, 2.mp3, 10.mp3. Some writing
software may also cause recording to occur in a different order.
How MP3 discs differ to CDs
A file is a single audio track and is treated as a chapter on this unit. A folder
(album) is treated as a title on this unit.
The display during play is different
The information displayed in the GUI screens is different
Total number of chapters
Chapter playing Elapsed playing time
(cannot be changed)
The method of specifying a chapter to play is different
Press [ENTER] after pressing the numbered buttons.
For example, to select chapter 23, press [2] ➡ [3] ➡ [ENTER].
You do not have to press [S10].
Repeat play
You can repeat chapters or titles.
Limitations on MP3 play
≥You cannot use program or random play.
≥The time information may not be displayed correctly.
≥If both MP3 and CD-DA data is recorded on the disc, only the data type
used for the first track is played.
≥It may take some time for play to start if the disc includes still picture data
or if there are many folders on the disc.
≥Noise may be output if a file is suffixed “.MP3” or “.mp3” but is not actually
an MP3 file.
≥This unit is not compatible with ID3 tags and packet-write format.
:
,
9
GROUP
PAG E
SUBTITLE
SKIP
STOP
CANCEL
HP-V.S.S.
SETUP
SP-V.S.S.
AUDIO
ONLY
REPEAT
MODE
A-B
REPEAT
PLAY
MODE
ANGLE
123
456
789
0
PAUSE PLAY
SLOW/SEARCH
AUDIO
RETURN
MARKER
ENTER
OPEN/CLOSE
T
O
P
M
E
N
U
M
E
N
U
D
I
S
P
L
A
Y
10
>
=
1
6
,
5
;
ENTER
CANCEL
GROUP
2, 1/
001
004.mp3
003
002
005.mp3
006.mp3
007.mp3
008.mp3
009.mp3
010.mp3
011.mp3
012.mp3
013.mp3
PGMRND
DVD V CD
A-B
TITLE TRACK CHAP V.S.S. BASS
CINEMA
VIDEO MP3
1/ 59
C
0 : 01
Files in this example are
played in order from 004.mp3
to 013.mp3
root
: Folder (Title)
004.mp3–013.mp3:
File (Chapter)
Numbered
buttons

9
RQT6043
Basic operations
Skipping chapters or tracks
[DVD-A] [DVD-V] [VCD] [CD]
During play or while paused
Press [:] or [9].
≥Each press increases the number of skips.
Frame-by-frame viewing
[DVD-A] [DVD-V] [VCD]
Remote control only
While paused
Move [2] or [1].
The frame changes each time you move the joystick.
≥The frames change in succession if you hold the joystick in position.
≥Pressing [;] also activates forward frame-by-frame.
Fast forward and rewind—SEARCH
[DVD-A] [DVD-V] [VCD] [CD]
During play
Press [6] or [5].
Turn the shuttle dial [6, 5] on the main unit.
≥Play starts again when you release the shuttle dial.
≥Audio will be heard during search for most discs. You can turn this audio
off if you want to (➡ page 18, Audio—Audio during Search).
Slow-motion play
[DVD-A] [DVD-V] [VCD]
While paused
Press [6] or [5].
Turn the shuttle dial [6, 5] on the main unit.
≥The picture stills again when you release the shuttle dial.
Starting play from a selected title or track
[DVD-A] [DVD-V] [VCD] [CD]
Press the numbered buttons to select the item.
To select a 2-digit number
Example: To select track 23, press [S10] ➡ [2] ➡ [3].
Play starts from the selected item.
Note
≥This works only when stopped with some discs.
≥This may not work with some discs.
Selecting groups to play
[DVD-A]
The tracks on DVD-Audio are divided into groups. How these groups are
played differs with the disc so read the instructions that came with the disc
for further details.
1 Press [GROUP].
2 Press [ENTER].
3 Press the numbered buttons to select the track
number and press [ENTER].
The selected group and track begin to play.
Playing all the groups in succession (➡ page 11)
Playing bonus groups
Some discs contain bonus groups. To enjoy these groups you may have to
enter a password. Refer to the disc’s jacket.
1. Press [GROUP] to select the bonus group and press [ENTER].
2. Enter the 4-digit password with the numbered buttons and press
[ENTER].
≥If you enter the wrong password, you can erase a digit by pressing
[CANCEL].
3. Press the numbered buttons to select a track and press [ENTER].
≥The bonus group can be played as many times as you like after the pass-
word has been entered until the disc is removed from the unit.
Notes
≥The speed of search and slow-motion increases up to 5 steps.
≥Press [1] (PLAY) to restart play.
≥You cannot move backwards with Video CD during frame-by-
frame and slow-motion.
≥Frame-by-frame and slow motion only work on the moving pic-
ture parts of DVD-Audio.
When playing Video CDs with playback control
Turning the shuttle dial or pressing buttons to perform SKIP,
search or slow-motion may take you to a menu screen.
T
1
G
1
The group number changes
each time you press the button.

10
RQT6043
Basic operations
Selecting still pictures—Page Skip
[DVD-A]
Remote control only
During play
Press [PAGE].
The page changes each time you press the button.
To enjoy even higher quality sound—
AUDIO ONLY
[DVD-A] [DVD-V] [VCD] [CD]
You can enjoy higher quality audio by stopping the video signal.
Press [AUDIO ONLY].
≥The button on the main unit lights.
≥AUDIO ONLY is canceled if you press the button again or turn the unit off.
The light goes out.
Note
≥Video signals are output while the disc is stopped and when operations
such as searching are performed. The television screen can appear un-
usual while video signals are not being output.
≥The television may be distorted when video signals are turned on and off
when you turn AUDIO ONLY on and off, but this is not a malfunction.
Enjoying virtual surround effects with
2 speakers or headphones (ADVANCED
SURROUND V.S.S.)
[DVD-V] [VCD]
SP-V.S.S.: Dolby Digital, DTS, MPEG, Linear PCM, 2-channel or over
only
HP-V.S.S.: Dolby Digital, MPEG, Linear PCM, 2-channel or over only
Use ADVANCED SURROUND V.S.S. (Virtual Surround Sound) to enjoy a
surround-like effect if you are using 2 front speakers or headphones.
If you are playing a disc with surround effects recorded on it, the effect is
broadened and sound seems to come from virtual speakers on either side.
During play
Press [SP-V.S.S.] or [HP-V.S.S.].
Each time you press the button:
SP 1/HP 1: Natural effect
;
SP 2/HP 2: Emphasized effect
;
SP OFF/HP OFF: Cancel (Factory preset)
Note
≥Advanced Surround will not work, or will have less effect with some discs,
even if you select “1” or “2”.
≥Turn off the surround sound effects on the equipment you have connect-
ed when using this effect.
≥Turn Advanced Surround off if it causes distortion.
≥Output from this unit will be in stereo (two channels) when Advanced
Surround is on.
Using headphones
1 Set [PHONES] to “MIN” and connect the head-
phones (not included).
Headphone plug type: 6.3 mm stereo
2 Adjust headphone volume with [PHONES].
Note
Avoid listening for prolonged periods of time to prevent hearing damage.
PAGE 1
^-------------------}
Basic play
GROUP
PAG E
SUBTITLE
SKIP
STOP
CANCEL
HP-V.S.S.
SETUP
SP-V.S.S.
AUDIO
ONLY
REPEAT
MODE
A-B
REPEAT
PLAY
MODE
ANGLE
123
456
789
0
PAUSE PLAY
SLOW/SEARCH
AUDIO
RETURN
MARKER
ENTER
OPEN/CLOSE
T
O
P
M
E
N
U
M
E
N
U
D
I
S
P
L
A
Y
10
>
=
PAGE
AUDIO ONLY
PLAY MODE
1
ENTER
3, 4, 2, 1/
CANCEL
SP-V.S.S.
HP-V.S.S.
6
,
5
Numbered
buttons
A
Speaker Speaker
3 to 4 times distance A
Optimum seating position
OO
OO
OWhen using the
television’s speakers
NN
NN
N
Distance Al
Television’s width
Seating position
PHONES
MIN MAX
1
2

11
RQT6043
Advanced operations
[DVD-A] [VCD] [CD]
Remote control only
While stopped
Press [PLAY MODE] to select the play mode.
The mode changes each time you press the button. Select the mode then
follow the procedures in the next column to start play.
All group play [DVD-A]
To play all the groups in succession
Program play
To play a maximum of 32 tracks in a programmed order
e.g. DVD-Audio
Random play
To play tracks randomly
e.g. DVD-Audio (three groups)
Normal play
≥The program is retained in memory.
All group play
[DVD-A]
Press [1] (PLAY).
Program play
1 Press [ENTER].
2 [DVD-Audio\only]
Move [3, 4] to select a group and press
[ENTER].
If you select bonus groups, you will have to enter a 4-digit password
(➡ page 9).
3 Move [3, 4] to select a track and press [ENTER].
Each time you move the joystick,
1()2( - - - - - - - )ALL
^---------------------------------------J
≥Repeat steps 1, 2 and 3 to program other tracks.
≥You can also select a group or track with the numbered buttons.
≥All the tracks on a disc are selected when you select “ALL” (all the
tracks in the selected group with DVD-Audio).
4 Press [1] (PLAY).
Play now begins in the programmed sequence.
To add or change tracks
Move [3, 4] to select an available item, then repeat steps 1–3.
To move to the page before or after the one shown
Press [6] or [5].
To clear the programmed tracks one by one
Move [3, 4] to select the item number (No) and press [CANCEL]. (Alter-
natively, you can select “Clear” with [3, 4, 2, 1] and press [ENTER].)
To clear the whole program
Move to “Clear all” with [3, 4, 2, 1] and press [ENTER].
The whole program is also cleared when the unit is turned off or the disc
tray is opened.
Random play
1 [DVD-Audio\only]
Move [2, 1] to select a group and press
[ENTER].
≥You can select more than one group.
≥You can also select groups with the numbered buttons.
≥If you select bonus groups, you will have to enter a 4-digit pass-
word (➡ page 9).
2 Press [1] (PLAY).
Play now begins in random order.
To clear a group [DVD-A]
Move [2, 1] to select the group you want to clear, then press [ENTER].
Press PLAY to start
All Group Playback
PLAY MODE
ENTER
RETURN
6
∫ 1
5
Choose a group and track, then press ENTER.
No Time
G
Total Time
0 Press PLAY to start
T
Play
Clear
Clear all
0:00
SELECT
1
Choose a group or groups
All123
Random Playback
0 Press PLAY to start
ENTER
RETURN
SELECT
DVD
AUDIO
Changing the play sequence
PGMRND
DVD VCD
A-B
TITLE TRACK CHAP V.S.S. BASS
CINEMA
VIDEO
GROUP
AUDIO
Group No. Track No. Program No.
RND
DVD
AUDIO

12
RQT6043
Advanced operations
Repeat play
[DVD-A] [DVD-V] [VCD] [CD]
Remote control only
A-B repeat play
You can repeat a section between points A and B within a title or track.
1 During play
Press [A-B REPEAT] at the starting point (A).
2 Press [A-B REPEAT] at the finishing point (B).
To cancel
Press [A-B REPEAT] until “`¢¢” is displayed.
Note
≥A-B repeat play does not work if the DVD’s elapsed play time is not
shown on the unit’s display.
≥Some subtitles recorded around point A or B may fail to appear (DVD).
≥The unit automatically determines the end of a title/track as point B when
the end of the title/track is reached.
Repeat play
During play
Press [REPEAT MODE].
Each time you press the button:
e.g. DVD-Video
≥DVD-Audio
Track (T)>Whole group (G)>OFF
^----------------------------------------------------}
During All group, Program, or Random play modes, “A” is displayed
instead of “G”.
≥DVD-Video
Chapter (C)>Title (T)>OFF
^------------------------------------------}
≥Video CD/CD
Track (T)>Entire disc (A)>OFF
^------------------------------------------------}
If the Video CD has playback control
1. Press [∫] during play until “PBC PLAY” is cleared from the display.
2. Press the numbered buttons to select a track to start play (➡ page 9).
3. Press [REPEAT MODE] (➡ above).
Note
You cannot use repeat play to repeat an entire DVD-Video.
∫ To repeat only your favorite tracks
[DVD-A] [VCD] [CD]
Start program play (➡ page 11) and press [REPEAT MODE] to display the
repeat mode you like.
Marking places to play again––MARKER
You can mark specific points on a disc to return to later. All the markers are
cleared when the unit is turned off, or the disc tray is opened.
1 Press [MARKER].
2 Press [ENTER] at the point you want to mark.
To select another marker, move [2, 1].
To play from a marked position
Move [2, 1] to select a marker number and press [ENTER].
To clear a marker
Move [2, 1] to select a marker number and press [CANCEL].
A
✱
C T
OFF
PGMRND
DVD VCD
A-B
V.S.S. BASS
VIDEO
✱✱✱✱✱
GROUP
PAG E
SUBTITLE
SKIP
STOP
CANCEL
HP-V.S.S.
SETUP
SP-V.S.S.
AUDIO
ONLY
REPEAT
MODE
A-B
REPEAT
PLAY
MODE
ANGLE
123
456
789
0
PAUSE PLAY
SLOW/SEARCH
AUDIO
RETURN
MARKER
ENTER
OPEN/CLOSE
T
O
P
M
E
N
U
M
E
N
U
D
I
S
P
L
A
Y
10
>
=
A-B REPEAT
MARKER
∫
CANCEL
REPEAT MODE
ENTER
2, 1/
PGMRND
DVD VCD
A-B
V.S.S. BASS
VIDEO

13
RQT6043
Advanced operations
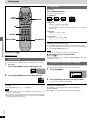
Changing soundtracks, subtitle languages and angles
[DVD-A] [DVD-V]
Remote control only
Some DVDs have multiple soundtracks, subtitle languages and camera
angles, and you can change these during play.
Soundtracks
During play
Press [AUDIO].
The number changes each time you press the button.
e.g. DVD-Video
DVD-VideoDVD-Audio
Soundtrack playing
Soundtrack selected
Indicates that a multi-channel
soundtrack can be down-mixed to
two channels.
Lights when a multi-chan-
nel soundtrack is playing.
Subtitles
During play
Press [SUBTITLE].
The number changes each time you press the button.
To clear/display the subtitles
1. Press [SUBTITLE].
2. Move [1].
3. Move [3, 4] to select “OFF” or “ON”.
Angles
During play
Press [ANGLE].
The number changes each time you press the button.
Subtitle language number
Angle number
192k24b 2ch
LPCM
3/2.1 ch
Digital
Î
1 ENG
1
1
≥Play restarts from the beginning of the soundtrack when changing DVD-
Audio soundtracks that are accompanied by still pictures.
≥Even if a second soundtrack isn’t recorded on a DVD-Audio, two
soundtrack numbers will normally be shown when you press [AUDIO].
The soundtrack currently playing is number 1.
≥You can also use this button to turn the vocals on and off on karaoke
discs. Read the disc’s instructions for details.
PGMRND
DVD VCD
A-B
GROUP TITLE TRACK CHAP D.N.R. D.MIX P.PCM V.S.S. BASS
CINEMA
MLT.CH
VIDEO MP
3
AUDIO
I love you
Je t’aime
ENG
ON
FRA
ON
1
2
1
2
GROUP
PAG E
SUBTITLE
SKIP
STOP
CANCEL
HP-V.S.S.
SETUP
SP-V.S.S.
AUDIO
ONLY
REPEAT
MODE
A-B
REPEAT
PLAY
MODE
ANGLE
123
456
789
0
PAUSE PLAY
SLOW/SEARCH
AUDIO
RETURN
MARKER
ENTER
OPEN/CLOSE
T
O
P
M
E
N
U
M
E
N
U
D
I
S
P
L
A
Y
10
>
=
ANGLE
AUDIO
3, 4, 1
SUBTITLE
Notes regarding soundtracks and subtitle languages
≥“–” or “––” is displayed instead of the language number in circum-
stances such as when no language is recorded on the disc.
≥In some cases, the subtitle language is not changed to the selected
one immediately.
≥Refer to [D] and [E] on page 15 for language abbreviations and audio
signal type details.

14
RQT6043
Advanced operations
Using Graphical User Interface (GUI) screens
GUI screens are menus that contain information about the disc or unit.
These menus allow you to perform operations by changing this informa-
tion.
Common procedures
[DVD-A] [DVD-V] [VCD] [CD]
Remote control only
1 Press [DISPLAY].
Each time you press the button:
[A] Disc information>[B] Unit information (➡ step 2)
:;
Original display(- [C] Shuttle screen
≥The screens depend on the disc contents.
2 [Unit\information\only]
While the leftmost icon is highlighted
Move [3, 4] to select the menu.
Each time you move the joystick:
Play menu(-----)Video menu
ee
uu
Display menu()Audio menu
3 Move [2, 1] to select the item.
4 Move [3, 4] to select the setting.
≥Items with “3” or “4” above and below can be changed by [3, 4].
≥Press [ENTER] if the setting does not change after moving [3, 4].
≥Some items require different operations. Read the explanations on
the following pages.
For your reference
≥Depending on the condition of the unit (playing, stopped, etc.) and the
type of software you are playing, there are some items that you cannot
select or change.
≥When numbers are displayed (e.g. title No.), the numbered buttons are
also effective for setting. After entering numbers, press [ENTER] to regis-
ter the setting.
To clear the icons
Press [RETURN] until the menus disappear.
∫ To change the position of the icons
1. Move [2, 1] to select the rightmost icon.
2. Move [3, 4] to move the icons.
(There are 5 positions)
ª
A
Disc information
GROUP
PAG E
SUBTITLE
SKIP
STOP
CANCEL
HP-V.S.S.
SETUP
SP-V.S.S.
AUDIO
ONLY
REPEAT
MODE
A-B
REPEAT
PLAY
MODE
ANGLE
123
456
789
0
PAUSE PLAY
SLOW/SEARCH
AUDIO
RETURN
MARKER
ENTER
OPEN/CLOSE
T
O
P
M
E
N
U
M
E
N
U
D
I
S
P
L
A
Y
10
>
=
DISPLAY
RETURN
ENTER
3, 4, 2, 1/
Numbered
buttons
e.g. DVD-Video
a T: Title number [DVD-V]
G: Group number [DVD-A]
b C: Chapter number [DVD-V]
T: Track number [DVD-A] [VCD] [CD]
c Time [DVD-A] [DVD-V]
Select a position to start play by specifying a time with the numbered
buttons.
Changing the time display [DVD-A] [VCD] [CD]
Move [3, 4] to show the elapsed play time, remaining time for the
track, or remaining time for the disc/group (DVD-A).
d Soundtrack language [DVD-A] [DVD-V] (➡ page 13)
(See [D] on page 15 for language abbreviations.)
e Audio signal type [DVD-A] [DVD-V] (➡ page 13)
(See [E] on page 15 for details.)
Karaoke vocal on/off (Karaoke DVD only) [DVD-V]
Solo: OFF or ON Duet: OFF, V1iV2, V1 or V2
f Subtitle language [DVD-A] [DVD-V] (➡ page 13)
(See [D] on page 15 for language abbreviations.)
Subtitles on/off
ON()OFF
g Angle number [DVD-A] [DVD-V] (➡ page 13)
h Still picture number [DVD-A]
Selected picture is shown during play.
i Audio mode [VCD]
LR()L()R
^---------------------J
j Menu play [VCD] (with playback control only)
Indicates whether menu play (playback control) is on or off.
e.g. DVD-Audio e.g. Video CD
2
C
2
1 : 46 : 50
1 ENG 3/2.1 ch
Digital
Î
ENG
ON
1
1
T
cba d e f g
T
P B C
L R
ON
ji
GT
Page
1
h

15
RQT6043
Advanced operations
ª
B
Unit information
a A-B repeat [DVD-A] [DVD-V] [VCD] [CD] (➡ page 12)
[ENTER] (start point) ➡ [ENTER] (finish point)
To cancel: [ENTER]
b Repeat play [DVD-A] [DVD-V] [VCD] [CD] (➡ page 12)
≥DVD-Audio
Track (T)(>Whole group (G)(>OFF
^-----------------------------------------------------------J
≥DVD-Video
Chapter (C)(>Title (T)(>OFF
^------------------------------------------------J
≥Video CD/CD
Track (T)(>Entire disc (A)(>OFF
^------------------------------------------------------J
c Play mode display [DVD-A] [VCD] [CD]
---: Normal play PGM: Program play
RND: Random play ALL: All group play ([DVD-A])
d Marker [DVD-A] [DVD-V] [VCD] [CD] (➡ page 12)
Video menu
Digital picture mode [DVD-A] [DVD-V] [VCD]
N: Normal mode
C: Cinema mode (Mellows movies, enhances detail in dark scenes.)
U: User mode
The following items are also displayed when you select “U”.
a Contrast (j7 to i7)
b Brightness (0 to i15)
c Sharpness (j6 to i6)
d Color (j7 to i7)
ª
C
Shuttle screen
N
a ADVANCED SURROUND V.S.S. mode [DVD-V] [VCD] (➡ page 10)
SP()HP
b SP/HP level [DVD-V] [VCD] (➡ page 10)
1()2()OFF
^---------------------J
c Dialogue Enhancer [DVD-V]
(Dolby Digital/DTS, 3-channel or over only)
ON()OFF
The volume of the dialogue from the center channel is raised when you
select “ON”.
E: Slow-motion play (Backward) [DVD-A] [DVD-V]
;: Pause
D: Slow-motion play (Forward) [DVD-A] [DVD-V] [VCD]
6: Search (Backward)
1: Play
5: Search (Forward)
Note
The numbers on either side of the shuttle screen indicate the maximum
speeds of the search.
r
100
j
100
Play menu Audio menu
Display menu
a IPB display [DVD-V] (➡ page 21)
ON()OFF
Displays the picture type (I/P/B) in the still picture mode.
b Display dimmer
Changes the brightness of the unit’s display.
BRIGHT()DIM()AUTO
§
([DVD-A] [DVD-V] [VCD])
^---------------------------------J
§
The display is dimmed during play, but brightens when you perform ope-
rations such as slow-motion, search, and pause.
[D] Audio/Subtitle language
ENG: English SVE: Swedish CHI: Chinese
FRA: French NOR: Norwegian KOR: Korean
DEU: German DAN: Danish MAL: Malay
ITA: Italian POR: Portuguese VIE: Vietnamese
ESP: Spanish RUS: Russian THA: Thai
NLD: Dutch JPN: Japanese ¢: Others
[E] Signal type/data
LPCM/PPCM/Î Digital/DTS/MPEG: Signal type
k (kHz): Sampling frequency
b (bit): Number of bits
ch (channel): Number of channels
Example:
3/2 .1ch
.1: Subwoofer signal
(not displayed if there is no subwoofer signal)
0: No surround
1: Mono surround
2: Stereo surround (left/right)
1: Center
2: Front leftiFront right
3: Front leftiFront rightiCenter
SP OFF
OFF
ca b
OFF BRIGHT
I P B
I P B
ab
AB
––– 1 2 3 ✱✱
OFF
ab c d
U
0
0 0 0
a b c d

16
RQT6043
Advanced operations
This unit has built-in Dolby Digital and DTS decoders (➡ page 21).
You can enjoy the powerful movie theater and hall-like sound available with Dolby Digital and DTS by connecting an amplifier with 5.1-channel input
terminals. You do not need to purchase separate Dolby Digital or DTS decoders.
Use analog connection to enjoy audio recorded with high sampling frequencies (over 48 kHz). To protect the rights of the producers of this
kind of material, this audio will be down-sampled to 48 kHz or 44.1 kHz if you use digital connection.
To enjoy 5.1-channel surround sound
Analog connection
Connect an amplifier with 5.1-channel audio input terminals.
Change “Speaker setting” (➡ page 19).
Digital connection
Connect an amplifier with a built-in decoder or a decoder-amplifier combi-
nation.
Change “Digital output” (➡ page 20).
Note
≥Turn speaker and headphone V.S.S. (➡ page 10) off when you connect
through the 5.1-channel output terminals. The unit does not output the
signals for channels other than the front speakers when V.S.S. is on.
≥If you do not connect a subwoofer, it is advisable to connect front spea-
kers (L/R) capable of producing bass of less than 100 Hz.
Note
You cannot use DTS Digital Surround decoders not suited to DVD-Video.
DIGITAL AUDIO OUT
(
PCM/BITSTREAM
)
CENTER
AUDIO OUT
SUB-
WOOFER
R
R
FRONT
R
SURROUND
VIDEO
OUT
S VIDEO
OUT
OPTICAL
SURROUND
L
FRONT
L
L
2ch5.1ch
DIGITAL AUDIO OUT
(
PCM/BITSTREAM
)
CENTER
AUDIO OUT
SUB-
WOOFER
R
R
FRONT
R
SURROUND
VIDEO
OUT
S VIDEO
OUT
OPTICAL
SURROUND
L
FRONT
L
L
2ch5.1ch
SUB-
WOOFER
SURROUND FRONTCENTER
(L) (R) (R) (L)
OPTICAL
Back of the unit Back of the unit
Optical digital audio
cable
Do not bend when
connecting.
Amplifier
Audio cable
Connect cables to
terminals corresponding
to the speakers you have
connected.
Insert fully,
with this side
facing up.
Speakers
You can enjoy surround sound by connecting from
three to six speakers.
Example: Six speakers
White WhiteRed RedWhite Red
Home Theater—Enjoying more powerful sound

17
RQT6043
Advanced operations
Recording to MDs or cassette tapes
To make a digital recording
1. Connect the recording equipment with an optical digital audio cable
(➡ [B] above).
2. When recording DVDs, make the following settings.
ADVANCED SURROUND V.S.S.: OFF (➡ page 10)
PCM Down Conversion: Yes (➡ page 20)
Dolby Digital/DTS Digital Surround/MPEG: PCM (➡ page 20)
MPEG: Not available in Asia.
∫ Analog recording
You can record to an MD or cassette deck. Using analog connection
means sound will be unaffected by the copy guards found on DVDs.
To make an analog recording
Connect the recording equipment with an audio cable (➡ [A] above).
∫ Digital recording
You can record the digital signal directly onto an MD.
The signals on DVDs will be converted to 48 kHz/16 bit linear PCM.
Ensure the following conditions are met.
≥There is no copy guard recorded on the disc.
≥The recording equipment can handle a sampling frequency of 48 kHz.
Note
≥The equipment connections described are examples.
≥Peripheral equipment and optional cables sold separately unless otherwise indicated.
≥Before connection, turn off all equipment and read the appropriate operating instructions.
To enjoy stereo or Dolby Pro Logic
ªA
Analog connection
Connect an analog amplifier or system component.
ªB
Digital connection
Connect a digital amplifier or system component.
Change “Digital output” (➡ page 20).
To enjoy Dolby Pro Logic
≥If you connect an amplifier that can decode Dolby Pro Logic, you will also need to connect center and surround speakers to enjoy surround
sound. Read the instructions for the equipment for connection details.
≥Turn Advanced Surround off (➡ page 10). Dolby Pro Logic will not function correctly if Advanced Surround is on.
DIGITAL AUDIO OUT
(
PCM/BITSTREAM
)
CENTER
AUDIO OUT
SUB-
WOOFER
R
R
FRONT
R
SURROUND
VIDEO
OUT
S VIDEO
OUT
OPTICAL
SURROUND
L
FRONT
L
L
2ch5.1ch
DIGITAL AUDIO OUT
(
PCM/BITSTREAM
)
CENTER
AUDIO OUT
SUB-
WOOFER
R
R
FRONT
R
SURROUND
VIDEO
OUT
S VIDEO
OUT
OPTICAL
SURROUND
L
FRONT
L
L
2ch5.1ch
R
L
AUX IN
OPTICAL
Amplifier or system component
Insert fully,
with this side
facing up.
Optical digital audio cable
Do not bend when connecting.
Audio cable
WhiteRed

18
RQT6043
Advanced operations
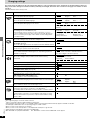
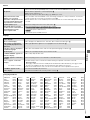
This chart shows the settings for this unit. Change the settings to suit your preferences and to suit the unit to the environment in which it is
being used. These settings are retained in memory until they are changed, even if the unit is turned off. See page 19 for details on menu
operation.
≥Underlined items are the factory preset.
Changing settings
Options
English French German Italian
Spanish Original
§1
Other ¢¢¢¢
§2
Automatic
§3
English French German
Italian Spanish Other ¢¢¢¢
§2
English French German Italian
Spanish Other ¢¢¢¢
§2
For Asia: Language options are English and
Chinese.
Setting ratings (When level 8 is selected)
8 No Limit 1 to 7
§4
0 Lock All
Changing ratings (When level 0–7 is selected)
Unlock Player Change Level
Change Password Temporary Unlock
4:3 Pan&Scan 4:3 Letterbox 16:9
Video S-Video RGB
Automatic Field Frame
PAL60: when connected to a PAL television.
NTSC: when connected to an NTSC television.
(For Asia: “NTSC” is the factory preset.)
Multi-channel
§5
Speaker presence and size
Delay time Channel balance
2-channel
§6
No Yes
Bitstream PCM
PCM Bitstream
PCM Bitstream
Off On
On Off
§7
English Français Deutsch
Italiano Español
For Asia: English
On Off
Off On
Off On
Items
Audio [DVD-A] [DVD-V]
Choose the preferred audio language.
Subtitle [DVD-A] [DVD-V]
Choose the preferred subtitle language.
Menus [DVD-A] [DVD-V]
Choose the preferred language for disc menus.
Ratings [DVD-V]
Set a ratings level to limit DVD-Video play.
≥The password screen is shown if you choose levels 0 to 7 or if you
choose “ Ratings” when levels 0 to 7 have been selected. (➡ page 19)
≥Select “Level 0” to prevent play of discs that do not have ratings levels
recorded on them.
TV Aspect (➡ page 5)
Choose the setting to suit your television and preference.
(For the United Kingdom, Continental Europe and Russia)
AV1 Output (➡ page 4)
Choose the video signal format to be output from the AV1 SCART terminal.
Still Mode (➡ page 21)
Specify the type of picture shown when paused.
NTSC Disc Output
Choose whether PAL 60 or NTSC signals are output during playback of
NTSC discs (➡ page 6).
Speaker Setting [DVD-A] [DVD-V] (➡ page 19)
Choose the settings to suit your audio system and the listening
environment.
PCM Down Conversion [DVD-A] [DVD-V] (➡ page 20)
Dolby Digital [DVD-A] [DVD-V] (➡ page 20)
DTS Digital Surround [DVD-A] [DVD-V] (➡ page 20)
(For the United Kingdom, Continental Europe, Russia, Australia and
N.Z.) MPEG [DVD-A] [DVD-V] (➡ page 20)
D. Range Compression [DVD-A] [DVD-V] (Dolby Digital only)
Change the dynamic range for late night viewing.
Audio during Search [DVD-A] [DVD-V] [VCD]
Choose whether to have sound during search.
Menu Language
Choose the preferred language for these menus and the on-screen messages.
On-Screen Messages
Choose whether to show on-screen messages or not.
DVD-Video Mode
Select how to play pictures contained on some DVD-Audio.
§8
The setting returns to “Off” when you remove the disc or turn the unit off.
Demo
A demonstration of the unit’s on-screen displays starts when you select
“On”. The demonstration stops when you press a button and the setting
reverts to “Off”.
Menus
Disc
Video
Audio
Display
Others
Remarks
§1
The original language of each disc will be selected.
§2
Input a code number with the numbered buttons (➡ page 23).
§3
If the language selected for “Audio” is not available, subtitles of that language will automatically appear if available on that disc.
§4
Prohibits play of DVD-Video with corresponding ratings recorded on them.
§5
When you have connected 3 or more speakers.
§6
When you have connected 2 speakers or an amplifier with a Dolby Pro Logic decoder.
§7
Audio will still be heard during search with some DVD-Audio.
§8
Off: DVD-Audio are played as DVD-Audio. On: DVD-Video contents found on DVD-Audio can be played.

19
RQT6043
Advanced operations
Speaker setting
[DVD-A] [DVD-V]
Change speaker presence and size a, delay time b, and channel
balance c to suit the speakers you have connected.
These settings are not necessary when you select “2-channel”
(only two speakers are connected).
Speaker presence and size (a)
1. Use [3, 4, 2, 1] to select the item and press [ENTER].
2. Move [3, 4] to select the setting and press [ENTER].
Icon examples: Surround speaker (L)
Large: When the speaker supports low-frequency (under 100 Hz) repro-
duction.
Small: Select when the speaker does not support low-frequency
reproduction.
The size setting for the front speakers is automatically determined by the
setting for the subwoofer.
(Continued on next page)
SETUP
SELECT
ENTER RETURN
m s
m s
d B
0
d Bd B
L
Exit
Test
LS
R
SW
C
RS
d B
0
0
0
0
0
b a c
a
a
c a
accab
(L) (R)
LS LS
Common procedures
Remote control only
See page 18 for menu and option details.
1 Press [SETUP] to show the menus.
2 Move [2, 1] to select the menu’s tab.
The screen changes to display the menu.
Disc menu Video menu Audio menu
(---) (---)
::
;;
Others menu Display menu
(------------------------------------------------------)
3 Move [3, 4] to select the item you want to
change and press [ENTER].
4 Move [3, 4] to select the option and press
[ENTER].
The screen now shows the menu again.
To return to the previous screen
Press [RETURN].
When you are finished
Press [SETUP].
Entering a password (Ratings)
[DVD-V]
The password screen is shown when you select levels 0 to 7.
1. Input a 4-digit password with the numbered buttons and press
[ENTER].
≥If you enter a wrong number, press [CANCEL] to erase it before you
press [ENTER].
≥The lock symbol appears closed to show the rating is locked.
≥Do not forget your password.
2. Press [ENTER] to confirm the 4 digits.
Now, when you insert a DVD-Video that exceeds the ratings limit
you set, a message appears on the television.
Follow the on-screen instructions.
Front (L)
Center
Front (R)
Test
signal
Exit
Surround
Subwoofer
SmallLarge
Numbered
buttons
Disc
SELECT
Audio
Subtitle
Menus
Ratings
English
English
Automatic
Level 8
SETUP
SETUP
ENTER RETURN
Enter a 4-digit password,
then press ENTER.
Ratings
✱✱✱✱
Password
SELECT
GROUP
PAG E
SUBTITLE
SKIP
STOP
CANCEL
HP-V.S.S.
SETUP
SP-V.S.S.
AUDIO
ONLY
REPEAT
MODE
A-B
REPEAT
PLAY
MODE
ANGLE
123
456
789
0
PAUSE PLAY
SLOW/SEARCH
AUDIO
RETURN
MARKER
ENTER
OPEN/CLOSE
T
O
P
M
E
N
U
M
E
N
U
D
I
S
P
L
A
Y
10
>
=
RETURN
ENTER
3, 4, 2, 1/
CANCEL
SETUP
No

20
RQT6043
Advanced operations
Delay time (b)
[DVD-V] (Dolby Digital, center and surround speakers only)
For optimum listening with 5.1-channel sound, all the speakers, except for
the subwoofer, should be the same distance from the seating position. If you
have to place the center or surround speakers closer to the seating position,
adjust the delay time to make up for the difference.
If distance d (from the center speaker) and f (from the surround speak-
ers) are the same as or greater than e (from the front speakers), leave the
delay time as “0”, the factory preset.
If either distance d or f is less than e, find the difference in the relevant
table and change to the recommended setting.
Changing the delay time
1. Use [3, 4, 2, 1] to select the delay time box and press [ENTER].
2. Move [3, 4] to adjust the delay time and press [ENTER].
≥Center speaker ≥Surround speakers
Channel balance (c)
1. Use [3, 4, 2, 1] to select “Test” and press [ENTER].
A test signal is output from one speaker at a time, starting with the front
left speaker and proceeding clockwise.
FRONT(L)_--)CENTER_--)FRONT(R)
:;
SURROUND(L)(-----------==SURROUND(R)
2. While listening to the test signal, move [3, 4] to adjust the vol-
ume of the center and surround speakers so they are the same
apparent volume as the front speakers.
(The front speakers cannot be adjusted here.)
3. Press [ENTER].
The test signal stops.
Note
No signal is output for the subwoofer. To adjust its volume, play something,
then return to this screen to adjust to suit your taste.
When you are finished
Use [3, 4, 2, 1] to select “Exit” and press [ENTER].
Note
The unit may be unable to output as set here due to limitations imposed by
the unit itself or the disc being played. (The FL display’s “P.PCM” indicator
lights or “D.MIX” indicator goes out in these cases.)
Setting
1.3 ms
2.6 ms
3.9 ms
5.3 ms
Difference
Approx. 50 cm
Approx. 100 cm
Approx. 150 cm
Approx. 200 cm
Setting
5.3 ms
10.6 ms
15.9 ms
Difference
Approx. 200 cm
Approx. 400 cm
Approx. 600 cm
Changing settings
Digital output
[DVD-A] [DVD-V]
Change the settings when you have connected equipment through this
unit’s DIGITAL AUDIO OUT terminal (OPTICAL).
PCM Down Conversion
Select how to output the high-quality audio signals (sampling frequencies
of 96 kHz and 88.2 kHz) on discs that do not have copyright protection.
Choose the settings to suit the equipment you have connected.
Note
≥Some equipment cannot handle sampling frequencies of 88.2 kHz, even
if they can handle 96 kHz. Read your equipment’s operating instructions
for details.
≥Signals are down-sampled to either 48 kHz or 44.1 kHz despite the
above settings if they have a sampling frequency of 176.4 kHz or more or
are copyright protected.
Dolby Digital, DTS Digital Surround and MPEG
§
Bitstream: Select if the equipment you connected can decode the signal.
(Factory preset for Dolby Digital)
PCM: Select if the equipment you connected cannot decode the signal.
(Factory preset for DTS Digital Surround and MPEG)
IMPORTANT
If the equipment you connected cannot decode the signal, the setting
must be changed to PCM. If not, signals the equipment cannot pro-
cess will be output by this unit, causing high levels of noise which
can damage your hearing and the speakers.
§
MPEG: Not available in Asia.
Setting
No
Yes
Equipment
(Able to handle
88.2 kHz or more)
Yes
No
Audio output
Output as is
Down-sampled to
48 kHz or 44.1 kHz
LS
RS
L
R
SW
f
e
d
C
Page is loading ...
Page is loading ...
Page is loading ...
Page is loading ...
-
 1
1
-
 2
2
-
 3
3
-
 4
4
-
 5
5
-
 6
6
-
 7
7
-
 8
8
-
 9
9
-
 10
10
-
 11
11
-
 12
12
-
 13
13
-
 14
14
-
 15
15
-
 16
16
-
 17
17
-
 18
18
-
 19
19
-
 20
20
-
 21
21
-
 22
22
-
 23
23
-
 24
24


Ask a question and I''ll find the answer in the document
Finding information in a document is now easier with AI
Related papers
-
Panasonic DVD-A7 Owner's manual
-
-
-
-
-
-
Panasonic DMPBD10 Operating instructions
-
-
-
Panasonic DVDA10 Operating instructions
Other documents
-
Denon DVD-800 User manual
-
Yamaha DV-S5270 User manual
-
Technicolor - Thomson DTH4500 User manual
-
 SENZ SDVD20 DVD SPILLER Owner's manual
-
Hitachi HTD-K160 User manual
-
-
-
-
-
