Se usarán controladores estándar.
botón de modo telefónico
La touche Téléphone s’allume.
Le système utilise des pilotes stan
Telephone mode button
Your PC’s standard drivers will be used.
|
If your telephone
has a separate
headset port,
please refer to
the “Guide for ad-
ditional functions”
for setting up and
using this port.
|
Si votre téléphone
possède un
connecteur
micro-casque,
consultez le Guide
des fonctions
additionnelles.
|
Si su teléfono dis-
pone de un puerto
para microcascos
independiente,
consulte la ”Guía
de funciones
adicionales” para
configurar utilizar
este puerto.
|
English
|
Français
|
Español
Installation
Votre micro-casque peut se configurer
de deux manières : soit téléphone OU
ordinateur, soit téléphone ET ordinateur.
Raccordement au téléphone
[3.1] Sur le téléphone, débranchez le
combiné.
[3.2] Raccordez le combiné à la base.
[3.3] Branchez le cordon de la base sur
le téléphone.
Raccordement USB à l’ordinateur
Note : l’appareil est reconnu sous le nom
GN9350.
[3.4] Branchez la petite extrémité du
cordon USB sur le port USB de la base.
[3.5] Branchez la grosse extrémité sur
le port USB de l’ordinateur.
-
dard. Systèmes d’expl. compatibles :
voir Guide des fonctions additionnelles.
Raccordement électrique
[3.6] Branchez l’adaptateur sur la base.
[3.7] Branchez l’adaptateur sur une prise.l’adaptateur sur uneprise. sur une prise.
Configuración
Puede configurarlo para utilizarlo con
teléfono/PC o con ambos.
Conexión al teléfono
[3.1] Desench. cable microteléfono.
[3.2] Enchufe microteléfono a base.
[3.3] Enchufe cable base a teléf.
Conexión al PC mediante USB
Nota: El identificador aparecerá como
GN9350.
[3.4] Enchufe extremo peq. de cable
USB al puerto USB de base.
[3.5] Enchufe extremo grande de cable
USB al puerto USB de PC.
Consulte la Guía de funciones adicionales
para conocer SO compatibles.
Conexión a alimentación
[3.6] Enchufe adaptador a base.
[3.7] Enchufe adapt. a toma eléc.
El se
iluminará.
Setting up
You can set up your headset in 2 ways:
use with either telephone or PC or use
with both telephone and PC.
Connecting to telephone
[3.1] Unplug handset cord.
[3.2] Plug handset cord to base.
[3.3] Plug base’s cord to telephone.
Connecting
to PC via USB
Note: Unit ID will appear as GN9350.
[3.4] Plug small end of supplied USB
cord to base’s USB port.
[3.5] Plug large end of supplied USB
cord to PC’s USB port.
See Guide for additional functions for
supported operating systems.
Connecting to power
[3.6] Plug power adapter into base.
[3.7] Plug power adapter into electrical
outlet.
will light.
Page 6
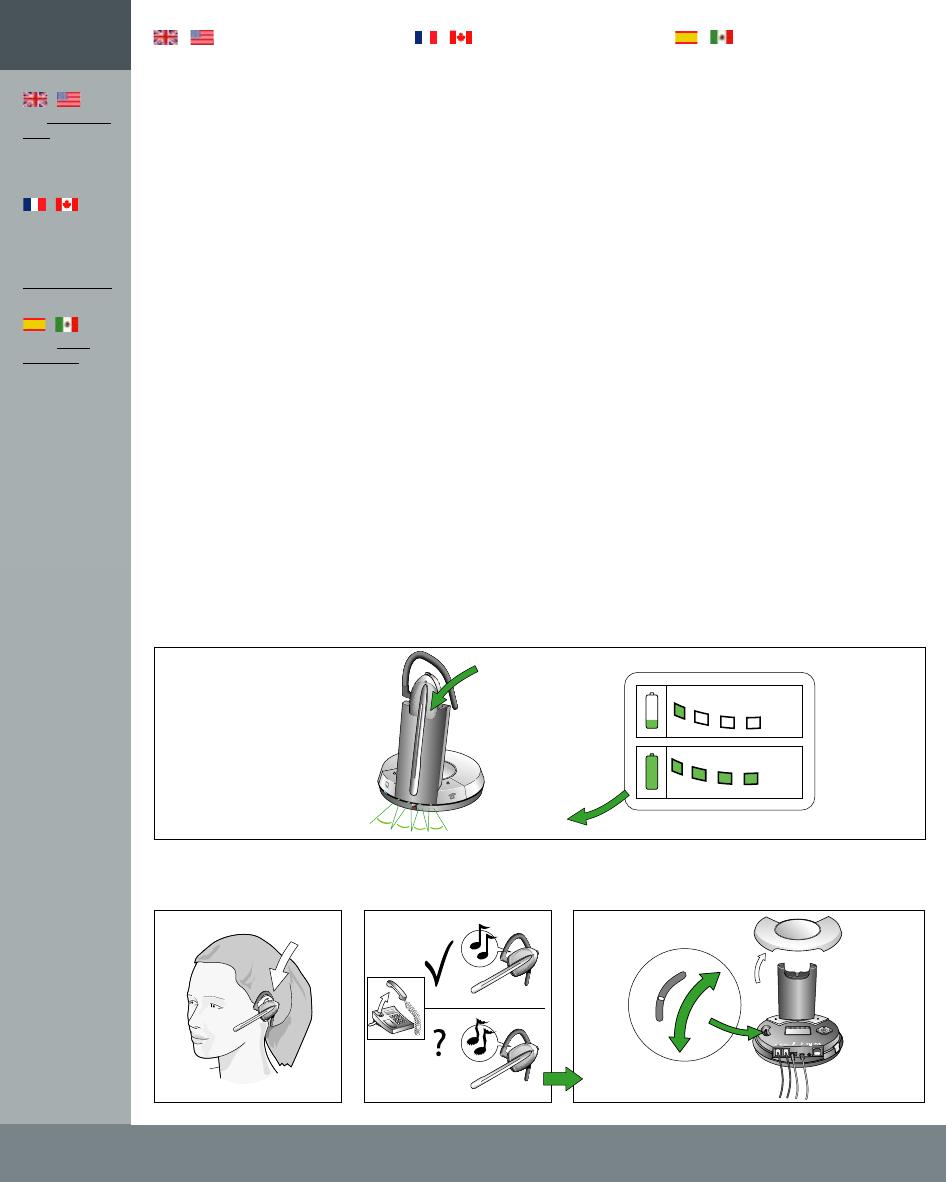
Battery indicator
Si no se oye tono o éste no es claro,
El nº de diodos iluminados indica
Todos los diodos del
Le nombre de diodes allumées indique
En l’absence de tonalité ou si elle n’est
Toutes les diodes du
If no/unclear dial tone is heard,
The number of lit battery indicator
1 sec )))
25 %
100 %
A
B
C
D
E
F
G
4.1-4.2
4.3 4.4 4.5-4.6
Charging/Dial tone Charge/Tonalité Carga/tono de llamada
4
|
See www.jabra.
com for more
about clear dial
tone adjustment.
|
Pour plus d’infos
sur le réglage
de la tonalité,
consultez
www.jabra.com
|
Visite www.
jabra.com para
obtener más
información
acerca del ajuste
de tono de
llamada claro.
Charging
Charge
Carga
Clear dial tone adjustment
Réglage de la tonalité
Ajuste de tono de llamada
|
English
|
Français
|
Español
Charge
[4.1] Placez le micro-casque dans le
berceau de charge.
voyant de
batterie s’allument 1 seconde.
[4.2] Chargez le micro-casque au
moins 30 mn (charge complète : 3 h).
le niveau de charge, même si le micro-
casque n’est pas dans la base.
Réglage de la tonalité
[4.3] Mettez le micro-casque.
[4.4] Décrochez le combiné, vous
entendez la tonalité dans le casque.
pas nette, poursuivez le réglage, voir 4.6.
[4.5] Retirez le couvercle pour accéder
à la molette de réglage de la tonalité.
[4.6] Faites-la coulisser de A à G pour
obtenir une tonalité nette. Si celle-ci est
aussi nette sur A que sur G, restez sur A.
Charging
[4.1] Put headset in base to charge.
All diodes will
light for 1 sec.
[4.2] Charge headset for minimum 30
min. before use. A full charge takes 3 h.
diodes show level of charge, even with
headset out of base.
Clear dial tone adjustment
[4.3] Put on headset.
[4.4] Lift handset and listen for dial
tone in headset.
continue adjustment to 4.6.
[4.5] Remove base cover and locate
clear dial tone switch.
[4.6] Slide the switch (through A-G
settings) until dial tone is clear. If dial
tone is just as clear in position A as in
position G, leave switch in position A.
Carga
[4.1] Ponga microcasco en la base.
indicador de
batería se iluminarán un segundo.
[4.2] Antes de usar microc., cargar
mín. 30 min. Carga completa: 3 h.
nivel de carga de batería, incluso con
microc. fuera de base.
Ajuste de tono de llamada
[4.3] Póngase el microcasco.
[4.4] Levante el microteléfono y
espere a oír el tono de llamada.
realice el paso siguiente.
[4.5] Retire la tapa de la base y localice
el conmutador de tono de llamada claro.
[4.6] Desplace el conmutador (por A-
G). Si el tono es igual de claro en A que
en G, déjelo en A.
Page 8
Page 9


