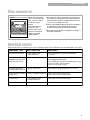
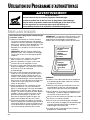
Whirlpool Washer YGS395LEG User manual
- Category
- Cookers
- Type
- User manual
This manual is also suitable for

Self-Cleaning
Gas Range
A Note to You ............2
Range Safety .............3
Parts and Features....5
Using Your Range......6
Using the Self-
Cleaning Cycle.........24
Caring for Your
Range.......................28
Troubleshooting.......34
Requesting
Assistance or
Service .....................36
Index ........................39
Warranty...................40
1-800-
4
61-
5
681
Call our Consumer Assistance Centre
with questions or comments.
TO THE INSTALLER: PLEASE LEAVE THIS INSTRUCTION
BOOK WITH THE UNIT.
TO THE CONSUMER: PLEASE READ AND KEEP THIS
BOOK FOR FUTURE REFERENCE.
4.65 Cubic Foot (0.132 m
3
) Oven
MODEL YGS395LEG
8272239
with ACCUBAKE* System

2
A NOTE TO YOU
Thank you for buying a WHIRLPOOL* appliance.
The Whirlpool Brand is committed to designing quality products that consistently perform for you to make your
life easier. To ensure that you enjoy years of trouble-free operation, we developed this Use and Care Guide.
It is full of valuable information about how to operate and maintain your appliance properly and safely. Please
read it carefully.
Also, please complete and mail the Product Registration Card provided with your appliance. The card helps us
notify you about any new information on your appliance.
Please record your model’s information.
Whenever you call to request service for your appliance,
you need to know your complete model number and
serial number. You can find this information on the
model and serial number label/plate (see diagram in
the “Parts and Features” section).
Please also record the purchase date of your appliance
and your dealer’s name, address, and telephone number.
Keep this book and the sales slip together in a safe place for future reference. It is important
for you to save your sales receipt showing the date of purchase. Proof of purchase will as-
sure you of in-warranty service.
Model Number
Serial Number
Purchase Date
Dealer Name
Dealer Address
Dealer Phone
WARNING: If the information in this manual is not followed exactly, a fire or
explosion may result causing property damage, personal injury or death.
– Do not store or use gasoline or other flammable vapors and liquids in the vicinity
of this or any other appliance.
– WHAT TO DO IF YOU SMELL GAS
•
Do not try to light any appliance.
•
Do not touch any electrical switch; do not use any phone in your building.
•
Immediately call your gas supplier from a neighbor’s phone. Follow the gas
supplier’s instructions.
•
If you cannot reach your gas supplier, call the fire department.
– Installation and service must be performed by a qualified installer, service
agency or the gas supplier.
Our Consumer Assistance Centre number is toll free.
1-800-
4
61-
5
681
To find detailed product information, the location of the nearest Whirlpool dealer or designated servicer, to
purchase an accessory item, or register your appliance on-line, please visit our Web site at
www.whirlpool.com/canada

3
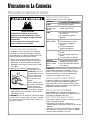
RANGE SAFETY
continued on next page
You will be killed or seriously injured if you don’t
follow instructions.
You can be killed or seriously injured if you don’t
follow instructions.
Your safety and the safety of others is very important.
We have provided many important safety messages in this manual and on your appliance. Always read and
obey all safety messages.
This is the safety alert symbol.
This symbol alerts you to hazards that can kill or hurt you and others.
All safety messages will be preceded by the safety alert symbol and the word “DANGER” or
“WARNING.” These words mean:
wDANGER
wWARNING
All safety messages will identify the hazard, tell you how to reduce the chance of injury, and tell you what can
happen if the instructions are not followed.
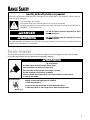
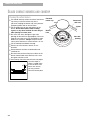
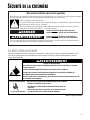
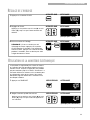
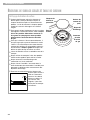
wWARNING
Tip Over Hazard
A child or adult can tip the range and be killed.
Connect anti-tip bracket to rear range foot.
Reconnect the anti-tip bracket, if the range is moved.
See the installation instructions for details.
Failure to follow these instructions can result in death or serious burns
to children and adults.
Making sure the anti-tip bracket is installed:
•
Slide range forward.
•
Look for the anti-tip bracket securely attached to floor.
•
Slide range back so rear range foot is under anti-tip bracket.
Anti-Tip Bracket
Range Foot
THE ANTI-TIP BRACKET
The range will not tip during normal use. However, the range can tip if you apply too much force or weight
to the open door without the anti-tip bracket fastened down properly.

4
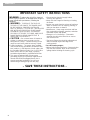
RANGE SAFETY
– SAVE THESE INSTRUCTIONS –
WARNING: To reduce the risk of fire, electrical
shock, injury to persons, or damage when using the
range, follow basic precautions, including the
following:
• WARNING – TO REDUCE THE RISK OF
TIPPING OF THE RANGE, THE RANGE MUST
BE SECURED BY PROPERLY INSTALLED
ANTI-TIP DEVICES. TO CHECK IF THE DEVICES
ARE INSTALLED PROPERLY, SLIDE RANGE
FORWARD, LOOK FOR ANTI-TIP BRACKET
SECURELY ATTACHED TO FLOOR, AND SLIDE
RANGE BACK SO REAR RANGE FOOT IS
UNDER ANTI-TIP BRACKET.
• CAUTION – Do not store items of interest to
children in cabinets above a range or on the
backguard of a range – children climbing on the
range to reach items could be seriously injured.
• Proper Installation – The range, when installed,
must be electrically grounded in accordance with
local codes or, in the absence of local codes, with
the
Canadian Electrical Code, Part 1, c22.1-98
or
latest revision. Be sure the range is properly
installed and grounded by a qualified technician.
• This range is equipped with a three-prong
grounding plug for your protection against shock
hazard and should be plugged directly into a
properly grounded receptacle. Do not cut or
remove the grounding prong from this plug.
IMPORTANT SAFETY INSTRUCTIONS
• Disconnect the electrical supply before
servicing the appliance.
• Never Use the Range for Warming or Heating
the Room.
• Injuries may result from the misuse of appliance
doors or drawers such as stepping, leaning, or
sitting on the doors or drawers.
• Maintenance – Keep range area clear and free
from combustible materials, gasoline, and other
flammable vapors and liquids.
• Storage in or on the Range – Flammable
materials should not be stored in an oven or
near surface units.
• Top burner flame size should be adjusted so it
does not extend beyond the edge of the
cooking utensil.
For self-cleaning ranges –
• Before Self-Cleaning the Oven – Remove broiler
pan and other utensils. Wipe off all excessive
spillage before initiating the cleaning cycle.

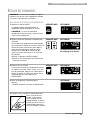
5
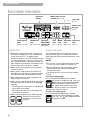
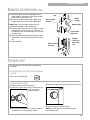
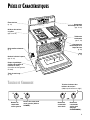
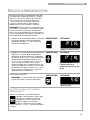
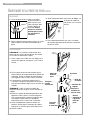
Oven vent
(p. 22)
Surface burners
and grates
(pp. 6, 29-31)
Anti-tip bracket
(p. 3)
Door stop clip
(p. 31-33)
Model and
serial number
plate
(behind left side
of storage drawer)
Storage drawer
(p. 23)
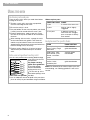
PARTS AND FEATURES
Electronic oven
control
(p. 10-22)
Control panel
(pp. 5, 28)
Automatic oven
light switch
(p. 33)
Left front
control knob
(POWER*Burner)
Right front
control knob
Right rear
control knob
(ACCUSIMMER*
setting)
Left rear
control knob
Surface burner marker
(shows which burner
you are setting)
CONTROL PANEL

6
USING YOUR RANGE
USING THE SURFACE BURNERS
NOTE: Do not leave empty cookware, or cookware
which has boiled dry, on a hot surface burner. The
cookware could overheat, causing damage to the
cookware or cooking product.
Using POWER Burner
POWER Burner is an adjustable setting for the left
front burner which provides an ultra-high heat setting.
It can be used to rapidly bring liquid to a boil and to
cook large quantities of food.
Using ACCUSIMMER
ACCUSIMMER is an adjustable setting for the right
rear burner. It allows more accurate simmer control at
the lowest setting.
Easy ways to save energy
•
To help shorten your cooking time, use the least
amount of liquid possible.
•
Preheat your pots and pans only when
recommended and for the shortest time possible.
•
Start your food on a higher heat setting, then turn
the control to a lower setting to finish cooking.
wWARNING
Fire Hazard
Do not let the burner flame extend beyond
the edge of the pan.
Turn off all controls when not cooking.
Failure to follow these instructions can
result in death or fire.
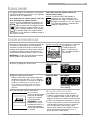
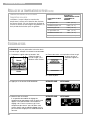
RECOMMENDED USE
•
To light the burner.
•
To provide highest heat
setting.
•
To start food cooking.
•
To bring liquid to a boil.
•
To hold a boil.
•
To fry chicken or pancakes.
•
For gravy, pudding, and icing.
•
To cook large amounts of
vegetables.
•
To keep food warm.
•
To simmer.
•
To provide lowest
simmer/heat setting.
•
To melt chocolate or butter.
SETTING
LIGHT
POWER*Burner
(left front burner)
HIGH
Mid-range
(between HIGH
and LOW)
LOW
ACCUSIMMER*
setting
(right rear burner)
Burner heat settings
Use the following chart as a guide.
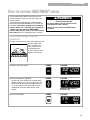
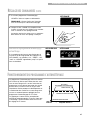
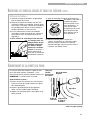
Using the control knobs
Your range comes with electric ignitors. Electric
ignitors automatically light the burners each time
you turn the control knobs to LIGHT.
•
Place a filled pan on the burner grate before
turning on the surface burner. Do not operate a
burner for extended periods of time without
having cookware on the grate.
•
Push in the control knob and turn it counter-
clockwise to the
LIGHT position. The
clicking sound is the
ignitor sparking. Make
sure the burner has lit.
•
To stop the clicking
sound after the burner
lights, turn the control
knob to the cook
setting you want. You
can set the control knob
anywhere between HIGH and LOW.
NOTE: All four electric ignitors will click at the same
time. However, the burner with the control knob
turned to LIGHT is the one that will ignite.

7
USING YOUR RANGE
USING THE SURFACE BURNERS (CONT.)
In case of a prolonged power failure
You can manually light surface burners. Hold a lit
match near a burner and turn the control knob to
the LIGHT position. After the burner lights, turn the
control knob to the setting you want.
Home canning information
The large diameter of most water-bath or pressure
canners combined with high heat settings for long
periods of time can cause damage to the cooktop.
To protect your range:
•
Center the canner over the surface burner. Do
not extend more than 1 inch (2.5 cm) outside the
burner area.
•
Do not place your canner on 2 surface burners
at the same time.
•
Start with hot water. This reduces the time
the control is set on high. Reduce the heat
setting to the lowest position needed to maintain
a boil or required pressure levels in a pressure
canner.
•
Refer to your canner manual for specific
instructions.
For up-to-date information on canning, contact
your local U.S. Government Agricultural
Department Extension Office or companies who
manufacture home canning products.
Using the right cookware makes a
big difference
•
The pan should have a flat bottom, straight sides,
and a well-fitting lid.
•
Choose medium to heavy gauge (thickness)
cookware.
•
The pan material (metal or glass) affects how
quickly and evenly the pan heats.
•
When using glass or ceramic cookware, check to
make sure it is suitable for use on surface burners.
•
To avoid tipping, make sure pots and pans are
centered on the grates.
The pan material affects how fast heat transfers from the surface cooking area through the pan material and how
evenly heat spreads over the pan bottom. Choose pans that provide the best cooking results.
Aluminum
• Heats quickly and evenly.
• Use for all types of cooking.
• Medium or heavy thickness is best for most cooking.
• Used as a core or base in cookware to provide even heating.
Cast iron
• Heats slowly and evenly.
• Good for browning and frying.
• Maintains heat for slow cooking.
• Can be coated with porcelain enamel.
Ceramic or
ceramic glass
• Heats slowly and unevenly.
• Use on low to medium settings.
• Follow manufacturer’s instructions.
Copper
• Heats very quickly and evenly.
• Used as a core or base in cookware to provide even heating.
Earthenware
• Can be used for cooktop cooking if recommended by the
manufacturer.
• Use on low settings.
Porcelain enamel-on-steel or
enamel-on-cast iron
• See cast iron and stainless steel.
Stainless steel
• Heats quickly but unevenly.
•
A core or base of aluminum or copper on the cookware provides
even heating.
• Can be coated with porcelain enamel.
CHARACTERISTICS OF COOKWARE MATERIALS

8
USING YOUR RANGE
Positioning racks and pans
Place the oven racks where you need them before
turning on the oven.
•
To move a rack, pull it out to the stop position,
raise the front edge and lift it out.
•
Be sure the rack(s) is level.
•
Use pot holders or oven mitts to protect your hands
if rack(s) must be moved while the oven is hot.
•
For best performance, cook on one rack. Place
the rack so the top of the food will be centered in
the oven.
•
When cooking with two racks, arrange the racks
on the 2nd and 4th rack guides. Two sheets of
cookies may be baked if sheets are switched at
approximately three quarters of the total bake time.
Increase baking time, if necessary.
•
For best results allow 5 cm (2 inches) of space
around each pan and between pans and oven
walls.
Extra oven rack position (roasting rack)
Use this rack position when roasting food too large
to be placed on the first
rack position.
For proper roasting,
follow these guidelines:
•
To avoid spillage,
remove food before
pulling out the rack.
•
Tilt the rack up at the
front before pulling it over
the door.
•
Use an adequate amount of liquid in the pan (meat
juices or water) so your food does not get overdone.
USING THE OVEN
Extra oven rack position
Where to place pans:
WHEN YOU HAVE
1 pan
2 pans
3 or 4 pans
PLACE
In center of the oven rack.
Side by side or slightly
staggered.
In opposite corners on
each oven rack. Stagger
pans so no pan is directly
over another.
Rack placement for specific foods:
FOOD
Frozen pies, large
roasts, turkeys, angel
food cakes
Bundt cakes, most
quick breads, yeast
breads, casseroles,
meats
Cookies, biscuits,
muffins, cakes,
nonfrozen pies
RACK POSITION
1st or 2nd rack
guide from bottom
2nd rack guide
from bottom
2nd or 3rd rack
guide from bottom
NOTE: For information on where to place your rack
when broiling, see “Broiling guidelines” later in this
section.

9
USING YOUR RANGE
BAKEWARE CHOICES
Baking performance is affected by the type of bakeware used. Use the bakeware size recommended in the recipe.
BAKEWARE TYPE
Light colored aluminum
• Light golden crusts
• Even browning
• Use temperature and time recommended
in recipe.
Dark aluminum and other
bakeware with dark, dull,
and/or non-stick finish
• Brown, crisp crusts
• May reduce baking temperature 25°F (14°C).
• Use suggested baking time.
• Use temperature and time recommended in recipe
for pies, breads, and casseroles.
• Place rack in center of oven.
Ovenproof glassware,
ceramic glass, or ceramic
• Brown, crisp crusts
• May reduce baking temperature 25°F (14°C).
Insulated cookie sheets or
baking pans
• Little or no bottom browning • Place in the bottom third of oven.
• May need to increase baking time.
Stainless steel • May need to increase baking time.
• Crisp crustsStoneware
• Follow manufacturer's instructions.
• Light, golden crusts
• Uneven browning
BEST USED FOR
GUIDELINES
USING ALUMINUM FOIL
NOTE: Do not line the oven bottom with foil or other
liners. It could affect the
oven surface as well as
the quality of your
baking.
•
Do not cover the
entire rack with
aluminum foil. It will
reduce air circulation
and give you poor
cooking results.
•
Use aluminum foil to catch spillovers from pies or
casseroles by placing foil on the oven rack below.
Foil should be turned up at edges and be at least
1 inch (2.5 cm) larger than dish.
•
Place tent-shaped foil loosely over meat or poultry
to slow down surface browning for long term
roasting. Remove foil for the last 30 minutes.
•
Use narrow strips of foil to shield piecrust edges if
browning too quickly.

10
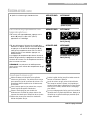
USING YOUR RANGE
HR MIN
COOK
TIME
DELAY
START
TIME
STOP
TIME
TIMER
SET
TIMER
OFF
BAKE
TEMP
START
ENTER
OFF
CANCEL
O
N
C
F
BAKE
BROIL
HEAT
DELAY
DTIME START?
STOP
CLEAN
TIME
RTIME
LOCKED
COOK
SELF-CLEANING OVENSELF-CLEANING OVEN
CLOCK LIGHT
AUTO
CLEAN
CUSTOM
BROIL
5 SEC
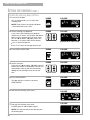
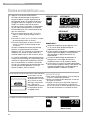
THE ELECTRONIC OVEN CONTROL
Clock pad
(p. 11)
Off/cancel
pad
(p. 12)
Start/enter
pad
(pp. 11, 12)
Minute
pads
(p. 11)
Hour
pads
(p. 11)
Temperature
pad
(pp. 13, 15, 17)
Oven selector
pads
(pp. 13, 16, 25)
Electronic
MEALTIMER*
control pads
(pp. 19-22)
Manual oven
light pad
(p. 33)
Electronic
display
Display/clock
•
When you first plug in the range, everything on
the display will light up for 1 to 2 seconds, then
a time of day and “PF” will appear on the
temperature display. Press OFF/CANCEL to clear
“PF” from the display. If, after you set the clock
(see “Setting the clock” later in this section), “PF”
again appears on the display, your electricity was
off for a while. Reset the clock, if needed.
•
When you are not using the oven, the control is
an accurate clock.
•
When you are using the oven or minute timer,
the display will show times, temperature settings,
and what command pads have been pressed.
•
When showing the time of day, the display will
show the hour and minutes.
•
When you are using the minute timer, the display
will show minutes and seconds in the following
sequence:
– For settings from 1-59 minutes, the display will
count down each second.
– For settings one hour or over, the display will
count down each minute.
•
When you are using cook time and/or stop time,
the display will show hours
and minutes or minutes and
seconds.
Minute timer set and
off pads (pp. 11, 12)
Using the control lock
The control lock lets you shut down the control
panel command pads. The control lock comes in
handy when you want to prevent others from using
the oven.
NOTES:
•
You can only use the control lock when the oven
is not in use or the control has not been set.
•
Set the control lock when cleaning the control
panel to prevent yourself from accidentally
turning on the oven.
•
The control lock will stay on even after a power
failure.
To lock the control panel:
Press and hold START/ENTER for 5 seconds.
You will hear a single tone and “Loc” and
will appear on the temperature display.
When the control is locked, “START?”
will appear on the display and 3 tones
will sound if you press any command
pad other than clock or timer set.
To unlock the control panel:
Press and hold START/ENTER for 5 seconds.
You will hear 3 tones followed by a single
tone. “Loc” and will disappear from the
temperature display.
START
ENTER
5 SEC
COOK
TIME
STOP
TIME
START
ENTER
5 SEC
USING YOUR RANGE

1. Press CLOCK.
2. Set the time.
Press the “up” (s) or “down” (t) pad(s) until
the correct time shows on the display.
3. Start the clock.
NOTE: If you do not want the clock time
displayed, press and hold CLOCK for 5
seconds. To display the clock time again,
press and hold CLOCK for 5 seconds. You
should not have to reset the time.
11
USING YOUR RANGE
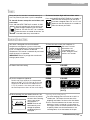
SETTING THE CLOCK
PRESS YOU SEE
TIME
CLOCK
PRESS YOU SEE
(example for 5:30)
TIME
HR MIN
PRESS YOU SEE
START
ENTER
5 SEC
CLOCK
OR
USING THE ELECTRONIC MINUTE TIMER
The minute timer does not start or stop the oven.
It works like a kitchen timer. It can be set in hours
and minutes up to 12 hours, 59 minutes. The
minute timer will display minutes and seconds for
settings under 1 hour. You will hear four 1-second
tones when the set time is up.
1. Press TIMER SET.
2. Set the time.
Press the “up” (s) or “down” (t) pad(s) until
the correct time shows on the display.
PRESS YOU SEE
RTIME
TIMER
SET
PRESS YOU SEE
RTIME
HR MIN
(example for 10 minutes)
continued on next page

OFF/CANCEL will cancel any function except the
clock, timer, or control lock. When you
press OFF/CANCEL, the display will show
the time of day or, if the minute timer is
also being used, the time remaining.
12
USING YOUR RANGE
3. Start the minute timer.
The minute timer will begin counting down
immediately after the timer is started.
When the time is up:
You will hear four 1-second tones, then four
1-second reminder tones every minute until you
press the timer off pad.
NOTE: To remove the reminder tones, press and
hold TIMER SET for 5 seconds. To bring back
the tones, follow the same step. You will see
“OFF” when the tones are turned off and “on”
when they are turned on.
4. Turn off the minute timer.
To cancel the minute timer:
Press TIMER OFF.
USING THE ELECTRONIC MINUTE TIMER (CONT.)
PRESS YOU SEE
RTIME
(display counts down)
START
ENTER
5 SEC
YOU SEE
RTIME
PRESS YOU SEE
TIMER
OFF
(time of day)
PRESS YOU SEE
TIMER
OFF
(time of day)
After setting a function, you must press START/
ENTER to start the function. If you do not
press START/ENTER within 5 seconds of
setting, “START?” will show on the display
as a reminder.
STARTING/CANCELING A FUNCTION
START
ENTER
5 SEC
OFF
CANCEL

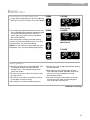
2. Choose the bake setting.
3. Set the temperature (optional).
Do this step if you want to set a temperature
other than 350°F (177°C). Press ▲ to raise the
temperature or ▼ to lower the temperature in
5°F (3°C) amounts. Use these pads until the
desired temperature shows on the small display.
13
Your oven is designed with the ACCUBAKE*
temperature management system to constantly
monitor oven temperature. The burner element will
cycle, as needed, to maintain the desired
temperature. This feature is automatically activated
when the oven is in operation.
IMPORTANT: Do not try to light the oven burner
during a power failure.
TONES
Tones tell you if a function is entered correctly or
not. They also tell you when a cycle is completed.
To shut off all tones except the end-of-timer and
error tones:
Press and hold STOP TIME for 5 seconds. A short
tone will sound to tell you the tones have
been changed. Repeat to turn the tones
back on. You will see “oFF” for 3 seconds
when the tones are turned off and “on” for
3 seconds when they are turned on.
To choose between high and low volume tones:
Press and hold DELAY START TIME for 5 seconds. A
short tone will sound to tell you the tones
have been changed. Either “HI” or “LO” will
appear on the time display for 3 seconds to
show the volume you chose.
DELAY
START
TIME
STOP
TIME
BAKING/ROASTING
PRESS YOU SEE
BAKE
F
BAKE
PRESS YOU SEE
F
BAKE
(example for bake at 190°C
[375°F])
TEMP
4. When roasting, put your food in the oven. You
do not have to preheat
the oven when roasting,
unless your recipe
recommends it.
NOTE: The oven will
cook normally even
though the preheat
conditioning timer is
displayed.
Roasting meats and poultry
•
For even cooking, place the meat on a rack in a
shallow pan. This keeps the meat out of the
drippings and allows the heat to circulate better.
•
Use a meat thermometer for the most accurate
doneness. Insert it so the tip is in the center of
the largest muscle or thickest portion of the meat
or poultry. Make sure the thermometer is not
touching bone, fat, or the bottom of the pan.
USING YOUR RANGE
continued on next page
1. Place the racks where you need them in
the oven. For more
information, see
“Positioning racks”
under “Using the Oven”,
earlier in this section.
Rear
Front

14
USING YOUR RANGE
BAKING/ROASTING (CONT.)
START
ENTER
5 SEC
PRESS YOU SEE
O
N
F
BAKE
BROIL
HEAT
O
N
F
BAKE
BROIL
HEAT
YOU SEE
(example for set temperature
of 350°F [177°C])
6. When baking, put your food in the oven after
the preheat conditioning
time ends. During baking/
roasting, the oven burner
will turn on and off to keep
the oven temperature at
the setting.
7. After cooking, turn off the oven.
PRESS YOU SEE
(time of day)
OFF
CANCEL
5. Press START/ENTER.
A preheat conditioning time counts down the
approximate preheat time after the oven
temperature has been set and the start pad has
been pressed. The oven control automatically
sets preheating times based on the oven
temperature you select:
•
For 245°F (118°C) and less, the preheating
time is 4 minutes.
•
For 250°F-445°F (121°C-229°C), the preheating
time is 10 minutes.
•
For above 450°F (232°C), the preheating time
is 15 minutes.
As the preheat conditioning ends, the selected
oven temperature replaces “PrE” on the display
and the time of day reappears. You will hear a
1-second tone, indicating the oven is ready to use.
The ACCUBAKE* system electronically regulates
the preheat time and temperature to maintain a
precise temperature range for the best cooking
results. The preheat and set temperatures may
be different at the end of the countdown. This
is normal.
NOTES:
•
When the oven temperature is greater than 170°F
(77°C), no preheating time will be shown on the
display.
•
You can change the temperature setting any
time after pressing START/ENTER. You do not
have to press START/ENTER again.
•
The preheating time will not change if you reset
t
he temperature before the countdown time ends.
•
If you are baking/roasting while the minute
timer is counting down, you can see the set
baking/roasting temperature for 5 seconds by
pressing BAKE.
Saving energy
•
To avoid loss of heat, open the oven door as little
as possible.
•
Use a timer to keep track of cooking time.
•
Plan your meals for the most efficient use of the
oven by cooking more than one food at a time, or
baking while the oven is still hot after cooking a
meal.

15
Although your new oven is properly adjusted to
provide accurate temperatures, it may cook faster
or slower than your old oven.
If you are not satisfied with the baking/roasting
results, you can change the offset temperature by
following the steps below.
1. Press and hold BAKE for 5 seconds.
The display will show the current offset
temperature, for example “0,” if you have not
already adjusted the temperature.
2. Set the new offset temperature.
Press s to raise the temperature or t to lower
the temperature in 10°F (6°C) amounts. You can
set the temperature change to as low as -30°F
(-17°C) or as high as +30°F (+17°C). A minus (-)
sign will appear before the number when de-
creasing the temperature setting. The minus sign
shows the oven will be cooler by the displayed
amount. There is no sign in front of the number
when increasing the temperature setting.
3. Enter the adjustment.
NOTE: You must press START/ENTER or your
changes will not be made.
To display temperatures in °C instead of °F:
Press and hold the custom broil pad for 5 seconds.
You will hear a short tone and the
temperatures displayed will switch to °C.
To switch back to °F, repeat the
instructions above. Whenever you switch,
“°C” or “°F” will be displayed for 5 seconds.
How to determine the amount of
adjustment needed
The chart at the right tells you how much to adjust
the offset temperature to get the cooking results
you want. You can figure out cooking results by the
amount of browning, moistness, and rising times for
baked foods.
NOTE: DO NOT measure the oven temperature with
a thermometer. Opening the oven door will lower
the oven temperature and give you an incorrect
reading. Also, the thermometer temperature reading
will change as your oven cycles.
PRESS YOU SEE
F
(factory setting of “0”)
BAKE
PRESS YOU SEE
START
ENTER
5 SEC
(time of day)
PRESS YOU SEE
F
(example when making oven
10°F [6°C] warmer)
TEMP
CUSTOM
BROIL
ADJUSTING THE OVEN TEMPERATURE CONTROL
USING YOUR RANGE
TO COOK
FOOD ...
A little more
Moderately more
Much more
A little less
Moderately less
Much less
ADJUST BY
THIS NUMBER
OF DEGREES
+10°F (+6°C)
+20°F (+11°C)
+30°F (+17°C)
-10°F (-6°C)
-20°F (-11°C)
-30°F (-17°C)

16
USING YOUR RANGE
BROILING
NOTE:
•
Do not preheat when broiling unless your recipe
recommends it.
1. Place the rack where you need it in the oven.
See “Broiling guide-
lines” later in this
section.
3. Close the door.
2. Put your food on the broiler pan and place the
pan in the center of
the oven rack.
4. Press CUSTOM BROIL.
5. Start the oven.
You can change the temperature setting any
time before or after pressing START/ENTER.
To change the setting, see “To custom broil at
a lower temperature” later in this section. After
changing the setting, you do not have to press
START/ENTER again.
6. After broiling, turn off the oven.
PRESS YOU SEE
CUSTOM
BROIL
PRESS YOU SEE
START
ENTER
5 SEC
O
N
BROIL
HEAT
PRESS YOU SEE
OFF
CANCEL
(time of day)
Rear
Front
BROIL

17
To custom broil at a lower temperature:
•
If your food is cooking too fast, press the ▼ temp
pad until 325°F (163°C) shows on the small display.
•
If you want your food to broil slower from the start,
press CUSTOM BROIL and press the ▼ temp pad
so a temperature between 300°F and 525°F
(149°C and 274°C) shows on the small display.
Press START/ENTER.
Lower temperature settings let the broil heating
element cycle and slow cooking results. The lower
the temperature, the slower the cooking.
NOTE: Fish and chicken are some foods that may
cook better if you use lower broiling temperatures.
BROILING (CONT.)
PRESS YOU SEE
TEMP
O
N
F
BAKE
BROIL
HEAT
TIME TIMECOOK
(example shows broil at
325°F [163°C])
F
BAKE
BROIL
CUSTOM
BROIL
(example shows broil at
400°F [204°C])
PRESS YOU SEE
O
N
BROIL
HEAT
START
ENTER
5 SEC
YOU SEE
TEMP
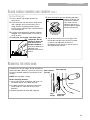
Broiling guidelines
•
Use only the broiler pan and grid provided. They
are designed to drain extra juices from the
cooking surface. This drainage helps prevent
spatter and smoke.
•
To make sure the juices drain well, do not cover
the grid with foil.
•
Trim excess fat to reduce spattering. Slit the fat
on the edges to prevent curling.
•
Use tongs to turn meat to avoid losing juices.
USING YOUR RANGE
continued on next page
•
Pull out oven rack to stop position before turning
or removing food.
•
After broiling, remove the pan from the oven
when removing the food. Drippings will bake on
the pan if left in the heated oven, making
cleaning more difficult.
•
For easier cleaning, line the bottom of the pan
with aluminum foil. Clean the pan and grid as
soon as possible after each use.

Broiling guidelines (cont.)
Recommended rack positions are numbered from
the bottom (1) to the top
(5). For best results,
place food 3 inches
(7 cm) or more from the
broil burner and turn
meat after approximately
2
⁄3 of the broiling time.
Turn chicken pieces after
approximately half of the
broiling time. Very thin
cuts, such as fish fillets,
may not need to be turned at all. Lobster tails are
not turned.
18
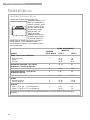
USING YOUR RANGE
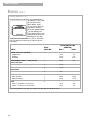
BROILING (CONT.)
APPROXIMATE TIME
(MINUTES)
SIDE 2
7-8
8-9
9-10
6-7
10-11
4-5
3-4
18-20
11-16
4-5
7-9
MEAT
Steak, 1 inch (2.5 cm) thick
medium rare
medium
well done
Ground Meat Patties,
3
⁄4 inch (1.8 cm)
thick, well done
Pork Chops, 1 inch (2.5 cm) thick
Ham Slice,
1
⁄2 inch (1.25 cm) thick
precooked
Frankfurters
Chicken
bone-in pieces
boneless breasts
Fish
fillets
1
⁄4-
1
⁄2 inch (0.6-1.3 cm) thick
steaks
3
⁄4-1 inch (1.8-2.5 cm) thick
RACK
POSITION
4
4
4
4
4
3
4
4
SIDE 1
14-15
15-16
18-19
13-14
21-22
8-10
6-7
18-20
12-16
8-10
15-18
Times are guidelines only and may need to be adjusted for individual tastes.

19
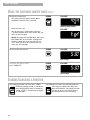
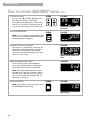
The electronic MEALTIMER control will turn the
oven on and off at times you set, even when you
are not around.
Delayed time baking/roasting is ideal for foods
that do not need a preheated oven, like meats and
casseroles. Do not use delayed time cooking for
cakes, cookies, etc. – they will not rise properly.
Before using the electronic MEALTIMER
control, make sure the clock is set to the correct
time of day. (See the “Setting the clock” section.)
To start baking/roasting now and stop
automatically:
1. Place the oven rack(s) where you need them and
put your food in the
oven. To place your
racks correctly, see
“Positioning racks”
under “Using the Oven”
earlier in this section.
2. Choose the bake setting.
3. Set the temperature (optional).
Do this step if you want to set a temperature
other than 350°F (177°C). Press ▲ to raise the
temperature or ▼ to lower the temperature in
5°F (3°C) amounts. Use these pads until the
temperature you want shows on the small
display.
4. Press COOK TIME.
USING THE ELECTRONIC MEALTIMER*CONTROL
PRESS YOU SEE
BAKE
F
BAKE
TEMP
F
BAKE
(example shows bake at
375°F [191°C])
PRESS YOU SEE
COOK
TIME
F
BAKE
TIMECOOK
PRESS YOU SEE
USING YOUR RANGE
wWARNING
Food Poisoning Hazard
Do not let food sit in oven more than one
hour before or after cooking.
Doing so can result in food poisoning or
sickness.
USING YOUR RANGE

20
USING YOUR RANGE
5. Set the cook time.
Press the “up” (s) or “down” (t) pad(s) until
the correct time shows on the display.
6. Start the oven.
NOTES:
•
You can change the temperature or time
settings any time after pressing START/ENTER
by repeating Steps 3 or 5. You do not have to
press START/ENTER.
•
The display will count down the baking/
roasting time in hours and minutes (if cook
time is more than 1 hour) or in minutes and
seconds (if cook time is less than 1 hour).
7. When baking/roasting is done:
The oven will turn off by itself and beep 4 times.
You will also hear four 1-second tones every
minute until you press OFF/CANCEL.
NOTE: To remove the reminder tones, press and
hold the cook time pad for 5 seconds. To bring
back the tones, repeat this step. You will see
“oFF” when the tones are turned off and “on”
when they are turned on.
8. Turn off the oven.
NOTE: You can do this step any time to cancel
the MEALTIMER control setting.
USING THE ELECTRONIC MEALTIMER*CONTROL (CONT.)
PRESS YOU SEE
HR MIN
F
BAKE
TIMECOOK
(example shows 30-minute
baking/roasting time)
YOU SEE
TIMECOOK
OFF
CANCEL
(time of day)
PRESS YOU SEE
PRESS YOU SEE
O
N
F
BAKE
BROIL
HEAT
DTIME TIMECOOK
START
ENTER
5 SEC
(display counts down
cook time)
Page is loading ...
Page is loading ...
Page is loading ...
Page is loading ...
Page is loading ...
Page is loading ...
Page is loading ...
Page is loading ...
Page is loading ...
Page is loading ...
Page is loading ...
Page is loading ...
Page is loading ...
Page is loading ...
Page is loading ...
Page is loading ...
Page is loading ...
Page is loading ...
Page is loading ...
Page is loading ...
Page is loading ...
Page is loading ...
Page is loading ...
Page is loading ...
Page is loading ...
Page is loading ...
Page is loading ...
Page is loading ...
Page is loading ...
Page is loading ...
Page is loading ...
Page is loading ...
Page is loading ...
Page is loading ...
Page is loading ...
Page is loading ...
Page is loading ...
Page is loading ...
Page is loading ...
Page is loading ...
Page is loading ...
Page is loading ...
Page is loading ...
Page is loading ...
Page is loading ...
Page is loading ...
Page is loading ...
Page is loading ...
Page is loading ...
Page is loading ...
Page is loading ...
Page is loading ...
Page is loading ...
Page is loading ...
Page is loading ...
Page is loading ...
Page is loading ...
Page is loading ...
-
 1
1
-
 2
2
-
 3
3
-
 4
4
-
 5
5
-
 6
6
-
 7
7
-
 8
8
-
 9
9
-
 10
10
-
 11
11
-
 12
12
-
 13
13
-
 14
14
-
 15
15
-
 16
16
-
 17
17
-
 18
18
-
 19
19
-
 20
20
-
 21
21
-
 22
22
-
 23
23
-
 24
24
-
 25
25
-
 26
26
-
 27
27
-
 28
28
-
 29
29
-
 30
30
-
 31
31
-
 32
32
-
 33
33
-
 34
34
-
 35
35
-
 36
36
-
 37
37
-
 38
38
-
 39
39
-
 40
40
-
 41
41
-
 42
42
-
 43
43
-
 44
44
-
 45
45
-
 46
46
-
 47
47
-
 48
48
-
 49
49
-
 50
50
-
 51
51
-
 52
52
-
 53
53
-
 54
54
-
 55
55
-
 56
56
-
 57
57
-
 58
58
-
 59
59
-
 60
60
-
 61
61
-
 62
62
-
 63
63
-
 64
64
-
 65
65
-
 66
66
-
 67
67
-
 68
68
-
 69
69
-
 70
70
-
 71
71
-
 72
72
-
 73
73
-
 74
74
-
 75
75
-
 76
76
-
 77
77
-
 78
78


Whirlpool Washer YGS395LEG User manual
- Category
- Cookers
- Type
- User manual
- This manual is also suitable for
Ask a question and I''ll find the answer in the document
Finding information in a document is now easier with AI
in other languages
Related papers
-
Whirlpool 9763003 User manual
-
-
Whirlpool GS440LEMB0 Owner's manual
-
-
-
-
Whirlpool 9761040 User manual
-
-
-
Other documents
-
Kenmore 665.75837 User manual
-
KitchenAid KGRT500 User manual
-
-
KitchenAid KGRT607HBS8 Owner's manual
-
-
-
Amana AGR5330BAS User manual
-
Estate Estate W10017560 User guide
-
-