Philips RQ1051 User manual

Category
Men's shavers
Type
User manual

This manual is also suitable for

6
Introduction
Thank you for buying this Philips shaver. Please read
this user manual, as it contains information about the
wonderful features of this shaver as well as some tips
to make shaving easier and more enjoyable.
Important
Read this user manual carefully before you use the
shaver and the charger. Save the user manual for
future reference.
Danger
- Make sure the adapter does not get wet.
Warning
- Be careful with hot water. Always check if the
water is not too hot, to prevent your hands from
getting burnt.
- The adapter contains a transformer. Do not cut
off the adapter to replace it with another plug, as
this causes a hazardous situation.
- The shaver and the charger are not intended for
use by persons (including children) with reduced
physical, sensory or mental capabilities, or lack of
experience and knowledge, unless they have been
given supervision or instruction concerning use of
the appliances by a person responsible for their
safety.
- Children should be supervised to ensure that they
do not play with the shaver and the charger.
Caution
- Do not use the shaver, the charger or the adapter
if it is damaged.
- Charge and store the shaver at a temperature
between 5°C and 35°C.
ENGLISH
- Always put the protection cap on the shaver
to protect the shaving heads when you are
travelling.
- Never use scouring pads, abrasive cleaning agents
or aggressive liquids such as petrol or acetone to
clean the appliance.
- Only use the adapter supplied.
- If the adapter is damaged, always have it replaced
with one of the original type in order to avoid a
hazard.
- Never immerse the charger in water, nor rinse it
under the tap.
Compliance with standards
- The shaver complies with the internationally
approved IEC safety regulations and can be safely
cleaned under the tap.
- These Philips appliances comply with all standards
regarding electromagnetic elds (EMF). If handled
properly and according to the instructions in this
user manual, the appliances are safe to use based
on scientic evidence available today.
General
- The adapter transforms 100-240 volts to a safe
low voltage of less than 24 volts.
Overview (Fig. 4)
A Protection cap
B Shaving unit
C Trimmer
D Trimmer on/off slide
E Shaver (RQ1090/RQ1060/RQ1053/RQ1050)
F Shaver on/off button
G Display
H Cleaning brush
I Adapter
ENGLISH 7
J Small plug
K Charger
The display
Before you use the shaver for the rst time, remove
the protective foil from the display.
The three shaver types (RQ1090, RQ1060, RQ1053
and RQ1050) have different displays, which are
shown in the gures below.
- RQ1090
- RQ1060
- RQ1053/RQ1050
Charging
- Charging takes approx. 1 hour.
- When you place the shaver in the charger, the
display automatically switches off after approx. 5
hours.
ENGLISH8
RQ1090
- When the shaver is charging, the minutes
indication and the plug symbol ash.
- The shaving minutes increase until the shaver is
fully charged.
RQ1060
- When the shaver is charging, the plug
symbol ashes.
- First the arrowheads of the bottom charge level
ash, then the arrowheads of the second level
ash, and so on until the shaver is fully charged.
RQ1053/RQ1050
- When the shaver is charging, the battery symbol
ashes blue.
Battery fully charged
RQ1090
- When the battery is fully charged, the minutes
indication is visible on the display and the plug
symbol disappears from the display.
RQ1060
- When the battery is fully charged, all arrowheads
and all charge level lights light up blue continuously
and the plug symbol disappears from the display.
ENGLISH 9
- When you remove the shaver from the charger,
the arrowheads of the top charge level light up
blue to indicate that the battery is full.
RQ1053/RQ1050
- When the battery is fully charged, the battery
symbol lights up blue continuously.
Battery low
RQ1090
- When the battery is almost empty (when there
are only 5 or fewer shaving minutes left), the
minutes indication and the plug symbol start to
ash.
- When you switch off the shaver, the shaving
minutes and the plug symbol continue to ash for
a few more seconds. You hear a beep when there
are no minutes left.
RQ1060
- When the battery is almost empty (when there
are only 5 or fewer shaving minutes left), the
battery symbol ashes red and the arrowheads of
the bottom charge level ash blue.
- When you switch off the shaver, the battery
symbol and the arrowheads of the bottom charge
level continue to ash for a few seconds.
ENGLISH10
RQ1053/RQ1050
- When the battery is almost empty (when there
are only 5 or fewer shaving minutes left), the
battery symbol lights up red.
- When you switch off the shaver, the battery
symbol starts to ash for a few seconds.
Remaining battery capacity
RQ1090
- The remaining battery capacity is indicated by the
number of shaving minutes shown on the display.
RQ1060
- The remaining battery capacity is indicated by the
ashing arrowheads of a particular charge level
Clean shaver
For optimal shaving performance, we advise you to
clean the shaver after every use.
- The tap symbol ashes to remind you to clean the
shaver.
Note: The displays of types RQ1060, RQ1053 and
RQ1050 look different but show the same indication.
Replace shaving unit
For maximum shaving performance, we advise you
to replace the shaving unit every two years.
ENGLISH 11
- To remind you to replace the shaving unit, the
shaving unit symbol ashes (all types) and you
hear a beep when you switch off the shaver
(RQ1090 only). This happens at the end of 7
successive shaves to remind you to replace the
shaving unit.
Note: The displays of types RQ1060, RQ1053 and
RQ1050 look different but show the same indication.
Travel lock
You can lock the shaver when you are going to
travel. The travel lock prevents the shaver from being
switched on by accident.
Activating the travel lock
1 Press the on/off button for 3 seconds to enter
the travel lock mode.
, The lock symbol appears on the display (all
types) and you hear a beep (RQ1090 only) to
indicate that the travel lock has been activated.
Note: The displays of types RQ1060, RQ1053 and
RQ1050 look different but show the same indication.
Deactivating the travel lock
1 Press the on/off button for 3 seconds.
, The motor starts running to indicate that the
travel lock has been deactivated.
The shaver is now ready for use again.
Note: When you place the shaver in the plugged-in
charger, the travel lock is automatically deactivated.
ENGLISH12
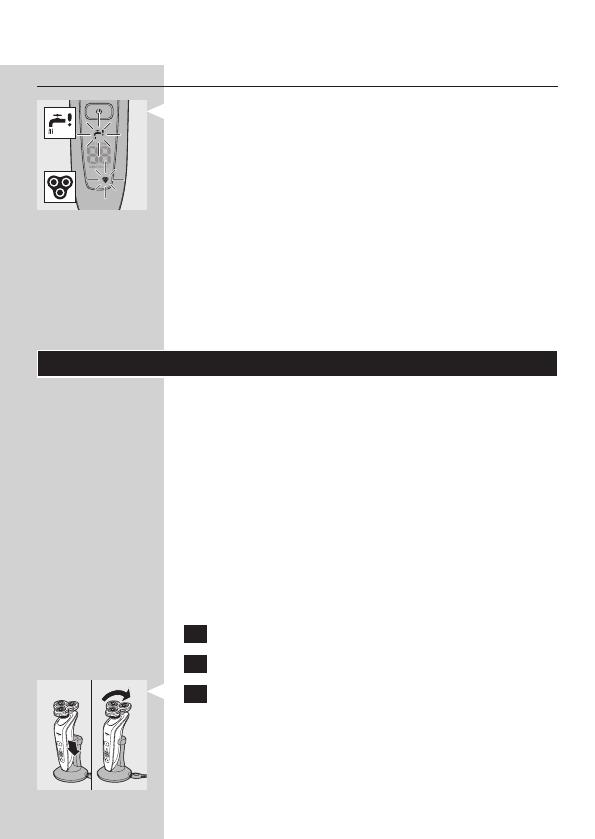
Blocked shaving heads
- If the shaving heads are blocked, the shaving unit
symbol and the tap symbol with exclamation mark
ash. In this case, the motor cannot run because
the shaving heads are soiled or damaged.
Note: The displays of types RQ1060, RQ1053 and
RQ1050 look different show the same indication.
- When this happens, you have to clean the shaving
unit or replace it.
- The shaving unit symbol and the tap symbol
with exclamation mark continue to ash until you
unblock the shaving heads.
Charging
Charging takes approx. 1 hour.
A fully charged shaver has a shaving time of up to 65
minutes, which is enough for approx. 21 shaves.
The actual shaving time is calculated by the shaver.
If you have a heavy beard, the shaving time may be
less than 65 minutes. The shaving time may also vary
over time, depending on your shaving behaviour and
beard type.
Quick charge
After the shaver has charged for 5 minutes,
it contains enough energy for one shave.
1 Put the small plug in the charger.
2 Put the adapter in the wall socket.
3 Place the shaver in the charger. Press the
shaver tightly into the holder to lock into place.
Note: RQ1090 only: If the shaver is placed correctly,
you hear a beep.
ENGLISH 13
, The display shows that the shaver is charging
(see chapter ‘The display’).
Using the shaver
Shaving
1 Press the on/off button once to switch on the
shaver.
, The display lights up for a few seconds.
2 Move the shaving heads over your skin. Make
both straight and circular movements.
- Shaving on a dry face gives the best results.
- Your skin may need 2 or 3 weeks to get
accustomed to the Philips shaving system.
3 Press the on/off button once to switch off the
shaver.
, The display lights up for a few seconds and then
shows the remaining battery capacity (RQ1090/
RQ1060 only).
Trimming
You can use the trimmer to groom your sideburns
and moustache.
1 Pull the shaving unit off the shaver.
2 Press the on/off button once to switch on the
shaver.
, The display lights up for a few seconds.
3 Press the trimmer slide forwards to slide out
the trimmer.
4 You can now start trimming.
ENGLISH14
5 Press the trimmer slide backwards to retract
the trimmer.
6 Press the on/off button once to switch off the
shaver.
, The display lights up for a few seconds and then
shows the remaining battery capacity (RQ1090/
RQ1060 only).
7 Insert the lug of the shaving unit into the slot
in the top of the shaver (1). Then press the
shaving unit downwards (2) to attach it to the
shaver (‘click’).
Cleaning and maintenance
Never use scouring pads, abrasive cleaning agents
or aggressive liquids such as petrol or acetone to
clean the appliance.
- Be careful with hot water. Always check if the
water is not too hot, to prevent your hands from
getting burnt.
- Clean the shaver after every shave for optimal
shaving performance.
- You can clean the outside of the shaver with a
damp cloth.
- Regular cleaning guarantees better shaving
performance.
Cleaning the shaving unit under the tap
1 Switch off the shaver.
2 Pull open the three shaving heads one by one.
ENGLISH 15
3 Rinse all three shaving heads and all three hair
chambers under a hot tap for 30 seconds.
Be careful with hot water. Always check if the
water is not too hot, to prevent your hands from
getting burnt.
4 Carefully shake off excess water and leave the
shaving heads open to let the shaving unit dry
completely.
Never dry the shaving unit with a towel or tissue,
as this may damage the shaving heads.
, For thorough cleaning, switch on the shaver and
immerse the shaving unit in hot water with some
liquid soap for 30 seconds. You can also clean the
shaving unit with some alcohol.
Cleaning the shaving unit with the brush
supplied
1 Switch off the shaver.
2 Pull open the three shaving heads one by one.
3 Clean the shaving heads and the hair chambers
with the brush supplied.
4 Close the shaving heads.
Cleaning the trimmer with the brush
supplied
Clean the trimmer every time you have used it.
ENGLISH16
1 Switch off the shaver.
2 Press the trimmer slide forwards to slide out
the trimmer.
3 Clean the trimmer with the short-bristled side
of the brush supplied. Brush up and down along
the trimmer teeth.
4 Switch the shaver on and off and repeat step 3.
5 Press the trimmer slide backwards to retract
the trimmer.
Tip: For optimal trimmer performance, lubricate the
trimmer teeth with a drop of sewing machine oil every
six months.
Storage
There are two ways to store the shaver or to take it
with you when you travel:
- put the shaver in the charger.
- slide the protection cap onto the shaving unit to
prevent damage to the shaving heads.
Replacement
Replace the shaving unit when the shaving unit
symbol appears on the display. Replace a damaged
shaving unit right away.
For maximum shaving performance, we advise you
to replace the shaving unit every two years.
Only replace the shaving unit with an original RQ10
Philips arcitec Shaving Unit.
ENGLISH 17
1 Pull the old shaving unit off the shaver.
2 Insert the lug of the new shaving unit into the
slot in the top of the shaver (1). Then press the
shaving unit downwards (2) to attach it to the
shaver (‘click’).
Ordering parts
The following parts are available:
- HQ8500 adapter
- RQ10 Philips arcitec Shaving Unit
- HQ110 Philips Shaving Head Cleaning Spray
Environment
- Do not throw away the appliances with the
normal household waste at the end of their life,
but hand them in at an ofcial collection point for
recycling. By doing this, you help to preserve the
environment.
- The built-in rechargeable shaver battery contains
substances that may pollute the environment.
Always remove the battery before you discard or
hand in the shaver at an ofcial collection point.
Dispose of the battery at an ofcial collection
point for batteries. If you have trouble removing
the battery, you can also take the appliance to a
Philips service centre. The staff of this centre will
remove the battery for you and will dispose of it
in an environmentally safe way.
ENGLISH18
Disposal of the shaver battery
Only remove the battery when you discard the
shaver. Make sure the battery is completely empty
when you remove it.
1 Remove the shaver from the charger.
2 Let the shaver run until it stops.
3 Pull the shaving unit off the shaver.
4 Undo the 2 screws on the back of the shaver.
5 Insert a screwdriver between the front and
back panel to open the shaver.
6 Remove the side panels.
7 Unscrew the 3 screws on the inside of the
shaver and remove the back cover.
ENGLISH 19
8 Pull the wires out of the motor unit and
remove the battery.
Be careful, the battery strips are sharp.
Do not put the shaver back into the plugged-
in charger after you have removed the battery.
Guarantee & service
If you need information or if you have a problem,
please visit the Philips website at www.philips.com
or contact the Philips Customer Care Centre
in your country (you nd its phone number in
the worldwide guarantee leaet). If there is no
Customer Care Centre in your country, go to
your local Philips dealer or contact the Service
Department of Philips Domestic Appliances and
Personal Care BV.
Guarantee restrictions
The shaving heads (cutters and guards) are not
covered by the terms of the international guarantee
because they are subject to wear.
Frequently asked questions
1 Why doesn’t the shaver shave as well as it used
to?
- The shaver may not be properly clean. Switch
on the shaver and immerse the shaving unit in
hot water with some liquid soap (see chapter
‘Cleaning and maintenance’).
- The shaving heads may be damaged or
worn. Replace the shaving unit (see chapter
‘Replacement’).
ENGLISH20
2 Why doesn’t the shaver work when I press the
on/off button?
- The battery may be empty. Recharge the battery
(see chapter ‘Charging’).
- The travel lock may be activated. Press the on/off
button for 3 seconds to deactivate the travel lock.
- The shaving unit is soiled or damaged to such an
extent that the motor cannot run. In this case,
the shaving unit symbol, the tap symbol and
the exclamation mark ash. When this happens,
you have to clean the shaving unit or replace it.
Immerse the shaving unit in hot water with some
liquid soap.
- The temperature of the shaver may be too high.
In this case, the shaver does not work and the
exclamation mark on the display ashes. As soon
as the temperature of the shaver has dropped
sufciently, you can switch on the shaver again.
3 Why is the shaver not fully charged after I
charged it in the charger?
- You may not have placed the shaver in the charger
properly. Make sure you press the shaver until it
locks into place.
ENGLISH 21
  • Page 1 1
  • Page 2 2
  • Page 3 3
  • Page 4 4
  • Page 5 5
  • Page 6 6
  • Page 7 7
  • Page 8 8
  • Page 9 9
  • Page 10 10
  • Page 11 11
  • Page 12 12
  • Page 13 13
  • Page 14 14
  • Page 15 15
  • Page 16 16
  • Page 17 17
  • Page 18 18
  • Page 19 19
  • Page 20 20
  • Page 21 21
  • Page 22 22
  • Page 23 23
  • Page 24 24
  • Page 25 25
  • Page 26 26
  • Page 27 27
  • Page 28 28
  • Page 29 29
  • Page 30 30
  • Page 31 31
  • Page 32 32
  • Page 33 33
  • Page 34 34
  • Page 35 35
  • Page 36 36
  • Page 37 37
  • Page 38 38
  • Page 39 39
  • Page 40 40
  • Page 41 41
  • Page 42 42
  • Page 43 43
  • Page 44 44
  • Page 45 45
  • Page 46 46
  • Page 47 47
  • Page 48 48
  • Page 49 49
  • Page 50 50
  • Page 51 51
  • Page 52 52
  • Page 53 53
  • Page 54 54
  • Page 55 55
  • Page 56 56
  • Page 57 57
  • Page 58 58
  • Page 59 59
  • Page 60 60
  • Page 61 61
  • Page 62 62
  • Page 63 63
  • Page 64 64
  • Page 65 65
  • Page 66 66
  • Page 67 67
  • Page 68 68
  • Page 69 69
  • Page 70 70
  • Page 71 71
  • Page 72 72
  • Page 73 73
  • Page 74 74
  • Page 75 75
  • Page 76 76
  • Page 77 77
  • Page 78 78
  • Page 79 79
  • Page 80 80
  • Page 81 81
  • Page 82 82
  • Page 83 83
  • Page 84 84
  • Page 85 85
  • Page 86 86

Philips RQ1051 User manual

Category
Men's shavers
Type
User manual
This manual is also suitable for

Ask a question and I''ll find the answer in the document

Finding information in a document is now easier with AI