Page is loading ...
Page is loading ...
Page is loading ...
Page is loading ...
Page is loading ...
Page is loading ...
Page is loading ...
Page is loading ...
Page is loading ...
Page is loading ...
Page is loading ...
Page is loading ...
Page is loading ...
Page is loading ...
Page is loading ...
Page is loading ...
Page is loading ...
Page is loading ...
Page is loading ...
Page is loading ...
Page is loading ...
Page is loading ...
Page is loading ...
Page is loading ...
Page is loading ...
Page is loading ...
Page is loading ...
Page is loading ...
Page is loading ...
Page is loading ...
Page is loading ...
Page is loading ...
Page is loading ...
Page is loading ...
Page is loading ...
Page is loading ...
Page is loading ...
Page is loading ...
Page is loading ...
Page is loading ...
Page is loading ...
Page is loading ...
Page is loading ...
Page is loading ...
Page is loading ...
Page is loading ...
Page is loading ...
Page is loading ...
Page is loading ...
Page is loading ...
Page is loading ...
Page is loading ...
Page is loading ...
Page is loading ...
Page is loading ...
Page is loading ...
Page is loading ...
Page is loading ...
Page is loading ...
Page is loading ...
Page is loading ...
Page is loading ...
Page is loading ...
Page is loading ...
Page is loading ...
Page is loading ...
Page is loading ...
Page is loading ...
Page is loading ...
Page is loading ...
Page is loading ...
Page is loading ...
Page is loading ...
Page is loading ...
Page is loading ...
Page is loading ...
Page is loading ...
Page is loading ...
Page is loading ...
Page is loading ...
Page is loading ...
Page is loading ...
Page is loading ...
Page is loading ...
Page is loading ...
Page is loading ...
Page is loading ...
Page is loading ...
Page is loading ...
Page is loading ...
Page is loading ...
Page is loading ...
Page is loading ...
Page is loading ...
Page is loading ...
Page is loading ...
Page is loading ...
Page is loading ...
Page is loading ...
Page is loading ...
Page is loading ...
Page is loading ...
Page is loading ...
Page is loading ...
Page is loading ...
Page is loading ...
Page is loading ...
Page is loading ...
Page is loading ...
Page is loading ...
Page is loading ...
Page is loading ...
Page is loading ...
Page is loading ...
Page is loading ...
Page is loading ...
Page is loading ...
Page is loading ...
Page is loading ...
Page is loading ...
Page is loading ...
Page is loading ...
Page is loading ...
Page is loading ...
Page is loading ...
Page is loading ...
Page is loading ...
Page is loading ...
Page is loading ...
Page is loading ...
Page is loading ...
Page is loading ...
Page is loading ...
Page is loading ...
Page is loading ...
Page is loading ...
Page is loading ...
Page is loading ...
Page is loading ...
Page is loading ...
Page is loading ...
Page is loading ...
Page is loading ...
Page is loading ...
Page is loading ...
Page is loading ...
Page is loading ...
Page is loading ...
Page is loading ...
Page is loading ...
Page is loading ...
Page is loading ...
Page is loading ...
Page is loading ...
Page is loading ...
Page is loading ...
Page is loading ...
Page is loading ...
Page is loading ...
Page is loading ...
Page is loading ...
Page is loading ...
Page is loading ...

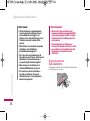
Disposal of your old appliance
1. When this crossed-out wheeled bin symbol is attached to a product it means the product is
covered by the European Directive 2002/96/EC.
2. All electrical and electronic products should be disposed of separately from the municipal
waste stream via designated collection facilities appointed by the government or the local
authorities.
3. The correct disposal of your old appliance will help prevent potential negative consequences for
the environment and human health.
4. For more detailed information about disposal of your old appliance, please contact your city
office, waste disposal service or the shop where you purchased the product.
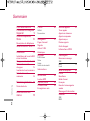
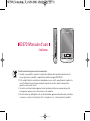
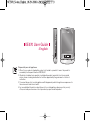
KE970 User Guide
- English

For your safety 4
Guidelines for safe and
efficient use 5
KE970 features 9
Parts of the phone
On-Screen Icons 11
Installation 12
Installing the SIM card and
the handset battery
Charging the Battery 13
Disconnecting the charger
14
Inserting the memory card
Removing the memory
card 15
General functions 16
Entering Text
Menu Tree 18
Profiles 19
Activate
Personalise
Browser 20
Home
Bookmarks
Go to URL
History
Settings 21
Network profiles
Cache
Cookies
Security certificates
Informationen
Multimedia 22
MP3 player
Camera 23
Video camera 25
Voice recorder
Call history 26
All calls
Missed calls
Dialled calls
Received calls
Call duration
Call costs 26
Data information
Messaging 27
New message
Text
Multimedia 28
Email
Inbox 29
Email box
Drafts
Outbox
Sent 30
Listen voicemail
Info message
Templates
Text
Multimedia
Settings
Text message
Multimedia message 31
Email
Voicemail number
Push messages 32
Info message
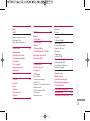
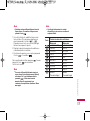
Contents
Contents
2

Contacts 33
Search
New contact
Speed dials
Groups
Copy all
Delete all
Settings
Information 34
My stuff 35
Images
Sounds
Videos
Documents
Others
Games & Apps
External memory
Tools 37
Alarm clock
Calendar
Calculator
Memo 38
Stop watch
Unit converter
World clock
SIM services
Settings 39
Date & Time
Languages
Display
Wallpaper
Backlight timer
Brightness
Home screen shortcut
Menu style
Dialing style
Standby text
Network name
Connectivity
Bluetooth
Network 40
USB connection 42
Call 42
Call divert
Answer mode
Send my number
Call waiting 43
Minute minder
Auto redial
Send DTMF
Security
PIN code request
Phone lock
Call barring
Fixed dial number 44
Change codes
Flight mode
Power saving
Reset default
Memory status
Q&A 45
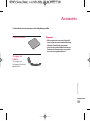
Accessories 47
Technical data 48
Contents
3

For your safety
For your safety
4
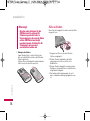
Caution!
• Switch off the phone in any area where
required by special regulations. For example,
do not use your phone in hospitals or it may
affect sensitive medical equipment.
• Emergency calls may not be available under
all mobile networks. Therefore, you should
never depend solely on your mobile phone
for emergency calls.
• Only use ORIGINAL accessories to avoid
damage to your phone.
• All radio transmitters carry risks of
interference with electronics in close
proximity. Minor interference may affect TVs,
radios, PCs, etc.
• Batteries should be disposed of in
accordance with relevant legislation.
• Do not dismantle the phone or battery.
• Risk of explosion if battery is replaced by an
incorrect type.
Warning!
• Mobile Phones must be switched off at all
times in aircrafts.
• Do not hold the phone in your hand while
driving.
• Do not use your phone near petrol stations,
fuel depots, chemical plants or blasting
operations.
• For your safety, use ONLY specified
ORIGINAL batteries and chargers.
• Do not handle the phone with wet hands
while it is being charged. It may cause an
electric shock or seriously damage your
phone.
• Keep the phone in a safe place out of small
children’s reach. It includes small parts
which, if detached, may cause a choking
hazard.

Please read these simple guidelines. Not following
these guidelines may be dangerous or illegal.
Further detailed information is given in this
manual.
Exposure to radio frequency
energy
Radio wave exposure and Specific
Absorption Rate (SAR) information
This mobile phone model KE970 has been
designed to comply with applicable safety
requirements for exposure to radio waves. This
requirement is based on scientific guidelines that
include safety margins designed to assure the
safety of all persons, regardless of age and health.
v
The radio wave exposure guidelines employ a
unit of measurement known as the Specific
Absorption Rate, or SAR. Tests for SAR are
conducted using standardised methods with the
phone transmitting at its highest certified
power level in all used frequency bands.
v
While there may be differences between the
SAR levels of various LG phone models, they
are all designed to meet the relevant guidelines
for exposure to radio waves.
v
The SAR limit recommended by the
International Commission on Non-Ionizing
Radiation Protection (ICNIRP) is 2W/kg
averaged over ten (10) gram of tissue.
v
The highest SAR value for this model phone tested
by DASY4 for use at the ear is 0.443(stainless
case) or 0.417(aluminum case) W/kg (10g) and
when worn on the body is 0.245(stainless case) or
0.483(aluminum case) W/kg (10g).
v
SAR data information for residents in
countries/regions that have adopted the SAR
limit recommended by the Institute of Electrical
and Electronics Engineers (IEEE), which is 1.6
W/kg averaged over one (1) gram of tissue (for
example USA, Canada, Australia and Taiwan).
Product care and
maintenance
v
Do not disassemble this unit. Take it to a
qualified service technician when repair work is
required.
v
Keep away from electrical appliances such as a
TV’s, radios or personal computers.
v
The unit should be kept away from heat sources
such as radiators or cookers.
v
Never place your phone in a microwave oven as
it will cause battery to explode.
v
Do not drop.
v
Do not subject this unit to mechanical vibration
or shock.
v
The coating of the phone may be damaged if
covered with wrap or vinyl wrapper.
Warning!
Only use batteries, chargers and
accessories approved for use with this
particular phone model. The use of any other
types may invalidate any approval or warranty
applying to the phone, and may be dangerous.
Guidelines for safe and efficient use
Guidelines for safe and efficient use
5

v
Do not use harsh chemicals (such as alcohol,
benzene, thinners, etc.) or detergents to clean
your phone. There is a risk of this causing a fire.
v
Do not subject this unit to excessive smoke or
dust.
v
Do not keep the phone next to credit cards or
transport tickets; it can affect the information
on the magnetic strips.
v
Do not tap the screen with a sharp object as it
may damage the phone.
v
Do not expose the phone to liquid or moisture.
v
Use accessories, such as earphones and
headsets, with caution. Ensure that cables are
tucked away safely and do not touch the
antenna unnecessarily.
v
Please remove the data cable before powering
on the handset.
Electronic devices
All mobile phones may get interference, which
could affect performance.
v
Do not use your mobile phone near medical
equipment without requesting permission.
Avoid placing the phone over pacemakers (i.e.
in your breast pocket.)
v
Some hearing aids might be disturbed by
mobile phones.
v
Minor interference may affect TVs, radios, PCs,
etc.
Road safety
Check the laws and regulations on the use of
mobile phones in the areas when you drive.
v
Do not use a hand-held phone while driving.
v
Give full attention to driving.
v
Use a hands-free kit, if available.
v
Pull off the road and park before making or
answering a call if driving conditions so require.
v
RF energy may affect some electronic systems
in your motor vehicle such as a car stereo or
safety equipment.
v
If your vehicle is equipped with an air bag, do
not obstruct it with installed or portable
wireless equipment. It can cause serious injury
due to improper performance.
Guidelines for safe and efficient use
Guidelines for safe and efficient use
6

If you are listening to music whilst out and about,
please ensure that the volume is at a reasonable
level so that you are aware of your surroundings.
This is particularly imperative when attempting to
cross the street.
Avoid damage to your hearing
Damage to your hearing can occur if you are
exposed to loud sound for long periods of time.
We therefore recommend that you do not turn on
or off the handset close to your ear. We also
recommend that music and call volumes are set to
a reasonable level.
Blasting area
Do not use the phone where blasting is in
progress. Observe restrictions, and follow any
regulations or rules.
Potentially explosive
atmospheres
v
Do not use the phone at a refueIling point. Don’t
use near fuel or chemicals.
v
Do not transport or store flammable gas, liquid,
or explosives in the compartment of your
vehicle, which contains your mobile phone and
accessories.
In aircraft
Wireless devices can cause interference in
aircraft.
v
Turn off your mobile phone before boarding any
aircraft.
v
Do not use it on the ground without crew
permission.
Children
Keep the phone in a safe place out of small
children’s reach. It includes small parts which if
detached may cause a choking hazard.
Emergency calls
Emergency calls may not be available under all
mobile networks. Therefore, you should never
depend solely on your mobile phone for
emergency calls. Check with your local service
provider.
Guidelines for safe and efficient use
7

Battery information and care
v
You do not need to completely discharge the
battery before recharging. Unlike other battery
systems, there is no memory effect that could
compromise the battery’s performance.
v
Use only LG batteries and chargers. LG chargers
are designed to maximize the battery life.
v
Do not disassemble or short-circuit the battery
pack.
v
Keep the metal contacts of the battery pack
clean.
v
Replace the battery when it no longer provides
acceptable performance. The battery pack may
be recharged hundreds of times until it needs
replacing.
v
Recharge the battery if it has not been used for
a long time to maximize usability.
v
Do not expose the battery charger to direct
sunlight or use it in high humidity, such as the
bathroom.
v
Do not leave the battery in hot or cold places,
this may deteriorate the battery performance.
Guidelines for safe and efficient use
Guidelines for safe and efficient use
8

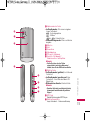
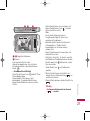
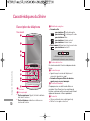
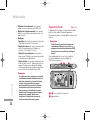
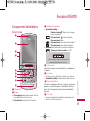
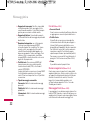
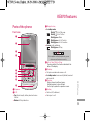
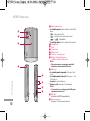
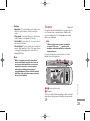
Parts of the phone
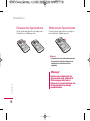
Front view
1
Earpiece
2
LCD
v
Top: Signal strength, battery level and various
function
v
Bottom: Soft key indications
3
Navigation key
v
In standby mode:
Briefly
qq
: List of Message
Briefly
rr
: List of Profiles
Briefly press: Menu
Briefly press: List of Contacts
Briefly press: List of Favourites
v
In menu: scroll up & down
Briefly press: OK key
4
Left soft key/ Right soft key
These keys perform the function indicated in the
bottom of the display.
5
Send key
v
Dial a phone number and answer a call.
v
In standby mode: shows recently dialled, received
and missed call.
6
Clear key
Deletes a character with each press.
Hold the key down to clear all input.
Use this key to go back to a previous screen.
7
End key
v
Switch on/off (hold down)
v
End or reject a call.
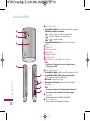
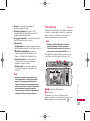
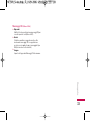
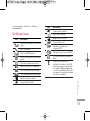
KE970 features
KE970 features
9
;IQ[QM
1
2
9
5
6
7
8
4
3
With the up/down scrolling navigation key, you can
select menu and functions more easily.

8
Alpha numeric keys
v
In standby mode: Input numbers to dial Hold
down
- International calls
- Activate Voice mail centre menu
to - Speed dials
v
In editing mode: Enter numbers & characters
9
Microphone
0
Flash
a
Camera lens
b
Battery cover
c
Holes for a carring strap
d
Battery Charging Connector
/ Cable connector and Ear jack
Note
v
Pleas ensure phone is powered on and in idle
mode before connecting the USB cable.
e
Side keys
v
In standby mode (opened): Volume of key
tone
v
In standby mode (closed):Short press - The
LCD light on.
v
In menu: scroll up & down
v
During a call: volume of the earpiece
Note
v
To protect the sense of hearing while Slide open,
maximum volume level is 3.
f
MP3 key
Activates the MP3 player directly.
g
Side camera key
Long press - Photo camera activation
KE970 features
KE970 features
10
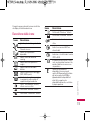
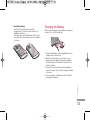
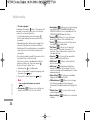
X
4
DIGITAL ZOOM
b
a
c
d
e
f
g
0

The screen displays several icons. These are
described below.
On-Screen Icons
Icon Description
Tells you the strength of the network
signal. *
Call is connected.
You can use GPRS service.
Shows that you are using a roaming
service.
The alarm has been set and is on.
Tells you the status of the battery.
You have received a text message.
You have received a voice message.
Vibrate only menu in profile.
General menu in profile.
Icon Description
Outdoor menu in profile.
Silent menu in profile.
Headset menu in profile.
You can divert a call.
Indicates that the phone is
accessing WAP.
Indicates that you are using GPRS.
You have activated the Bluetooth
menu.
Shows the EDGE service is
available. Connection to the EDGE
service allows you to transfer data
at a speed of 200Kb/s (depending
on network availability). Check with
your operator for network coverage
and service availability.
KE970 features
11

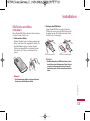
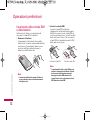
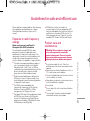
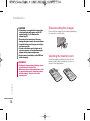
Installing the SIM card and
the handset battery
Make sure the power is off before you remove the
SIM card or battery.
1. Remove the battery.
Press and hold down the battery release button
and lift off the battery cover. Turn the phone up-
side down, as shown, then lift up the battery
with your fingers and pull-out the battery.
Note
v
Removing the battery from the phone when the
power is on may cause the phone to malfunction.
2. Install the SIM card.
Insert and slide the SIM card into the SIM card
holder. Make sure that the SIM card is inserted
properly and that the gold contact area on the
card is facing downwards. To remove the SIM
card, press down lightly and pull it in the
reverse direction.
To insert the SIM card To remove the SIM card
Note
v
The metal contact of the SIM card can be easily
damaged by scratches. Pay special attention to
the SIM card while handling. Follow the
instructions supplied with the SIM card..
WARNING!
• Do not replace or remove the SIM card
while your phone is being used or turned on,
or data may be lost or the SIM card might be
damaged.
Installation
Installation
12

3. Install the battery.
Insert the the battery into the battery
compartment as metal contacts meet in the
middle of the phone.
Push down the top of the battery until it snaps
into place. Place the battery cover to the phone
as shown.
Charging the Battery
Before connecting the travel adapter to the phone
you must first install the battery.
1. Ensure the battery is fully charged before using
the phone for the first time.
2. With the arrow facing you as shown in the
diagram push the plug on the battery adapter
into the socket on the side of the phone until it
clicks into place.
3. Connect the other end of the travel adapter to
the mains socket. Use only the charger included
in the box.
4. The moving bars of battery icon will stop after
charging is complete.
Installation
13

Disconnecting the charger
Disconnect the charger from the phone by pulling
the connector, not the cord.
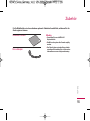
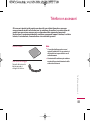
Inserting the memory card
Insert the memory card into the slot until the
memory card is fully inserted into the slot, as
shown in the figure below:
WARNING!
• Unplug the charger during lightning storms
to avoid electric shock or fire.
• Make sure that no sharp-edged items, such
as animal teeth or nails, come into contact
with the battery. There is a risk of this
causing a fire.
CAUTION!
• If the battery is completely discharged, the
charging display will appear on the LCD
approximately 1 to 1.5 minutes after
connecting TA.
• Do not force the connector as this may
damage the phone and/or the travel adapter.
• Insert the battery pack charger vertically to
wall power outlet.
• If you use the battery pack charger out of
your own country, use an attachment plug
adaptor for the proper configuration.
• Do not remove your battery or the SIM card
while charging.
Installation
Installation
14

Removing the memory card
Carefully remove the memory card out of the
soket, as shown in the figure below:
Note
v
Only use memory cards that have been approved
by the manufacturer. Some memory cards might
not be compliant with the handset.
Warning
Do not replace or remove the memory card
while your phone is on, or data could be lost
and the memory card might be damaged.
Installation
15

Entering Text
You can enter alphanumeric characters by using
the phone°Øs keypad. For example, storing names
in the Address Book, writing a message, creating
scheduling events in the calendar all require
entering text. The following text input methods are
available in the phone.
Note
v
Some fields may allow only one text input mode
(e.g. telephone number in address book fields).
T9 Mode
This mode allows you to enter words with only
one keystroke per letter. Each key on the keypad
has more than one letter. The T9 mode
automatically compares your keystrokes with an
internal linguistic dictionary to determine the
correct word, thus requiring far fewer keystrokes
than the traditional ABC mode.
ABC Mode
This mode allows you to enter letters by pressing
the key labeled with the required letter once,
twice, three or four times until the letter is
displayed.
123 Mode (Numbers Mode)
Type numbers using one keystroke per number. To
change to 123 mode in a text entry field, press
key until 123 mode is displayed.
Symbolic Mode
This mode allows you to enter special characters.
Changing the Text Input Mode
1. When you are in a field that allows characters
to be entered, you will notice the text input
mode indicator in the upper right corner of the
display.
2. If you want to change modes, press . The
available modes are changed.
General functions
General functions
16

Using the T9 Mode
The T9 predictive text input mode allows you to
enter words easily with a minimum number of key
presses.
As you press each key, the phone begins to display
the characters that it thinks you are typing based
on a built-in dictionary. As new letters are added,
the word changes to reflect the most likely
candidate from the dictionary.
Note
v
You can select a different T9 language from the
menu option or press hold down the key
The default setting for T9 is set to disabled mode.
1. When you are in the T9 predictive text input
mode, start entering a word by pressing keys
to Press one key per letter
2. Enter the whole word before editing or deleting
any key strokes.
3. Complete each word with a space by pressing
the key or key.
To delete letters, press . Press and hold down
to erase the
letters continuously.
Note
v
To exit the text input mode without saving your
input, press . The phone returns to the idle
screen.
Note
v
Refer to the table below for more information on
the characters available using the keys.
Key
Characters in the order display
Upper Case Lower Case
. , ? ! ' '' 1 - ( ) @ / : _ . , ? ! ' '' 1 - ( ) @ / : _
A B C 2 À Â Æ Ç a b c 2 à â æ ç
D E F 3 É È Ê Ë d e f 3 é è ê ë
G H I 4 Î Ï g h i 4 î ï
J K L 5 j k l 5
M N O 6 Ñ Ô Ö OE m n o 6 ñ ô ö oe
P Q R S 7 p q r s 7
T U V 8 Û t u v 8 û
W X Y Z 9
ˆ
W
ˆ
Y w x y z 9 ˆw ˆy
Space
0 (long press)
Space
0 (long press)
General functions
17

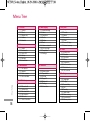
Menu Tree
Menu Tree
18
1.1 General
1.2 Silent
1.3 Vibrate only
1.4 Outdoor
1.5 Headset
2.1 Home
2.2 Bookmarks
2.3 Go to URL
2.4 History
2.5 Settings
2.6 Information
3.1 MP3 player
3.2 Camera
3.3 Video camera
3.4 Voice recorder
4.1 All calls
4.2 Missed calls
4.3 Dialled calls
4.4 Received calls
4.5 Call duration
4.6 Call costs
4.7 Data information
5.1 New message
5.2 Inbox
5.3 Email box
5.4 Drafts
5.5 Outbox
5.6 Sent
5.7 Listen voicemail
5.8 Info message
5.9 Templates
5.0 Settings
6.1 Search
6.2 New contact
6.3 Speed dials
6.4 Groups
6.5 Copy all
6.6 Delete all
6.7 Settings
6.8 Information
5. Messaging
6. Contacts
7.1 Images
7.2 Sounds
7.3 Videos
7.4 Documents
7.5 Others
7.6 Games & Apps
7.7 External memory
8.1 Alarm clock
8.2 Calendar
8.3 Calculator
8.4 Memo
8.5 Stop watch
8.6 Unit converter
8.7 World clock
8.8 SIM services
9.1 Date & Time
9.2 Languages
9.3 Display
9.4 Connectivity
9.5 Call
9.6 Security
9.7 Flight mode
9.8 Power saving
9.9 Reset default
9.0 Memory status
7. My stuff
8. Tools
9. Settings
1. Profiles
2. Browser
3. Multimedia
4. Call history

In Profiles, you can adjust and customise the
phone tones for different events, environments, or
caller groups.
Activate (Menu 1.X.1)
1. A list of profiles is displayed.
2. In the Profiles list, scroll to the profile you want
to activate and press the left soft key [OK]
or OK key.
3. Then, select Activate.
Personalise
(Menu 1.X.2)
Scroll to the desired profile in the Profile list. After
pressing the left soft key or the OK key, select
Personalise.
The profile setting option opens. Set the option as
required.
v
Call alert type: Set the alert type for incoming
calls.
v
Ring tones: Select the desired ring tone from
the list.
v
Ring volume: Set the volume of the ringing
tone.
v
Message alert type: Set the alert type for
messages.
v
Message tones: Select the alert tone for
messages.
v
Keypad tones: Select the desired keypad tone.
v
Keypad volume: Set the volume of keypad
tone.
v
Slide tones: Allows to set the flip tone for
adjusting environment.
v
Effect sound volume: Set the volume of effect
sound.
v
Power on/off volume: Set the volume of the
ringing tone when switching the phone on/off.
v
Auto answer: This function will be activated
only when your phone is connected to the
handsfree kit.
•
Off: The phone will not answer automatically.
•
After 5 secs: After 5 seconds, the phone will
answer automatically.
•
After 10 secs: After 10 seconds, the phone
will answer automatically.
Note
v
All profiles cannot be renamed.
Profiles
Profiles
19

You can access various WAP (Wireless
Application Protocol) services such as banking,
news, weather reports and flight information.
These services are specially designed for mobile
phones and they are maintained by WAP service
providers.
Check the availability of WAP services, pricing and
tariffs with your network operator and/or the
service provider whose service you wish to use.
Service providers will also give you instructions on
how to use their services.
Once connected, the homepage is displayed. The
content depends on the service provider. To exit
the browser at any time, press the ( ) key.
The phone will return to the idle menu.
Note
v
The WAP browser menus may vary, depending
on your browser version.
Home
Menu 2.1
Connects to a homepage. The homepage will be
the site which is defined in the activated profile. It
will be defined by the service provider if you have
not defined it in the activated profile.
Bookmarks
Menu 2.2
This menu allows you to store the URL of favourite
web pages for easy access at a later time.
Go to URL
Menu 2.3
You can connect directly to the site you want.
After entering a specific URL, press the OK key.
History
Menu 2.4
This menu will shows the recent browsing pages.
Browser
Browser
20
Page is loading ...
Page is loading ...
Page is loading ...
Page is loading ...
Page is loading ...
Page is loading ...
Page is loading ...
Page is loading ...
Page is loading ...
Page is loading ...
Page is loading ...
Page is loading ...
Page is loading ...
Page is loading ...
Page is loading ...
Page is loading ...
Page is loading ...
Page is loading ...
Page is loading ...
Page is loading ...
Page is loading ...
Page is loading ...
Page is loading ...
Page is loading ...
Page is loading ...
Page is loading ...
Page is loading ...
Page is loading ...
Page is loading ...
Page is loading ...
Page is loading ...
Page is loading ...
Page is loading ...
Page is loading ...
-
 1
1
-
 2
2
-
 3
3
-
 4
4
-
 5
5
-
 6
6
-
 7
7
-
 8
8
-
 9
9
-
 10
10
-
 11
11
-
 12
12
-
 13
13
-
 14
14
-
 15
15
-
 16
16
-
 17
17
-
 18
18
-
 19
19
-
 20
20
-
 21
21
-
 22
22
-
 23
23
-
 24
24
-
 25
25
-
 26
26
-
 27
27
-
 28
28
-
 29
29
-
 30
30
-
 31
31
-
 32
32
-
 33
33
-
 34
34
-
 35
35
-
 36
36
-
 37
37
-
 38
38
-
 39
39
-
 40
40
-
 41
41
-
 42
42
-
 43
43
-
 44
44
-
 45
45
-
 46
46
-
 47
47
-
 48
48
-
 49
49
-
 50
50
-
 51
51
-
 52
52
-
 53
53
-
 54
54
-
 55
55
-
 56
56
-
 57
57
-
 58
58
-
 59
59
-
 60
60
-
 61
61
-
 62
62
-
 63
63
-
 64
64
-
 65
65
-
 66
66
-
 67
67
-
 68
68
-
 69
69
-
 70
70
-
 71
71
-
 72
72
-
 73
73
-
 74
74
-
 75
75
-
 76
76
-
 77
77
-
 78
78
-
 79
79
-
 80
80
-
 81
81
-
 82
82
-
 83
83
-
 84
84
-
 85
85
-
 86
86
-
 87
87
-
 88
88
-
 89
89
-
 90
90
-
 91
91
-
 92
92
-
 93
93
-
 94
94
-
 95
95
-
 96
96
-
 97
97
-
 98
98
-
 99
99
-
 100
100
-
 101
101
-
 102
102
-
 103
103
-
 104
104
-
 105
105
-
 106
106
-
 107
107
-
 108
108
-
 109
109
-
 110
110
-
 111
111
-
 112
112
-
 113
113
-
 114
114
-
 115
115
-
 116
116
-
 117
117
-
 118
118
-
 119
119
-
 120
120
-
 121
121
-
 122
122
-
 123
123
-
 124
124
-
 125
125
-
 126
126
-
 127
127
-
 128
128
-
 129
129
-
 130
130
-
 131
131
-
 132
132
-
 133
133
-
 134
134
-
 135
135
-
 136
136
-
 137
137
-
 138
138
-
 139
139
-
 140
140
-
 141
141
-
 142
142
-
 143
143
-
 144
144
-
 145
145
-
 146
146
-
 147
147
-
 148
148
-
 149
149
-
 150
150
-
 151
151
-
 152
152
-
 153
153
-
 154
154
-
 155
155
-
 156
156
-
 157
157
-
 158
158
-
 159
159
-
 160
160
-
 161
161
-
 162
162
-
 163
163
-
 164
164
-
 165
165
-
 166
166
-
 167
167
-
 168
168
-
 169
169
-
 170
170
-
 171
171
-
 172
172
-
 173
173
-
 174
174
-
 175
175
-
 176
176
-
 177
177
-
 178
178
-
 179
179
-
 180
180
-
 181
181
-
 182
182
-
 183
183
-
 184
184
-
 185
185
-
 186
186
-
 187
187
-
 188
188
-
 189
189
-
 190
190
-
 191
191
-
 192
192
-
 193
193
-
 194
194
-
 195
195
-
 196
196
-
 197
197
-
 198
198
-
 199
199
-
 200
200
-
 201
201
-
 202
202
-
 203
203
-
 204
204
-
 205
205
-
 206
206
-
 207
207
-
 208
208
-
 209
209
-
 210
210
-
 211
211
-
 212
212
-
 213
213
-
 214
214
-
 215
215
-
 216
216
-
 217
217


Ask a question and I''ll find the answer in the document
Finding information in a document is now easier with AI
in other languages
- italiano: LG KE970.ACISGD Manuale utente
- français: LG KE970.ACISGD Manuel utilisateur
- Deutsch: LG KE970.ACISGD Benutzerhandbuch