
Rugged Computing
Users Manual Rugged Tablet PCs
ID83 Rugged Tablet PC
(Intel
®
®®
®
Atom™ Dual Core N2600 Based
Tablet PC)
USERS MANUAL
Version: 1.1
R10ID8M-RTXX 10.4 inch Rugged Tablet PC
R12ID8M-RTXX 12.1 inch Rugged Tablet PC
R10ID8M-RTXXGP
10.4 inch Mobile Rugged Tablet PC
R12ID8M-RTXXGP
12.1 inch Mobile Rugged Tablet PC

Rugged Computing
Users Manual Rugged Table PCs
2
IMPORTANT SAFETY INSTRUCTIONS
Please read these instructions carefully before using the product and
save for later reference.
Follow all warnings and instructions marked on the product.
Unplug this product from the wall outlet before cleaning. Clean the
product with a damp soft cloth. Do not use liquid or aerosol cleaners
as it may cause permanent damage to the screen.
Do not use this product near water.
Do not place this product on an unstable cart, stand, or table. The
product may fall, causing serious damage to the product.
This product should be operated from the type of power indicated on
the marking label. If you are not sure of the type of power available,
consult your dealer or local power company.
This product is equipped with a 3-wire grounding type plug, a plug
having a third (grounding) pin. This plug will only fit into a
grounding-type power outlet. This is a safety feature. If you are
unable to insert the plug into the outlet, contact your electrician to
replace your obsolete outlet. (For AC version only)
Do not defeat the purpose of the grounding-type plug.
Do not allow anything to rest on the power cord. Do not locate this
product where persons will walk on the cord.
Never push objects of any kind into this product through cabinet slots
as they may touch dangerous voltage points or short out parts that
could result in a risk of fire or electric shock. Never spill liquid of any
kind on the product.
Do not attempt to service this product by yourself, as opening or
removing covers may expose you to dangerous voltage points or
other risks and will void the warranty. Refer all servicing to qualified
service personnel.
Unplug this product from the wall outlet and refer servicing to
qualified service personnel under the following conditions:
When the power cord or plug is damaged or frayed.
If liquid has been spilled into the product.
If rainy or water has been exposed to the product.
If the product does not operate normally that the operating
instructions are followed. Adjust only those controls that are covered
by the operating instructions since improper adjustment of other
controls may result in damage and will often require extensive work
by a qualified technician to restore the product to normal operation.
If the product has been dropped or the cabinet has been damaged.
If the product exhibited a distinct change in the performance, that
indicates a need for service.

Rugged Computing
Users Manual Rugged Table PCs
3
Copyright Notice
Copyright © 2008 Winmate Communication Inc., ALL RIGHTS RESERVED. No
part of this document may be reproduced, copied, translated, or transmitted in any
form or by any means, electronic or mechanical, for any purpose, without the prior
written permission of the original manufacturer.
Trademark Acknowledgement
Brand and product names are trademarks or registered trademarks of their
respective owners.
Disclaimer
Winmate Communication Inc. reserves the right to make any product changes
without notice, including circuits and/or software described or contained in this
manual in order to improve design and/or performance. Winmate Communication
assumes no responsibility or liability for the use of the described product(s),
conveys no license or title under any patent, copyright, or masks work rights to
these products, and makes no representations or warranties that these products
are free from patent, copyright, or mask work right infringement, unless otherwise
specified. Applications that are described in this manual are for illustration
purposes only. Winmate Communication Inc. makes no representation or warranty
that such application will be suitable for the specified use without further testing or
modification.
Warranty
Winmate warrants that each of its products will be free from material and
workmanship defects for a period of one year from the invoice date. If the customer
discovers a defect, Winmate will, at its option, repair or replace the defective
product at no charge to the customer, provided it is returned during the warranty
period of one year, with transportation charges prepaid. The returned product must
be properly packaged in it’s original packaging to obtain warranty service.
If the serial number and the product shipping data differ by over 30 days, the
in-warranty service will be made according to the shipping date. In the serial
numbers the third and fourth two digits give the year of manufacture, and the fifth
digit means the month (e. g., with A for October, B for November and C for
December).
For example, the serial number 1W08Axxxxxxxx means October of year 2008.

Rugged Computing
Users Manual Rugged Table PCs
4
Customer Service
We provide service guide for any problem as follow steps:First, visit the website
at http://www.winmate.com.tw to find the update information about the product.
Second, contact with your distributor, sales representative, or our customer service
center for technical support if you need additional assistance. You may have the
following information ready before you call:
Product serial number
Peripheral attachments
Software (OS, version, application software, etc.)
Description of complete problem
The exact wording of any error messages
In addition, free technical support is available from our engineers every
business day. We are always ready to give advice on application requirements or
specific information on the installation and operation of any of our products. Please
do not hesitate to call or e-mail us.
Notice
1. Do not touch the LCD panel surface with sharp or hard objects.
2. Do not use abrasive cleaners, waxes or solvents for cleaning, use only a dry or
damp, soft cloth.
3. Use only with a high quality, safety-approved, AC/DC power adapter.

Rugged Computing
Users Manual Rugged Table PCs
5
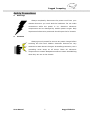
Safety Precautions
Warning!
Always completely disconnect the power cord from your
chassis whenever you work with the hardware. Do not make
connections while the power is on. Sensitive electronic
components can be damaged by sudden power surges. Only
experienced electronics personnel should open the PC chassis.
Caution!
Always ground yourself to remove any static charge before
touching the CPU card. Modern electronic devices are very
sensitive to static electric charges. As a safety precaution, use a
grounding wrist strap at all times. Place all electronic
components in a static-dissipative surface or static-shielded bag
when they are not in the chassis.

Rugged Computing
Users Manual Rugged Table PCs
6
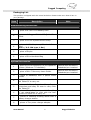
Packaging List
This product is shipped with the items list below. Please make sure that all are in
your package.
Item Description Note
Default Packing Accessories
1 1 piece of 6 Cell Li-Ion Battery Pack
2
1 piece of Rugged Tablet PC Quick Start
Guide
3 1 piece of CD for System Driver Utility.
4
1 piece of 19V Adapter w/ Standard Power
Cord.
(Euro / U.S. Std type, 1.8m)
5 1 piece of Stylus
6 1 piece of Slim Handheld Bag
Optional Accessories
1
1 piece of CD for Recovery CD for Operation
System (Windows 7 Embedded).
Optional with Windows 7
Embedded pre-installed.
2 1 piece of Win 7 Recovery Users Guide.
Optional with Windows 7
Embedded pre-installed.
3
1 piece of Handstrip with 4 pieces M3x5
screws
4
1 piece of Handle Belt can lock on the side of
the Tablet PC to carry on.
5
1 piece of Carry Bag, the Carry Bag is
convenient and easy for user to carry with
the Tablet PC.
6
1 piece of Carry Belt, can use with Carry Bag
or use stand-alone to click with the four
corners of Tablet PC to carry on.
7
1 pieces of Desktop Docking Stand with a
battery charger station
8 1 pieces of Car power charger adapter

Rugged Computing
Users Manual Rugged Table PCs
7
9 Other battery if necessary in order

Rugged Computing
Users Manual Rugged Table PCs
8
Contents
IMPORTANT SAFETY INSTRUCTIONS.............................................................2
PACKAGING LIST ...................................................................................................6
CHAPTER 1 GETTING STARTED ......................................................................11
1.1
C
ONNECTING THE
AC
P
OWER
............................................................................................................... 11
1.2
T
URNING
O
N AND
O
FF THE
T
ABLET
PC .............................................................................................12
1.2.1
T
URNING ON THE
T
ABLET
PC ...................................................................................................12
1.2.2
T
URNING OFF THE
T
ABLET
PC..................................................................................................12
1.3
T
HE
O
PTIMIZED
U
SE FOR
S
UNLIGHT
R
EADABLE
T
OUCHSCREEN
.................................................13
1.4
T
AKING A
L
OOK AT
I/O
F
UNCTIONS
(
FOR
10.4
INCH
R
UGGED
T
ABLET
PC).........................14
1.5
T
AKING A
L
OOK AT
I/O
F
UNCTIONS
(
FOR
12.1
INCH
R
UGGED
T
ABLET
PC).........................19
1.6
P
RODUCT
F
EATURES AND
S
PECIFICATION
........................................................................................ 25
1.6.1
Product Features ....................................................................................................................... 25
1.6.2
Product Specification ...............................................................................................................26
CHAPTER 2 OPERATING TABLET PC AND HOTTAB HOTKEY UTILITY
....................................................................................................................................29
2.2
S
TARTING AND
S
TOPPING THE
T
ABLET
PC.......................................................................................29
2.2
Q
UICK TO
K
NOW
M
ENU AND
H
OT
T
AB
H
OTKEY
F
UNCTION
...........................................................30
2.2.1
How to use Menu Function .................................................................................................... 30
2.2.2
How to use HotTab Hotkey Function .................................................................................34
2.2.3
Connecting to a Wireless Network and Bluetooth ........................................................42
2.2.4 Using the Bluetooth Wireless Feature ................................................................................ 43
2.2.5 Using the 3G Feature ................................................................................................................ 46
2.2.6
Using the GPS Feature ............................................................................................................ 49
2.2.7
Using the Camera Feature
(
Optional
)
..........................................................................52
CHAPTER 3 TABLET PC POWER MANAGEMENT.........................................56
3.1
A
BOUT
AC
A
DAPTER
...............................................................................................................................56
3.2
C
HARGING AND
C
HECKING
C
HARGING
S
TATUS
............................................................................... 57
3.2.1
Charging the Battery Pack.....................................................................................................57
3.2.2
Charging Approaches............................................................................................................... 58
3.2.3
Checking the Battery Level ...................................................................................................60
3.2.4
Battery Low Signals and Actions......................................................................................... 61
3.3
R
EPLACING THE
B
ATTERY
P
ACK
...........................................................................................................62
3.4
P
OWER
-S
AVING
T
IPS
.............................................................................................................................64
CHAPTER 4 EXPANDING YOUR TABLET PC ................................................66
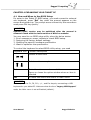
4.1
H
OW AND
W
HEN TO
U
SE
BIOS
S
ETUP
.............................................................................................66
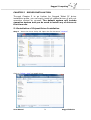
4.2
BIOS
F
UNCTIONS
...................................................................................................................................67
4.2.1 Main Menu........................................................................................................................................67
4.2.2 Advanced Menu.............................................................................................................................. 67
4.2.3 Boot Menu........................................................................................................................................68
4.2.4 Exit Menu .........................................................................................................................................69

Rugged Computing
Users Manual Rugged Table PCs
9
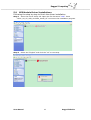
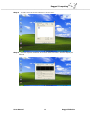
CHAPTER 5 DRIVER INSTALLATION ..........................................................71
5.1
I
NSTALLATION OF
C
HIPSET
D
RIVER
I
NSTALLATION
...................................................................... 71
5.2
G
RAPHIC
D
RIVER
I
NSTALLATION
........................................................................................................75
5.3
A
UDIO
D
RIVER
I
NSTALLATION
............................................................................................................78
5.4
LAN
D
RIVER
I
NSTALLATION
................................................................................................................81
5.5
H
OT
T
AB
U
TILITY
D
RIVER
I
NSTALLATIONS
......................................................................................83
5.6
W
IRELESS
LAN
D
RIVER
I
NSTALLATION
...........................................................................................85
5.7
B
LUETOOTH
D
RIVER
I
NSTALLATIONS
................................................................................................ 87
5.8
3G
M
ODULE
D
RIVER
I
NSTALLATIONS
................................................................................................ 91
5.9
GPS
M
ODULE
D
RIVER
I
NSTALLATIONS
.............................................................................................92
5.10
T
OUCH
D
RIVER
I
NSTALLATION
................................................................................................ 95
CHAPTER 6 CARING YOUR TABLET PC ....................................................101
6.1
G
ENERAL
P
ROTECTION
T
IPS FOR
T
ABLET
PC ................................................................................101
6.2
C
LEANING THE
T
ABLET
PC.................................................................................................................. 101
6.3
B
ATTERY
P
ROTECTION
T
IPS
...............................................................................................................103
6.4
T
OUCH SCREEN
P
ROTECTION
T
IPS
...................................................................................................104
6.5
T
ROUBLE SHOOTING FROM
A
TO
L ....................................................................................................105
A. Battery Problem ................................................................................................................................. 105
B. Bluetooth Transmission Problem ................................................................................................. 105
C. Display Problem .................................................................................................................................105
D. Date/Time Problems ........................................................................................................................ 105
E. Hardware Driver Problem ...............................................................................................................106
F. Hard Drive Problem...........................................................................................................................106
G. LAN Problem .......................................................................................................................................107
H. Power Management Problems ......................................................................................................107
I. Startup Problems................................................................................................................................ 107
J. Sound Problems.................................................................................................................................. 108
K. Wireless LAN Problem......................................................................................................................109

Rugged Computing
Users Manual Rugged Table PCs
10
CHAPTER 1
Getting Started

Rugged Computing
Users Manual Rugged Table PCs
11
CHAPTER 1 GETTING STARTED
This chapter guides you to get the Rugged Tablet PC ready for operating.
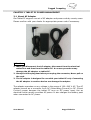
1.1 Connecting the AC Power
Our tablet PC can operate either on the external AC power adapter or internal
battery power. It is suggested that you use AC power when you start up the
tablet PC first time.
**Caution
Use only the AC adapter included with your tablet PC. Using other AC adapters
may damage the tablet PC.
1. Make sure that the tablet PC is turned off.
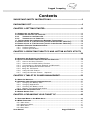
2. Place the tablet PC upside down.
3. Put Battery Pack into the battery slot and screw tightly with four screws.
4. Plug the DC cord of the AC adapter to the power connector of the tablet PC.
5. Plug the female end of the AC power cord to the AC adapter and the male end to
the power electrical outlet.
6. Turn on the Tablet PC few seconds later after power is being supplied from the
electrical outlet to the AC adapter.
7. When the AC adapter is connected, the Battery Pack is also under charging. You
can check the Battery Status LED indicator to see the currently progress. The
indicator turns to green when is fully charged.
(For information on using battery power, see “Chapter 3 The Power Management”)
**Caution
When you disconnect the AC adapter, disconnect from the electrical outlet first
and then from the tablet PC. A reverse procedure may damage the AC adapter
or the tablet PC.
When unplugging the connector, always hold the plug head. Never pull on the
cord.

Rugged Computing
Users Manual Rugged Table PCs
12
1.2
Turning On and Off the Tablet PC
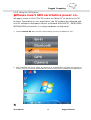
1.2.1 Turning on the Tablet PC
1. Place your tablet PC on a flat and stable surface or holding the tablet PC on your
hand.
2. Make sure that the tablet PC is either connected to AC power or the battery pack
with power.
3. Press the power button by 4 seconds to start it.
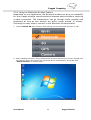
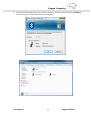
1.2.2 Turning off the Tablet PC
To turn off the tablet PC power, use the “Shut Down” command of your
operating system.
**Caution
If you have to turn the tablet PC on again immediately after turning it
off, wait for at least five seconds. Turning the tablet PC off and on
rapidly can damage it.

Rugged Computing
Users Manual Rugged Table PCs
13
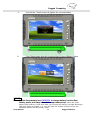
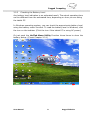
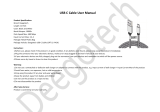
1.3 The Optimized Use for Sunlight Readable Touchscreen.
With the imposed reflective function, the modified LCD can reflect the ambient light
passing the LCD cell and utilize the reflected light beams as its illumination. The
stronger the ambient light is, the brighter the LCD will appear. As a result, the modified
LCD is viewable under lighting conditions. The optimized angle of view is fourty-five
degree. And the optimized distance of view is 30cm.
**Caution
Although transflective LCD is mainly used in outdoor environment and it may
increase the reflective lights under sunlight, it is suggested that you should keep
the LCD in appropriate temperature for operation and storage, and avoid direct
sunlight if possible. To ensure the transflective LCD work stably, 0~50°C
(32-121°F) operation and storage temperature is suitable.
Light Source

Rugged Computing
Users Manual Rugged Table PCs
14
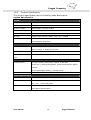
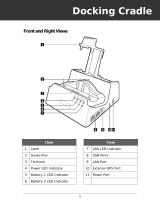
1.4 Taking a Look at I/O Functions (for 10.4 inch Rugged Tablet PC)
This section we will show the Tablet PC external connection parts and their
functions.
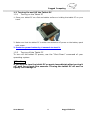
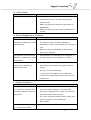
Front side Control Functions
#
Components Function Description See Other
Intro.
1 Power On
Button
Push 4 seconds
continuous
to turn-on the PC.
Need 8 seconds continuous push to
force the Tablet PC turn-off
immediately.
2 LED Indicator From left to right shows the status
about Power mode, Battery mode,
Storage and Wi-Fi status mode.
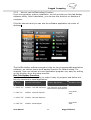
3 Menu Push Menu function to show Brightness,
Volume,Battery status and WiFi/
Bluetooth on/off.
Chapter 2.2.1
4 Up Push Up key to increse Brightness or
Volume under Menu function.
Chapter 2.2.1
5 Down Push Down key to decrese Brightness or
Volume under Menu function.
Chapter 2.2.1
6 Hotkey 6 programmable Hot-key for user to
define by application, default first short
push key (F1 short) will turn-on Hot TAB
AP Utility.
Chapter 2.2.2
Men
u
Up & Down
F1,
F2,
F3
Power On
Button
LED Indicator for
Power, Battery,
HDD and Wi-Fi
Status

Rugged Computing
Users Manual Rugged Table PCs
15
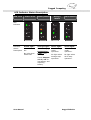
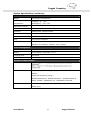
LED Indicator Status Description
LED Term
Power mode Battery Status
Storage
Status
Wi-Fi Status
LED
Indicator
Indicator
Status
Description
Green light:
::
:
when Power
On.
No light when
Power Off.
Orange Light:
::
:
Under charging
Red Blinking
Light:
::
:Low
Battery
Check Chapter
3.2.3/ 2.4 for
low battery and
replacing
battery
Green light:
::
:
when storage
under
operation.
No light when
storage stop
operation.
Green light:
::
:
when Wi-Fi
under
operation.
No light when
Wi-Fi stop
operation.
Rear side Stylus
Stylus Carry
Hole
WiFi Ant.

Rugged Computing
Users Manual Rugged Table PCs
16
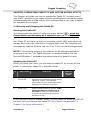
Front Side
# Components Function Description See Other Intro.
1 Stylus Slot Easy to take out and plug in the
stylus pen.
The Tablet PC has one stylus pen in accessory. Our default stylus is only recommended for
use in our Tablet PC.
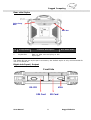
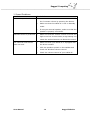
Right side Input/ Output
# Components Function Description See Other Intro.
1 RS232 Port Connect RS232 cable D-SUB 9pin to
the RS232 port.
2 Sim Card Slot
3 SD Card Slot
4 VGA Port Connect VGA cable to the VGA
output port, and the other side
connect to monitor VGA input.

Rugged Computing
Users Manual Rugged Table PCs
17
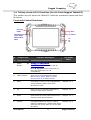
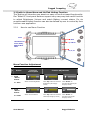
LAN
Audio Out USB x2
Power Input
Front Side
Micro In
Left side Input/ Output
# Components Function Description See Other Intro.
1 LAN Port The product can support
10/100/1000 Mbit Giga LAN
ethernet, connect RJ-45 LAN cable
to LAN port.
2 Audio Port Audio ouput, Microphone input
3 USB Two USB2.0 compliance ports for
user to connect any USB device.
4 Power Jack Connect 19V Adapter to the Power
jack.

Rugged Computing
Users Manual Rugged Table PCs
18
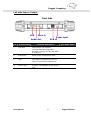
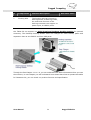
Top side Input/ Output
Button side Input/ Output
# Components Function Description See Other Intro.
1 Docking Slot The Docking slot can connect to
docking device as docking cradle,
the maximum funciotn of the
docking connector can support 1x
power input, 4 USB2.0 ports.
Front Side
Docking Slot

Rugged Computing
Users Manual Rugged Table PCs
19
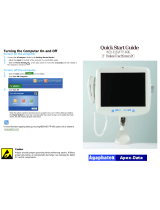
1.5 Taking a Look at I/O Functions (for 12.1 inch Rugged Tablet PC)
This section we will show the Tablet PC external connection parts and their
functions.
Front side Control Functions
#
Components Function Description See Other
Intro.
1 Power On
Button
Push 4 seconds
continuous
to turn-on the PC.
Need 8 seconds continuous push to
force the Tablet PC turn-off
immediately.
2 LED Indicator From left to right shows the status
about Power mode, Battery mode,
Storage and Wi-Fi status mode.
3 Menu Push Menu function to show Brightness,
Volume,Battery status and WiFi/
Bluetooth on/off.
Chapter 2.2.1
4 Up Push Up key to increse Brightness or
Volume under Menu function.
Chapter 2.2.1
5 Down Push Down key to decrese Brightness or
Volume under Menu function.
Chapter 2.2.1
6 Hotkey 6 programmable Hot-key for user to
define by application, default first short
push key (F1 short) will turn-on Hot TAB
AP Utility.
Chapter 2.2.2
Menu
Up & Down
F1,
F2,
F3
Power on Button
LED Indicator for Power, Battery,
HDD and Wi-Fi Status

Rugged Computing
Users Manual Rugged Table PCs
20
LED Indicator Status Description
LED Term
Power mode Battery Status
Storage
Status
Wi-Fi Status
LED
Indicator
Indicator
Status
Description
Green light:
::
:
when Power
On.
No light when
Power Off.
Orange Light:
::
:
Under charging
Red Blinking
Light:
::
:Low
Battery
Check Chapter
3.2.3/ 2.4 for
low battery and
replacing
battery
Green light:
::
:
when storage
under
operation.
No light when
storage stop
operation.
Green light:
::
:
when Wi-Fi
under
operation.
No light when
Wi-Fi stop
operation.
Page is loading ...
Page is loading ...
Page is loading ...
Page is loading ...
Page is loading ...
Page is loading ...
Page is loading ...
Page is loading ...
Page is loading ...
Page is loading ...
Page is loading ...
Page is loading ...
Page is loading ...
Page is loading ...
Page is loading ...
Page is loading ...
Page is loading ...
Page is loading ...
Page is loading ...
Page is loading ...
Page is loading ...
Page is loading ...
Page is loading ...
Page is loading ...
Page is loading ...
Page is loading ...
Page is loading ...
Page is loading ...
Page is loading ...
Page is loading ...
Page is loading ...
Page is loading ...
Page is loading ...
Page is loading ...
Page is loading ...
Page is loading ...
Page is loading ...
Page is loading ...
Page is loading ...
Page is loading ...
Page is loading ...
Page is loading ...
Page is loading ...
Page is loading ...
Page is loading ...
Page is loading ...
Page is loading ...
Page is loading ...
Page is loading ...
Page is loading ...
Page is loading ...
Page is loading ...
Page is loading ...
Page is loading ...
Page is loading ...
Page is loading ...
Page is loading ...
Page is loading ...
Page is loading ...
Page is loading ...
Page is loading ...
Page is loading ...
Page is loading ...
Page is loading ...
Page is loading ...
Page is loading ...
Page is loading ...
Page is loading ...
Page is loading ...
Page is loading ...
Page is loading ...
Page is loading ...
Page is loading ...
Page is loading ...
Page is loading ...
Page is loading ...
Page is loading ...
Page is loading ...
Page is loading ...
Page is loading ...
Page is loading ...
Page is loading ...
Page is loading ...
Page is loading ...
Page is loading ...
Page is loading ...
Page is loading ...
Page is loading ...
Page is loading ...
Page is loading ...
-
 1
1
-
 2
2
-
 3
3
-
 4
4
-
 5
5
-
 6
6
-
 7
7
-
 8
8
-
 9
9
-
 10
10
-
 11
11
-
 12
12
-
 13
13
-
 14
14
-
 15
15
-
 16
16
-
 17
17
-
 18
18
-
 19
19
-
 20
20
-
 21
21
-
 22
22
-
 23
23
-
 24
24
-
 25
25
-
 26
26
-
 27
27
-
 28
28
-
 29
29
-
 30
30
-
 31
31
-
 32
32
-
 33
33
-
 34
34
-
 35
35
-
 36
36
-
 37
37
-
 38
38
-
 39
39
-
 40
40
-
 41
41
-
 42
42
-
 43
43
-
 44
44
-
 45
45
-
 46
46
-
 47
47
-
 48
48
-
 49
49
-
 50
50
-
 51
51
-
 52
52
-
 53
53
-
 54
54
-
 55
55
-
 56
56
-
 57
57
-
 58
58
-
 59
59
-
 60
60
-
 61
61
-
 62
62
-
 63
63
-
 64
64
-
 65
65
-
 66
66
-
 67
67
-
 68
68
-
 69
69
-
 70
70
-
 71
71
-
 72
72
-
 73
73
-
 74
74
-
 75
75
-
 76
76
-
 77
77
-
 78
78
-
 79
79
-
 80
80
-
 81
81
-
 82
82
-
 83
83
-
 84
84
-
 85
85
-
 86
86
-
 87
87
-
 88
88
-
 89
89
-
 90
90
-
 91
91
-
 92
92
-
 93
93
-
 94
94
-
 95
95
-
 96
96
-
 97
97
-
 98
98
-
 99
99
-
 100
100
-
 101
101
-
 102
102
-
 103
103
-
 104
104
-
 105
105
-
 106
106
-
 107
107
-
 108
108
-
 109
109
-
 110
110


Ask a question and I''ll find the answer in the document
Finding information in a document is now easier with AI
Related papers


Other documents
-
 Rugged Computing M970D User manual
-
 Deegotech 43237-2 User manual
-
Getac E100(52628148XXXX) User manual
-
Tecnoware FCM17199 Datasheet
-
 RuggedBook SR858 User manual
-
Panasonic CF-C1 Series Addendum
-
 Twinhead T7M User manual
-
Point of View TAB-10C010-232 User manual
-
 Agaphatek MED-8150 Quick start guide
-
Bematech SB-9015D User manual


