Roland PK-5 User manual
- Category
- Musical Instruments
- Type
- User manual
This manual is also suitable for

r
PK-5A
Dynamic MIDI Pedal
Owner’s Manual
ENGLISH ENGLISH
ENGLISH ENGLISH
Thank you for purchasing the Roland PK-5A Dynamic MIDI Pedal. The PK-5A is an easy-to-operate pedalboard anyone
can use with the benefit of Roland's superior digital technology.
The PK-5A is a 13-pedal, monophonic/polyphonic, programmable pedalboard with dynamics. The PK-5A contains no
internal sound source.
LEDs provide information and directions to the player while programming the many features of the PK-5A, making
operation quicker and easier.
MIDI connectors are provided for connecting other MIDI devices.
Copyright © 2003 ROLAND EUROPE. All rights reserved. No part of this publication may be reproduced in any form without the written permission of Roland Europe S.p.a.
PK-5A book Page 3 Thursday, July 24, 2003 6:26 PM

PK-5A
[3]
[4] [5] [6] [7] [8] [9]
[10] [11]
[1][2]
PK-5A book Page 2 Thursday, July 24, 2003 6:26 PM

For Canada
This Class B digital apparatus meets all requirements of the Canadian Interference-Causing Equipment Regulations.
Cet appareil numérique de la classe B respecte toutes les exigences du Règlement sur le matériel brouilleur du Canada.
NOTICE
AVIS
For the USA
FEDERAL COMMUNICATIONS COMMISSION
RADIO FREQUENCY INTERFERENCE STATEMENT
This equipment has been tested and found to comply with the limits for a Class B digital device, pursuant to Part 15 of the
FCC Rules. These limits are designed to provide reasonable protection against harmful interference in a residential
installation. This equipment generates, uses, and can radiate radio frequency energy and, if not installed and used in
accordance with the instructions, may cause harmful interference to radio communications. However, there is no guarantee
that interference will not occur in a particular installation. If this equipment does cause harmful interference to radio or
television reception, which can be determined by turning the equipment off and on, the user is encouraged to try to correct the
interference by one or more of the following measures:
– Reorient or relocate the receiving antenna.
– Increase the separation between the equipment and receiver.
– Connect the equipment into an outlet on a circuit different from that to which the receiver is connected.
– Consult the dealer or an experienced radio/TV technician for help.
This device complies with Part 15 of the FCC Rules. Operation is subject to the following two conditions:
(1) This device may not cause harmful interference, and
(2) This device must accept any interference received, including interference that may cause undesired operation.
Unauthorized changes or modification to this system can void the users authority to operate this equipment.
This equipment requires shielded interface cables in order to meet FCC class B Limit.
This product complies with the requirements of European Directive EMC 89/336/EEC.
Dieses Produkt entspricht der europäischen Richtlinie EMC 89/336/EEC.
Ce produit est conforme aux exigences de la directive européenne EMC 89/336/EEC.
Questo prodotto è conforme alle esigenze della direttiva europea EMC 89/336/EEC.
Este producto cumple con la directrice EMC 89/336/EEC de la CE.
Dit product beantwoordt aan de richtlijn EMC 89/336/EEC van de Europese Unie.
For EU Countries
PK-5A book Page 67 Thursday, July 24, 2003 6:26 PM

PK-5A
Features
4
r
Supplied accessories
Your PK-5A comes with 6x MN1500 alkaline batter-
ies. These can be found into the package.
The metal cover of the battery holder is located on
the PK-5A’s rear panel.
(1) Open the cover and take the battery holder
out of its location.
(2) Insert batteries in the appropriate holder.
(3) Place the holder into the appropriate location
and close the metal cover.
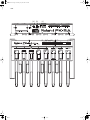
Panel descriptions
[1] MIDI sockets (IN/OUT/THRU)
[2] DC IN socket (for an optional adapter)
[3] POWER switch
MODE selectors:
FUNCTION selectors:
[9] OCTAVE/SELECT & FACTORY SET
[10] PRG CHANGE & USER SET
[11] MIDI CHANNEL
[12] Pedals
If you wish to use the PK-5A with an optional AC adaptor type (ACA series, optional) please follow these precau-
tions:
• The appropriate power supply for the instrument is shown
on the AC adaptor’s name plate. Please make sure that the
line voltage in your area meets the requirements.
• Do not use the PK-5A on the same power circuit with any
device that will generate line noise (such as an electric
motor or variable lighting system).
• It is normal for this unit to become hot while being oper-
ated.
• If the unit is not to be used for a long period of time,
unplug the external AC adaptor from the outlet.
• Disconnect the AC adaptor immediately in the event of an
electrical storm.
• Before setting up the PK-5A with other MIDI devices,
switch it off along with all other units.
• Be sure to connect the MIDI cables securely. If the MIDI
cable is disconnected while the instrument is being played,
various problems may occur (e.g. a note may continue to
sound).
• Static electricity may cause the built-in computer to mal-
function. Should this occur, simply reset the PK-5A by turn-
ing the power off and then, after a few seconds, back on.
• The PK-5A might not operate correctly if turned on imme-
diately after being turned off. If this happens, simply turn it
off and after a few seconds later, turn it on again.
• Operating the PK-5A near a neon light, fluorescent lamp, TV
or CRT display may cause noise interference. If so, change
the position of the instrument.
• To avoid risk of electric shock, do not perform any servicing.
Refer all servicing to qualified service personnel.
1. Features
[4] MONO
[5] POLY
[6] DRUMS
[7] SOUND EFFECTS
[8] CONTROLLER
2. Important notes
PK-5A book Page 4 Thursday, July 24, 2003 6:26 PM

[4] MONO mode—Owner’s Manual
5
To ensure the best use and full enjoyment of your PK-5A, please read this guide carefully and thoroughly.
Location
Avoid using the PK-5A in excessive heat or
humidity conditions or where it may be
affected by direct sunlight or dust. Also avoid
places subject to strong vibrations.
Cabinet care
Use a soft dry cloth for dusting. To remove fin-
gerprints or dulling film, use a soft cloth
slightly dampened with water and a little mild
detergent. Immediately wipe dry with a soft
cloth. Do not use solvents such as paint thin-
ners.
[1] MIDI Sockets (IN/OUT/THRU)
[2] DC IN socket
[3] POWER ON/OFF switch
To connect with household AC current, use only
the specified optional AC adapter (BOSS ACA
series).
After inserting the six batteries into the holder, press the
[POWER]
switch [3] to switch on the PK-5A.
(1) To use the PK-5A with an AC adapter
(optional), connect the adapter to the DC IN
socket [2], located on the rear panel of the
instrument.
Note:
Check whether the line voltage in your area meets the
requirements.
(2) Connect the adapter to a wall outlet.
(3) Press the
[POWER]
switch [3] to switch on the
PK-5A.
[4] MONO mode
Press the MONO selector [4] to enable the
PK-5A’s monophonic mode. In that case, only
one note at a time can be played.
The PK-5A was designed for use with Roland’s
arranger-type keyboards. By default, the MONO
section therefore transmits on MIDI channel
“2”, which corresponds to the “Manual Bass”
(M.Bass) channel.
When in MONO mode [4], the following fea-
tures of the FUNCTION section are available:
●
[9] OCT
Nine different octaves can be selected via the
pedals
[0]
~
[8]
(where
[0]
corresponds to the low-
est octave and
[8]
to the highest).
When you press the OCT selector [9], the corre-
sponding indicator lights to inform you that
the OCTAVE function is active.
You can now change octaves by pressing one of
the pedals
[0]
~
[8]
.
All indicators briefly light to confirm your selec-
tion.
●
[9] SELECT
When you press the SELECT selector [9], the
corresponding indicator lights to indicate that
the SELECT mode has been activated.
In that case, the following parameters can be
selected.
• VELOCITY (pedal
[9]
)
If this parameter is on, your playing dynamics
are translated into MIDI velocity values (0~
127). If you switch it off, the PK-5A transmits
all notes with the velocity value “64”.
To switch off the VELOCITY parameter, press the
SELECT selector [9] and pedal
[9]
. (Repeat this to
switch the velocity sensitivity back on again.)
All indicators briefly light to confirm your selec-
tion.
• HOLD (pedal
[A]
)
When HOLD is on, the note pressed on the ped-
alboard continues to sound. It is now very easy
to play tied bass notes, as it is not necessary to
continue to hold a pedal to obtain a suspended
note.
To activate the HOLD function, press the MONO
selector [4].
To switch off the HOLD parameter, press the
SELECT selector [9] and pedal
[A]
once more. All
indicators briefly light to confirm your selec-
tion.
3. The care of your PK-5A
4. Connection
5. Operation
PK-5A book Page 5 Thursday, July 24, 2003 6:26 PM

PK-5A
Operation
6
r
• RETRIGGER (pedal
[B]
)
When this parameter is on, some special effects
can be obtained.
When in MONO mode, the pedalboard is mono-
phonic: if you press two pedals simultaneously,
only the last note played will sound. When that
note is released, the previous note will sound,
so a pleasant alternating effect can be
obtained.
To switch off the RETRIGGER parameter, press
the SELECT selector [9], then pedal
[B]
. All indi-
cators briefly light to confirm your selection.
• OCTAVER (pedal
[C]
)
When this parameter is on, a note is added to
each note you play. The added note is one
octave above the note you played.
Note:
If the OCT parameter is set to
[8]
, the added note
may be out of range of the receiving tone generator. In
that case, the PK-5A transposes the added note one
octave down.
To switch off the OCTAVER parameter, press the
SELECT selector [9] and pedal
[C]
. All indicators
briefly light to confirm your selection.
●
[10] PRG CHANGE
To send a program change number, press the
PRG CHANGE selector [10]; the corresponding
indicator lights.
Use the pedals to enter the desired PC number:
to send the program number “123”, press ped-
als
[1]
,
[2]
and
[3]
in succession. Then press pedal
[B]
(ENTER) to confirm the operation. All indica-
tors briefly light to confirm your selection.
If you pressed the wrong pedal while specifying
the number, you can cancel your input by
pressing pedal
[A]
(CANCEL).
If you wish to send the previously-entered pro-
gram change number again, simply press the
PRG CHANGE selector [10] and pedal
[B]
(ENTER). All indicators briefly light to confirm
your selection.
Note:
If a program change number higher than “128” is
entered, the PK-5A sends the previously-entered (cor-
rect) number when pedal
[B]
(ENTER) is pressed.
●
MIDI program changes & Bank Select mes-
sages (CC00 & CC32)
You can also add Bank Select information
(CC00 and CC32) to the program change num-
bers you transmit.
(1) Press the PRG CHANGE selector [10] (indica-
tor lights).
(2) Press pedal
[C]
to select the MSB/LSB func-
tion.
The indicator of the MONO mode now flashes.
(3) Use the pedals to enter the value for CC00.
Example: To set the CC00 (MSB) value to “16”,
press
[1]
and
[6]
.
(4) Confirm by pressing pedal
[B]
(ENTER).
The PK-5A now expects you to input a value for
CC32 (LSB). Repeat steps (3) and (4).
Note:
If you pressed the wrong pedal while specifying
the number, you can cancel your input by pressing
pedal
[A]
(CANCEL).
Note:
If you only need to enter a CC00 value, confirm it
by pressing
[B]
twice (so as to skip the CC32 value).
Note:
If a value higher than “127” is entered, the PK-5A
uses the previously-entered (correct) value for CC00
when pedal
[B]
(ENTER) is pressed.
(5) After entering (or skipping) the CC32 value,
you need to specify the program change
number to be transmitted along with the
MSB (and LSB) value(s).
See “[10] PRG CHANGE” for details. All indica-
tors briefly light to confirm your selection.
The entire operation sequence can be summa-
rized as follows:
(1) CC00
: selector [10]
→
[C]
→
use the pedals
to enter the value
→
[B]
(Enter) (or
[A]
(Cancel))
(2) CC32
*: use the pedals to enter the value
→
[B]
(Enter) (or
[A]
(Cancel))
(* Press
[B]
again to skip the CC32 value.)
(3) PRG
: use the pedals to enter the program
number
→
[B]
(Enter) (or
[A]
(Cancel))
●
[11] MIDI CHANNEL
To select a MIDI channel (1~16), press the MIDI
CHANNEL selector [11] (indicator lights).
Use the pedals to enter the MIDI channel you
wish to set. Example: to specify channel “15”,
press
[1]
and
[5]
. Then press pedal
[B]
(ENTER) to
confirm the operation. All indicators briefly
light to confirm your selection.
Note:
If you pressed the wrong pedal while specifying
the number, you can cancel your input by pressing
pedal
[A]
(CANCEL).
Note:
To return to the default MIDI channel (“2” in
MONO mode), press the MIDI CHANNEL selector [11]
and pedal
[C]
. All indicators briefly light to confirm your
selection.
Note:
If a MIDI channel number higher than “16” is
erroneously selected, the PK-5A will exit this function
when pedal
[B]
(ENTER) is pressed.
PK-5A book Page 6 Thursday, July 24, 2003 6:26 PM

[5] POLY mode—Owner’s Manual
7
[5] POLY mode
Press the POLY selector [5] if you need to play
several notes simultaneously (which is called
“polyphonic”).
When you connect the PK-5A to a Roland
arranger-type instrument and activate that
instrument’s Chord Intelligence function, you
only need to press two (or three) pedals in order
to obtain full chords.
The PK-5A’s POLY section transmits on MIDI
channel “14”, which corresponds to the “Note-
To-Arranger” (NTA) function of all Roland
arranger-type instruments.
In POLY mode [5], the following functions are
available (FUNCTION section):
●
[9] OCT:
Nine different octaves can be selected via the
pedals
[0]
~
[8]
(where
[0]
corresponds to the low-
est octave and
[8]
to the highest).
When you press the OCT selector [9], the corre-
sponding indicator lights to inform you that
the OCTAVE function is active.
You can now change octaves by pressing one of
the pedals
[0]
~
[8]
. All indicators briefly light to
confirm your selection.
●
[9] SELECT
When you press the SELECT selector [9], the
corresponding indicator lights to indicate that
the SELECT mode has been activated.
In that case, the following parameters can be
selected.
• VELOCITY (pedal [9])
If this parameter is on, your playing dynamics
are translated into MIDI velocity values (0~
127). If you switch it off, the PK-5A transmits
all notes with the velocity value “64”.
To switch off the VELOCITY parameter, press the
SELECT selector [9] and pedal [9]. (Repeat this to
switch the velocity sensitivity back on again.)
All indicators briefly light to confirm your selec-
tion.
• DUMP (pedal [A])
The DUMP function allows you to archive the
PK-5A’s settings using a computer (with MIDI
interface), an external sequencer, a MIDI data
filer, etc. The settings of the following sections
are transmitted: MONO, POLY, DRUMS (USER
SET), SOUND EFFECTS (USER SET), MIDI CON-
TROLLER (USER SET).
(1) Connect the PK-5A’s MIDI OUT socket to the
MIDI IN socket of a computer or sequencer.
(2) Activate data reception or recording on the
external device.
(3) Wait until the sequencer’s count-in (if appli-
cable) is finished, then press the PK-5A’s
SELECT selector [9] and pedal [A].
Note: The data dump starts as soon as you press this
pedal.
The following indicators now light in sequence:
MONO & POLY→DRUM→SOUND EFFECTS→
MIDI CONTROLLER.
(4) Stop recording on the external sequencer/
computer and save the data.
To transfer archived settings back to the PK-5A,
connect the sequencer’s, etc., MIDI OUT socket
to the PK-5A’s MIDI IN socket and start play-
back of the data file. All indicators briefly light
when the data dump has been received.
• BATTERY CHECK (pedal [B])
This function allows you to check the status of
the inserted batteries via the following indica-
tors:
Press the SELECT selector [9] and pedal [B].
Press [B] again to leave this function and return
to the OCT/SELECT selection level. If necessary,
press any other selector (MONO, POLY, etc.) to
leave the OCT/SELECT level.
• TRANSPOSE (pedal [C]):
Press the SELECT selector [9] and pedal [C] to
select the TRANSPOSE function. The OCT/
SELECT indicator now flashes to indicate that
you need to press one of the following pedals in
order to specify the desired transposition inter-
val (the number of semitones by which the
notes you play are shifted):
Press [C] again to leave this function and return
to the OCT/SELECT selection level. If necessary,
press any other selector (MONO, POLY, etc.) to
leave the OCT/SELECT level.
Charge OCT/SELECT
PRG
CHANGE
MIDI CHANNEL
60%→100% ■■ ■
30%→60% ❑■ ■
<30% ❑❑ ■
0 1 2 3 4 5 6 7 8 9
Off +1 +2 +3 +4 +5 –6 –5 –4 –3
A B C
–2 –1 Exit
PK-5A book Page 7 Thursday, July 24, 2003 6:26 PM

PK-5A Operation
8
r
●
[10] PRG CHANGE
To send a program change number, press the
PRG CHANGE selector [10]; the corresponding
indicator lights.
Use the pedals to enter the desired PC number:
to send the program number “68”, press pedals
[6] and [8] in succession. Then press [B] (ENTER)
to confirm the operation. All indicators briefly
light to confirm your selection.
If you pressed the wrong pedal while specifying
the number, you can cancel your input by
pressing pedal [A] (CANCEL).
If you wish to send the previously-entered pro-
gram change number again, simply press the
PRG CHANGE selector [10] and pedal [B]
(ENTER). All indicators briefly light to confirm
your selection.
Note: If a program change number higher than “128” is
entered, the PK-5A sends the previously-entered (cor-
rect) number when pedal [B] (ENTER) is pressed.
●
MIDI program changes & Bank Select mes-
sages (CC00 & CC32)
You can also add Bank Select information
(CC00 and CC32) to the program change num-
bers you transmit.
(1) Press the PRG CHANGE selector [10] (indica-
tor lights).
(2) Press pedal [C] to select the MSB/LSB func-
tion.
The indicator of the POLY mode now flashes.
(3) Use the pedals to enter the value for CC00.
Example: To set the CC00 (MSB) value to “127”,
press [1], [2] and [7].
(4) Confirm by pressing pedal [B] (ENTER).
The PK-5A now expects you to input a value for
CC32 (LSB). Repeat steps (3) and (4).
Note: If you pressed the wrong pedal while specifying
the number, you can cancel your input by pressing
pedal [A] (CANCEL).
Note: If you only need to enter a CC00 value, confirm it
by pressing [B] twice (so as to skip the CC32 value).
Note: If a value higher than “127” is entered, the PK-5A
uses the previously-entered (correct) value for CC00
when pedal [B] (ENTER) is pressed.
(5) After entering (or skipping) the CC32 value,
you need to specify the program change
number to be transmitted along with the
MSB (and LSB) value(s).
See “[10] PRG CHANGE” for details. All indica-
tors briefly light to confirm your selection.
The entire operation sequence can be summa-
rized as follows:
(1) CC00: selector [10]→ [C]→ use the pedals
to enter the value→ [B] (Enter) (or [A] (Cancel))
(2) CC32*: use the pedals to enter the value→
[B] (Enter) (or [A] (Cancel))
(* Press [B] again to skip the CC32 value.)
(3) PRG: use the pedals to enter the program
number→ [B] (Enter) (or [A] (Cancel))
●
[11] MIDI CHANNEL
To select a MIDI channel (1~16), press the MIDI
CHANNEL selector [11] (indicator lights).
Use the pedals to enter the MIDI channel you
wish to set. Example: to specify channel “15”,
press [1] and [5]. Then press pedal [B] (ENTER) to
confirm the operation. All indicators briefly
light to confirm your selection.
Note: If you pressed the wrong pedal while specifying
the number, you can cancel your input by pressing
pedal [A] (CANCEL).
Note: To return to the default MIDI channel (“14” in
POLY mode), press the MIDI CHANNEL selector [11] and
pedal [C]. All indicators briefly light to confirm your
selection.
Note: If a MIDI channel number higher than “16” is
erroneously selected, the PK-5A will exit this function
when pedal [B] (ENTER) is pressed.
PK-5A book Page 8 Thursday, July 24, 2003 6:26 PM

[6] DRUMS mode—Owner’s Manual
9
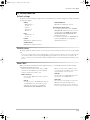
[6] DRUMS mode
Press the DRUMS selector [6] to switch the PK-5A to
DRUMS mode. In keeping with standardized usage
(GM and GS, for example), the PK-5A transmits on
MIDI channel “10” when this mode is selected. You
can change this, however (e.g. to “16” in order to
control the M.Drums part of Roland arranger-type
instruments).
After selecting DRUMS mode, you can use the
PK-5A’s pedals for “drumming”.
In DRUMS mode [6], the following functions are
available (FUNCTION section):
●
[9] FACTORY SET
After pressing the FACTORY SET selector [9] (the
corresponding indicator lights), 13 note num-
bers can be transmitted for triggering an exter-
nal instrument’s Drum Set. The note numbers
assigned to the pedals in this way represent the
PK-5A’s factory set. This FACTORY SET cannot
be overwritten.
On most (Roland arranger-type and GM/GM2/
GS) instruments, these assignments correspond
to the following drum sounds:
●
[10] USER SET
Press the USER SET selector [10] (the corre-
sponding indicator lights), to select a different
Drum Set assignment, which is called USER SET.
Unlike the factory set, the USER SET assign-
ments can be changed (which would be useful
for triggering samples, grooves, etc., for exam-
ple). The original assignments are as follows:
• Programming the User Set
(1) Connect an external keyboard’s (or the
sequencer’s) MIDI OUT socket to the PK-5A’s
MIDI IN socket.
(2) On the external instrument, set the transmit
channel (TX) to the MIDI channel used by the
PK-5A’s DRUMS mode (probably “10”).
(3) On the PK-5A, select the DRUMS [6] mode.
(4) Press and hold the USER SET selector [10] for
at least two seconds (until its indicator starts
flashing).
(5) While the USER SET indicator is flashing,
press the key on the external keyboard whose
note number you wish to assign to the USER
SET.
Example: to assign the note “C1” (24) to a pedal,
press that key on the external instrument (or
transmit a long C1 with your sequencer).
(6) On the PK-5A, press the pedal you wish to
assign the received note message to.
Example: to assign the “C1” to the leftmost
pedal, press [0].
Release the key you are holding on your key-
board. All indicators briefly light to confirm
your selection.
(7) Repeat steps (4)~(6) to assign different note
numbers to the remaining pedals.
Pedal MIDI note Drum instrument
0 C2 36 Standard Kick 1
1 C#2 37 Side Stick
2 D2 38 Standard Snare 1
3 D#2 39 Hand Clap
4 E2 40 Standard Snare 2
5 F2 41 Low Tom 2
6 F#2 42 Closed Hi-Hat
7 A2 45 Mid Tom 2
8 G#2 44 Pedal Hi-Hat
9 C3 48 High Tom 2
A A#2 46 Open Hi-Hat
B C#3 49 Crash Cymbal 1
C D#3 51 Ride Cymbal 1
Pedal MIDI note Drum instrument
0 E4 64 Open Low Conga
1 D#4 63 Open High Conga
2 D4 62 Mute High Conga
3 C#4 61 Low Bongo
4 C4 60 High Bongo
5 F#4 66 Low Timbale
6 F4 65 High Timbale
7 F#3 54 Tambourine
8 A4 69 Cabasa
9 G#4 68 Low Agogo
A G4 67 High Agogo
B B4 71 Short High Whistle
C C#5 73 Short Guiro
PK-5A book Page 9 Thursday, July 24, 2003 6:26 PM

PK-5A Operation
10
r
●
[11] MIDI CHANNEL
To select a MIDI channel (1~16), press the MIDI
CHANNEL selector [11] (indicator lights).
Use the pedals to enter the MIDI channel you
wish to set. Example: to specify channel “12”,
press [1] and [2]. Then press pedal [B] (ENTER) to
confirm the operation. All indicators briefly
light to confirm your selection.
Note: If you pressed the wrong pedal while specifying
the number, you can cancel your input by pressing
pedal [A] (CANCEL).
Note: To return to the default MIDI channel (“10” in
DRUMS mode), press the MIDI CHANNEL selector [11]
and pedal [C]. All indicators briefly light to confirm your
selection.
Note: If a MIDI channel number higher than “16” is
erroneously selected, the PK-5A will exit this function
when pedal [B] (ENTER) is pressed.
[7] SOUND EFFECTS mode
Press the SOUND EFFECTS selector [7] to select the
mode of the same name. In this mode, the PK-5A
transmits on MIDI channel “16” (and sends PC57,
CC00= 0, CC32= 0 whenever you select it).
After selecting SOUND EFFECTS mode, you can use
the PK-5A’s pedals for triggering sound effects.
In SOUND EFFECTS mode [7], the following func-
tions are available (FUNCTION section):
●
[9] FACTORY SET
After pressing the FACTORY SET selector [9] (the
corresponding indicator lights), 13 note num-
bers can be transmitted for triggering an exter-
nal instrument’s “SFX set”. The note numbers
assigned to the pedals in this way represent the
PK-5A’s factory set. This FACTORY SET cannot
be overwritten.
On most (Roland arranger-type and GM/GM2/
GS) instruments, these assignments correspond
to the following sounds:
●
[10] USER SET
Press the USER SET selector [10] (the corre-
sponding indicator lights), to select a different
SFX set assignment, which is called USER SET.
Unlike the factory set, the USER SET assign-
ments can be changed. The original assign-
ments are as follows:
• Programming the User Set
(1) Connect an external keyboard’s (or the
sequencer’s) MIDI OUT socket to the PK-5A’s
MIDI IN socket.
(2) On the external instrument, set the transmit
channel (TX) to the MIDI channel used by the
PK-5A’s SOUND EFFECTS mode (probably
“16”).
(3) On the PK-5A, select the SOUND EFFECTS [7]
mode.
(4) Press and hold the USER SET selector [10] for
at least two seconds (until its indicator starts
flashing).
(5) While the USER SET indicator is flashing,
press the key on the external keyboard whose
note number you wish to assign to the USER
SET.
Example: to assign the note “C2” (36) to a pedal,
press that key on the external instrument (or
transmit a long C2 with your sequencer).
(6) On the PK-5A, press the pedal you wish to
assign the received note message to.
Pedal MIDI note Sound
0 G5 79 Rain
1 G#5 80 Thunder
2 A#5 82 Seashore
3 B5 83 Stream
4 E3 52 Laughing
5 F3 53 Scream
6 A#3 58 Applause
7 A4 69 Jetplane
8 G#4 68 Train
9 A#4 70 Helicopter
A D4 62 Wind Chimes
B C#5 73 Machine Gun
C D#5 75 Explosion
Pedal MIDI note Sound
0 F#5 78 Birds
1 F#5 78 Dog
2 G3 55 Heartbeat
3 A3 57 Footsteps 2
4 B3 59 Door Creaking
5 C4 60 Door
6 C#4 61 Scratch
7 D#4 63 Car-Engine
8 E4 64 Car-Stop
9 F4 65 Car-Pass
A G4 67 Siren
B C5 72 Gun Shot
C A5 81 Wind
PK-5A book Page 10 Thursday, July 24, 2003 6:26 PM

[8] MIDI CONTROLLER mode—Owner’s Manual
11
Example: to assign the “C2” to the leftmost
pedal, press [0].
Release the key you are holding on your key-
board. All indicators briefly light to confirm
your selection.
(7) Repeat steps (4)~(6) to assign different note
numbers to the remaining pedals.
●
[11] MIDI CHANNEL
To select a MIDI channel (1~16), press the MIDI
CHANNEL selector [11] (indicator lights).
Use the pedals to enter the MIDI channel you
wish to set. Example: to specify channel “8”,
press [8]. Then press pedal [B] (ENTER) to confirm
the operation. All indicators briefly light to con-
firm your selection.
Note: If you pressed the wrong pedal while specifying
the number, you can cancel your input by pressing
pedal [A] (CANCEL).
Note: To return to the default MIDI channel (“16” in
SOUND EFFECTS mode), press the MIDI CHANNEL selec-
tor [11] and pedal [C]. All indicators briefly light to con-
firm your selection.
Note: If a MIDI channel number higher than “16” is
erroneously selected, the PK-5A will exit this function
when pedal [B] (ENTER) is pressed.
[8] MIDI CONTROLLER mode
Press the MIDI CONTROLLER selector [8] to select
the mode of the same name. Conceived for use with
Roland arranger-type instruments, the PK-5A’s fac-
tory set transmits on MIDI channel “10” (which is
used for program change messages that allow you
to select Music Styles). The User Set, on the other
hand, transmits on MIDI channel “1”.
In MIDI CONTROLLER mode, the PK-5A can be used
for starting/stopping Style playback and for select-
ing the following accompaniment patterns by foot:
Fill-in to Variation, Fill-in to Original, Break Mute,
Intro and Ending.
In MIDI CONTROLLER mode [8], the following func-
tions are available (FUNCTION section):
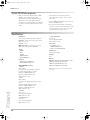
●
[9] FACTORY SET
When you press the FACTORY SET selector [9],
(the corresponding indicator lights), the follow-
ing remote control functions are available (note
that certain pedals do nothing here):
●
[11] MIDI CHANNEL
To select a MIDI channel (1~16), press the MIDI
CHANNEL selector [11] (indicator lights).
Use the pedals to enter the MIDI channel you
wish to set. Example: to specify channel “8”,
press [8]. Then press pedal [B] (ENTER) to confirm
the operation. All indicators briefly light to con-
firm your selection.
Note: The MIDI channel setting only applies to the Fac-
tory Set (the User Set can handle different MIDI chan-
nels for to the various pedals).
Note: If you pressed the wrong pedal while specifying
the number, you can cancel your input by pressing
pedal [A] (CANCEL).
Note: To return to the default MIDI channel (“10”),
press the MIDI CHANNEL selector [11] and pedal [C]. All
indicators briefly light to confirm your selection.
Note: If a MIDI channel number higher than “16” is
erroneously selected, the PK-5A will exit this function
when pedal [B] (ENTER) is pressed.
Pedal Function MIDI message
0 Start FA
1 Fill-in To Variation PC 81
2— —
3 Fill-in To Original PC 82
4— —
5— —
6 Break Mute PC 85
7— —
8 Intro FA+PC 83
9— —
A Ending PC 84
B— —
C Stop FC
PK-5A book Page 11 Thursday, July 24, 2003 6:26 PM

PK-5A Operation
12
r
●
[10] USER SET
Press the USER SET selector [10] (the corre-
sponding indicator lights), to select a set of
MIDI control changes (CC), which is called USER
SET.
Unlike the factory set, the USER SET assign-
ments can be changed. The original assign-
ments are as follows:
Note: These messages are sent on MIDI channel “1”.
Your own assignments can use different MIDI channels.
• Programming the User Set
(1) Connect an external keyboard’s (or the
sequencer’s) MIDI OUT socket to the PK-5A’s
MIDI IN socket.
(2) On the PK-5A, select the MIDI CONTROLLER
[8] mode.
(3) Press and hold the USER SET selector [10] for
at least two seconds (until its indicator starts
flashing).
(4) While the USER SET indicator is flashing,
transmit the desired MIDI message on the
MIDI channel the pedal you wish to assign
should use.
Example: to assign the expression message
(CC11) of MIDI channel 4 to a pedal, select MIDI
channel “4” on the external instrument and
then transmit a CC11 message with the desired
value (e.g. “80”). (It would be a good idea to use
a sequencer for this assignment.)
Note: Be sure to send only one (constant) value to the
PK-5A, or ensure that the last value you transmit is the
one you wish to use, to avoid that an incorrect value is
memorized.
(5) On the PK-5A, press the pedal you wish to
assign the received message to.
Example: to assign the “CC11= 80” message for
channel “4” to the leftmost pedal, press [0]. All
indicators briefly light to confirm your selec-
tion.
(6) Repeat steps (3)~(5) to assign different mes-
sages to the remaining pedals.
Pedal Function MIDI message
0 Chorus on CC93= 127
1 Chorus off CC93= 0
2 Tremolo on CC92= 127
3 Tremolo off CC92= 0
4 Volume “0”
CC07=
[corresponding
value]
5 Volume “30”
6 Volume 45
7 Volume “64”
8 Volume “80”
9 Volume “95”
A Volume “110”
B Volume “127”
C Sustain/Hold on/off CC64= 127/0
PK-5A book Page 12 Thursday, July 24, 2003 6:26 PM

Velocity curves—Owner’s Manual
13
Default settings
The PK-5A selects the following settings when it is switched on (unless you have changed the settings as described
on the previous pages).
MONO
— MIDI Channel: 2
— Velocity: on
— Hold: off
— Retrigger: on
— Octaver: off
POLY
— MIDI Channel: 14
— Velocity: on
DRUMS
MIDI Channel: 10 (Factory & User)
SOUND EFFECTS
MIDI Channel: 16 (Factory & User)
MIDI CONTROLLER
MIDI Channel: 10 (Factory), 1 (User)
Resetting the default values
• To reset the default values of the currently
selected mode, hold down the selector of the
corresponding mode (MONO, POLY, DRUMS,
SOUND EFFECTS, MIDI CONTROLLER) while
switching the PK-5A on.
• To recall the default values of all modes, hold
down the FACTORY SET selector [9] while
switching the PK-5A on.
Velocity curves
The PK-5A’s pedals are velocity sensitive. If necessary, you can select a different velocity curve to suit your playing
style.
To do so, press and hold one of the pedals ([0]~[C]) to select the desired velocity curve. The curve with the high-
est velocity sensitivity is assigned to pedal [0]. Pedal [C] corresponds to the least sensitive velocity curve. Of
course, you can also select intermediary values by holding down the corresponding pedal while switching on the
PK-5A.
About MIDI
MIDI is the acronym for Musical Instrument Digital Interface. It is a standardized interface for data exchange
among MIDI-compatible instruments.
This means that your PK-5A can be used as a MIDI
controller for other MIDI tone generators (Roland
arrangers, synthesizers, modules, etc.).
MIDI connections
There are three MIDI sockets on the rear panel
of the PK-5A:
MIDI IN
Use this socket for feeding MIDI signals from an
external MIDI device to the PK-5A, or for pro-
gramming the PK-5A’s User Sets (DRUMS,
SOUND EFFECTS, MIDI CONTROLLER modes).
Note: The messages received via MIDI IN are mixed
(“merged”) with the PK-5A’s MIDI messages and trans-
mitted via MIDI OUT (“Soft Thru” function).
MIDI OUT
Use this socket for sending MIDI signals from
the PK-5A to external MIDI devices.
MIDI THRU
The exact copy of the signals received via the
MIDI IN is sent out through this socket.
Note: When receiving SysEx messages (data dumps),
the PK-5A is disabled until all data have been received.
6. Miscellaneous
PK-5A book Page 13 Thursday, July 24, 2003 6:26 PM

PK-5A Miscellaneous
14
r
If your PK-5A fails to operate
• Make sure that the 6 Alkaline Batteries (MN
1500) are not below their charge limit.
When using the optional AC adapter, check
whether its cord is firmly plugged into the
socket on the rear panel [2]. Also check whether
the adapter is firmly plugged into the AC wall
outlet.
Check whether the wall outlet works as
expected. Plug in a lamp or radio to test the
wall outlet.
• Set the POWER switch [3] (located on the rear
panel) to the ON position.
• If the PK-5A is still inoperable, your Roland
technician or dealer is best qualified to provide
you with competent service. Do not perform
any adjustments or repairs yourself.
Specifications
Pedalboard
13-key polyphonic/monophonic pedalboard
Dynamics: 13 different velocity curves (select-
able at power-on)
Velocity: on/off
MIDI Soft Thru: the messages received via
MIDI IN are transmitted via MIDI OUT
Modes
— MONO
— POLY
— DRUMS
— SOUND EFFECTS
— MIDI CONTROLLER
Functions
— OCT/SELECT & FACTORY SET
— PRG CHANGE & USER SET
MIDI CHANNEL functions
→MONO:
Octave (0~8)
Select (Velocity, Hold, Retrigger, Octaver)
Program change numbers (1~128)
Bank Select MSB/CC00 (0~127)
Bank Select LSB/CC32 (0~127)
MIDI channel (1~16)
→POLY:
Octave (0~8)
Select (Velocity, Dump, Battery Check, Trans-
pose)
Program change numbers (1~128)
Bank Select MSB/CC00 (0~127)
Bank Select LSB/CC32 (0~127)
MIDI channel (1~16)
→DRUMS:
Factory Set
User Set (programmable)
MIDI Channel (1~16)
→SOUND EFFECTS:
Factory Set
User Set (programmable)
MIDI channel (1~16)
→MIDI CONTROLLER:
Factory Set
User Set (programmable)
MIDI channel (1~16)
Rear panel
— AC adaptor socket
— POWER ON/OFF switch
— MIDI sockets (THRU/OUT/IN)
Dimensions:
425 x 560 x 120 mm.
Weight
8 kg
Options
Adapters: BOSS ACA 220 (9V/300 mA), 220V
BOSS ACA 240 (9V/100 mA), 240V
BOSS ACA 120 (9V/200 mA), 117V
BOSS ACA 100 (9V/150 mA), 100V
Note: Specifications are subject to change without
prior notice.
PK-5A book Page 14 Thursday, July 24, 2003 6:26 PM
-
 1
1
-
 2
2
-
 3
3
-
 4
4
-
 5
5
-
 6
6
-
 7
7
-
 8
8
-
 9
9
-
 10
10
-
 11
11
-
 12
12
-
 13
13
-
 14
14


Roland PK-5 User manual
- Category
- Musical Instruments
- Type
- User manual
- This manual is also suitable for
Ask a question and I''ll find the answer in the document
Finding information in a document is now easier with AI