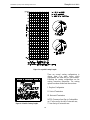
Hearth and Home Technologies 8300 User manual
- Category
- Fireplaces
- Type
- User manual

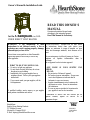
Owner’s Manual & Installation Guide
for the Champlain (8300)GAS-
FIRED DIRECT VENT HEATER
READ THIS OWNER’S
MANUAL
Operate and maintain this gas heater
according to this instruction manual.
Read This Manual In Its Entirety.
WARNING: If the information in these
instructions is not followed exactly, a fire or
explosion may result causing property damage,
personal injury or loss of life.
Do not store or use gasoline or other flammable
vapors and liquids in the vicinity of this or any
other appliance.
WHAT TO DO IF YOU SMELL GAS:
• Do not try to light any appliance.
• Do not touch electrical switches; do not use
the phone in your building.
• Immediately call your gas supplier from a
neighbors phone. Follow your gas suppliers
instructions.
• If you cannot reach your gas supplier, call the
fire department.
A qualified installer, service agency or gas supplier
must perform installation and service.
AVERTISSEMENT: Assurez-vous de bien suivre
les instructions donné dans cette notice pour
réduire au minimum le risque d’incendie ou pour
éviter tout dommage matéeriel, toute blessure ou la
mort.
Ne pas entresposer ni utiliser d’essence ni d’autre
vaperurs ou liquides inflammables dans le
voisinage
de cet apprareil ou de tout autre appareil.
QUE FAIRE SI VOUS SENTEZ UNE
ODEUR
DE GAZ:
• Ne pas tenter d’allumer d’appareil.
• Ne touchez à aucun interrupteur. Ne pas vous
servir des téléphones se trouvant dans le
batiment où vous vous trouvez.
• Appelez immédiatement votre fournisseur de
gaz depuis un voisin. Suivez les instructions
du fournisseur.
• Si vous ne pouvez rejoindre le fournisseur de
gaz, appelez le service dos incendies.
L’installation et service doit être exécuté par un
qualifié installer, agence de service ou le
fournisseur de gaz.
6400-40421
Model #8300
04/17/03
HearthStone
Quality Home Heating Products
317 Stafford Avenue,
Morrisville, Vermont 05661
E-Mail: [email protected]

HearthStone Quality Home Heating Products Inc Champlain Model #8300
2
INFORMATION SHEET
Record, on this page, all relevant information concerning the purchase, installation, and maintenance
of your CHAMPLAIN Gas-Fired Direct Vent heater. This information will facilitate servicing,
purchase of replacement parts, and warranty claims (if necessary). Keep your original receipt in a safe
place as proof of purchase.
Serial Number:
Fuel type (check one) Natural Gas Liquid Propane
Sold by:
Phone: Date of Purchase:
Installed by:
Phone: Date of Installation:
Gas Supplier:
Phone:
Read this Owner’s Manual before installing or operating the CHAMPLAIN heater. Retain this manual for
future reference.
SERVICE RECORD
Date Who Performed Work Work Performed Notes:
WHAT WHEN WHAT WHEN
Firebox Cleaning............. annually Door Gasket.................... Replacement as needed
Glass Cleaning................ as needed

HearthStone Quality Home Heating Products Inc Champlain Model #8300
3
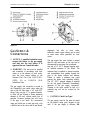
INTRODUCTION
Congratulations on your purchase of a
Champlain Gas-Fired Direct Vent heater.
The Champlain, by HearthStone Cast Iron
Stoves, incorporates the latest in balanced
vent gas technology, which will provide you
with clean, efficient heat for years to come.
The Champlain will provide you with years
of practical and convenient service.
However, as with any gas appliance, the unit
must be properly and safely installed and
maintained by qualified service personnel to
ensure safe and trouble-free operation.
Your Champlain is equipped with a standard
pilot which:
1. generates a milli-volt signal that
powers the wall-mounted thermostat
and;
2. lights the main burner when the
thermostat calls for heat.
This unit is equipped with an
On/Off/Thermostat switch and a variable
output control. The variable output control is
located on the gas control valve. It allows
you to vary the heat output, along with the
flame height to suit personal taste. Heat
output can be reduced {set to “LOW”}
during the Fall and Spring, when the need
for heat is reduced and increased {set to
“HIGH” during Winter months, when the
need for heat is the greatest.
A wall-mounted thermostat is provided by
HearthStone. Regardless of how you set the
variable output control, when the optional
thermostat has been installed and the
On/Off/Thermostat switch is set to
“Thermostat”, the wall-mounted thermostat
will control the on/off cycling of the unit. At
any time, you can override the thermostat
with the On/Off/Thermostat switch by
setting it to “ON” or “OFF”.
The Unit can also be equipped with an
optional blower fan, which turns on and off
independently of the burner flames. When
the speed switch, which allows you to turn
the fan on or off and control the speed of the
fan to suit your needs, is set to “On”, the fan
will automatically turn on when the stove is
hot and cycle off when the unit is no longer
hot.
Also available are two different optional
remote controls. Both of the remote controls
are capable of turning the unit on and off.
One of the optional remotes also allows you
to control the temperature of the stove from
anywhere in the vicinity of the unit. If “ON”
& “OFF” are the only controls required, Kit
# 90-56912 can be used. If you would like to
control the temperature via the remote
control, use Kit # 90-56914.
READ THIS OWNER’S MANUAL
Operate and maintain this gas heater
according to the instructions in this manual.
Read this manual in its entirety. This
manual has two sections, the first section is
for the OPERATOR, and the second section is
for the QUALIFIED SERVICE PERSONNEL only.
HEATER MUST BE INSTALLED
AND MAINTAINED BY QUALIFIED
SERVICE PERSONNEL
Verify the gas connections and venting
systems with requirements of local, regional
or national installation codes. Qualified
service personnel must inspect the gas heater
before use and at least annually.
TABLE OF CONTENTS
READ THIS OWNER’S MANUAL........1

HearthStone Quality Home Heating Products Inc Champlain Model #8300
4
INTRODUCTION...........................................3
SAFETY INFORMATION...............................4
FIRE HAZARD........................................... 5
SHOCK HAZARD...................................... 5
MUST BE VENTED TO THE OUTSIDE ......... 5
SERVICE CAUTION ...................................5
HOT SURFACES ........................................ 5
CERAMIC FIBER LOG SAFETY
INFORMATION.......................................... 6
SPECIFICATIONS:.................................7
OWNER’S INFORMATION............................8
ROUTINE MAINTENANCE AND CARE.......10
FIREBOX, PILOT, & BURNER TUBES .......11
INSTALLER’S INFORMATION ....................11
UNPACK AND INSPECT FOR DAMAGE .....12
VENTING INFORMATION...........................16
ELECTRICAL CONNECTIONS ....................24
GAS SUPPLY & CONNECTIONS.................27
LOG PLACEMENT .....................................28
LIGHTING THE UNIT FOR THE FIRST TIME
...................................................................31
INITIAL ADJUSTMENTS.............................32
MAINTENANCE AND CARE........................34
PARTS LISTS .............................................36
SAFETY INFORMATION
Your Champlain is a very attractive and
extremely efficient, utilizing today’s best
technologies. By following a few simple
safety precautions and by performing minimal
maintenance, the unit will remain appealing
while providing years of quality performance.
The installation must conform to local codes
or, in the absences of local codes, the current
National Fuel Gas Code, ANSI Z223.1 (NFPA
54) or CAN/CGA B149 Installation Code.
(Installer l’appareil selon les codes ou
réglements locaux, ou, en l’absence de tells
réglements, selon les Codes d’installation
CAN/CGA B149.)
Do not use this appliance if any part has been
under water. Immediately call a qualified
service technician to inspect the heater and to
replace any part of the control system and gas
control that has been under water. (Ne pas se
servir de cet appareil s’il a été plongé dans
l’eau, complétement ou en partie. Appeler un
technicien qualifié pour inspector l’appareil et
remplacer toute partie du systéme de contrôle
et toute commande qui ont été plunges dans
l’lau.)
During the first few hours of operation the
appliance may produce a slight smoke and/or
odor. This is normal during the first several
burns. During the initial burn, open a
window(s) to assist in the removal of the
smoke/odor. If the logs appear to smoke, turn
the heater off and call a qualified service
technician.
The appliance and its individual shutoff valve
must be disconnected from the gas supply
piping system during any pressure testing of
›
WARNING:
A qualified service technician should do
installati
on and repair. A qualified
service technician should inspect the
appliance before use and at least annually.
More frequent cleaning may be required
due to excessive lint from carpeting,
bedding material, etc. It is imperative that
control compartments,
burners, and
circulating air passages of the appliance
are kept clean and free of obstructions.
(S’assurer que le brûleur et le
compartiment des commandes sont
propres. Voir les instructions
d’installation et d’utilisation qui
accompagnent l’appareil.)

HearthStone Quality Home Heating Products Inc Champlain Model #8300
5
that system at test pressures in excess of ½
psig. (3.5k Pa). The appliance must be isolated
from the gas supply piping system by closing
its individual manual shutoff valve during any
pressure testing of the gas supply piping
system at test pressures equal to or less than ½
psig (3.5k Pa).
FIRE HAZARD
Do not store or use gasoline or other
flammable vapors or liquids in the vicinity
of this appliance. The Champlain should be
located out of traffic and away from
furniture, draperies, clothing, and flammable
material.
SHOCK HAZARD
(WHEN EQUIPPED WITH OPTIONAL
BLOWER)
This appliance is equipped with a three-prong
(grounding) plug for protection against shock
hazard and should be plugged directly into a
properly grounded three-prong receptacle. Do
not cut or remove the grounding prong from the
plug.
MUST BE VENTED TO THE
OUTSIDE
Never vent the gas heater to other rooms or
buildings. This gas appliance must not be
connected to a chimney flue serving a
separate solid-fuel burning appliance.
SERVICE CAUTION
If you believe your Champlain is not, in any
way, performing properly, immediately
discontinue operation until the unit has been
inspected and approved by qualified service
personnel. Prior to servicing the unit, turn
the valve control knob clockwise to “OFF”.
The unit should be cool prior to servicing
and cleaning. Any safety screen, guard, or
component removed during servicing should
be replaced prior to operation. Use of any
components not supplied by HearthStone on
the stove voids all warranties. Do not
substitute components.
HOT SURFACES
Certain exposed surfaces of the Champlain
will reach high temperatures during normal
operation. Clearances to combustibles must
be maintained, as specified in the “Clearances
To Combustibles” section of this manual. Due
to high temperatures the appliance should
be located out of traffic and away from
furniture, draperies, clothing and
flammable materials. Children and adults
should be alerted to the hazards of high
surface temperatures and should stay away
to avoid burns to skin or clothing ignition.
Young children should be carefully
supervised when in the same room as the
appliance. Clothing or other flammable
material should not be placed on or near
the appliance. (Surveille les enfants. Garder
les vêtements, les meubles, l’essence ou autres
liquides à vapeur inflammables lin de
l’appareil.) Clean the area around, under, and
behind the unit on a regular basis to prevent
the accumulation of dust and lint.
Certified for use by:
Board of State Examiners of Plumbers and Gasfitters
100 Cambridge Street, Room 1511
Boston, Massachusetts
02202

HearthStone Quality Home Heating Products Inc Champlain Model #8300
6
› WARNING: DO NOT OPERATE THE APPLIANCE WITH THE FRONT GLASS AND
CAST FAÇADE REMOVED, CRACKED OR BROKEN. REPLACEMENT OF GLASS
SHOULD BE DONE BY A LICENSED OR QUALIFIED SERVICE PERSON. ONLY OPEN
FRONT FOR ROUTINE SERVICE. DO NOT SLAM OR STRIKE GLASS.
CERAMIC FIBER LOG SAFETY INFORMATION
If the decorative ceramic log material supplied with the Champlain is damaged or missing, it
must be replaced with the same, approved replacement parts supplied by the manufacturer. These
components affect the
combustion quality and safety of the heater. Do not replace fiber ceramic logs with unapproved
ceramic logs or any other material.
Always wear gloves and safety goggles while handling the log set and ember strip.

HearthStone Quality Home Heating Products Inc Champlain Model #8300
7
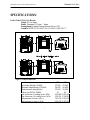
SPECIFICATIONS:
LISTED: DIRECT VENT GAS HEATER
Listed: DV Gas Heater
Model: Champlain DV Room Heater
Testing Agency: Intertek Testing Services NA Inc. (ITS)
Tested to: ANSI Z21.88-1998, CSA 2.33-M98, CAN/CGA2.17
Figure 1: Champlain Dimensions
NG LP
Input rating (Btu/hr) 0-2000ft 37,000
37,000
Maximum output (Btu/hr) 0-2000ft 26,200
26,800
Minimum input rating (Btu/hr) 20,300
22,600
Orifice size DMS 0-2000ft 31 49
Man. pressure- HI setting (in.w.c./kPa) 3.5/0.84
10.0/2.48
Man. pressure- LO setting (in.w.c./kPa) 1.2/0.30
3.3/0.80
Inlet pressure-HI (in.w.c./kPa.) 7.0/1.74
13.0/3.22
Inlet pressure-Lo (in.w.c./kPa) 5.0/1.24
11.0/2.75

HearthStone Quality Home Heating Products Inc Champlain Model #8300
8
OWNER’S INFORMATION
The installation must conform with local
codes or, in the absences of local codes, the
current National Fuel Gas Code, ANSI Z223.1
(NFPA 54) or CAN/CGA B149 Installation
Code. (Installer l’appareil selon les codes ou
règlements locaux, ou, en l’absence de tels
règlements, selon les Codes d’installation
CAN/CGA-B149.)Do not use this appliance
if any part has been under water.
Immediately call a qualified service
technician to inspect the heater and to
replace any part of the control system and
gas control that has been under water. (Ne
pas se servir de cet appareil s’il a été plongé
dans l’eau, complètement ou en partie.
Appeler un technicien qualifié pour inspector
l’appareil et remplacer toute partie du système
de contrôle et toute commande qui ont été
plongés dans l’lau.
LIGHTING INSTRUCTIONS
NOTE: The gas control knobs and the piezo
ignitor are located behind the control valve
access door, under the front of the unit.
1. STOP! Read the What To Do If You
Smell Gas! Warning (on the cover of
this manual).
2. Set the on/off/T-stat switch or thermostat
to the “OFF” position.
3. Push in and turn gas control knob
clockwise to “OFF”. (If not previously
lit, the knob should be in this position.)
4. Wait (5) five minutes to clear out any
gas. If you then smell gas, STOP! Smell
all around the appliance area for gas.
Be sure to smell next to the floor because
some gases are heavier than air and will
settle on the floor. If you smell gas
immediately follow the What To Do If
You Smell Gas! warning on the cover of
this Manual. If you do not smell gas,
proceed to the next step.
5. Turn gas control knob counter-clockwise
to “PILOT”.
6. Push in control knob all the way and
hold in. Immediately light the pilot with
the gas lighter (push in and “click” the
piezoelectric spark ignitor button several
times until lit). Continue to hold the
control knob in for about 20 seconds
after the pilot is lit. Release the knob and
it will pop back out. Pilot should remain
lit. If the pilot goes out, repeat the
operation.
• If knob does not pop out when released,
stop, shut off the gas supply to the heater
and immediately call a qualified service
technician or gas supplier.
• If the pilot will not stay lit after several
tries, turn the gas control knob “OFF”
and call a qualified service technician or
gas supplier.
7. After the pilot lights, turn gas control
knob counter-clockwise to “ON”.
8. If the ON/OFF/THERMOSTAT switch
is set to “ON”, the stove should now be
lit. If the thermostat (or remote) has been
installed, set the ON/OFF
THERMOSTAT switch to
“THERMOSTAT” and turn the
thermostat (or remote) to “ON”. Then
set the desired temperature.
9. Shut the gas control valve access door.
NOTE: When pressing/clicking the
piezoelectric spark ignition button to light
the pilot, watch through the glass (front) of
the unit. Click the ignitor button until a
flame is visible at the pilot. Once the pilot is
lit, continue to press on the gas control knob
for another 20 seconds, then release.
Ascertain that the pilot is still lit by looking
through the front door. If lit, then turn the
gas control knob fully counter-clockwise to

HearthStone Quality Home Heating Products Inc Champlain Model #8300
9
the “ON” position. If the pilot fails to light,
or if it went out due to a premature release
of the gas control knob while pressed in the
“PILOT” position, wait 60 seconds for the
Interlock to release. Then repeat the lighting
process as described in this section of the
manual.
Once the pilot has been lit, the gas control
knob has been turned to the “ON” position,
and the ON/OFF/T-STAT switch has been
turned to “ON”, the main burners should
light immediately. If you would like to use
the thermostat and it has been installed,
switch the ON/OFF/T-STAT switch to
thermostat. Turn the thermostat to "ON" and
set it to a higher position so that it "calls" for
heat in order to turn light the main burners
(i.e. turns the unit on). Note that the
thermostat controls the on/off cycling of the
main burners, but the pilot remains lit
regardless of the thermostat setting. The
only way to turn the pilot off is to turn the
gas control knob fully clockwise to the
“OFF” position.
TO TURN OFF GAS TO APPLIANCE
1. Set the thermostat to the “OFF”
position or turn the ON/OFF/T-
STAT switch to the “OFF” position.
2. If shutting the unit off for the non-
heating season, turn the gas control
knob fully clockwise to the “OFF”
position. Do not force the knob to
turn.
DAILY OPERATION
The Champlain gas-fired heater is easily
operated by the homeowner once installed
and adjusted by a qualified service
technician. Following is a list of the controls
available to the owner/user:
A. ON/OFF/PILOT………Built into Valve
B. VARIABLE OUTPUT
CONTROL……………Built into Valve
C. ON/OFF/THERMOSTAT
SWITCH…………………...…Standard
D. THERMOSTAT………………Standard
E. REMOTE CONTROL (w/o
thermostat)…………………....Optional
F. REMOTE CONTROL
(w/thermostat)…………….…..Optional
G. BLOWER……………………..Optional
A. ON/OFF/PILOT
The valve is equipped with two “control
knobs”. One is the ON/OFF/PILOT
knob, located on the front left side of the
valve. When in the “OFF” position, the
unit cannot operate at all. When in the
“PILOT” position, the pilot light can be
lit, but that is all. When in the “ON”
position, the unit may be on
continuously, or it may be “waiting” to
be controlled by the thermostat or
remote, depending on the setting of the
other controls.
B. VARIABLE OUTPUT CONTROL
The Variable Output Control knob,
located on the front right side of the
valve, controls the “rate” heat is
produced. By adjusting the variable
output control the rate of heat output can
be varied to meet the heating
requirements of the season. Choosing a
“LOW” flame setting will result in
longer burn cycles at a reduced output,
while choosing a “HIGH” flame setting
will result in a shorter, hotter burn cycle.
Through trial and error you can select
the optimum flame size for you setting
and application.
C. ON/OFF/T-STAT SWITCH
The ON/OFF/T-STAT switch controls
how the unit will operate, continuously
or by thermostat. When the switch is in
the “ON” position, the main burner

HearthStone Quality Home Heating Products Inc Champlain Model #8300
10
will stay on constantly, and the
thermostat will not operate. When the
switch is in the “T-STAT” position, it
will operate via the thermostat, running
only when the thermostat “calls” for
heat. When the switch is in the “OFF”
position, the pilot remains lit but the unit
can not operate, as the main burner can
not light.
D. THERMOSTAT
The unit may be controlled
automatically via the wall-mounted
thermostat. By setting the ON/OFF/T-
STAT switch to “T-STAT”, and setting
the desired room temperature, the unit
will cycle on and off as needed to
maintain the requested temperature.
E. REMOTE CONTROL (w/o thermostat)
The unit may also be partially controlled
via the OPTIONAL remote control, Kit
#90-56912. When the ON/OFF/T-STAT
switch is in the “ON” position, it allows
you to turn the stove “On” & “Off” from
anywhere in the vicinity of the unit, and
is available through your local
HearthStone dealer.
F. REMOTE CONTROL (w/thermostat)
The unit may also be fully controlled via
the OPTIONAL REMOTE CONTROL
w/thermostat, available through your
local HearthStone dealer Kit #90-56914.
When the ON/OFF/THERMOSTAT
switch is in the “ON” position, this
Remote allows you to turn the unit “On”
& “Off” and also allows you to control
the temperature of the stove from
anywhere in the vicinity of the unit.
G. BLOWER
The unit may be equipped with an
OPTIONAL blower fan, available
through your local HearthStone dealer.
The fan helps to circulate heat away
from the stove.
Note: the ON/OFF/T-STAT switch or the
THERMOSTAT controls the on/off cycling
of the main burners, but the pilot remains lit
regardless of any of the control settings (B-
G) listed previously, except the
ON/OFF/PILOT control knob, which is the
only way to turn the pilot off. Turning the
gas control knob fully clockwise to the
"OFF" position will turn off the pilot.
During the summer, non-heating season,
switch the wall thermostat and rocker
switches to “OFF”, and turn off the pilot.
This will improve the overall efficiency of
the unit, as the heat from the pilot is not
wanted in the summer. When putting the
unit back into service follow the “Lighting
of the Unit” portion in the “How To Turn
On & Off” section of this manual.
When the unit is first lit, especially when
cool, it is normal to experience some
condensation on the inside of the glass
window. This condensation will burn off
within the first few minutes of operation. If
continuous condensation or water drips are
noted from any part of the unit, immediately
discontinue operation of the unit and contact
a qualified service technician.
ROUTINE MAINTENANCE
AND CARE
The Champlain requires minimal routine
maintenance and care. The unit should
always be cool and off when being cleaned.
CLEANING
› WARNING: Do not clean the unit
when hot. The unit should receive
regular cleaning on, under, and around
the stove to prevent the buildup of dust

HearthStone Quality Home Heating Products Inc Champlain Model #8300
11
and lint. The exterior surfaces of the unit
can be cleaned using soap, water, and a
soft cloth. Do not use abrasive or
chemical cleaners and take care not to
scratch the glass or enamel finish (if so
equipped) when cleaning the unit. The
use of chemical wax based cleaners or
polishes are not recommended due to the
potential for discoloration or the enamel
when the residue of the cleaners or
polishes is exposed to heat.
FIREBOX, PILOT, & BURNER
TUBES
The firebox, pilot & burner tubes should
receive periodic cleaning to prevent the
accumulation of dust, lint and debris.
Regularly check to insure the area around
the Champlain is kept free and clear from
combustible materials, gasoline, and other
flammable vapors and liquids. Check that
the flow of ventilation air is not obstructed.
Once a year the unit and its venting
system should be inspected by qualified
service personnel to ensure that it is clean,
free of obstruction, safe, and in good
working order. If service or maintenance
is required, qualified service personnel
should perform it.
INSTALLER’S
INFORMATION
CODES
Adhere to all local codes or, in their
absence, the latest edition of THE
NATIONAL FUEL GAS CODE ANSI
Z223.1 (NFPA 54) or CAN/CGA B149
Installation Code that can be obtained from:
AMERICAN NATIONAL STANDARDS
INSTITUTE, INC.
1430 BROADWAY
NEW YORK, NY 10018
OR
NATIONAL FIRE PROTECTION
ASSOCIATION, INC.
BATTERY MARCH PARK
QUINCY, MA 02269
The appliance when installed, must be
electrically connected and grounded in
accordance with local codes or, in the
absence of local codes, with the current
NFPA 70-National Electrical Code or CSA
C22.1-Canadian Electric Code.
A manufactured home (mobile) OEM
installation must conform with the
Manufactured Home Construction and
Safety Standard, Title 24 CFR, Part 3280
(U.S.) or Standard for Manufactured Home
Installation, ANSI/NCBCS A225.1 or
Standard for Gas Equipped Recreational
Vehicles and mobile Housing, CSA
Z240.4.CAN/SCA Z240 MH (Canada).
(Installer l’appareil selon les codes ou
règlements locaux, ou, en l’absence de tels
règlements, selon les Codes d’installation
CAN/CGA-B149.)

HearthStone Quality Home Heating Products Inc Champlain Model #8300
12
ITEMS REQUIRED FOR
INSTALLATION
* External regulator (for propane/L.P.G.
only)
* Piping which complies with local codes
* Pipe sealant approved for use with
propane/L.P.G. (resistant to sulfur
compounds)
* Manual shutoff valve
* Sediment trap
* Tee joint
* Pipe wrench
* Phillips head and flat head screwdriver
* Other parts as required by local code
*Safety Glasses
*Gloves
PACKING LIST
1-Champlain Gas-Fired Heater
4-Decorative Ceramic Fiber Logs
1-Ember Screen
1-Bag of Charcoal Embers
1-Owner’s Manual
1-Thermostat
1-Thermostat wire
1-L.P. Fuel Conversion Kit
UNPACKING AND INSPECTION
UNPACK AND INSPECT FOR DAMAGE
The Champlain is packaged by the
manufacturer to withstand shipment without
damage. However, damage can occur during
transit so take care to inspect for damage
when unpacking and installing the unit. If
any damage or missing parts are detected,
immediately contact your dealer. Do not
install or put into service a damaged or
incomplete heater.
The unit should appear to be square and
level. The sheet metal parts should be
smooth and free of bends or dents. The
enameled cast iron should be free of chips or
cracks. If visible or concealed damage is
found, contact your dealer.
The decorative ceramic fiber logs supplied
with the Champlain are located in the
firebox. Always use great care when
handling the decorative ceramic logs, as
they are fragile and subject to damage and
breakage. To open the firebox, remove the
two upper front screws (located in the grill
of the front) that hold the cast façade onto
the unit. (THESE SCREWS ARE
SHIPPED ON THE UNIT FOR
TRANSIT PURPOSES ONLY AND DO
NOT NEED TO BE REINSTALLED)
Next, open the valve access door, by pulling
the ash lip down and allowing the door to
swing away. Grasp the handle of the latch,
located in the center of the opening, and
pull forward, being careful not to drop the
front as the latch is unfastened. Be careful
not to chip the enamel when unlatching the
front. To open the firebox, reach over the
firebox, and under the front grill. With a flat
screwdriver pry the retaining clips up. There
will be two separate clips. Be careful, when
you lift the last one, as it will free the glass
and frame from the unit.
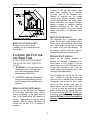
HEARTH REQUIREMENT/FLOOR
PROTECTION
The Champlain may be placed on a non-
combustible surface or wood floor. For
placement of the Champlain on carpeting,
vinyl tile or other combustible materials, the
appliance shall be installed on a metal or
wood panel extending the full width and
depth of the appliance. Installations must
meet local codes.

HearthStone Quality Home Heating Products Inc Champlain Model #8300
13
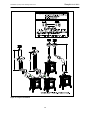
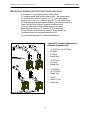
CHAMPLAIN DIMENSIONS
CLEARANCE TO COMBUSTIBLES
Due to high surface temperatures, the unit
should be located out of traffic and away
from furniture and draperies. Clothing and
other flammable material should not be
placed on or near the heater. When
positioning the unit always maintain
adequate clearances around air openings into
the combustion chamber and allow for
adequate ventilation. Be sure to consider the
need for access to the gas control valve
access door on the front of the unit as well
as full access for periodic cleaning and
servicing. Also consider the location of the
Optional Blower Fan.
NOTE: These clearances represent
minimum distances in all cases, which,
through testing in an independent
laboratory to ANSI and CSA standards,
will prevent fire or spontaneous
combustion. We do not control the
combustible materials exposed to heat by
this product; therefore, an assessment
must be made by the installer to prevent
consequential damage of walls and
flooring.
Figure 2
Figure 3

HearthStone Quality Home Heating Products Inc Champlain Model #8300
14
Figure 4
Figure 5

HearthStone Quality Home Heating Products Inc Champlain Model #8300
15
Acceptable Direct Vent TERMINATION Cap locations.
Figure 6

HearthStone Quality Home Heating Products Inc Champlain Model #8300
16
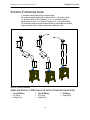
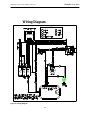
VENTING INFORMATION
VENTING CONNECTION
1. The Champlain Direct Vent is approved
for installation only with the vent
connecting components listed on this
page. Use the following instructions
along with the pipe manufacturer’s
instructions to complete the installation.
2. Attach the inner starter collar and gasket
to the unit with the eight # 8-32 x 3/8"
Phillips Head self-tapping screws.
3. Place the outer starter collar and gasket
onto the back of the stove. Secure the
outer adapter with the eight # 8-32 x
3/8" Phillips Head self-tapping screws
that are provided. Install the rest of the
vent system according to the
manufacturer’s instructions.
1. Gasket 4” 3160-130
2. Inner starter 924H
3. Gasket 6” 3160-157
4. Outer Starter 924H
Figure 7: Gasket & Stove Adapter Installation

HearthStone Quality Home Heating Products Inc Champlain Model #8300
17
VENTING COMPONENTS &
CONFIGURATION
The Champlain cannot be vented jointly
with any other solid fuel or gas appliance. It
must be vented directly to the outside of the
building using a proper termination as listed
in the manual. Your Champlain Direct Vent
stove is approved for use with Simpson
Dura-Vent’s GS Direct Vent, AmeriVent
Direct, or Secure Vent systems. The venting
configurations are shown in Figures 10 - 12.
After determining the venting configuration
for your stove, select the vent system that
will accommodate your installation.
Caution: Make sure all stove and
termination cap clearances have been
observed per the Owner’s Manual.
Caution: Be sure there is no wiring or
plumbing in the chosen location.
Caution: Venting terminals shall not be
recessed into a wall or siding.
Note: If further direction is needed for
installation, please refer to the venting
instructions, which are provided with the
venting system.
ACCEPTABLE DIRECT VENT
TERMINATION CAP LOCATIONS
The vent/air intake termination clearances
above the high side of an angled roof are as
follows:
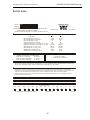
Roof Pitch Feet Meters
Flat to 6/12 1 0.3
7/12 to 9/12 2 0.6
10/12 to 12/12 4 1.2
13/12 to 16/12 6 1.8
17/12 to 21/12 8 2.4
Listed below are components acceptable for
installation. The venting system must be
comprised of the appropriate venting
components as specified.
APPROVED VENTING SYSTEM
COMPONENTS
*Component Description
90
0
Elbow
45
0
Elbow
6" Straight
9" Straight
12" Straight
24" Straight
36" Straight
48" Straight
11"-14 5/8" Adjustable Pipe Length
Horizontal Vent Cap
Vertical Vent Cap
Snorkel 36”
Vinyl Siding Standoff 4 x 6 5/8”
Round Ceiling Support Wall
Thimble Covers
Wall thimble

HearthStone Quality Home Heating Products Inc Champlain Model #8300
18
Figure 8: Acceptable Venting Lengths
Figure 9: Allowable Venting Lengths
There are several venting configurations to
choose from. You must choose which
configuration will work best for your situation.
Following the venting configurations are the
venting connection instructions. The venting
options have been divided into three sections:
I. Fireplace Configuration
II. Vertical Termination
III. Horizontal Termination
NOTE: Clearances from Pipe to Combustibles
are 1” below and to the side of horizontal runs,
2” from the top of horizontal runs.

HearthStone Quality Home Heating Products Inc Champlain Model #8300
19
FIREPLACE VENTING CONFIGURATIONS
• 30’ maximum system height (with or without offsets-note shutter setting)
• 10’ maximum offset (refer to Figures 8 – 10 shutter setting)
• maximum rise to run = 1 to 5 (refer to Figures 8 – 10 note shutter setting)
• termination must fall within the area outlined by the shaded area shown in Figure 8 and the
chart in Figure 9 should be considered as well.
DV CLASS A CHIMNEY SYSTEMS (4)
- Chimney Conversion Kit A
- Chimney Conversion Kit B
- Chimney Conversion Kit C
- Masonry Chimney Conversion Kit
• Co-Linear Flex Liner (10ft min/30ft max)
• Co-Linear Flex Connector
• High Wind Termination Cap
DV CHIMNEY CO-LINER SYSTEM
• Chimney Liner Termination Kit (includes Co-Liner to Co-Axial Termination and Flashing)
• (2) Sections 3” Flex Liners (10ft min/30ft max)
• High Wind Termination Cap
• Co-Axial to Co-Linear Appliance Connector
• (4) 3-1/2” Hose Clamps
DV CHIMNEY CO-AXIAL LINER SYSTEM
• Chimney Liner Termination Kit (includes Co-Linear to Co-Axial Termination and
Flashing
(2) Sections 3” Flex Liners (10ft min/30ft max)
• High Wind Termination Cap
• Co-Axial to Co-Linear Appliance Connector
• (4) 3-1/2” Hose Clamps
The use of an existing chimney as an air intake is not covered under the ANSI Z21.88-CSA
2.33-M98 test methods and the resulting ITS/WHI product certification. The Authority
having jurisdiction must be consulted prior to proceeding with these installation methods.

HearthStone Quality Home Heating Products Inc Champlain Model #8300
20
Figure 10: Fireplace Installation
Page is loading ...
Page is loading ...
Page is loading ...
Page is loading ...
Page is loading ...
Page is loading ...
Page is loading ...
Page is loading ...
Page is loading ...
Page is loading ...
Page is loading ...
Page is loading ...
Page is loading ...
Page is loading ...
Page is loading ...
Page is loading ...
Page is loading ...
Page is loading ...
Page is loading ...
Page is loading ...
Page is loading ...
Page is loading ...
Page is loading ...
-
 1
1
-
 2
2
-
 3
3
-
 4
4
-
 5
5
-
 6
6
-
 7
7
-
 8
8
-
 9
9
-
 10
10
-
 11
11
-
 12
12
-
 13
13
-
 14
14
-
 15
15
-
 16
16
-
 17
17
-
 18
18
-
 19
19
-
 20
20
-
 21
21
-
 22
22
-
 23
23
-
 24
24
-
 25
25
-
 26
26
-
 27
27
-
 28
28
-
 29
29
-
 30
30
-
 31
31
-
 32
32
-
 33
33
-
 34
34
-
 35
35
-
 36
36
-
 37
37
-
 38
38
-
 39
39
-
 40
40
-
 41
41
-
 42
42
-
 43
43


Hearth and Home Technologies 8300 User manual
- Category
- Fireplaces
- Type
- User manual
Ask a question and I''ll find the answer in the document
Finding information in a document is now easier with AI
Related papers
Other documents
-
Camp Chef Pro 90X Quick start guide
-
HearthStone Santa Fe 8761 Owner's manual
-
HearthStone Green Mountain Insert 70 Owner's manual
-
Williams 2275 User manual
-
Ashley Hearth Products AG34IK Installation guide
-
Assa Abloy HES 8000 Series Installation guide
-
Canon PSC 2000 User manual
-
-
-