American Standard 200A User manual
- Category
- Dehumidifiers
- Type
- User manual

READ AND SAVE THESE INSTRUCTIONS
HUMIDIFIERS
OWNER’S MANUAL
Includes Safety & Operating Instructions
and Warranty Information
For Models *HUMD200A, 300A, 500A
10006174
B2203330A
5.04 Pub No. 22-5036-01
READ AND SAVE THESE INSTRUCTIONS
HUMIDIFIERS
OWNER’S MANUAL
Includes Safety & Operating Instructions
and Warranty Information
* May be "A" or "T"

- 00 -
TABLE OF CONTENTS
WARNING
120 volts may cause injury from electrical shock.
Disconnect power and shut off water supply before servicing.
CAUTION
Sudden operation may cause personal injury or
property damage. Turn humidistat or Humidifier Control to “OFF” or
lowest setting before servicing
Introduction . . . . . . . . . . . . . . . . . . . . . . . . . . . . . . . . . . . . . . . . . . . . . . .1
Principle of Operation . . . . . . . . . . . . . . . . . . . . . . . . . . . . . . . . . . . . . . . .2
Operating Instructions
• Automatic Humidifier Control . . . . . . . . . . . . . . . . . . . . . . . . . . . . . .3
• Manual Humidifier Control . . . . . . . . . . . . . . . . . . . . . . . . . . . . . . . .5
Effect of Water Characteristics . . . . . . . . . . . . . . . . . . . . . . . . . . . . . . . .6
Annual Maintenance . . . . . . . . . . . . . . . . . . . . . . . . . . . . . . . . . . . . . . . .7
Annual Summer Shutdown . . . . . . . . . . . . . . . . . . . . . . . . . . . . . . . . . . . .7
Periodic Preventive Maintenance . . . . . . . . . . . . . . . . . . . . . . . . . . . . . . .8
MAINTENANCE INSTRUCTIONS
Models *HUMD200A, *HUMD300A . . . . . . . . . . . . . . . . . . . . . . . . . .9
Models *HUMD500A . . . . . . . . . . . . . . . . . . . . . . . . . . . . . . . . . . . . .10
Limited Warranty . . . . . . . . . . . . . . . . . . . . . . . . . . . . . . . . . . . . . . . . . .11
Replacement Record . . . . . . . . . . . . . . . . . . . . . . . . . . . . . . . . . . . . . . . .12

- 1 -
Replacement Humidifier Pads are available from your installing dealer.
Thank you for your recent purchase of our humidifier. The addition of this
product to your heating and cooling system will increase your level of
comfort by adding just the right amount of moisture to your indoor
environment. During the heating season, your humidifier will not only
make you feel more comfortable, but it will help protect your home and
your furnishings, as well.
Your new humidifier is easy to use and easy to live with. Simple
maintenance is required on a periodic basis to keep it in peak operating
condition. This homeowner’s manual will outline these steps for you, as
well as other basic operating procedures so you can enjoy the full
benefits of your new humidifier.
How Your Humidifier Operates:
During the winter, your comfort relies on two things: the perfect
temperature and the perfect amount of moisture. Your new humidifier will
provide your home with the recommended indoor relative humidity to
ensure your comfort all winter long.
INTRODUCTION
© 2004 American Standard Inc., All rights reserved

- 2 -
Your new humidifier has been installed to operate in conjunction with the
blower motor in your furnace. When the Humidifier Control calls for
humidity and the blower motor is operating, water flows to the distribution
tray located at the top of the unit. The water is evenly distributed across
the width of the tray and over the Humidifier Pad. Dry, hot air is moved
through this moisture laden Humidifier Pad where it is evaporated into a
vapor. This now humidified air is circulated throughout your home.
Humidified air helps to reduce static electricity, reduces wood furniture
from drying out, helps prevent nasal passages from becoming too dry and
makes your home more comfortable.
Important Notes About Your Humidifier:
When the humidifier is operating, there will be a small, steady stream of
water to drain. Do not use the saddle valve to regulate the water flow. The
saddle valve is designed to be either completely open or completely
closed.
Although your humidifier incorporates a self-flushing action, the Humidifier
Pad will develop mineral build-up on it over time. To assure high
capacity, trouble-free performance it should be replaced annually.
The granular coating on the bottom of the distribution tray is designed to
provide an even flow of water over the Humidifier Pad. Do not clean the
mineral scale off the bottom of the distribution tray at the end of
the humidification season. The scale actually provides an excellent
track for the water to follow.
I. YOUR HUMIDIFIER

- 3 -
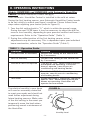
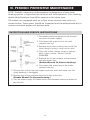
TABLE 1 – Operation Guide
Models HUMD300A and HUMD500A with Automatic Humidifier
Control: (Manual Humidifier Control-see pg 4)
Your Automatic Humidifier Control is installed in the cold air return.
During the first heating season, your Automatic Humidifier Control needs
to be set initially to match your home’s condition. Please follow these
steps when adjusting your control (refer to Figure A).
1. Turn the dial setting knob to “5,” which is within the normal range.
During the next 24-48 hours it may be necessary to adjust the dial for
more or less humidity, depending on your personal comfort and home’s
requirements. Refer to the “Operation Guide” (Table 1).
2. During the coldest portion of the first heating season, minor
adjustments may be necessary. This is dependent upon your individual
home construction, refer to the “Operation Guide” (Table 1).
Condition Solution
Condensation on windows Reduce the setting on the control dial
by 1 increment.
Lack of humidity Increase the setting on the control dial
by 1 increment.
Humidifier does not operate Turn dial to “Test.” Make certain furnace
and blower are operating. If unit still
doesn’t operate, consult your air
conditioning and heating dealer.
Humidifier won’t shut off Turn dial to “Off.” If unit continues to
operate, consult your air conditioning
and heating dealer.
Test mode System operation is checked by setting the
knob to “Test.” Make certain furnace and
blower are operating. Humidifier will
operate for one minute.
Off
7
6
5
4
3
2
1
T
e
s
t
N
O
R
M
A
L
Humidity Level
The relative humidity in your home
will now be accurately controlled
to meet your needs and should not
need further adjustment during
future heating seasons. Make note
of the dial setting in the event you
temporarily move the knob when
performing annual maintenance of
the Humidifier.
II. OPERATING INSTRUCTIONS
FIGURE A

- 4 -
Your Automatic Humidifier, is a high precision system that will accurately
maintain the relative humidity in your home. For every 1°F change in
outdoor temperature, the control will automatically adjust the indoor
relative humidity (RH) by
1
/2%. If you would like to determine the RH in
your home, follow these steps:
1. Determine the outdoor temperature.
2. Activate the furnace blower by setting your thermostat fan switch to the
“On” position, or setting your thermostat to a higher temperature.
3. Turn the control dial setting to the “Off” position. Then, slowly turn the dial
clockwise until you hear the solenoid valve “click on.” Next, slowly turn the
dial counter clockwise until you hear the solenoid valve “click off.” At this
point, make note of the dial setting.
4. Locate your dial setting on Table 2. Follow the dial setting to the right
until it intersects with the current outdoor temperature. This is the
relative humidity in your home under existing conditions.
5. Return the thermostat and the Humidifier Control to their original
settings.
The Automatic Humidifier will accurately control the humidity in your
home to a maximum of 45% RH and a minimum of 10% RH. The values of
outdoor temperature and dial settings may fall in between or outside of
the listed values in Table 2. In these cases, you can only approximate your
home’s actual indoor RH.
As an example, if the outdoor temperature is 20°F, and, following step 3,
the humidifier turns off at “5” on the dial range, then the RH in your home is 35%.
-10 0 10 20 30 40
1 10 10 10 15 20 25
2 10 10 15 20 25 30
3 10 15 20 25 30 35
4 15 20 25 30 35 40
5 20 25 30
35 40 45
6 25 30 35 40 45 45
7 30 35 40 45 45 45
Outdoor Temperature (°F)
Dial Setting
TABLE 2 – % Relative Humidity Guide

- 5 -
To check the humidifier’s operation, note the current setting and set the
Automatic Humidifier Control to the test mode when the furnace blower
motor is operating. Water will flow into the humidifier for 1 minute and
then it will turn off. This insures the unit is operating properly. Do not
leave the control in the test mode as it will not operate. Reset the control
to it’s original setting.
TABLE 3 – Outdoor-Indoor Relative Humidity
Model HUMD200A with Manual Mode:
(Automatic Humidifier Control – see pg 3)
Your new Humidifier is controlled by a humidifier control installed either in
the living area (typically near the thermostat) or in the cold air return. It is
important to anticipate a drop in outdoor temperature and reduce the setting
accordingly to avoid excessive condensation. For example, with an outdoor
temperature of 20°F the correct setting will be 35% relative humidity. If the
temperature is expected to fall to 0°F that evening, then merely reduce the
setting to 25% several hours prior to the temperature change.
The recommended settings on the humidifier control are based on years
of research (see Table 3) and experience as to what is best for the
average home. These settings represent a compromise between RH levels
that would be most desirable for comfort reasons and humidity levels that
are suitable for protection of your home. For example, a wintertime indoor
RH of 50% may be considered ideal by some, but unfortunately, it
probably would result in damage to your home. Observance of the
recommended RH levels on your humidistat, therefore, is an important
safeguard. Condensation of water on inside windows in the form of
fogging or frost is usually an indication of too high relative humidities.
This same condensation can take place in other areas in your home with
the possibility of damage resulting.
Outside Temperature Recommended RH
+40°F 45%
+30°F 40%
+20°F 35%
+10°F 30%
0°F 25%
–10°F 20%
–20°F 15%
The humidistat is a precision instrument that can be used to determine
the RH accurately in your home during the winter. Turn the dial to the
lower setting, then reverse the dial direction slowly until a “click” is
heard. At this point, read the RH on the dial. This will be very close to the
actual RH in your home.

- 6 -
III . EFFECT OF WATER CHARACTERISTICS
To check the humidifier operation, set the humidifier control above the click
point, make sure that the water saddle valve is open and that there is
electricity to the unit. Generally, the furnace and blower motor must be
operating for the humidifier control to function. After the humidifier has
operated for several minutes and water is entering the unit and coming out
at the drain, reduce the humidifier control setting below the click point and
the unit should automatically shut off. Now set the humidistat dial at the
recommended inside relative humidity, depending on the outside
temperature. Follow the suggested settings prior to a drop in the outside
temperature.
Additional Information
Be sure to keep fireplace dampers closed when not in use. They provide
an excellent escape route for heat, as well as humidity. Humidity is lost at
an even faster rate than heat because water vapor tends to seek its own
level and your humidifier would not be able to replace it even when
running at full capacity.
On occasion, indoor moisture producing activities such as clothes drying,
cooking, showers, etc., may raise the relative humidity level higher than it
should be, even though the Humidifier is not operating. Telltale
indications, again, are condensation or frost on cold surfaces such as
windows, doors, walls, etc. If such condensation persists for several
hours, your home should be ventilated to dissipate the potentially
damaging excess moisture.
Your humidifier will operate effectively using either hot, cold, hard or
mechanically softened water. Whether to use available tap water, even
though it may be quite hard, or chemically softened water, is a common
concern to homeowners when installing a humidifier. Because of the
humidifier’s design, most of these solids are effectively controlled by
flushing them down the drain.
Water used in homes contains varying amounts of minerals. The residue
remaining as a result of hard water evaporation is primarily calcium and
magnesium components and is usually quite hard, scaly, and dense.
Residue from softened water tends to be soft and fluffy and has a greater
volume than hard water scale. The service life of a Humidifier Pad may be
extended by using hard water, but in either case, the Humidifier Pad
should be changed once a year. This is why proper maintenance is
important and necessary. Service hot water 140°F maximum, is
recommended with drain type units for increasing capacity.

- 7 -
IV. ANNUAL MAINTENANCE
V. ANNUAL SUMMER SHUTDOWN
For best performance, we recommend that you replace the
Humidifier Pad in your Humidifier annually.
To obtain a replacement:
• Call the installer of your humidifier.
This information is often found on your equipment.
• Call your heating and air conditioning dealer.
• Look in the Yellow Pages under Humidifying Apparatus
or Heating & Air Conditioner Contractors.
• If none of the above are successful and you still need
information, please feel free to write us or send an email to our
website.
For Models *HUMD200A, *HUMD300A close the bypass damper
.
AUTOMATIC HUMIDIFIER CONTROL:
Humidifiers controlled by the Automatic Humidifier Control require no
control adjustment. Shut off the water supply to the humidifier by closing
the saddle valve.
MANUAL HUMIDIFIER CONTROL:
For humidifiers controlled by a Manual Humidifier Control, simply turn the
control to the “Off” position. Shut off the water supply to the humidifier
by closing the saddle valve.

- 8 -
VI. PERIODIC PREVENTIVE MAINTENANCE
NOTE: Periodic inspection and preventive maintenance of your total
heating system is important for efficient and safe operation. Your heating
dealer should perform humidifier service at the same time.
All models are equipped with an in-line water strainer and orifice as
shown below. These parts should be inspected and cleaned periodically to
assure continued proper unit performance.
1. Disconnect electrical power to the furnace
and shut off water supply.
2. Disconnect the water line at the inlet
compression nut.
3. Remove the in-line strainer from inside the
inlet fitting by using a small nail or wire.
4. Flush the in-line strainer clean or replace
with a new strainer, Service Part No.
SRA00859.
5. Replace the in-line strainer and reconnect
the inlet water line.
(Double Wrench To Prevent Leaking.)
6. Disconnect the water line at the outlet
compression nut.
7. Remove the orifice from the copper or plastic tube and make sure this
small opening is unplugged.
8. Replace the orifice and reconnect the outlet water line.
(Double Wrench To Prevent Leaking.)
9. Turn on water supply @ Saddle Valve and reconnect electrical power to
the furnace.
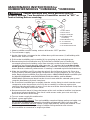
INSPECTION AND SERVICE INSTRUCTIONS

MAINTENANCE INSTRUCTIONS for
HUMIDIFIER MODELS *HUMD200A, *HUMD300A
Sudden operation may cause personal injury or
property damage. Turn humidistat or humidifier control to “OFF” or
lowest setting before servicing.
1. Front C
2. Drain H
3. Bypass
4. Water P
Assem
5 Distribu
4
56
8
72
31
90-820
- 9 -
1. Front Cover
2. Drain Hose
3. Bypass Damper
4. Humidifier Pad
Assembly
5. Distribution Tray
6. ”V” Notches
7. Humidifier Pad
8. Scale Control Insert
*MAY BE “A” OR “T”
1. Note humidifier control setting and turn dial to the “OFF” position.
2. Turn off water supply.
3. At the side of the unit opposite the airflow duct pull front cover (1) off holding with
both hands and set aside.
4. Pull out the humidifier pad assembly (4) by grasping at top and tipping out.
5. Remove the plastic distribution tray (5) from the humidifier pad assembly by
unsnapping the plastic holding strips from the tabs at the end of the tray. Lightly
scrape out any mineral deposits and clean the “V” notches (6), but do not scrape
off the granular coating from the bottom. This textured surface helps ensure even
water flow for maximum performance. If coating is removed replace distribution tray.
6. Slide the humidifier pad (7) out from the plastic Scale Control Insert (8). Clean the
insert frame by twisting and flexing it to loosen the calcium deposits, or use a putty
knife. Replace the humidifier Pad annually with a #BAYPAD01A1010A humidifier pad
for Model HUMD200A and #BAYPAD02A1310A humidifier pad for Model
HUMD300A. Slide the pad back into the insert frame with the colored spot up and
snap the distributor tray back into place.
7. Re-install the humidifier pad assembly into the unit by fitting its drain into the round
receptacle at the base of the unit. Push the assembly in at the top against the
retaining ribs that will hold it in place. Push the end of the feed tube back firmly into
the nozzle and replace the front cover.
8. Remove the drain hose (2) from the bottom of the unit and bend and flex it to loosen
the internal mineral deposits. Then flush it with water under pressure and slip it
back onto the black drain fitting.
9. Turn on water supply @ saddle valve.
10. Check system operation:
Manual Humidifier Control
: Turn up humidifier control to highest setting and make sure
the furnace and blower are operating. Humidifier will operate if RH is less than 50%.
Automatic Humidifier Control
: Check system operation by setting the knob to “Test.”
With furnace and blower operating humidifier will operate for one minute.
11. Set humidifier or control to its original position.
CAUTION!
*HUMD200A, *HUMD300A

Sudden operation may cause personal injury
or property damage. Turn humidistat or
Humidifier Control to “OFF” or lowest setting before servicing.
- 10 -
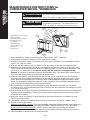
1. Note Humidifier Control setting and turn dial to the “OFF” position.
2. Disconnect electrical power and turn off water supply.
3. Unlatch humidifier cover assembly (1) from base assembly (2) at the bottom of the
cover, lift, and set aside.
4. Pull out the humidifier pad assembly (3) by grasping at the top and tipping out.
5. Remove the distribution tray (4) by unsnapping the plastic holding strips from the
tabs at the end of the distribution tray. Lightly scrape out any mineral deposits and
clean the “V” notches (5) but do not scrape off the granular coating from the
bottom. If coating is removed replace distribution tray. This textured surface helps
ensure even water flow for maximum performance.
6. Slide the humidifier pad (6) out from the plastic scale control insert (7). Clean the
insert frame by twisting and flexing it to loosen the mineral deposits or use a putty
knife. Replace humidifier pad annually with a #BAYPAD02A1310A humidifier pad.
Slide the humidifier pad back into the scale control insert with the colored spot up
and snap the distribution tray (4) back into place.
7. Re-install the humidifier pad assembly (3) into the base assembly (2). Push the
assembly (3) in at the top between the retaining ribs that hold the assembly in place
in a vertical position.
8. Remove the drain hose (8) from the bottom of the unit. Bend and flex it to loosen the
internal mineral deposits. Then flush it with water under pressure and slip it back
onto the drain fitting.
9. Reinstall cover assembly (1) by hooking at the top of the base assembly (2) and
latching at the bottom.
10. Reconnect electrical power (9) and turn on the water supply @ saddle valve.
11. Check system operation:
Manual Humidifier Control
: Turn up humidifier control to highest setting and make sure
the furnace and blower are operating. Humidifier will operate if RH is less than 50%.
Automatic Humidifier Control: Check system operation by setting the knob to
“Test.” With furnace and blower operating humidifier will operate for one minute.
12. Set Humidifier Control to its original position.
MAINTENANCE INSTRUCTIONS for
HUMIDIFIER MODEL *HUMD500A
*HUMD500A
54
7
2
6
8
1
90-858
3
9
WARNING
120 volts may cause injury from electrical shock.
Disconnect power and shut off water supply before servicing.
CAUTION
1. Humidifier Cover Assembly
2. Base Assembly
3. Humidifier Pad Assembly
4. Distribution Tray
5. "V" Notches
6. Humidifier Pad
7. Scale Control Insert
8. Drain Hose
9. Power Cord
*MAY BE “A” OR “T”

- 11 -
(First letter may be preceded by an “A” or “T”)
(Parts Only)
This limited warranty is extended by American Standard Inc., to the
original purchaser and to any succeeding owner of the real property
to which the humidifier is originally affixed, and applies to products
purchased and retained for use within the U.S.A. and Canada.
If any part of your humidifier (with the exception of the humidifier pad
and the inline water strainer) fails because of a manufacturing defect
within five years from the date of the original purchase, Warrantor
will furnish the required replacement part. Any local transportation,
related service labor, mechanical filters and diagnosis calls are not
included.
This limited warranty does not cover failure of your humidifier if it is
damaged while in your possession, damage caused by unreasonable
use of the humidifier and/or damage from failure to properly maintain
the humidifier as set forth in the Use and Care manual (see Proper
Maintenance section).
THE LIMITED WARRANTY AND LIABILITY SET FORTH HEREIN ARE IN
LIEU OF ALL OTHER WARRANTIES AND LIABILITIES, WHETHER IN
CONTRACT OR IN NEGLIGENCE, EXPRESS OR IMPLIED, IN LAW OR
IN FACT, INCLUDING IMPLIED WARRANTIES OF MERCHANTABILITY
AND FITNESS FOR PARTICULAR USE, AND IN NO EVENT SHALL
WARRANTOR BE LIABLE FOR ANY INCIDENTAL OR CONSEQUENTIAL
DAMAGES.
Some states do not allow limitations on how long an implied limited
warranty lasts or do not allow the exclusion or limitation of incidental
or consequential damages, so the above limitation or exclusion may
not apply to you. This limited warranty gives you specific legal rights,
and you may also have other rights which vary from state to state.
Parts will be provided by our factory organization through a service
organization in your area. If you would like further help or information
concerning this limited warranty, contact:
American Standard Inc. GW-639-1804
6200 Troup Highway
Tyler, TX 75711-9010
Attention: Manager, After Sales Support
LIMITED WARRANTY HUMIDIFIER
*HUMD0200A, 300A, 500A

Date
Dealer Name
SERVICE AND HUMIDIFIER PAD REPLACEMENT RECORD


Printed in U.S.A.
-
 1
1
-
 2
2
-
 3
3
-
 4
4
-
 5
5
-
 6
6
-
 7
7
-
 8
8
-
 9
9
-
 10
10
-
 11
11
-
 12
12
-
 13
13
-
 14
14
-
 15
15
-
 16
16


American Standard 200A User manual
- Category
- Dehumidifiers
- Type
- User manual
Ask a question and I''ll find the answer in the document
Finding information in a document is now easier with AI