MAINTENANCE
To replace damper flap or gasket material:
1. Remove bird screen, using sharp point, (screwdriver,
knife, etc.) pull down and pop screen out. (Figure 4)
2. Remove screw (ITEM #8) in center of damper plate
assembly and pull assembly out.
3. Pull out damper rod and lift damper flap out.
4. Replace defective or worn parts and then reinstall
damper flap with rib in flap facing up.
5. Slide damper plate assembly into grooves on inside
of cap and replace screw. Make sure that damper
opens freely.
6. Replace screen and position as shown.
NOTE: The high quality paint coating on our outdoor
accessories may be used as the exterior finish or as
a prime coat for the finish of your choice. We suggest
that you apply the coating best suited for the special
conditions of your installation.
99041983E 99041983E 99041983E 99041983E
Broan-NuTone LLC Hartford, WI
www.broan.com 1-800-558-1711
Broan-NuTone LLC Hartford, WI
www.broan.com 1-800-558-1711
Broan-NuTone LLC Hartford, WI
www.broan.com 1-800-558-1711
Broan-NuTone LLC Hartford, WI
www.broan.com 1-800-558-1711
Figure 4 Figure 4 Figure 4 Figure 4
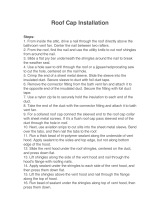
KEY PART NO. DESCRIPTION
1 97011442 Housing
2 98005577 Bird Screen
3 98005584 Damper Plate
4 98005581 Damper Flap
5 99500321 Long Sealant Strip (2 req.)
6 99500322 Short Sealant Strip (2 req.)
7 98005576 Damper Rod
8 99170245 Screw
KEY PART NO. DESCRIPTION
1 97011442 Housing
2 98005577 Bird Screen
3 98005584 Damper Plate
4 98005581 Damper Flap
5 99500321 Long Sealant Strip (2 req.)
6 99500322 Short Sealant Strip (2 req.)
7 98005576 Damper Rod
8 99170245 Screw
KEY PART NO. DESCRIPTION
1 97011442 Housing
2 98005577 Bird Screen
3 98005584 Damper Plate
4 98005581 Damper Flap
5 99500321 Long Sealant Strip (2 req.)
6 99500322 Short Sealant Strip (2 req.)
7 98005576 Damper Rod
8 99170245 Screw
KEY PART NO. DESCRIPTION
1 97011442 Housing
2 98005577 Bird Screen
3 98005584 Damper Plate
4 98005581 Damper Flap
5 99500321 Long Sealant Strip (2 req.)
6 99500322 Short Sealant Strip (2 req.)
7 98005576 Damper Rod
8 99170245 Screw
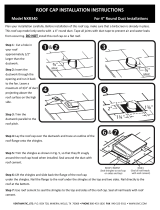
NAILS
(Seal all nail heads
with roof cement)
NAILS
(Seal all nail heads
with roof cement)
NAILS
(Seal all nail heads
with roof cement)
NAILS
(Seal all nail heads
with roof cement)
ROOF CEMENT
(Seal shingles to roof cap
on sides and top)
ROOF CEMENT
(Seal shingles to roof cap
on sides and top)
ROOF CEMENT
(Seal shingles to roof cap
on sides and top)
ROOF CEMENT
(Seal shingles to roof cap
on sides and top)
Figure 3 Figure 3 Figure 3 Figure 3
4. Use roofing cement to seal top and sides of roof cap.
Seal all nail heads with roof cement as well. (Figure 3)
5. From inside, attach 6" insulated flexible duct to collar
on roof cap. Secure with duct tape or duct clamp.
4. Use roofing cement to seal top and sides of roof cap.
Seal all nail heads with roof cement as well. (Figure 3)
5. From inside, attach 6" insulated flexible duct to collar
on roof cap. Secure with duct tape or duct clamp.
4. Use roofing cement to seal top and sides of roof cap.
Seal all nail heads with roof cement as well. (Figure 3)
5. From inside, attach 6" insulated flexible duct to collar
on roof cap. Secure with duct tape or duct clamp.
4. Use roofing cement to seal top and sides of roof cap.
Seal all nail heads with roof cement as well. (Figure 3)
5. From inside, attach 6" insulated flexible duct to collar
on roof cap. Secure with duct tape or duct clamp.