Ticor S4404 Installation guide

Type
Installation guide
1
Apron Sink Installation Instructions
Please read these instructions carefully before beginning installation.
We recommend that apron sinks be installed by professional countertop installers
and we are not responsible for damages to the countertop or sink during installation.
TOOLS AND MATERIALS
Safety glasses tape measure pencil drill sealant
Plus: 1/2” or larger drill bit, hole saw 1-3/8”, support frame members, sanding block, assorted
sandpaper, orbital sander(optional).
BEFORE YOU BEGIN
1. Observe all local plumbing and building codes.
2. Inspect the drain and supply tubing. Replace if necessary.
3. Prior to installation, unpack the new sink and inspect for damage. To prevent damage, return the
sink to its original packaging until installation is ready.
4. The cabinet and frame shown in these instructions are generic and may not represent actual
design or structure.
5. Before proceeding, determine how far the sink will extend beyond the front of the cabinet. It
should extend a minimum of 1/2” (1.3 cm) and a maximum of 2-3/4” (7 cm).
6. Shut off the hot and cold water supplies.
7. As applicable, assemble the faucet and drain to the sink before installing the sink.
2
PREPARATION
NOTE: You may use the provided brackets
(Four) to tighten the sink flange to the countertop
on the back side of the sink. Check with the
countertop manufacturer for proper use of
fastener. If you choose this option, you do not
need to install the back support.
1. Install the water supplies and drain piping
according to the roughing-in information.
2. Determine the faucet you will install. Make
sure there is enough room between the
backsplash or wall and back edge of the sink for
your faucet.
3. If you have not already done so, determine
the distance the apron will extend beyond the
face of the cabinet. The apron should extend no
less than 1-1/2” (1.3 cm) and no more than 2-
3/4” (7 cm).
4. Construct a wood frame to fit inside the
cabinet opening. The cabinet opening should be
33” (83.8 cm) wide.
5. The side supports should be 10” (25.4 cm)
long unless the back support is thicker than 1”
(2.5 cm). If the back support is thicker than 1”
(2.5 cm), determine the length of the side
supports by measuring from the inside edge of
the back support to the inside edge of the apron.
6. The back edge of the support frame should be
located 17-3/8” (44.1 cm) from the front of the
sink. Do not measure from the front of the
cabinet.
3
INSTALL THE SINK
NOTE: Use shims to level the sink if needed.
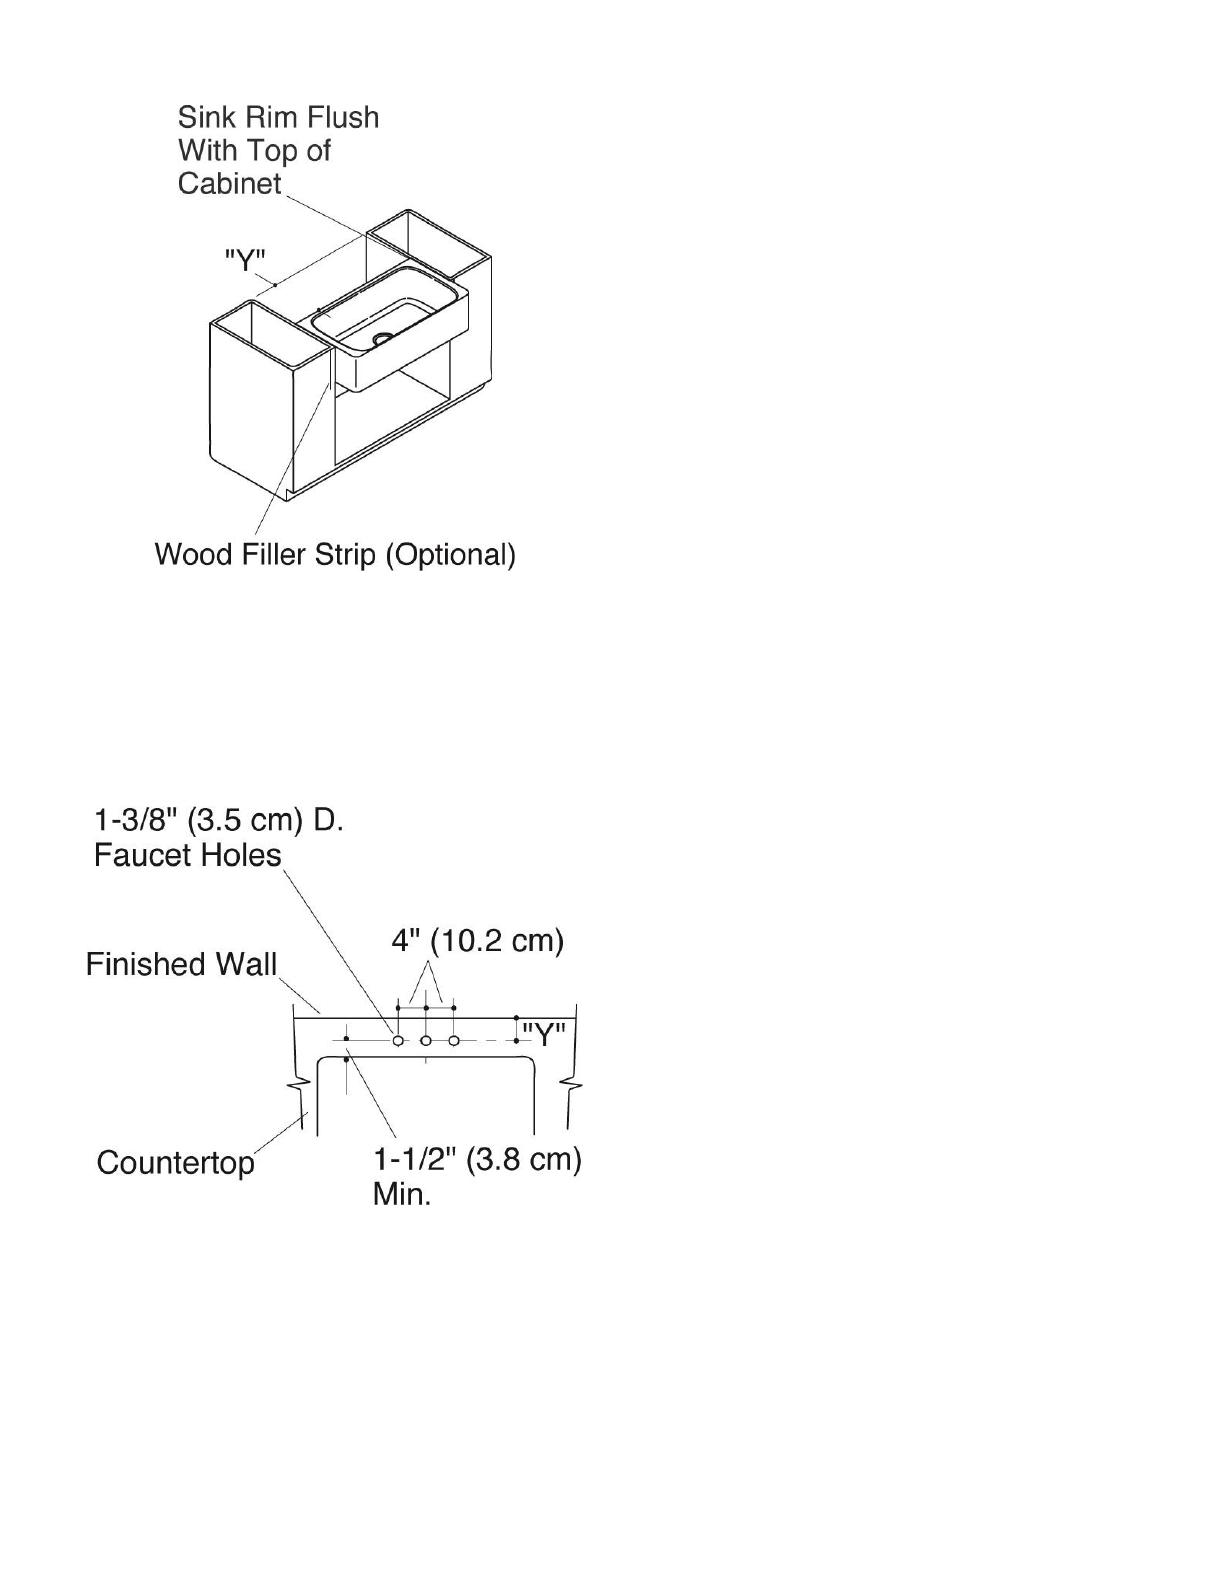
1. Verify that the sink will fit in the cabinet
opening. If necessary, adjust the opening by
sanding the opening or adding wood filler strips.
2. Install the strainer or garbage disposal to
the sink according to the manufacturer’s
instructions.
3. Apply a 1” (2.5 cm) spot of sealant at each
corner of the frame where it will contact the sink.
NOTE: If using shims additional sealant will be
needed.
4. Carefully position the sink within the
frame, making sure to center the sink in the
cabinet.
5. Verify that the sink is level. The top of the
sink should be flush with the top of the cabinet to
allow proper countertop installation. Adjust or
shim between the sink and support if needed.
6. Carefully measure the countertop to
determine the exact location of the cutout.
7. Carefully mark the cutout location on the
countertop.
COUNTERTOP AND FAUCET INSTALLATION
NOTE: The dimensions of your faucet may differ
from those shown. Check the roughing-in
dimensions of your faucet against those given.
CAUTION: Risk of product damage. Do not cut,
drill, or sand the countertop while positioned
over the fixture.
1. Measure 1-1/2” (3.8 cm) from the back edge
of the sink cutout and mark at multiple spots.
Draw a straight line through the marks.
2. Determine the faucet mounting location. Mark
the center of the location on the first line. This
is the centerline of the faucet.
3. Mark the locations of the handles and the
faucet.
4. Measure the distance “Y” and verify that there
is adequate clearance between the faucet
handles and the backsplash or finished wall to
ensure proper faucet operation.
5. Cut out the sink opening by carefully following
the pencil line.
6. Drill the faucet holes.
7. Sand the edge of the cutout to smooth the
surface and remove all saw marks. For
4
laminate type countertops, waterproof all
unprotected areas of wood.
8. Clean the top of the sink rim and the bottom
of the countertop, making sure the surface is
free from debris.
9. Apply a generous bead of sealant around the
sink rim where the sink rim will contact the
countertop.
10. Position the countertop over the sink,
making sure the sealant provides a complete
seal between the sink rim and the bottom of
the countertop.
CARE AND CLEANING
11. Immediately wipe away any excess sealant
with a damp cloth. Fill any voids between the
rim and the countertop if needed.
12. Allow the sealant to cure for at least 30
minutes before proceeding.
13. Install the faucet to the sink and countertop
according to the manufacturer’s instructions.
14. Connect and tighten the trap to the strainer,
and complete the water supply connections
to the faucet according to the instructions
packed with the faucet.
15. Run water into the sink and check for leaks.
16. Clean up with a non-abrasive cleaner.
Be careful not to leave staining materials in contact with the surface for extended periods of
time.
The ideal cleaning technique is to rinse thoroughly and blot dry any water from the surface
after each use.
Use a mild detergent such as liquid dishwashing soap and warm water for cleaning. Do not
use abrasive cleaners that may scratch or dull the surface.
Carefully read the cleaner product label to ensure the cleaner is safe for use on the
material.
Always test your cleaning solution on an inconspicuous area before applying to the entire
surface. Cleaners containing chloride are not recommended.
Wipe surfaces clean and rinse completely with water immediately after applying cleaner.
Rinse and dry any overspray that lands on nearby surfaces.
Do not allow cleaners to soak on surfaces.
Use a soft, dampened sponge or cloth. Never use an abrasive material such as a brush or
scouring pad to clean surfaces.
  • Page 1 1
  • Page 2 2
  • Page 3 3
  • Page 4 4

Ticor S4404 Installation guide

Type
Installation guide

Ask a question and I''ll find the answer in the document

Finding information in a document is now easier with AI