Genesis A1WINDOWFAN User manual

Category
Household fans
Type
User manual

Genesis A1WINDOWFAN is a high-velocity 9-inch window fan with a thermostat and Max Cool technology, designed to provide efficient ventilation and cooling in various window types. It features three-speed settings (low, medium, and high) for customized airflow, and a temperature control function that automatically adjusts the fan speed based on the desired temperature. The fan can be set to intake or exhaust air, making it suitable for both bringing in fresh air or removing stale air from a room.

Genesis A1WINDOWFAN is a high-velocity 9-inch window fan with a thermostat and Max Cool technology, designed to provide efficient ventilation and cooling in various window types. It features three-speed settings (low, medium, and high) for customized airflow, and a temperature control function that automatically adjusts the fan speed based on the desired temperature. The fan can be set to intake or exhaust air, making it suitable for both bringing in fresh air or removing stale air from a room.

READ AND SAVE THESE INSTRUCTIONS
Instruction Manual
A1WINDOWFAN
High Velocity 9 Inch Window Fan with
Thermostat and Max Cool Technology
145x210mm 说明书 -发- 颜色:K 20160317
Read Rules for Safe Operation and Instructions Carefully.
1. To reduce the risk of fire or electric shock, do not use this fan with any solid state
speed control device.
2. This appliance has a polarized plug (one blade is wider than the other). To reduce
the risk of electric shock, this plug is intended to fit fully in the outlet only one way.
If plug does not fit fully in the outlet, reverse the plug. If it is still does not fit,
contact a qualified electrician. Do not attempt to defeat this safety feature.
3. Do not leave fan running unattended.
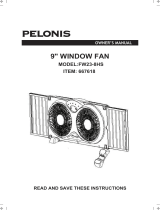
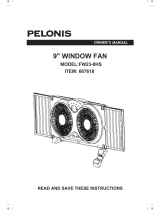
4. Fan is rated for use as a window fan. Please remove from window (unplugged)
when raining.
5. Keep out of reach of children.
6. Never insert fingers, pencils, or other foreign objects through the grill.
7. Disconnect fan when removing grills for cleaning. Reinstall before plugging into
power supply.
8. To protect against electrical shock, never immerse fan, cord, or plug in water.
Avoid using volatile cleaners.
9. Avoid contact with moving parts.
10. Do not operate in presence of volatile or explosive fumes.
11. Do not place fan or any parts near an open flame, cooking, or other heating
device.
12. Do not pull cord to disconnect, grip plug instead.
13. Do not hang or mount fan on a wall or ceiling.
14. Disconnect fan from power when moving from one location to another.
15. Be sure fan is on a stable surface when operating to avoid tipping over.
16. Do not use outdoors.
17. Never operate fan with damaged electrical cord, plug, or when the fan
malfunctions. Avoid use of extension cords.
18. To avoid fire hazard, never place the cord under rugs or any part of an open
flame, cooking, or heating appliance.
19. This product is intended for household use only and not for commercial or
industrial applications.
20. Automatically Operated Device - To Reduce The Risk Of Injury Disconnect
From Power Supply Before Servicing.
1
CAUTION
WARNING
2
When using electrical appliances, basic precautions should always be followed to
reduce the risk of fire, electric shock, and injury to persons, including the following:
(1) This product employs overload protection (fuse). A blown fuse indicates an
overload or short-circuit situation. If the fuse blows, unplug the product from
the outlet. Replace the fuse as per the user servicing instructions (follow
product marking for proper fuse rating) and check the products.
(2) Do not operate any fan with a damaged cord or plug.
(3) Do not run cord under carpeting. Do not cover cord with throw rugs, runners,
or similar coverings. Do not route cord under furniture or appliances. Arrange
cord away from traffic area and where it will not be tripped over.
2. Never insert fingers, pencils, or any other object through the grill when fan is
running.
3. Disconnect fan when moving from one location to another,
and before replacing
parts.
4. Disconnect fan when removing grilles for cleaning.
5. Do not operate in the presence of explosive and/or flammable fumes.
6. Do not place fan or any parts near an open flame, cooking, or other heating
appliance.
7. Always use on a dry leveled surface. Do not use outdoors.
8. Do not let the cord hang over the edge of a table, counter, or come in contact
with hot surfaces.
9. To disconnect grip plug and pull from wall outlet. Never yank on cord.
RULES FOR SAFE OPERATION
PREPARATION
Before beginning assembly of product, make sure all parts are present. Compare
parts with package contents list and diagram. If any part is missing or
damaged, do not attempt to assemble the product.
Estimated Assembly Time: 5 minutes
Tools Required for Assembly: Phillips Screwdriver (NOT INCLUDED)
A
B
C
D
Fig. 3
A
B
C
Fig. 1
A
D
B
C
23.9 in.
11.8 in.
Fig. 2
Pulls out up to 7.3 in.
A
Fig. 4
B
C
A
1. Plug the cord into any standard 120-volt A/C outlet.
2. To turn the fan on, press the SPEED button (A) on the panel. Fan will start at low
speed.
3. Adjust speed to low, medium or high by pressing SPEED button. A light will turn
on for each speed selected (C). Stop the fan by pressing the SPEED button
successively.
4. To start and stop the temperature settings, press the TEMP button (B) to cycle
through the temperature setting. Minimum setting is 60º F; maximum setting is
80º F. The fan will operate only if the temperature you have set is less than room
temperature. A light will turn on indicating the selected temperature (C).
5. Set the individual fan motors on either IN (intake) or OUT (exhaust) using the
control switch (D).
6. Temperature setting is available when the fan speed is set at High.
OPERATING INSTRUCTIONS
3
4
PACKAGE CONTENTS
Part Description Quantity
A
B
C
1
1
2
D
E
F
2
1
2
Fan body
Speed button
Expandable panels
Feet
Screw
Right and Left intake/exhaust control lever
Part Description Quantity
A
B
D
E
C
F
HARDWARE CONTENTS
Quantity
Picture
(Shown to size)
ST2.9x9.5
Screw
2
Part
AA
Description
• Push the feet (B) into the fan body (A) and snap together.
(Fig. 1). Fasten the two screws (D)from the bottom of the
feet.
• This window fan has been designed to fit double-hung,
slider, and casement windows with minimum openings
of 24.4 in. wide and 13 in. high. (Fig. 2)
• This fan is designed and recommended for use with your
window screen in place.
4. If the fan still does not fit properly in the window, re-
adjust the expandable panel on right/left side of fan to
fill in remaining space between panel and window
frame until a secure fit is achieved.
1. Position the fan in the window with the power switch
(A) facing the center of the opening.
2. To adjust height, remove fan from window, extend the
expandable panel (B) until it matches the height of the window.
3. With the window fully open, position the fan in the window with power switch
facing the center of the opening.
4. Fan must fit securely against the inside edge of the window opening.
5. Slide the sliding window to meet the edge of the fan.
The side edge of the window must fit securely behind the lip of fan housing.
6. Adjust the expandable panel to fill in remaining space between fan and window
frame. Expandable panel locks into position by closing the locks once you establish
a fit.
1. With the window fully open, set the fan in the window
with front (A) of fan facing the INSIDE.
2. Hold fan with one hand and lift the panel locks (C),
located at top and bottom on right/left side on fan, and
adjust penels (B) with the other hand. Before closing
window, pull down locks back into place securing the
panels.
3. Close the window on top of the fan with the bottom
edge of the window behind the lip of fan housing.
FOR DOUBLE-HUNG TYPE WINDOWS (Fig.3)
FEET INSTALLATION INSTRUCTIONS
FOR VERTICAL SLIDER-TYPE WINDOWS (Fig.4)
a) Grasp plug and remove from the receptacle or other
outlet device. Do not unplug by pulling on cord.
b) Open fuse cover. Slide open fuse access cover on
top of attachment plug towards blades.
c) Remove fuse carefully by pushing the fuse from the other
side or turn fuseholder over to remove fuse.
d) Risk of fire. Replace fuse only with 2.5 Amp, 125 Volt fuse.
e) Close fuse cover. Slide closed the fuse access cover on top of attachment plug.
f) Risk of fire. Do not replace attachment plug. Contains a safety device (fuse) that
should not be removed. Discard product if the attachment plug is damaged.
Notice:
If fuse is difficult to install, please make sure you are installing properly.
If help is still needed, contact a qualified electrician.
USER SERVICING INSTRUCTIONS
The fan requires little maintenance. If a part were to break, do not try to fix it by
yourself.
1. Before cleaning and assembling, unplug the fan.
2. To ensure adequate air circulation to the motor, keep vents at the rear of the
motor housing free of dust, debris, etc. Unplug fan before using a vacuum
cleaner to clean these vents. Do not disassemble the fan motor to clean.
3. Plastic parts should be cleaned with mild soap and damp cloth or sponge.
Thoroughly remove soap film with clean water. Do not use any abrasive
detergent or solvents to avoid scratching the surface.
MAINTENANCE INSTRUCTIONS
1. Be sure to unplug the power cord from the outlet before cleaning.
2. Plastic parts should be cleaned with mild soap and damp cloth or sponge.
Thoroughly remove soap film with clean water.
3. Be sure not to get water or other liquid inside of the motor.
4. Dry all parts completely before reassembling and reconnecting to power
source.
CLEANING
5
©Copyright 2018 Genesis and Distributed by BHRS Group LLC
TM
If you encounter any issues or have any concerns,
please email us at [email protected]
or call 1800-256-0695.
Please see our website to learn more about our products www.genesisco.com
  • Page 1 1
  • Page 2 2
  • Page 3 3
  • Page 4 4

Genesis A1WINDOWFAN User manual

Category
Household fans
Type
User manual

Genesis A1WINDOWFAN is a high-velocity 9-inch window fan with a thermostat and Max Cool technology, designed to provide efficient ventilation and cooling in various window types. It features three-speed settings (low, medium, and high) for customized airflow, and a temperature control function that automatically adjusts the fan speed based on the desired temperature. The fan can be set to intake or exhaust air, making it suitable for both bringing in fresh air or removing stale air from a room.

Ask a question and I''ll find the answer in the document

Finding information in a document is now easier with AI