Page is loading ...

QFT/QVT/QET
QFT/QVT/QET
Installation instructions for
Thermo-Lite series skylights
NOTICE
All GLASS MAY BE SUBJECT TO UNEXPECTED AND SPONTANEOUS BREAKAGE in rare circumstances due to imperfections in the glass that are
undetectable during the manufacturing and inspection process by the manufacturer of the glass and VELUX.
VELUX oers the choice of laminated or tempered glass skylights. Laminated glass is a combination of two or more glass sheets with one or more
interlayers of plastic (PVB) or resin. In case of breakage, the interlayer is designed to hold the fragments together. Tempered glass does not contain an
interlayer to hold the fragments together. Instead, tempered glass is designed to break into small, pebble-like pieces. When tempered glass breaks, pieces
of glass come loose and may strike an individual.
CONSULT LOCAL REGULATIONS AND/OR BUILDING MATERIAL CONSULTANTS TO DETERMINE WHICH TYPE OF GLASS IS RIGHT FOR YOU OR IF
LAMINATED GLASS IS REQUIRED IN YOUR APPLICATION.
Thermo-Lite series skylight
Model Frame Size Rough Opening
QFT QVT 1430 14½” x 30½”
QFT QVT 1445 14½” x 45½”
QFT QVT 1460 14½” x 60½”
QFT QVT QET 2222 22½” x 22½”
QFT QVT QET 2230 22½” x 30½”
QFT QVT QET 2245 22½” x 45½”
QFT QVT QET 2260 22½” x 60½”
QFT QVT QET 3030 30½” x 30½”
QFT QVT QET 3045 30½” x 45½”
QFT QVT QET 3060 30½” x 60½”
QFT QVT QET 4522 45½” x 22½”
QFT QVT QET 4530 45½” x 30½”
QFT QVT QET 4545 45½” x 45½”
Installation instructions
Please read these instructions carefully. They will assure you an
easy and trouble-free installation.
Important notes
These instructions only apply to Thermo-Lite series skylights
installed on roofs with pitches of no less than 3:12, using roofing
materials no more than 1” thick.
Standard information
The Thermo-Lite series comes standard with continuous perimeter
copper flashing. The standard Thermo-Lite series unit is an
integrally mounted skylight. The curb drops into the rough opening
and is secured to the truss or rafter by nailing or screwing through
the curb, perpendicular to the framing member.
If you require a deck mounted (flush cut) unit in this series that
does not drop into the opening, you must request it as it is not the
standard model of manufacture. However, it is available as a special
order. Flush cut units are secured to roof decking with pre-attached
mounting brackets and screws. If you have any questions regarding
the above, please call our customer service department for
additional information and assistance.

VELUX America Inc.
450 Old Brickyard Road • PO Box 5001 • Greenwood, SC 29648-5001
Tel 1-800-878-3589 • Fax 1-864-943-2631 • www.veluxusa.com
V-USA 2781-0109
©2008 VELUX Group
®VELUX and VELUX logo are registered trademarks of VELUX Group
445152-0209
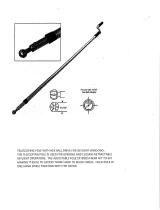
Please note
It is not necessary to remove the hatch in order to install the
skylight. However, if removal is desirable in order to reduce
weight during transport to the roof, the hatch can easily be
removed as follows:
Venting: Open the roof window with the operator. Remove
egress pin which secures the operator chain to the sash bracket.
Replace pin in bracket for storage. Raise front of hatch cover to
beyond a 60° angle and disengage hatch from the rain diverter
hinge bar.
Fixed: Carefully remove screws at bottom of hatch that
secure it to the wood curb. Lift hatch and disengage as
described above.
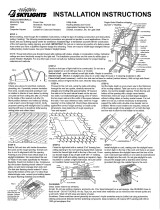
Thermo-Lite installation
1
6
2
7
3
8
4
5
9
10
Determine the desired location within the room. Mark the ceiling
using a carpenter’s square. Positioning the opening between
joists will keep your work to a minimum.
Carefully cut out the interior ceiling. Be sure not to cut electrical
wires, plumbing, etc. You are now ready to open the roof.
Frame the opening with the same size dimensional lumber as
the roof rafters. Check local building code for header size. Then,
carefully remove the roofing shingles 12 inches around the
opening on top and sides only. Save these shingles for use when
flashing skylight.
Examples of framing details
Prior to placing the skylight into the rough opening, you must
weather proof the perimeter sheathing around the opening. You
can apply a generous coat of roofing cement or silicone around
the opening.
Place the skylight squarely over the opening and carefully lower
into place. The unit will not fall through the opening because
the perimeter flashing is attached to the curb of the unit. Do not
push the unit down into opening. Make sure flashing lays flat on
roof deck.
Square and plumb the unit into the opening and shim where
necessary. Nail or screw through curb into rafter or truss to
secure the skylight.
Re-shingle around the unit by running a finish course under
the front apron and succeeding courses on top of the side
rakes and head flashing. Do not nail through the flashing
under any circumstances.
Check that all shingles are in place. Be careful that no nails in
shingles pierce any part of the flashing.
If you remove the hatch from a vented skylight, replace hatch
by holding hatch at a 60° angle and attaching at rear to hinge
assembly on curb. Lower front of hatch and reconnect operator
chain to bracket with pin removed earlier. For a fixed skylight
replace hatch as above and secure with screws at bottom
of hatch.
Finish interior by using sheetrock or other finishing materials
compatible with interior of room. A finishing return is provided
at the bottom of the curb for transition with interior
finish material.
Take precautions on roofs where sliding snow and extreme water run
o is likely to occur by installing a snow deflector or rain diverter
(supplied by others) above any Thermo-Lite skylight with a frame width
greater than 45”. Thermo-Lite skylights with frame widths less than
45” may also require the installation of snow deflectors or rain diverters
on roofs where there are hazards of sliding snow or heavy run o of
water above the skylights.
/