Superscan 19TVD4S Owner's manual
- Category
- CRT TVs
- Type
- Owner's manual
This manual is also suitable for

TOOOBUF(_ 04.4.7 1:44 PM Page 1
9
I_ T/ /T
[ {NSTRUCC_ONES EN ESPANOL {NCLU{DAS. 1
_ AsaoENERGYSTAR_
L_Y_ Partner, our company has
determined that this product meets
the ENERGY STAR ® guidelines for
energy efficiency. ENERGY STAR ®
is a U.S registered mark
% ,.":<</i' " <
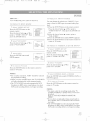
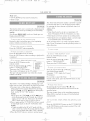
A(CESSORIFS 1 PART N().
Remote Control Unit /NE22_
Batteries _2 AA Batteries
Owner's Manual [ 1EMN20025

T0005UF(pl-3B).QX3 04.4.7 1:44 PM Page 2
WARNING: TO REDUCE THE RISK OF FIRE OR ELE( TRI( SHO(K, DO NOT EXPOSE THIS APPLIAN( E
TO RAIN OR MOISTURE.
CAUTION
CAUTION: TO REDU( E THE RISK OF ELECTRI(
SHO(K, DO NOT REMOVE (OVER (OR BACK).
NO LSER SERVICEABLE PARTS INSIDE REFER
SERVI(ING TO QL ALIFIED SERVICE PERSON-
NEL
The caution marking is located on the rear of the cabinet.
THIS SYMBOL INDICATES THAT DAN-
GEROUS VOLTAGE ( ONSTITL TING A
RISK OF ELECTRI( SHOCK IS PRESENT
WITHIN THIS UNIT
THIS SYMBOL INDICATES THAT THERE
ARE IMPORTANT OPERATING AND
MAINTENANCE INSTRUCTIONS IN THE
LITERATURE AC( OMPANYING THE
APPLIAN( E.
IMPORTANT SAFEGUARDS
1oRead instructions-All the sal'cty and operating instructions
should be read before the appliance is operated.
2oRetain Instructions-The safety and operating instructions
should be retained for tmure reference
3°Heed WarningsoAll warnings on the appliance and in the
operating insm+ctions should be adhered to
4.Folbw Instructions-All operating and use instructions
should be tbllowed.
5°Cleaning-Unplug TV VCRiDVD £'om the wall outlet before
cleaning. Do not use liquid charters or aerosol cleaners. Use
a damp cloth for cleaning.
EXCEPTION: A product that is meant for uninterrupted
service and, that for some specific reason, such as the possio
bility of the loss of an amhorization code tbr a CAT\: con-
verter, is not intended to be m_ptugged by the user t:or clean=
ing or any other propose, may exclude the reference to
unplugging the appliance in the cleaning description other-
wise required in item 5.
6oAttaehments-Do not use attachments not recommended by
the TViV(RiDVD umautitcturer as they may cause hazards
7oV_ater and Moisture-Do not use this TViV(RiDVD near
water4br example, near a bath tub, wash bowl, kitchen sink,
or laun&y rob, in a wet basemem, or near a swimming pool,
and the like.
&Accessories-Do not place this TViV(_DVD on an unstable
cart, stand, tripod, bracket, or table The ]A.7 VCR DVD may
fall, causing serious injury to someone, and serious damage
to the appliance. Use only with a cart, stand, tripod, bracket,
or table recommended by the manutitcturer, or sold with the
]_7 VCRiDVD. Any mourning of
the appliance should *:ollow the PORTABLE_CARTWARNING
manuiitcmrer's instructions and _'_IL
should use a mounting accessory
recommended by the manuthcturer.
An appliance and cart combination
should be moxed _ith care.Quick
stops, excessive three, and unex en
su@aces may cause the appliance
and cart combination to overturn.
AMEUBLES- Cot appareil ne dolt
SYMBOLE D'AVERTISSEMENT POUR
_tre placd que sur un meuble (axec LESCOMPOSANTES
APPARE]L ET MEUBE A ROULETTES
ou sansroulettes) recommand_ par
le titbricant. Si xous l'installez sur
un meuble 5_roulettes, d@lacez les
deax ensembles avec precautiom
Un arr_t brusque, Putilisation
d'une k)rce excessixe et des sur-
faces irrdgulbres risquem do ddsta=
biliser I ensemble et de b rem_erser
9. Ventilation-Slots and openings in the cabinet and the back
or bottom are provided for ventilation and to ensure reliable
operation of the TV VCR DVD and to protect it from over°
heating, and these openings mast not be blocked or cow
ered. The openings should never be blocked by placing the
TV VCRDVD on a bed, solit, rug, or other similar surtitce.
This TV VCRDVD should hexer be placed near or over a
radiator or heat register. This TV VCR DVD shonkt not be
placed in a built-in installation such as a bookcase or rack
unless proper ventilation is prox ided or the manutitcmrer's
instructions have been adhered to.
• 7
10.Power Sources-This T\ CRDVD should be operated
only from the type of power source indicated on the mark=
ing label. If you are not sure of the type of power suppl 3 to
?,our home, consult your appliance dealer or loca! po_er
company. For TV VCR DVDs intended to operate trom
battery power, or other sources, refer to the operating
Instructions.
11oGrounding or Polarization-This TV V(R DVD is
equipped _;ith a polarized alternating-current line plug(a
plug having one blade wider than the other). This plug will
fit into the power outlet only one way. This is a safety fen-
tare If yon are ramble to insert the plug tglly into the out-
let try reversing the plug. Itthe plug should still fail to fit,
contact >'our electrician to replace your obsolete outlet Do
not detent the satcty purpose ot the polarized plug.
12.Power-Cord Protection-Power-supply cords should be
routed so that they are not likely to be x_alked on or
pinched by items placed upon or against them, paying par°
ticular attention to cords at plugs, convenience receptacles,
and the point _here they exit t}om the appliance.
-2- EN
IB15
4>

T0005UF(pl-35).QX3 04.4.7 1:44 PM Page 3
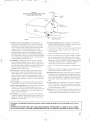
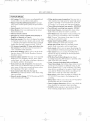
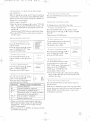
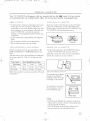
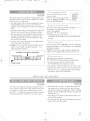
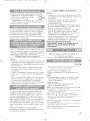
FIGURE A
EXAMPLE OF ANTENNA GROUNDING AS PER
NATIONAL ELECTRICAL CODE
LEAD IN
WIRE
ELECTRIC
SERVICE
NEC NATIONALELECTRICALCODE
S2898A
13.Outdoor Antenna grounding-If an outside antenna or
cable system is com_ected to the ]_J VCR DVD, be sure
the antenna or cable system is grounded so as to provide
some protection against voltage surges and built=up static
charges. Article 810 of the National Electrical (?ode,
AN SI NFPA No. 70, provides ini)rmation with respect to
proper grounding of the mast and supporting structure,
grounding of the lead=in wire to an antepam discharge unit,
size of grounding conductors, location ot antemm=discharge
m_it, connection to grounding electrode,s, and requirements
tbr the grounding electrode (Fig A)
14.Lightning-For added protection for this TV V( RiDVD
recei_ er during a lighming stom_, or when it is leti unat=
tended and unused ibr long periods of time, unplug it from
the wall outlet and disco_mect the antenna or cable system.
This will prevent damage to the TV VCR DVD due to
lightning and powerqine surges.
IS.Power Lines-An omside antenna system should not be
located in the vicinity of overhead power lines or other
electric light or powcr circuits, or where it can P,dl into
such power lines or circuits. When installing an outside
antenna system, extreme care should be taken to keep from
touching such power lines or circuits as contact with them
might be i_ta!.
16.Overloading-Do not oxerload wall outlets and extension
cords as this can result in a risk of fire or electric shock
17.Object and Liquid Entry-Never push objects of any kind
into this TViVCRiDVD tl,a'ough openings as they may
touch dangerous voltage points or short out parts that could
result in a fire or electric shock. Never spill liquid of any
kind on the ]_7 VCR DVD
18.Servidng-Do not attempt to service this ]N?VCRiDVD
yourself as opening or removing covers may cxpose you to
dangerous voltage or other hazards Refer all servicing to
qualified se_wice persom_el.
DISCHARGE UNIT
(NEC SECTION 810 20)
CONDUCTORS
{NEC SECTION 8/0 2/}
GROUNDCLAMPS
GROUNDING
ELECTRODE SYSTEM
(NEC ART 250 PART H/
19.Damage Requiring Service-Unplug this TV VCRiDVD
from the wall outlet and refer servicing to qualified service
perso_me! under the tbllowing conditions:
a. When the power-supply cord or plug is damaged or ti'ayed.
b. If liquid has been spilled, or object_ have tallen into the
TV VCR DVD
c If the TViVCRiDVD has been exposed to rain or water.
d. If the TViVC_DVD does not operate nomm!ly by follow°
ing the operating instructions. Adjust only those controls
that are covered by the operating instructions, as improper
acljustment of other controls may resuh in damage and will
o,qen require extensive work by a qualified teclmician to
restore the TV VCR DVD to its normal operation.
e. If the TViVCWDVD has been &opped or damaged in any
way.
f When the TVVCR DVD exhibits a distinct change in per-
formance=this indicates a need for service.
2&Replacement Parts-When replacement parts are required,
be sure the selwice technician has used replacement parts
specified by the manufacturer that have the same character-
istics as the original part. Unauthorized sgbstitutions may
result in fire, electric shock, injmw to persons or other haz=
ards.
21°Safety Check-Upon completion of any service or repairs to
this TVVCR DVD, ask the service tedmician to perthrm
routine satcty checks to determine that the TV VCRiDVD
is in proper operating condition.
22°Heat-This TViV(RiDVD product should be situated away
from heat sources such as radiators, heat registers, stoves,
or other products (including amplificrs) that produce heat.
CAUTION: TO PREVENT ELECTRIC SHOCK, MATCH WIDF BLADE OF PLUG TO WIDF SLOT, FULLY
_NSlaRT.
ATTENTION: POUR EWTER LES CHOCS ELECTRIQUES, INTRODUIRE LA LANE LA PLUS LARGR
DR LA FICH l=DANS LA BORNE CORRESPONDANTE DR LA PRISE laT POUSSER JUSQU'AU FOND.
=3= EN
1BI5
4>

T0005UF(pl-35).QX3 04.4.7 1:44 PM Page 4
IRI.{:¢I I
IMPORTANT ( OPYRIGHT INFORMATION
Urmnthorized copying, broadcasting, public per%r-
nmnce and lending of discs are prohibited.
This product incorporates copyright protection tech-
nolog_ that is protected by method claims of certain
T_LS.patents and other intellectual property rights
owned by Macrovision Corporation and other rights
owners. Use of this copyright protection technolog3_
must be authorized by Macrovision Corporation,
and is intended for home and other limited viewing
uses only unless otherwise amhorized by
Macrovision Corporation. Reverse engineering or
disassembly is prohibited.
F(( WARNING- This equipment may gener-
ate or use radio fl'equency energ3; ( hanges or
modifications to this equipment may cause
harmful interDrence unless the modifications
are expressly approved in the instruction man-
ual The user could lose the authority to oper-
ate this equipment if an unauthorized change
or modification is made.
LASER SAFETY
This unit employs a laser. Only a qualified service
person should remove the cover or attempt to se>
vice this device, due to possible eye injury.
( AUTION: USE OF CONTROLS OR AD,RIST-
MENTS OR PERFORMANCE OF PROCE-
DURES OTHER THAN THOSE SPECIFIED
HEREIN MAY RESULT IN HAZARDOUS
RADIATION EXPOSURE.
( AUTION: VISIBLE AND INVISIBLE LASER
RADIATION VV%IEN()PEN AND INTERLOCK
DEFEATED DO NOT STARE INTO BEAM.
LO( ATION: INSIDE, NEAR THE DECK
MECHANISM
This (lass B digital apparatus coraplies with
( anadian ICES-003.
(let appareil num@ique de la classe B est con-
ihrn-te 'a la norme NMB-003 du ( anada.
(AUTION: TO PREVENT ELECTRIC SHOCK,
MATCH WIDE BLADE OF PLUG TO Vv]DE
SLOT. FULLY INSERT.
ATTENTION: POUR }_VITER LES CHOCS
_iLECTRIQUES, INTRODUIRE LA LAME LA
PLUS LARGE DE LA FICHE DANS LA
BORNE CORRESPONDANTE DE LA PRISE
ET POUSSER .R;SQU'AU FOND.
RADIO-TV INTERFERENCE
This equipment has been tested and %und to com-
ply with the limits %r a Class B digital device, ptu-
suant to Part i5 olkhe FCC Rules. These limits are
designed to provide reasonable protection against
hannftt interlbrence in a residential insmllation.
This equipment generates, uses, and can radiate
radio fiequency energy and, if not installed and
used in accordance with the insmtctions, may cause
harmfi_dinter*Drence to radio communications.
However, there is no guarantee that interference
will not occur in a particular installation. If this
equipment does cause harmfi_d interference to
radio or television reception, which can be deter-
mined by turning the equipment off and on, the
user is encouraged to try to correct the interl}r-
ence by one or more of the %llowing measures:
1) Reorient or relocate the receiving antenna.
2) Increase the separation between the equipment
and receiver.
3) Connect the equipment into an outlet on a cir-
cuit different fiom that to which the receiver is
connected.
4) Consult the dealer or an experienced radio/TV
technician tDr help.
-4- EN
IB15
+

T0005UF(pl-35).QX3 04.4.7 1:44 PM Page 5
For sa[} operation and safis_itctoU per%rmance of
yottr TV/VCR/DVD, keep the following in mind
when selecting a place for its installation:
* Shield it from direct sunlight and keep it away from
sources of intense heat.
* Avoid dusty or humid places.
* Avoid places with insufficient ventilation thr proper
heat dissipation. Do not block the ventilation holes at
the top or bottom of the unit. Do not place the unit
on a ca<oct because this will block the ventilation
holes.
® Install 1.u!it in a horizontal position.
* Avoid locations subject to strong vibration.
* Do not place tileTV/VCPJDVD nea' strong magnetic
fields.
* Avoid moving TV/VCR/DVD to locations where
temperature differences are extreme.
* Do not handle the power cord with wet hands.
* Do not pull on the power cord when disconnecting
it from an AC wall outlet. (}rasp it by the plug.
* If by accident, water is spilled on yot_r unit, unplug
the power cord immediately and rake the unit to an
Attthorized Sel_ice Center l\_rservicing.
® Do not put yottr fingers or objects into the
TV/VCR/DVD disc loading tray.
* Do not place anything directly on top of the unit.
Moisture condensation nmy occur inside the unit
when it is moved fiom a cold place m a wanr_ place
or after heating a cold room or under conditions of
high lmmidity, ff a DVD is played in a TV!VCPJ
DVD which has moisture, it may danmge the DVD
and TV/VCR/DVD Therefore when the condensation
occurs inside the unih tlal-nthe POWER on and allow
at least 2 hours for the unit to dW out.
The tbllowing symbols below appear in some head-
ings and notes in this manual, with the following
meanings
ITv/vcRI
: Description re_rs to TV!VCR operation (m the
TV!VCR mode).
: Description refers to playback of DVD video discs
(in the DVD mode).
: Description refers to playback of audio CDs
(in the DVD mode).
: Description refers to the items to be set by the
QUICK mode (in the DVD mode).
A NOTE ABOUT RE( Y( LING
This product's packaging materials are recyclable and can be reuse& Please dispose of aw materials in
accordance with your local recycling regldations.
Batteries should never be thrown away or incinerated but disposed of in accordance with your local regula=
tions concerning chemical wastes.
The serial number of this product may be found on the back of the unit. No other TV!VCPJDVD has the same
serial number as yours. You should record the number and other vital in%rmation here and retain this book as
a pemmnent record of your purchase to aid identification in case of their Serial nurnbers are not kept on file.
Date of Purchase
Dealer Purchase fiom
Dealer Address
Dealer Phone No.
Model No.
Serial No.
o 5 o EN
1(29

T0005UF(pI-35).QX3 04.4.7 1:44 PM Page 6
m I]IPORTAAT SAFEGUARDS _' VERTICAL HOLD ( ONTROL . . .26 MARKER SETUP S< REEN ...... 39
m PRECt UIZO:VS . ............... 4
LO( ATION ................... 5
AVOID THE HAZARDS OF
ELE( TRI< AL SHO(K AND FIRE .5
WARNING .................... 5
SYMBOLS USED IN THIS
MANUAL ..................... 5
m _BLE OF COATE:YIS . ......... 6
m EL4TURES. ................... 7
m OPEtL4TI:VG CONTROLS A:'_
F{ "IV('TIOA_S. .................. 9
m PRE_41t4TIOA" F()R {%'E ....... 11
ANTE NNAi( ABLE
< ONNE( TION ................ 11
< ONNE< TFNG TO FRONT AiV
INPUT ]A<KS ................ 12
INSTALLING THE BATTERIES .. 12
< ONNE< TFKG TO A STEREO
AMPLIFIER EQUIPPED WITH DIGI-
TAL INPUT .[A< KS RE< EIVER . .13
( ONNE( TI_G TO AN AMPLIFI-
ER/RE( EIVER \VITH A DOLBY
DIGITAL DE( ODER (ibr DVD) . .14
TV/VCR SECTION
m SET UPFOR USE ............. 15
SELECTING THE LANG UAGE . .15
(LO<K SET UP
(AUTO MANUAL) ............ 15
DAYLIGHT- SA\'fNG TIME ...... 17
<HAZEL SET UP ............ 18
DELETING (OR ADDING)
<HAZEL(S) ................. 18
m SPE(Z4L PLAYBA(X .......... 27
RENTAL PLAYBA< K .......... 27
AUTO REPEAT PLAYBA( K ..... 27
m SEARCH ..................... 28
ZERO RETURN ............... 28
PI( TURE SEAR< H ............ 28
TIME SEAR< H ............... 28
INDEX SEAR( H .............. 29
m SPE(ZAL F_ATURES; . ......... 29
REAL TIME TAPE <OUNTER . . .29
AUTO REWIND-E.fE< T ........ 29
m RECORDkYG ................. 30
NORMAL RE< ORDING ........ 30
SKIPPING UNWANTED S<ENES
DURING RECORDfNG ......... 30
OTR (One Touch Recording) ...... 31
<OPYING A VIDEO CASSETTE
(Requires a V<R or camcorder) ...31
m TIMER ...................... 32
AUTOMATI(
TIMER RE< ORDING .......... 32
TIMER PROGRAM EXTENSION .33
HINTS FOR AUTOMATI< TIMER
RE< ORDING ................. 34
AUTO RETURN. .............. 34
SLEEP TIMER ................ 34
m OA"SCREEA: DISPLAY ......... 35
m ('ABLE CHA:_]VEL
DESIG:_I4TIO]_9 .............. 35
DVD SECTION
m STE(gAL PLAYBA(_ FIiYCIION . . .40
REPEAT ..................... 4(I
PR(3GRAM ................... 40
RANDOM PLAYBACK ......... 40
m (_4NGLYG THESETTINGS ....41
SUBTITLE LANGUAGE ........ 41
AUDIO LANGUAGE ........... 4 l
STEREO SOEIND MODE ........ 4 l
< AMERA ANGLE ............. 41
BLA<K LEVEL SETTING ....... 41
VIRTUAL SURROUND ......... 41
m THE ON-S(_EF3" L\TOR]L4ITOA'...42
m (_4:VGLYG THE D_D SETUP
FEEMS ................. 43
LANGUAGE SETTING ......... 43
DISPLAY SETTING ............ 44
AUDIO SETTINGS ............ 44
PARENTAL ( ONTROL ......... 45
INITIALIZE .................. 45
m TROUBLESHOOTL\:G G{JDE ...46
m 3L4LYTEA_4N(_ ............... 49
DIS( HANDLING ............. 49
m SPE(ZFI(IIHONS ............. 50
m ESPAf/OL .................... 5**
m 1_{4RIt4NTY ........... Back Cover
m T_ OPERATIO:Y . .............. 19
\\½T< HING A TV PROGRAM ...19
DEGAUS SING ................ 19
PI( TURE CONTROL ........... 19
<LOSED < APTION SYSTEM .... 20
X-(HIP SET UP ............... 21
m MTS(3fldti-(7*annel Television
sound)S]STE3I ............ 23
CHECKING THE SELE( TED
MTS MODE .................. 23
MTS RECORDING MONITOR
MODE ...................... 23
SELE<TING THE MTS SYSTEM .24
m _TDEO 0tSSETTE ............. 25
mPLAYBA(;¥ ................... 26
NORMAL PLAYBA< K ......... 26
TRA< KFNG AD/USTMENT ..... 26
SLOW MOTION .............. 26
STILL PICTURE .............. 26
m ABOUT THE DISCS'. ........... 36
PLAYABLE DIS(S ............ 36
DIS( TYPES ................. 36
m PLA]gA_A DISC .............. 37
BASIC PLAYBACK ............ 37
GENERAL FEATURES ......... 37
DIS( MENU ................. 37
TITLE MENU ................. 37
RESUME .................... 38
PAUSE ...................... 38
STEP BY STEP PLAYBACK ..... 38
FAST FOR\\ L%RDiREVERSE
SEAR( H .................... 38
SLOW FOR\_ARD / SLOW
REVERSE .................... 38
SE54RCH F{_VCTIOA'. .......... 39
TRACK SEAR( H ............. 39
TITLE / CHAPTER SEARCH .... 39
TIME SEARCH ............... 39
-6- EN
IC29
+

T0005UF(pl-35).QX3 04.4.7 1:44 PM Page 7
I TV/VCR Mode I
* HbFisystem-The Hi-Fi stereo recoMing/playback
system offers you excellent sound quality.
* Rotary&head Record/PlaybackSystem-Fourheads
video ensureexcellentpicrare quality aad specialeffects
playback
* hdex Search-Fastoforwards to start of next recording,
* SmowNotion=View recorded material at slower
titan nomml speed.
* infrared remote controm
®Trilingual on screen TV/VCR setup display in
English or Spanish or French
® Reamtime counter-This shows the elapsed recording
or playback time in hours, minutes and seconds_ The
.... indication will appear when the tape is rewound
fmther titan tl_erope counter position "0:00:00"_
® i8i channel capabiHW TV tuner with direct stao
tion access-(A converter may be necessary to
view scrambled cable channels 0
* Auto Clock Setting=Allows you to set the clock
ftmction from a PBS (Public Broadcast Station)
broadcast station.
* Closed caption system-You nmy view specially
labeled (co) TV programs, movies, news, prere-
corded ropes, etc. with either a dialogue caption or
text display added to the program.
* Auto power on and off system-Automatically
rams on the TV/VCPJDVD when you insert a cas-
sette, turns off after auto-rewind and ejects when
tl_ebeginning of the rope is reached.
® Auto rewind when the end of a tape is
reached=This Amction doesn't occur when using
timer recording.
* Smooth mode change-TV/VCR mode and DVD
mode automatically changes.
®2 Step picture search operation=You can view a
video material at a high speed or super high speed
in either a forward or reverse direction in LP and
SLP mode. For SP mode only high speed applies.
®Three different playback tape speeds : SP/LP/SLP
®Two different recording tape speeds :SP/SLP
* Auto Head Cleaner=Automatically cleans video
heads when you insert or remove a cassette.
* Zero Return=The tape returns to the counter posi-
tion of 0:00:00 by rewinding or *hst forwarding.
* StiH-"Freezes" the picml-e at aW time, %r close
viewing of a particular scene.
* Digital Auto Tracking (DTR}=Automafically
adjusts tracking t\_reach rope you play.
* Rental Nay mode-Improves playback picture
quality from worn ropes, such as rcntal tapes.
* Auto repeat-Allows you to repeat the playing of a
rope indefinitely without pressing tl_e PLAY button.
* Time search-Lets you set the TV/VCR/DVD to
advance tl_erope by entering the desired playback
tirne you v_-a1111oskip.
* OTR (One Touch Recording)-Instant tirned
recording flora 30 to 480 minutes is possible at the
push of the REC/OTR button_
® i Year, 8 events (including Dally and Weekly
Timer Recording}=The built-in timer allows you to
record up to 8 programs at different times on dif
fcrcnt channels up to i year in advance. The Daily
timer allows recordings 1obe made of daily broad-
casts and the Weekly timer allows recording to be
made once a week up m the end of the rope.
* Auto return-After timer recording is finished, the
TViVCRiDVD can return to the begirming of the
recording.
®Smeep timer=Allows you m have the TV VCRiDVD
automatically turn off at a desired time.
* Timer Program Extension=A!lows you to shit_ the
time schedule %r automatic timer recording.
* VoCHP=Enables parents to prevent their children
from watching inappropriate nmterial on TV
-7- EN
1(29
4>

T0005UF(pl-35).QX3 04.4.7 1:44 PM Page 8
[ DVD Node ]
® Dolby Digital sound
This TV/VCWDVD can output an audio signal from
the digital audio output jack Dolby Digital.
®Still/fast/Mow/step playback
Various playback modes are available including still
picture, fast %rward/reverse, slow motion and step
flames.
®Random playback for audio CD
This TV!VCP,!DVD can shu[_le the order of tracks
to play them in random order.
® Program playback for audio CD
Yuu can prugram the order of tracks to play in any
desired order.
®DVD menus in a desired language
Yuu can display DVD menus in a desired langaage,
if available on a DVD.
®Screen saver/Auto power-off functions
The screen saver pru_am starts when there is no
input from the TV/VCR/DVD fur five minutes in the
stop mode_ When the screen has been in opperation
_br 15 mim_tes, the power will automatically turn off
®Subtitles in a desired language
Yuu can select a desired Iangmage _hr the display
s:ubtitles if that language is available on a DVD disc.
® Selecting a camera angle
Yuu cap. select the desired camera angle, if a DVD
disc contains sequences recorded from different
angles.
®Choices for audio language and sound mode
You can select the desired audio langlmge and sound
mode, if different languages and modes are available
on a DVD disc.
o Parental Bock
You can set the control level to limit playback of
DVD discs which may not be suitable for childrem
o Automatic detection of discs
This TV!VCR/DVD automatically detects if the
loaded disc is a DVD or audio CD.
®On-screen display
In%nnation about the CUlTentoperation can be dis=
played on a TV screen, allowing you to confirm the
CUlTendy active functions (such as program play-
back), on the TV screen using the remote control.
®Search
Chapter search / Title search / Track search / Time
search
o Repeat
Chapter / Title / Track / All / A=B
o Marker
The location on a specific DVD disc designated by
the user to be accessed later.
®Resume Play
User can return to the location at which play was
stoppe&
®VirtuaJ Surround
® 8it rate indication
o DRC {Dynamic range control)
Yuu can control the range of the diffcmce between
the loudest and so*iest sounds.
NOTE:
* Wc do not recommend the use of universal remote controls. Not all of the ffmctions of this unit will be con=
trolled with the universal remote control
It"you decide to use a universal remote control with this TV/VCWDVD, please be aware that the code nun1=
bet given may not operate this TV!VCR/DVD. In this case, please call the nmnufacmrer of the universal
remote control
- 8 - EN
1(29
4>

T0005UF(pl-35).QX3 04.4.7 1:44 PM Page 9
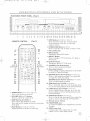
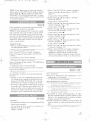
-TVfVCRIDVD FRONT PANEL - [Fig.l]
435 6789
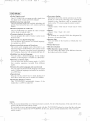
- REMOTE CONTROL - [Fig. 2]
1
22
23
24
25
26
(DVD)3
(TV/VCR) '
13
27
28
29
3O
31
32
33
PICTURE SLEEP
SPEED CRESET VSURR MUTE
<:b cO
DISpLAy ....... _//
45
44
11
43
42
3 (DVD)
5
41
4O
39
38
37
36
35
34
1. POWER Button [TV \'CR El5 / DVD 237]
Press to turn the power on and off.
2.VOLUNE (VOL) ZI..gVButtons
Press to control the volume level.
3.SKIP Buttons (for BVD)[R38]
Press once to skip chapters or tracks_
Press and hold to change tbrward or reverse play-
back speed.
4. PLAY Button [TV I'(R E26 / DVD P37]
Begins playback of the disc or video tape.
1011 12 13144 15 16 17 1819 20 21
5. STOP Button [TV \'CR R26 / DVD R37]
Stops operation of the disc, (or fiont panel)
Stops operation of the disc or video tape_
(remote control)
6.OPEN/CLOSE Button [DVD P37]
Press to open disc tray to insert or remove a disc.
7. Disc loading tray
8. DVD mndicator
Illumilmtes during DVD mode,
9°SELECT Button
Press to change to TV!VCR mode, A/V input or
DVD mode.
10.TV/VCR hdicator
Illuminates during TV/VCR mode_
11.CHANNEL (CH.)_,/V Buttons
Press to select memorized chalmeh
12. Recording hdicator
Flashes during recording Illuminates in the Stand=
by mode fur F'imer Recording
13. REC/OTR Button {Front Pane[) [TVV(R P30, 31]
Press to start malmal recording Press repeatedly
to begin One Tuuch Recording.
RECORD Button {Remote Contro{) [TV V(R P30]
Press to begin manual recording
14. REW Button (for TV/VCR) [TVVCRP26]
Press to rewind the tape, or to view the picture rapid-
ly in reverse during playback mode. (Rewind Search)
18. F.FWD Button (for TV/VCR} [TV \'CR R2(J
Press to rapidly advance the rope, or tO VieW the
picture rapidly in tbrward during playback mode.
(Forward Search)
16. STOP/EJECT Button [TV VCRR28]
Press to stop the tape movement. Press in the Stop
mode toremove tape _}om the TV/VCR/DVD.
17. Remote sensor window
18. HEADPHONE Jack
Tu connect headphone (not supplied) fur personal
listening
19. VmDEO input Jack
Connect tu the video output jack of a video
camera, VCR or video game system.
- 9 - EN
1(:29
4>

T0005UF(pl-35).QX3 04.4.7 1:44 PM Page 10 (_
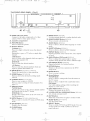
-TVlVCRtDVD REAR PANEL - [Fig.3]
48
20. AUDIO L/R input Jacks
Connect to the audio output jacks ufa video
camera, VCR or video game system.
21. Cassette compartment
22. PICTURE Button
Press to adjust the picture.
23. Number Buttons
TV Mode:[P lS]
Press two digits to directly access the desired
channel.
Remember to press a "0" before a single digit
channel.
+100 Button-
Press to select cable channels which are equal or
greater than manber 100.
DVD Mode:
Press to enter the desired nmnber.
+10 Button-
Press to enter the desired nmnbers which are
equal or greater than number 10.
24. PAUSE Button [TVVCR R26 DVD R38]
Pauses the current disc or tape operation.
28. SPEED Button [TVVCR R30]
Press to choose the desired recording speed:
SP/SLR
26. C.RESET Button [FVVC;RP28]
Press to reset counter to 0:00:00.
Press to cancel a setting of timer progqam. (See
page 33.)
27. DISPLAY Button
TV/VCR Mode:
Display the counter or the CU1Tentchalmel nm'nber
and current time on the TV screen.
DVD Mode:lEd2]
Displays the current slams on the TV screen fur
checking proposes.
28. SETUP Button [TVVCR R15] [DVD R43-45]
Press to enter or exit the TV mem_ or DVD setup
mode.
29. TITLE Button [DVD P37]
Displays the title menu.
30. CLEAR Button
Resets a setting
31. MODE Button [DVD Rd0]
Activates program playback or random playback mode
32.SEARCH MODE Button[DVDR391
Press to locate a desired point.
33. AUDIO Button [DVD Rdl]
Press to select a desired audio language or sound
mode.
34. SUBTITLE Button [DVD Rdl]
Press m select a desired subtitle langstage.
35° REPEAT Button [DVD Rdl]
Repeats playback of the current disc, title, chapter
or track.
36.ANGLE Button(DVD mode) [DVDPdl]
Press to change the camera angle to see the
sequence being played back from a different angle.
37. AoB REPEAT Button[DVD Ed0]
Repeats playback of a selected section.
38. RETURN Button
Retmns to the previous operation in the DVD
setup mode.
39. ENTER Button
Press to accept a setting.
40.Arrow Buttons
TV/VCR Mode:
Press to select a setting mode fi'om the menu on
the TV screen.
P,vss to select or adjust from a particular menu.
DVDMode:
Use when making settings while watching the
display on a TV screen.
41. DiSC MENU Button [DVD R37]
Displays the menus in the DVD.
42. M SURR {VIRTUALSURROUND) Button [DVD Rdl]
Sets virtual surround on/off
43. MUTE Button
Mutes the sotmd. Press it again to resmue sound.
44. SLEEP Button[TVVCRP34]
Sets the Sleep Timer.
45. SELECT Button
Press to switch TV/VCR and DVD mode. You can
see the mode (TV/VCR or DVD) on the fiont
panel indicator.
-10- EN
1(29
4>

T0005UF(pl-35).QX3 04.4.7 1:44 PM Page 11 (_
46.ANT. in Jack
Connect to an antenna, cable system, or satellite
system.
47. Power cord
Connect to a standard AC outlet (120V/60Hz).
NOTE: Remove the power cord from the hook to
avoid breaking a wire beibre you connect
to a standard AC outlet.
48. COAXIAL digRal audio out Jack {OVO, CO, MP3
Audio only)
Connect to the digital input of an external
amplifier or receiver
g,s
Satellite Box or
Cable Box (Not supplied)
E From Cable System or
Satellite Dish
or
VHF/UHF
__>_-_ VHF/UHF Antenna
<_ (Not supplied)
.Lt VHF Antenna (Not supplied)
UHF Antenna
(Not supplied)
or
J [Fig. 41
Flat twinqead cable
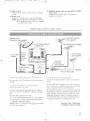
In some areas it will be necessa W to use an outdoor
antenna.
Use this connection if your cable system connects
directly to your TV!VCR/DVD without a converter
box.
By using this connection you can:
1) Use the TV!VCR/DVD rcrnote to select channels.
2) Program one or more unscrambled channels _br
Automatic Timer Recording.
NOTE: This TV/VCR/DVD will ONLY record and
view the same channel.
DL;?<;k",I J?' LLR Ji !z;v)R 7/iL ;/;!L
/f:(,yg
If yore cable set_ice snpplies you with a converter
box or if you use a satellite system, you can use the
basic connection shown in the illustration.
By using this connection you can also record scram=
bled channels. However, channel selection must be
made with the converter box or satellite box. This
means that channels cannot be changed using the
TV/VCPJDVD Remote Control. Unattended timer
recoNing is limited to one channel at a time.
Anten_ta/( able Connections
( ontinued on the Next Page.
-11- EN
1(29
4>

T0005UF(pl-35).QX3 04.4.7 1:44 PM Page 12 (_
TO RECORD A S( RAMBLED/UNSCRAM-
BLED CHANNEL
1. Set the TV!VCWDVD channel selector to the out-
put channel of the Cable Convel_rer Box or Satellite
Box. (Ex. CH3)
2.Select fl_e channel to r_cord with yore Cable
Converter Box or Satellite Box.
Note to CATV system installer:
This reminder is provided to call the CATV sys-
tem insmller's attention to Article 820°40 of flue
NEC that provides guidelines for proper ground-
ing and in particulac specifies that the cable
ground shall be connected to the grounding sys-
tem of the building as close to the point of cable
entry as practical.
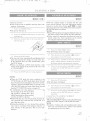
l)Open the battery compartment cover by pressing
the cover on the remote unit in the direction of the
arrow.
2)Insert 2 "AA" penlight batteries into the butte17
compartment in the direction indicated by the
polarib_ (+/-) markings.
3)Replace the cover.
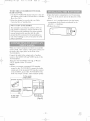
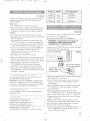
When you watch a program recorded on an anofller
source (VCR, video camera, video game systcm), use
the audio/video input jacks on fl_efiont of the
TV/VCR/DVD.
Connect fl_eaudio/video output jacks of another
source to the AUDIO L/R and VIDE() jacks of this
TV!VCR/DVD.
Then press the CHANNEL button A or T until
"AUX" appears on the TV screen.
NOTE:
* When you connect a monaural VCR (another
somce) to this TV/VCR/DVD, connect the Audio
output jack of the monaural VCR (another source)
to the AUDIO L jack of this TV/VCR/DVD. The
audio will output in bofl_ L and R chalmeI equally.
Tothe audio
............................................................................................................................output jacks
JAnother source] !-_ ::-_-=__
aEAPao_a \lOEO [] aao []
Audio/Video
[ _-_ cables
(not supplied)
etc.
output jack
@@@
TV/VCR/DVD]
[Fig. 51
-12- EN
1(29

T0005UF(pl-35).QX3 04.4.7 1:44 PM Page 13
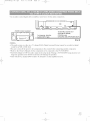
Use an audio coaxial digital cable available at retail stores for the audio connections.
Amplifier receiver equipped
To COAXIAL DIGITAL
AUDIO iNPUT jack
,O
To DIGITAL AUDIO OUT
(PCM/BITSTREAM)
COAXIAL jack
(only DVD, CD, MP3 AUDIO OUT)
[Fig. 6]
NOTES:
* The audio source on a disc in a 5. i channel Dolby Digital surround format cannot be recorded as digital
sound by an MD or DAT deck.
* Be sure to turn off the power to all components in the system be/bre connecting another component.
* Ret_r m the Owner's Manuals _\)rthe components to be connected to the TV!VCWDVD.
* Set Dolby Digital to OFF for audio output in the setup mode. Playing a TV!VCR/DVD using inconect set-
tings may generate noise distortion and may also danmge the speakers.
* This will allow 2 channel DVD sound to be listened to on the amplifier/receiver.
- 13 - EN
1(29

T0005UF(pl-35).QX3 04.4.7 1:44 PN Page 14 (_
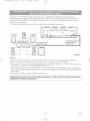
To use this TV/VCWDVD to play a DVD disc in a 5A channel Dolby Digital surround fom3at, the
TV/VCtL/DVD can output a DOLBY DIGITAL Data stream li'om its COAXIAL digital audio out jacL By
hooking the TV/VCtUDVD up to a Dolby Digital decoder, you can enjoy high-qualiv surrom3d sound as
enjoyed in movie theaters.
Use audio coaxial digital cables available at retail stores l\_rthe audio connections.
[Fig. 7]
NOTES:
* Be sure to tLtrn Offthe power to all components in the system before connecting another component.
* Rel_r to tile Owner's Manuals for the components to be connected to the TV/VCR/DVD
* If connected to a receiver with a Dolby Digital decoder, set DOLBY DIGITAL to ON tbr audio output in the
setup mode. (See page 44 to set DOLBY DIGITAL to ON.)
* Unless connected to a Dolby Digital decoder, set DOLBY DIGITAL to OFF for audio output in the setup
mode. Playing a TV!VCR/DVD using inconect settings may generate noise distortion and may also damage
the speakers.
* Only DVD, CD, MP3 sound is available using this jack.
Nanufactured Under license from Oolby Laboratories. "OoJby" and the douNe,O symbol are
trademarks of Dolby Laboratories.
- 14 - EN
1(29

TOOOSUF(pI-3B).QX3 04.4.7 1:44 PM Page 15
_ %" _..... U b _.
x
Plug the TVtVCWDVD po_aer cord into a
standard AC outlet.
NOTE:
* If any digits appear in the corner of the
screen, press the POWER button without unplug=
ging the po'_xer cord.
Make sltre °..
* Press the SELECT button to select TV/VCR mode or
make sure TVtVCR lights on.
* Press tM POD%R btltto11to ttlm on the T_/VCPwCDVD.
NOTE: This ti_mction effects only the language on
the screen menu and not the audio source.
ITV/VCR]
The TV/VCWDVD clock must be set correctly belbre
VCR timer recording is possible. It is suggested that
the clock be set manually when lirst setting up the
TVtVCR/DVD, then set to [ON] the auto clock sere
ring which will periodically coIrect the setting if nec=
essar>
NOTE: If you cannot receive a station with time
siglmlS, auto clock setting cannot be performed. Use
manual setting only.
Make slate ...
* The TV/VCRtDVD is mined on.
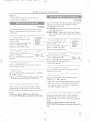
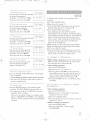
2 See<2 'LANGUAGE"
Press the SETUP button on the
remote control.
Press the Arroyo button .A or V to
point to '%ANGUAGE".
MENU
T_P,_ER pRO6 RA_,4r._INCS
PlOTURE CONTROL
SETT_N6 CLOCk<
CHANNEL SET UP
USERS SET UP
V C;HIP SET U_ _ *
_Ab*6UAOa EN6L_SH
CAPTION IOF"_] [_
ZERO RETURN
T_MESEAROH
, s : /;:;,s_Aba< L < ,. #...
Select ENGLISH , ESPANOL = Spamsh or
FRAN(iAIS French usm_ the ENTER button.
Press the SETUP button on the remote control to
return to TV mode.
NOTE: If"for some reason the menu is in Spanish or
French, press the SETUP button on the remote control,
press the A_Towbumm _ or _ to point to "IDIOMA
[ESPAN-OL]" or "LANGAGE [FRAN(iAIS]", then
press the ENTER button, then press the SET[PP button
on the remote control.
DATE May 6th, 2004
SETTING TIME 5:40PM
MENU
Press the SETUP button on the .......................
p GTURE CONTR©L
remote control. SETTiN¢' CLOCK
CHANNEL "ET UP
USERS SET UP
Press the Arrow button _ or _ to ...........
LAN®//AGE [ENGL Sbl]
CAPTION IOFF]
point to '_SETTING CLOCK"..,M_ .........._o.
Then press the ENTER button.
2 _!:5{!e{7:{_<_ _ < <,</.# ;:_;::'"
x ,J/._,.. ,, _,% ;292
Press the Arro'_ button _ or _ to ..............
point to "MANUAL CLOCK .......... pN_
AUTO CLOCK CH SEARCH
SET . ,oToo_o°,o, [0,
MANUAL CLOCK SET
D S • [OFF]
Then press the ENTER button.
Press the Arrow button _ or _ ....................
until your desired month appears. ,.............
5
(Example: May -> 05)
HOUR MINUTE
Then press the Arrow button _.
(Or press the Arrow button _ to
go back one step.)
_{ Seec{ _he day
Pressthe Arrow button _ or _ ................
until yore' desired day appears. ,,............
(Example:6th-+06)
Then press the Arrowbutton _. ...........
1151 EN
1(29
4>

TOOOBUF(pl-35).QX3 04.4.7 1:44 PM Page 16
qANUAL OLOCK SET
Press the AKow button A or _ ..............
until yotlr desired year appears. 0_,o.......
(Example: 2004) ............
Then press the AKow button _.
8{(C _%e O_/ ,_AnUAkOLOC_SE_
Press the AKo_ button _ or _ ..............
until your desired horn appears. .... ..........
(Example: 5, PM) "_ _."_
Then press the Arrow button _1_
_,:>, e ;q {<!
h4ANUA[ {{ OOK _ET
Press the Arrow button _ or _ ...............
until the desired minute appears, o............
(Example: 40) .... ,_....
O5 40 PM
{:?Start ecock
Press the SETUP button on the
remote control.
Although seconds are not displayed,
they begin counting from 00 when
you press the SETUP button on the
remote control. Use this t_ature to synchronize the
clock with the comect time.
NOTE:
When unplugging the AC cord or if there is a power
£hilure for more than 3 seconds, you nmy have to
reset the clock.
70 l: /Lci '_,,(7/!<7;(?{K VL77/',_(7
If you want to change the clock,
1) Follow steps [1] and [2].
2) Select where you want to change using the Arrow
button _.
3) Enter correct numbers using the Arrow button
or _.
4) Press the SETUP button on the remote control to
start the clock.
PLEASE NOTE:
If there is no local PBS (Public Broadcast station) in
your area or on your cable system, select "AUTO
CLOCK" and press the ENTER bumm to tuln [OFF]
this function. Then you can manually adjust the
clock.
* The TV;VCWDVD is tamed on.
* Confim_ the TV!VCPJDVD is receiving ftRE
(Radio Frequency) signal from either an antenna or
cable system connection using the ANT. terminal
on the rear of the TV!VCR/DVD.
NOTE:
* Ifa cable converter box is being used, nmke sure it
is powered on.
* You must use the TV/VC_/DVD remote control to
perform the clock setting procedure.
* If the TV/VCR/DVD is connected directly m a
cable converter box or satellite box, the local PBS
station must be selected on the cable box itself and
the TV/VCPJDVD must be set to the output chan-
nel of the cable convemer box or satellite box (usu=
ally channel 3 or 4), to be able to set up or correct
the clock automatically.
t ©LOCK'"
MENU
Press the SETUP button on the ....................
p OT[/RE OONTRO[
remote control, sEr,_o_oo_
CHANNEL SET UP
USERS SET UP
Press the Arrow button A or _ to ........_A_O_E_,%_,s_
_ • ,, OAPT ON [OF]
select SETTING CLOCK . •.........
TIME SEARCH
Press the ENTER button to enter
'_SETTING CLOCK" menu.
2 Se ANO ?.OCt:;' s:; ON}
Press the AKow button _ until
'%UTO CLOCK [ON]" appears.
P._.,# >a, _/ % , {<g g s/'v_"{'
Press the Arrow button _ to select
_%UTO CLOCK CH SEARCH". ............
AUTO COOK /ON]
Press the ENTER button. _...............
AUTO COCK CH / 02 ]
MANUAL CLOCK SET
* The TV/VCR]DVD is nov.... _o_
searching for the station which
contain the auto clock set signal.
The search %r a signal may take up to 20
seconds per channel.
* " appears at the lower left of ...................
08 0 _3
the screen _xhen the search has
ended.
* Auto Clock station- write do-vxn
the number(s) that appear on the
screen. These are the auto clock
station(s) in your area. See step [4] on page i7.
* It"no number(s) appear on the TV screem there are
no stations in your area which contain the Auto
Clock signal. Auto Clock Setting is not possible.
Please use Manual Clock Setting on page 15.
Press the SETUP button to exit the screen.
1161 EN
1(29
4>

T000BUF(pl-3B).QX3 04.4.7 1:44 PM Page 17
NOTE: During Auto Clock CH Search, the picture
may be distorted, this is normal.
A t_}<<i_{ <,Oc!,<S{:[ [_$9"_:;_
Press the SETUP button on the remote controh
Press the Arro'_xbutton & or V to
MENU
select "SETTING CLOCK". .......................
p CTURE CONTROL
SETTING CHOCK
Press the ENTER button to enter .............
users SeT UP
"SETTING CLOCK" menu. v..........
LAN®//AGE [ENGE 8H]
CAPTION I©FF]
Press the Arrow button T to select ..........
TIME SEARCH
"AUTO CLOCK CH'.
Press the ENTER button or the .............
Arro-vxbutton _ or I_ until you ......... _o_
AUTO CLOCK CH SEARCH
AUTO CLOCK CH [ 45]
MANUAL COCK SET
locate Auto Clock Set station nmn= o_, _o<
bet. See step [3] on page 16.
Press the SETUP button to exit the
screen.
ITV/VCR]
Select this feature and the TV/VCR/DVD's clock
automatically will advance one hour in April, then
reverse one hour in October.
When Daylight-Saving Time is ON, the clock will
change autonmtically as follows:
* First Sunday of April :At 2 AM the clock irene=
diately changes to 3 AM. Any timer programming
you have set to occur between 2 AM and 3 AM
will not record.
* Last Sunday of October :At 2 AM the clock
immediately changes to i AM.
3/Iake sm_e...
* Press the POWER bl._tlo11to n__l._t_ol!the TV/VCI_CDVD.
J See<; !{;I;::T"!'_,t_,CLOC/<'
mENU
TIMER pRO®RAMMING
PICTURE CONTROL
SaTTIN_ CLOC_
CHANNEL SET UP
USERS SET UP
v Clip SET UP
LANt, UAGE {ENGLISH}
CAF'T ON [OFF]
ZERO RETURN
Tl,_Z SEARCH
9 Set < 7 _ } < ,- _":,,, - ">1
Press the Arrow button & or T to .............. "
point to "D.S.T.'. ........ _o_
AUTO CLOCK CH SEARCH
Then press the ENTER button until ........... ,0_]
,_ANUAL CL©CK SE /
[ON] appears, o_ ,_°'_
Press the SETUP button on the remote control to
return to TV mode.
Repeat steps [1] to [2], select [OFF] using the
ENTER button.
1171 EN
1(29
d>

T0005UF(pl-35).QX3 04.4.7 1:44 PM Page 18
You can program the tuner to memorize all the chan-
nels you receive in your area.
NOTE: Channel memo17 programming is NOT
needed when connected to a cable box or satellite
box. Just select the TV/VCWDVD channel selector
to the output chalmeI of the cable box or satellite box
(Ex CH3), then select the channel to be viewed on
the Cable Box or Satellite Box.
Ma_sure...
* Press thePOW_Rbum)ntommonthe TV/VCR,©VT).
'J Seec ©/4A/_b£i_}£LSKT UP*
Press the SETUP button on the ......
TMER pRO{=RAMMING
remote control. PICTURECONTROL
SETT NG CL©CK
CHANNEL SET UP
Press the Arrow button & or T to USERSSETUP
v c_lp SET UP
point to _CHANNEL SET -UP'. ,__,oN........[o_......
ZERO RETURN
Then press the ENTER button. •............
Be!_ auoc :_roga*_s_,,g
Press the Arrow button A or V to c..,N__ o_
point to "AUTO CH PROGRAM- _.......... _,:_,_
M1NG'. ...........................
Then press the ENTER button.
The tuner scans and memorizes all
the active channels in your area.
The tuner stops on the lowest memorized channel.
* When AUTO CH PROGRAMMING is activated
where there is no TV signal input, "NO TV SIG-
NALS" will appear on the display after the com-
pletion of the channel scanning.
* The TV!VCWDVD rnay recognize TV channels to
be CATV channels if reception conditions are poor.
If this happens, check the antenna connection and
t_7the AUTO CH PROGRAMMING again, or
wait until reception conditions are better and then
W it again.
The channels you no longer receive or seldom watch
can be deleted fiom the memory. (Of comse, yon
can add the deleted channel into the memory again.)
Press the SET-UPbutton on the ......
TIqER pROGRAMMIN®
remote control, p,o_o_oo_o
8K•TING COOK
CHANN£L SET UP
Pressthe A_ow button _ or V to .... ......
v Clip SET UP
1 _3 LANGUAGE [ENGLISH}
point to "CHANNEL SET UP ....... _o<
ZERO RETDRN
Then press the ENTER button. •..........
2 Seee A©©/©E_LKT/i? ©_s, c............
Press the Arrow button _ or V to _ooo__•_,_<o_•,,)
point to "ADD/DELETE CH'. .....................
Press the ENTER button.
_f Kite< t}e dew, red eha ne
Press the Arrow button A or
until your desired channel number
appears. (You can also use the 0_
number buttons or the CHANNEL
button _ or V to enter it)
(Example: CHS)
* You must precede single-digit channel numbers
with a zero (Example: 02 ... 09).
* When selecting cable channels which are higher
than 99, press the _100 button first, then press the
last two digits. (Example: to select channel !25,
first press the +100 button then press "2" and "5').
_ Oee!e(o_ add} _om( _o} e_'_oy
Press the ENTER button. The channel ntlmber
changes to light red. The channel is deleted from
n]en]ory.
* To delete another channel, repeat steps [3] and [4].
* If you press the ENTER button again, the channel
is memorized again.
Added channel: Light Nue.
Deleted channel: Light red.
_ Ex see€an e se p '_ode
Press the SETUP button on the remote control to
remm to TV mode.
NOTE: To confirm that channel(s) has been deleted
or added, press the CHANNEL button *_or V.
IS EN
1(29
4>

T0005UF(pl-35).QX3 04.4.7 1:44 PM Page 19
_' o 7VVO_sU[V©
Pressthe POWER button to mm on the
TV!VCX/DVD.
2 Seecttcec}:{ e _'_<_e_
Press the CHANNEL button A or _" to select yol]r
desired channel number or press the number on the
rernote control.
Note _r using the Number button on the remote
controh
• You must precede single=digit channel numbers
with a zero (For example: 02, 03, 04 and so on).
• When selecting cable channels which are higher
than 99, press +i00 first, then press the last two
digits. (Example: m select channel 125, first press
"+100" then press "2" and "5").
Remember: if the TV/VCPdDVD is connected to a
cable box or satellite box, the TV!VCR/DVD lrl_tst
be on CH3 or CH4, then the channel m be viewed
must be selected on the cable box or satellite box.
Press the VOLUME button £ or V
to adjust the volmne.
VOLUME 2O
NOTES:
* If you press the CHANNEL button _ or _'in the
DVD mode, you can change the TV channels
Even if you turn off the TV/VC_/DVD in the
DVD mode, when you turn it on again, it will go
into the TV/VCR mode.
This television has a degaussing circuit that will clear
up color errors on the TV screen thm are caused by
any excess magnetism which happens to get too
close to the TV This circuit is designed to operate
once when the set is first plugged in. It'minor color
errors are seen in some locations on the screen,
please unplug the TV for approximately i5 minutes.
When the TV is plugged back in, the degaussing air=
cult will operate once to clear them up. Repeat this
procedure any time the TV screen is accidentally
magnetized, or when the TV is moved or relocated.
19
The TV!VCR/DVD's picture controls BRIGHT,
( ONTRAST, ( OLOR, TINT and SHARPNESS
are preset to _hctory specifications. Although they are
usually the best, you may need to make some further
adjustments for your individual preference.
NOTES:
* Procedures must be tbllowed within 5 seconds or
the Picture Control mode will be cancelled.
* When setting the Picture Control, the Game mode
will be cancelled.
:gake sure ...
* TV/VCPJDVD power xnust be turned on.
f S>_sa >C_" }x:!7220_a'<<<>/'
Press the PICTURE button on the remote control.
PresstheArro'_xbuttonA or_ untildesiredcontrol
is displayed.
BRIGHT
CONTRAST
COLOR
TINT BRIGHT
ooooooo_ooooooo÷
SHARPNESS
,,,_< t 1!<; I { ) ;Oil{ O!
Press the Al'ro'_ button _ or _ to adjust to yore'
desired level.
Arrow Burton _ A_+rmv Bu_rton
to decrease to increase
BRIGHT brighmess brighmess
to decrease to increase
(ONTRAST
contiast colrl-a st
(OLOR to pale to brilliam
TINT to pmple to g_ee_
SHAPNESS to sof_ to clear
® If there is a power failure of any kind, the
TV/VCR/DVD will remember the setting.
EN
1(29
+

T0005UF(pl-3B).QX3 04.4.7 1:44 PM Page 20
You can view specially labeled (co) TV prograrns,
movies, news and pre=recorded tapes with either a
dialogue caption or text display.
CAPTION mode: By choosing the caption mode, you
can watch dramas, rnovies and news while captioning
the dialogues and the contents of news.
TEXT mode: By choosing the text mode, you can
watch half screen text information Jr'you want
1-2: You may get these captions or text in*\_rrnation
by selecting either "i" or "2". Caption "2" is used,
usually for a second language if available.
NOTE:
Not all programs are broadcast with closed captions.
Your TV!VCR/DVD is designed to provide error flee
closed captions from high quality antenna, cable and
VCR signals. Conversely. poor quality signals are
likely to result in caption errors or no captions at all.
Common signal conditions which nmy cause captions
elTors are listed below:
* Automobile ignition noise
* Electric motor brush noise
* Weak snowy reception on TV screen
* Multiplex signa! reception displaying picture
ghosts or ailplane flutter.
* Playback of poorly recorded or worn VCR tapes.
NOTE:
If the TV!VCR/DVD displays a
black box on the TV screen, this [
/
means that the TV/VC1UDVD is /
set to the TEXT mode. To clear /
screen, select [C APTI()N! ]. [C AP-i
TION2] or [OFF]. / .............................................................
kIake sure ...
* TV/VCR/DVD's power must be turned on.
TIMER pg{©ORAMM NO
Press the SETUP button on the ............
CHANN£L SET UP
USERS SET tip
remote control. ,,OHP_E__P
t AN SL AG B (,LISF,]
CAPTIOr OFF
Press the Arro'_ button A or T to ....... 0
TItlE SEARCH
point to "CAPTIONZ ...........
....... ;/_ v £<; {.g:} ?{ O } @
Press the ENTER button until your ..........
TIMER PROGRAMM N®
desired caption menu appears. ...........
CHANNEL SET UP
USERS SET UP
V Clip SET UP
([CAPTION1], [CAPTION2] .......... *E_,,_,_
[TEXT1] or [TEXT2]) ...................=_o_
TIME SEARCI _
NDEX SEARCH
<? _::X<""e Ca: ©" f;_: <' " "<O
PresstheSETUP buttonon theremotecontrolto
return to TV mode.
7) <; _{_<;<iL77H! (Z<V;L) 4;_/77{?_
5 <? 7_'M
Repeat steps [1] and [2], select [OFF] using the
ENTER button. Press the SETUP button on the
remote control to return to TV mode.
L%<0,_,
The On-ScreenDisplaywilldisappeara£_er5 sec-
onds.
* It wil! also disappear when the MUTE button is
pressed or when the PAUSE button is pressed
while recording.
* If there is a power *Silure of any kind, the
TV!VCR/DVD will retain its memory for this fca=
tklr e.
-20- EN
1(29
4>
Page is loading ...
Page is loading ...
Page is loading ...
Page is loading ...
Page is loading ...
Page is loading ...
Page is loading ...
Page is loading ...
Page is loading ...
Page is loading ...
Page is loading ...
Page is loading ...
Page is loading ...
Page is loading ...
Page is loading ...
Page is loading ...
Page is loading ...
Page is loading ...
Page is loading ...
Page is loading ...
Page is loading ...
Page is loading ...
Page is loading ...
Page is loading ...
Page is loading ...
Page is loading ...
Page is loading ...
Page is loading ...
Page is loading ...
Page is loading ...
Page is loading ...
Page is loading ...
Page is loading ...
Page is loading ...
Page is loading ...
Page is loading ...
-
 1
1
-
 2
2
-
 3
3
-
 4
4
-
 5
5
-
 6
6
-
 7
7
-
 8
8
-
 9
9
-
 10
10
-
 11
11
-
 12
12
-
 13
13
-
 14
14
-
 15
15
-
 16
16
-
 17
17
-
 18
18
-
 19
19
-
 20
20
-
 21
21
-
 22
22
-
 23
23
-
 24
24
-
 25
25
-
 26
26
-
 27
27
-
 28
28
-
 29
29
-
 30
30
-
 31
31
-
 32
32
-
 33
33
-
 34
34
-
 35
35
-
 36
36
-
 37
37
-
 38
38
-
 39
39
-
 40
40
-
 41
41
-
 42
42
-
 43
43
-
 44
44
-
 45
45
-
 46
46
-
 47
47
-
 48
48
-
 49
49
-
 50
50
-
 51
51
-
 52
52
-
 53
53
-
 54
54
-
 55
55
-
 56
56


Superscan 19TVD4S Owner's manual
- Category
- CRT TVs
- Type
- Owner's manual
- This manual is also suitable for
Ask a question and I''ll find the answer in the document
Finding information in a document is now easier with AI

