

PREFACE
You have purchased a our scooter,
congratulations and thank you for
putting your trust in us.
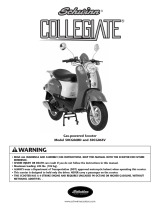
The 49'er is a sturdy scooter in modern
design.
Its sound construction, the meticulous se-
lection of materials, theadvanced manufac-
turing techniques and conscientious work of
dedicated employees provides the scooter
with all the characteristics
such as economical operation,
quality, reliability and its lasting value.
-We cannot be held liable for any conse-
quential damage caused by accessories
not approved by the factory.
The scope of delivery and version of the
scooterissolelydetermined bythe purchase
agreement concluded with the dealer.
This operating manual includes important
instructions for handling your light scoo-
ter. Read it carefully, because professional
handling combined with regular care and
maintenancehelpsto maintain the scooter's
value and is one of the requirements for
warranty claims.
We wish you at all times a safe journey.
Yours
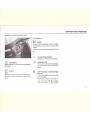
Safety-sy.mbols and notes
Please observe thefollowing:
Lt:.
WARNING
Precautionary measures against the risk of
accidents, injury and/or death.
M
FIRE HAZARD
The vehicle is equipped with a catalyst, this
results in extremely high temperatures on
the exhaust system (risk of burning).
,11"
•• CAUTION
Important instructions and precautionary
rules to avoid damage to the vehicle. Non-
observance can lead to the warranty be-
coming void.
~ NOTE
Special instructions for better handling du-
ring operation-, inspection-, adjustments
and service activities.

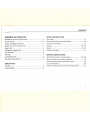
CONTENTS
OVERVIEW AND OPERATION
Identification number, engine number 3
View of vehicle
.4-05
Cockpit, handlebar instrument. 6
Ignition lock and fork-column lock .7
Digital clock 8
Storage box, luggage hook 9
Fuel, fuel tank ,", ..,., ,..,.., 10
Tankcap 11
Lubricating oil tank 12
Side stand, parking stand 13
I
,
SAFETY TEST
Checklist 14
Load and lights 15
RIDING INSTRUCTIONS
Ride safely 15
Ride-economically and environmentally 16
Running-in instructions 17
Starting 18 - 19
Brakes 20 - 21
Stopping the engine 21
SERVICE INSTRUCTIONS
Servicing the scooter / cleaning agents 22 - 23
Winter operation and corrosion protection 23
Repairing paint damage / servicing the tyres 24
Lay-up commission , 24
Technical modifications, accessories and spare parts 25

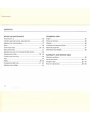
CONTENTS
NOTES ON MAINTENANCE
Transmission oil 26
Checking steering bearing, telescopic fork 26
Adjusting the shock absorber 27
Tyres 28
Front wheel brake 28 - 30
Rear wheel brake 31
Adjusting the playof the twist grip throttle control 32
Cleaning the air filter 33 - 35
Checking the spark plug 36
Fuse 37
Battery 38 -39
Changing the light bulbs 41 - 43
Adjusting the headlight 44
2
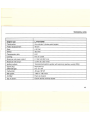
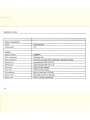
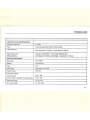
TECHNICAL DATA
Engine 45
Power transmission 46
Chassis 46
Lubricants and operating fluids .47
Electrical equipment 47
Dimensions and weights 48
WARRANTY AND SERVICE DATA
Warranty conditions 49
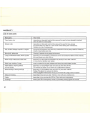
List of wear items 50 - 51
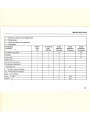
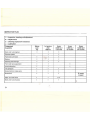
Inspection plan 52 - 54
Proof of maintenance 55 - 56

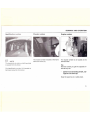
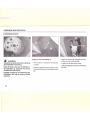
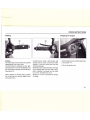
SUMMARY AND OPERATION
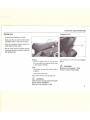
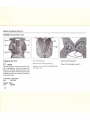
Identification number
Engine number
{
j
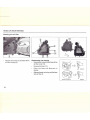
~ NOTE
The description for right- and left-hand side
is viewed from the driver.
The identification number (1) is located on
the frame below the front cover.
Chassis number
The chassis number is located on the frame
behind the cover (2).
The engine number (3) is located on the
left-hand side.
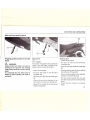
Key
With the scooter you get two separate in-
definite keys for:
Ignition lock, lubricating oil tank, sto-
rage box and tank cap.
Keep the spare key at a safety place.
3

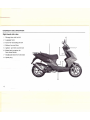
OVERVIEW AND OPERATION
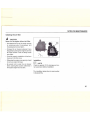
Right-hand side view
Storage box with tool kit
6
2
Luggage hook
3
Cover for lubricating oil tank
4 Battery box and fuse
5
Ignition- and fork-column lock
6
Brake fluid container for
front wheel brake
7 Handbrake lever for front brake
8
Spark plug
4

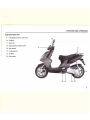
Left-hand side view
9
Handbrake lever for rear brake
10
10
Cockpit
I
11
Tank cap
12
Transmission oil filler screw
13
Kick starter
14
Parking stand
15
Air filter
16
Side stand
OVERVIEW AND OPERATION
12
16 15
14 13
5

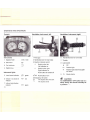
OVERVIEW AND OPERATION
Cockpit Handlebar instrument, rightHandlebar instrument, left
Instruments
Speedometer
km!h! mph
2
Odometer km
3
Fuel indicator
BJ
4
Digital ciU(;K
Instrument lights
5
Lown beam indicator
~D
green
6
Oil level - two stroke oil
'Er
red
indicator
7 Left and right direction
indicator
<>c:>
green
6
1 Fixed grip
2 Handbrake lever for rear brake
3 Direction-indicator switch
Q
Switch to the left:
Left indicator on
<;>
SwitCh to the nght:
Right indicator on
Push button for switch off
4
t:o
Push-button: horn
5 Emergency off switch
~ The engine does not start
n
The engine starts
6
Handbrake lever for front brake
7
Throttle
8
Light switch
•
Off
€DO,
Position light
~
Position light and driving light
low beam
9
m-
Starter button
d
CAUTION
The EMERGENCY OFF switch (5) is a
safety device and should normally be
in position
n.

Ignition- and fork-column lock
OVERVIEW AND OPERATION
j
&
WARNING
While riding, do not switch the ignition
off~
!
NOTE
Keys
With the scooter you get two indefinite igni-
tion keys. Keep the spare key at a safety
place.
Key positions
~ NOTE
Activate the parking light only for a limited
period.Take into account the charge of the
battery.
The keycan be removed in positions ~ and
~.
n
(1) Operating position
Ignition and all circuits activated.
(2) Ignition off
Forkcolumn not locked (handlebars
can be freely turned to the left or
right).
(3) Fork column locked and Igni-
tion off
Turn the handlebar to the left as far
as to the stop.
Push and turn the key to the left un-
til it is in the LOCK ~ position.
The fork column is now locked.
7

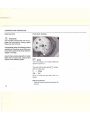
OVERVIEW AND OPERATION
Digital clock
~ NOTE
The Cockpit is supplied by the vehicle bat-
tery. The display is only visible when the
ignition is on.
After disconnecting and reconnecting the
battery the clock time needs to be reset.
M Mode for:
date ortime
S
Set for:
date and time
_8
Mode and Set
Button M press 1 time
Changing between date and
time
Button M press 2 time
until the month appears
The month value can be set by
pressing button
S
Button M press 3 time
until the day appears
The day value can be set by
pressing button
S
Button M press 4 time
until the hours appears
The hours value can be set by
pressing button
S
Burion
iyi
press 5 time
until the minutes appears
The minutes value can be set
by pressing button
S
Button M press 6 time
End of mode. Date and time is
set and ( : ) flashes.
Button S press 1 time
The date value appears for a
moment
Button S press 2 time
The seconds are shown.
Press the button
S
again to
return to the time value.

OVERVIEW AND OPERATION
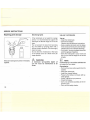
Storage
box
Luggage hook
Do not store valuables in the box.
- Make sure that the seat has been locked
completely after is was pressed down.
- Take out valuables before washing to
avoid wetting these objects.
- Do not place thermal sensitive objects
in the box because of engine's heat and
high temperature.
J
Unlock
Insert the ignition key (1) into the lock
turn and press down the key to the right
or left direction (OPEN).
Lock
Press down the seat (2) until the lock is
engaged.
Pull out the ignition key.
Never leave the key in the storage box.
&
WARNING
After the seat is closed check if its locked
firmly! -Risk of accidents!
Maximum load capacity: 10 kg
Iir-----1[JJ
Use the hook (1) only for small baggage
pieces.
&
WARNING
Maximum load capacity: 1.5 kg
Do not transport bulky loads.
9

OVERVIEW AND OPERATION
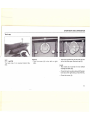
Fuel stock, tanking
Fuel,fuel tank
&
WARNING
Fuel is highly inflammable and can ex-
plode. Do not smoke or bring a naked
flame near the fuel tank.
Fuel expands under the influence of heat
and the sun.Therefore, never fill the tank
to the brim. Never fill the tank while the
engine is running.
Never bring aglowing cigarette or naked
flame near an open tank, because fuel
vapour could suddenly ignite.
10
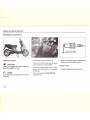
.~ NOTE
The fuel indicator (1) is active when the
ignition is turned on.
The scale with the tank symbol
Bl
remem-
bers for a tank stop. .
o
=
Empty
100
=
Full
Dont run down the fuel tank until it is
empty.
Filling up with fuel
- Use only premium lead-free fuel (min. 95
octane)

Tank cap
OVERVIEW AND OPERATION
f
)
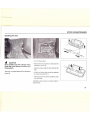
~ NOTE
The tank cap (1) is located behind the
seat.
Unlock:
- Turn the cover (2) to the left or right
side.
- Insert the ignition key in the lock (3) turn
to the left and open the tank cap (4).
Lock:
- The marks (5) must be in front before
closing the tank cap.
- Close the tank cap byluring with the igni-
tion key to the right and pull out the key.
- Close the cover (2).
11

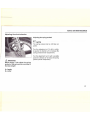
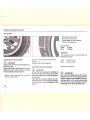
OVERVIEW AND OPERATION
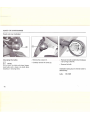
Lubricating oil tank
~ CAUTION
Check the oil level
during every tanking
and replenish if necessary.
If the oil level is too low, the indicator(1
"Er)
willlighi up. Nepienisn
tWO
stroke
oil within the next 50 km.
Damage caused by not observing this
instruction will not be covered under
warranty.
12
Filling up with lubricating oil
- Use only Mobil 1 Racing 2T same grade
or higher
- Insert the ignition key in the lock (1) turn
to the left and open the inspection cover
(2).
- Open the oil cap (3) and replenish max.
to the mark (4) of the oil filler.
Tighten the oil filler cap by hand.
Lock the inspection cover (2)with in igni-
tion key.

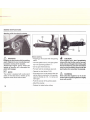
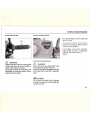
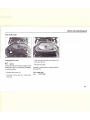
Side stand and parking stand
OVERVIEW AND OPERATION
(
Propping up the scooter on the side
stand.
6
WARNING
Always make sure that the stand is
resting on firm ground. On sloping
roads, always park the scooter facing
uphill.
It is essential that the side stand is
folded up before starting off! -Risk of
accidents!
Side stand
~ NOTE
The scooter is equipped with a side stand
switch. If the side stand is folded up the
engine is shoot off and will not start.
- Switch off the engine.
- Put
you r left hand on the left-hand
handlebar grip.
- Hold with your right hand the holder grip
(3).
- Fold out the arm of the side stand (1) as
far forward as it will go and stop by foot.
- Slowly tilt the scooter to the left until its
weight is supported.
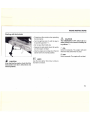
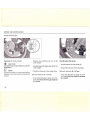
Parking stand
- Switch off the engine.
- Put your left hand on the left-hand
handlebar grip.
- Hold with your right hand the holder grip
(3).
- Push the parking stand (2) down until the
two skids are on the ground.
- Put you full body weight on the operating
mandrel of the main standard.
- Pull the scooter towards the rear and
simultaneously upwards onto the parking
stand.
- Check that the scooter is standing
firmly.
13

SAFETY TEST
Checklist
Beforeeach ride, carry out a safety
check using the checklist.
Takethe safety check seriously. Carry out
maintenance activities before you start your
ride orask a specialized dealer to do
so.This will provide you with the certainty
that your motorcycle corresponds to traffic
regulations. A technically faultless motor-
cycle isa basic requirement for the safety
of bothyourself and other road users.
14
Before starting your ride, check the fol-
lowing:
- Steering (smooth and free of play)
- Clutch lever play
- Lubricating oil quantity
- Fuel quantity
- Front brake
- Rear brake
- Tyres (profile and pressure)
- Telescopic fork
- Load / lights
- Total weight
- Lights
- Brake fluid (level)
- Brakes (operation)
In case of problems or difficulties, contact a
dealer, who will do everything pos-
sible to assist you.
6
WARNING
While the engine is running or the ig-
nition is on, do not touch the ignition
system.
FIRE HAZARD
The exhaust system becomes very hot.
While riding,idling or parking, make sure
that no inflammable materials (e.g. hay,
leaves, grass,coverings or luggage, etc.)
can come into contact with it!

SAFETY TEST
Load flights
Ride safely
Lt
WARNING
For the sake of your safety, use only
original accessories or products
released by
us.
We cannot judge for each third-part
product whether it can be safely used in
combination with your motorcycle.
Norcan a official approval givesuch a guar-
antee in all cases, since the test scope is
not always sufficient.
I
~ NOTE
Our accessories and approved
products as well as qualified advice are
available from all specialized deal-
ers.
Correctly loaded
- Make sure that the left-right weight dis-
tribution is balanced. - -
Check that fastenings are correct and
tight.
- Do nottransport bulky loads.
- Do not cover the lights.
&
WARNING
The total allowable weight may not be
exceeded.
Check the tyre pressure.
Checking the lights
&
WARNING
Before any ride, check the operation of
all lighting components.
Checkthat the headlamps and lenses are
clean.
u:I
CAUTION
Riding safety is largely also determined
by the manner of riding.
Therefore:
- Put on a tested/approved safety helmet
and correct close the buckle.
- Wear suitable protective clothes.
- Rest your feet on the footrests.
- Do not ride if your riding ability has been
compromised.
Your reactions can be adversely affected
not only by alcohol, but also by drugs and
medicines.
- Strictly observe all traffic regulations.
- Always adapt your riding speed to the
traffic and road conditions.
On smooth, slippery roadstake into account
that your riding stability and braking power
are limited by the grip of the tyres on the
road top.
15

RIDING INSTRUCTIONS
Ride economically and be aware of the environment
Fuel consumption, environmental pollution
and wear of engine, brakes and tyres de-
pend on various factors.
Your personal riding style is highly deter-
minant for economical fuel consumption
and exhaust gas and noise generation.
While idling, the engine takes a long time
to warm up to operational temperature. In
thewarm-up phase, however, the wear level
and pollutant emissions are very high. It is
therefore best to start riding immediately
after start-up.
Avoid rapid acceleration
Open the throttle not further than needed,
in order to reduce fuel consumption as well
as pollution and wear levels.
Do not use excessive revs: change un as
soon as possible and do not change down
until it is necessary to do so.
Ride as evenly as possible and look
ahead as far as possible.
Unnecessary acceleration and hard braking
cause highfuel consumption and increased
pollution levels.
16
Turn the engine off when waiting in traf-
fic.
Different riding conditions affect fuel con-
sumption. The following conditions are un-
favourable for fuel consumption:
- High traffic density,especially in big cities
with many stops for traffic lights.
- Frequent short rides with repeated starts
and warm-ups of the engine.
- Riding in a column of motor cycles at low
speed, meaning riding with relatively high
revs.
Plan rides ahead of time in order to avoid
heavy traffic.
Fuel consumption is also affected by con-
ditions that are out of your control, for in-
stance, poor road condition, hills, riding in
winter.
Observe the following aspects for eco-
nomical fuel consumption:
The planned inspection intervals must be
closely observed.
Regular service by a specialized
dealer will guarantee not only continued
operability, but also economical fuel con-
sumption, low environmental pollution
and a long lifespan.
Check the tyre pressure every two
weeks.
Low tyre pressure increases rolling resis-
tance. This increases fuel consumption
and tyre wear and adversely affects riding
behaviour.
- Continually check fuel consumption.
- Frequently check the lubricating oil.

Running-in
RIDING INSTRUCTIONS
Running-in instructions for engine
and transmission
\Ill
CAUTION
Excessive revs while running-in the en-
gine increases the wear of the engine.
Engine faults during the running-in pe-
riod must be immediately reported to a
specialized dealer.
,
l
- During the first 500 km:
Less than 1/2 throttle.
- Up to 1.000 km:
Less than 3/4 throttle.
~ CAUTION
The first inspection must be carried out
immediately after the first 1.000 km.
~ NOTE
During the running-in period, ride in fre-
quently changing load and rpm ranges. Se-
lect winding and slightly hilly routes. Avoid
constantly low rpm counts and full throttle
under load.
You can save yourself delays by making
an appointment with a specialized
dealer in advance.
Running-in new tyres
&
CAUTION
New tyres have a smooth surface. They
must therefore be roughened by care-
fully running them in at various slanted
positions.
Only then will the surface obtain its full
grip!
Running-in new brake linings
&
WARNING
New brake linings must be run-in and
will not havetheir full friction power until
after 500 km.
The slightly reduced braking effect can
be compensated for by an increase in
the pressure on the brake lever.
During this period, avoid unnecessary.
hard braking actions!
17

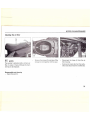
RIDING INSTRUCTIONS
Starting with the electric starter
Lt.
WARNING
Propping up the scooterwith the parking
stand. Operate the rear handbrake lever
to avoid a moving of the scooter.
Avoid high engine rpm's while the
vehicle is standinQ still, otherwise the
clutch will engage.
~ NOTE
The scooter is equipped with
a
side stand
switch. If the side stand is folded up the
engine is shoot off and will not start.
18
Before starting
- Propping up the scooter with the parking
stand.
Turn the ignition lock (1) with the ignition
key to its operating position
n.
Do not open the throttle (4).
Pull and hold the handbrake lever (2).
Operate the start button ffi(5).
If the engine can not be started after the
starter motor is running for 3-5 seconds,
open the throttle (4) 1/8 - 1/4 turns and
start again.
Push the scooter off its parking stand.
Mount the scooter.
Release the brake before riding.
udI
CAUTION
If the engine won't start immediately,
release the start button, wait a few sec-
onds and push it again. Each time, push
the start button for just a few seconds in
order to save the battery. Never push the
start button for more than 10 seconds.
6
WARNING
Never allow the engine to run in an en-
closed space. Exhaust gases are highly
toxic and can kill.
Page is loading ...
Page is loading ...
Page is loading ...
Page is loading ...
Page is loading ...
Page is loading ...
Page is loading ...
Page is loading ...
Page is loading ...
Page is loading ...
Page is loading ...
Page is loading ...
Page is loading ...
Page is loading ...
Page is loading ...
Page is loading ...
Page is loading ...
Page is loading ...
Page is loading ...
Page is loading ...
Page is loading ...
Page is loading ...
Page is loading ...
Page is loading ...
Page is loading ...
Page is loading ...
Page is loading ...
Page is loading ...
Page is loading ...
Page is loading ...
Page is loading ...
Page is loading ...
Page is loading ...
Page is loading ...
-
 1
1
-
 2
2
-
 3
3
-
 4
4
-
 5
5
-
 6
6
-
 7
7
-
 8
8
-
 9
9
-
 10
10
-
 11
11
-
 12
12
-
 13
13
-
 14
14
-
 15
15
-
 16
16
-
 17
17
-
 18
18
-
 19
19
-
 20
20
-
 21
21
-
 22
22
-
 23
23
-
 24
24
-
 25
25
-
 26
26
-
 27
27
-
 28
28
-
 29
29
-
 30
30
-
 31
31
-
 32
32
-
 33
33
-
 34
34
-
 35
35
-
 36
36
-
 37
37
-
 38
38
-
 39
39
-
 40
40
-
 41
41
-
 42
42
-
 43
43
-
 44
44
-
 45
45
-
 46
46
-
 47
47
-
 48
48
-
 49
49
-
 50
50
-
 51
51
-
 52
52
-
 53
53
-
 54
54


Ask a question and I''ll find the answer in the document
Finding information in a document is now easier with AI
Other documents
-
 Schwinn Motor Scooters 50CG06RD User manual
-
 Schwinn Motor Scooters 50CA06PK User manual
-
 Baja motorsports SC50P Owner's manual
-
Baja motorsports SC50 Owner's manual
-
 Baja motorsports RT50-R Owner's manual
-
SYM JET 4 - 50 Series Owner's manual
-
BMW C 650 GT Rider's Manual
-
-
Honda Dream DX CD110 Owner's manual
-


