
User Manual
8003605V 2.
8
Please read and understand all instructions before use.
Retain this manual for future reference.
12 Ton
Pneumatic
Bottle Jack

2
8003605V 2.
8
Visit www.princessauto.com for more information
12 Ton
Pneumatic
Bottle Jack
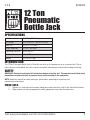
SPECIFICATIONS
Lift Capacity 26,400 lb (12,000 kg)
Lift Range 10-1/4 to 20 in. (260 to 510 mm)
Ram Lift 6-3/4 in. (170 mm)
Screw Extension 3-1/8 in. (80 mm)
Operating Pressure 90 to 120 PSI
Air Inlet 1/4 in NPT
Weight 27.1 lb (12.3 kg)
INTRODUCTION
The 12 Ton Pneumatic Bottle Jack is fitted for use with an air compressor or as a manual jack. The air
hose connects to the bottle jack with a swivel connector, preventing the hose from binding or kinking.
SAFETY
WARNING! Read and understand all instructions before using this tool. The operator must follow basic
precautions to reduce the risk of personal injury and/or damage to the equipment.
NOTE: Keep this manual for safety warnings, precautions, operating or inspection and
maintenance instructions.
WORK AREA
1. Operate in a safe work environment. Keep your work area clean, well lit and free of distractions.
2. Keep anyone not wearing appropriate safety equipment away from the work area.

12 Ton Pneumatic Bottle Jack
3
Visit www.princessauto.com for more information
8003605 V 2.
8
PERSONAL SAFETY
CAUTION! Wear personal protective equipment approved by the Canadian Standards Association
(CSA) or American National Standards Institute (ANSI).
Personal Protective Equipment
1. Wear impact safety goggles that provide front and side protection for the eyes.
2. Wear steel toe footwear or steel toe caps to prevent injury from falling objects.
SPECIFIC SAFETY PRECAUTIONS
CAUTION! This jack is not meant for commercial use.
1. This jack is a lifting device only. Do not overload the jack beyond its rated lift capacity
(see Specifications).
2. The base of the bottle jack should always rest on a firm, level surface capable of sustaining the
load. Keep the surface clean and free from debris.
3. The jack must remain in a static position for lifting and lowering loads. Never move a load that
is elevated on the jack. Ensure the load remains stable at all times.
4. Immediately after lifting, support the load with jack stands of adequate capacity. Never work
under a load without additional support devices.
5. DO NOT use the jack if damaged or it was subjected to a dynamic shock load. This is a sudden
and unexpected load or force applied to the jack. Have the jack inspected and repaired by a
qualified service technician.
6. DO NOT expose the jack to rain or any other kind of bad weather.
AIR TOOL PRECAUTIONS
1. Inspect the air line for cracks, fraying or other faults before each use. Discontinue use if the air
line is damaged or hissing is heard from the air line or connectors while operating the bottle
jack. Replace the defective component/air line.
2. Do not allow people, mobile equipment or vehicles to pass over the unprotected air line.
Position the air line away from high traffic areas, in a reinforced conduit or place planks on both
sides of the air line to create a protective trench.
3. Prevent damage to the air line by observing the following:
a. Never carry the bottle jack by the air line.
b. Keep the air line away from heat, oil, sharp edges or moving parts.
c. Do not wrap the air line around the bottle jack as sharp edges may pierce or crack the air
line. Coil the air line when storing.
4. A damaged or disconnected air line under pressure may whip around and inflict personal injury
or damage the work area. Secure the compressor’s air line to a fixed or permanent structure
with clamps or cable ties.

12 Ton Pneumatic Bottle Jack
4
For technical questions call: 1-800-665-8685
8003605V 2.
8
HYDRAULIC PRECAUTIONS
WARNING! Seek immediate, professional medical treatment if hydraulic fluid penetrates the skin. Do
not wait for the appearance of symptoms. An infection or toxic reaction may occur from the exposure.
1. The hydraulic components require regular inspection. Replace damaged hydraulic parts with
components from the same manufacturer.
2. Repairs should be done by a qualified service technician. Do not attempt makeshift repairs to a
hydraulic system. Such repairs can fail suddenly and create a hazardous condition.
3. Do not adjust the relief setting of the hydraulic system.
4. Hydraulic fluid escaping under pressure may have sufficient force to penetrate the skin.
a. Always check for leaks wearing a face shield or safety goggles.
b. Wear rubberized gloves.
c. Wear protective clothes.
d. Do not use your hands to detect a leak. Use a piece of cardboard and watch for
discolouration to find a hydraulic fluid leak.
5. DO NOT substitute hydraulic brake fluid or any other fluid for hydraulic jack oil. Only use a good
quality hydraulic jack oil in the bottle jack.
USE AND CARE OF THE BOTTLE JACK
1. Use the correct bottle jack for the job. It is designed for a specific function. Do not modify or
alter this bottle jack or use it for an unintended purpose.
2. Avoid unintentional starts. Be sure that the regulator/throttle switch is in the neutral or OFF
position when the bottle jack is not in use and before connecting it to any air source.
PARTS IDENTIFICATION
Carefully remove the parts and accessories from the packaging and inspect for damage. Make sure that all
items in the parts list are included.
WARNING! Do not operate the bottle jack if any part is missing. Replace the missing part before
operating. Failure to do so could result in a tool malfunction and personal injury.
Contents:
• 12 ton bottle jack
• Handle (2 piece)
• Package of seals and o-rings for the bottle jack

12 Ton Pneumatic Bottle Jack
5
Visit www.princessauto.com for more information
8003605 V 2.
8
ASSEMBLY
NOTE: When this manual refers to a part number, it refers to the included Parts List section.
The bottle jack comes preassembled. The handles (#58 and #59) fit together and can be locked into place
when needed.
OPERATION
WARNING! Inspect the bottle jack immediately if it was subject to an abnormal load or shock. Remove
the jack from service if damaged in any way, until repaired by a qualified technician.
PREPARATION
1. Before first use of this product, pour a teaspoon of good quality air tool oil into the hose
connector (#57) of the air inlet fitting. Connect it to the air source, turn on the air valve and
work for 3 seconds to evenly distribute lubricant.
2. Purge trapped air from the hydraulic system (see Maintenance).
3. Use the slotted end of the narrow handle to turn the release valve (#04) clockwise until it is
firmly closed.
4. Place the jack into position and adjust the extension screw (#13.1) as needed.
RAISING THE LOAD
1. Make sure both the jack and the load are on a hard level surface.
a. If raising a vehicle follow these steps:
i. Apply the parking and emergency brake.
ii. Use wheel chocks to block all wheels to prevent any movement when the vehicle
is lifted.
iii. Check in your vehicle owner’s manual for the location of the recommended lift points
and position bottle jack under one of those locations.
2. Connect the air inlet fitting into the shop air supply hose lock fitting, then turn on the air valve.
3. Raise the load to the desired height, then turn off the air valve.
a. When air source is not available, insert the big end of the handle into the handle bracket
(#34). Pump it manually to raise the load to desired height.
4. Immediately use a pair of jack stands with adequate capacity to support the load.
WARNING! Do not place any part of your body under the load without jack stands in place. The bottle
jack is not designed to maintain heavy loads for long periods of time

12 Ton Pneumatic Bottle Jack
6
For technical questions call: 1-800-665-8685
8003605V 2.
8
LOWERING THE LOAD
WARNING! Before lowering the load, ensure that there are no obstructions underneath and that all
people are standing clear.
1. When the work is done, raise the load enough to carefully remove the jack stands.
2. Slowly and carefully lower the load by inserting the slotted end of the narrow handle into the
release valve and turning anticlockwise in extremely small increments. Release all pressure in
the jack.
3. Lower the extension screw by turning it clockwise as needed to remove the bottle jack.
WARNING! Dynamic shock loads are created by quick opening and closing of the release valve when
the lowering the load. The resulting overload may cause the hydraulic system to failure, which could
result in severe personal injury and/or property damage.
MAINTENANCE
1. Maintain the bottle jack with care. A bottle jack in good condition is efficient, easier to control
and will have fewer problems.
2. Inspect the bottle jack components periodically. Have a qualified technician repair or replace
damaged or worn components.
3. Check the ram every three months for any sign of rust or corrosion. Clean as needed and wipe
with an oil cloth.
4. An annual inspection of the bottle jack by a qualified technician is recommended.
5. Maintain the bottle jack’s labels and name plate. These carry important information. If
unreadable or missing, contact Princess Auto Ltd. for replacements.
CAUTION! Only qualified service personnel should repair the bottle jack.
PURGE THE HYDRAULIC SYSTEM
Purge the hydraulic system to eliminate any air in the system if the jack efficiency drops or jack
doesn’t work.
1. If the jack performs poorly during manual operation, use the slotted end of the narrow handle
to turn the release valve 1-1/2 turns anticlockwise. Remove the oil filler plug (#16) by gently
pulling. Insert the large handle into the handle bracket and pump it 10 to 15 times, then replace
the filler plug.
2. If the jack performs poorly when used with a compressor, connect the air inlet fitting to the
air source, use the slotted end of the narrow handle to turn the release valve 1-1/2 turns
anticlockwise. Remove the oil filler plug (#16) by gently pulling. Turn on the air valve to let the
pump work for one minute, then replace the filler plug.

12 Ton Pneumatic Bottle Jack
7
Visit www.princessauto.com for more information
8003605 V 2.
8
HYDRAULIC OIL LEVEL
CAUTION! Do not substitute brake or transmission fluids or regular motor oil for hydraulic jack oil as
they can damage the seals.
1. Check the hydraulic jack oil level on a regular basis.
a. Place the jack in an upright position, completely lower the ram and remove the filler plug.
b. If the oil level is not adequate, fill with high quality hydraulic jack oil to the lower rim of the
fill hole. Purge the hydraulic system.
c. Top off with more hydraulic jack oil and replace the filler plug.
2. Replace the hydraulic jack oil once a year to extend the performance and life of the bottle jack.
a. Lower the ram fully and remove the oil filler plug.
b. Lay the bottle jack on its side and drain the oil into a suitable container.
c. Refill with a high quality hydraulic jack oil as described in Step 3.
NOTE: Dispose of hydraulic jack oil in accordance to local regulation (see Disposal).
LUBRICATION
Clean the outside of the jack with a dry, clean cloth. Periodically lubricate the joints, extension screw and
all moving parts with a light oil as needed
Lubrication is critical to jacks as they support heavy loads. Any restrictions due to dirt, rust, etc. can
cause either slow movement or cause extremely rapid jerks, damaging the internal components.
STORAGE
Store the jack in a dry location with the ram and extension screw fully lowered. This will help protect
critical areas from corrosion. Apply a thin coat of lubricant to exposed steel parts to avoid rust. Remove
the lubricant coating from the steel parts before using the tool again.
DISPOSAL OF THE BOTTLE JACK
Recycle a tool damaged beyond repair at the appropriate facility. Contact your local municipality for a
listing of disposal facilities.
DISPOSAL OF HYDRAULIC FLUID
Do not drain hydraulic jack oil into the sewer system or dispose in an uncontrolled location. Hydraulic
fluid may take up to a year to breakdown in the environment and the ingredients may still be toxic.
Contact your local municipality for proper disposal instructions or locations.

12 Ton Pneumatic Bottle Jack
8
For technical questions call: 1-800-665-8685
8003605V 2.
8
TROUBLESHOOTING
Contact Princess Auto Ltd. for a solution if the bottle jack does not function properly or parts are missing.
If unable to do so, have a qualified technician service the bottle jack.
Problem(s) Possible Cause(s) Suggested Solution(s)
Jack will not lift load. Release valve not tightly closed. Close release valve firmly.
Overload condition. Reduce load.
Air supply inadequate. Ensure adequate air supply.
Air trapped in system. Purge system (see Maintenance).
Jack will lift, but will not
maintain pressure.
Release valve not tightly closed. Close release valve firmly.
Overload condition. Reduce load.
Hydraulic unit malfunction. Contact Princess Auto Ltd. for
a solution or have a qualified
technician service the bottle jack.
Will not lower after unloading. Reservoir overfilled. Drain oil to proper level
(see Maintenance).
Linkages binding. Clean and lubricate moving parts.
Poor lift performance. Hydraulic jack oil level low. Add hydraulic jack oil to proper
level (see Maintenance).
Air trapped in system. Purge system (see Maintenance).
Will not lift to max height. Hydraulic jack oil level low. Add hydraulic jack oil to proper
level (see Maintenance).

12 Ton Pneumatic Bottle Jack
9
Visit www.princessauto.com for more information
8003605 V 2.
8
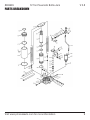
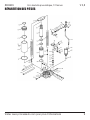
PARTS BREAKDOWN

12 Ton Pneumatic Bottle Jack
10
For technical questions call: 1-800-665-8685
8003605V 2.
8
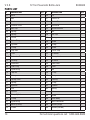
PARTS LIST
# DESCRIPTION QTY
01 Base 1
02 Ball 6
03 Seal 1
04 Release Valve 1
05 Ball Cup 2
06 Spring 1
07 Spring 1
08 Screw 2
09 Nylon Ring 1
10 Cylinder 1
11 O-ring 1
12 Cup Seal 1
13 Ram 1
13.1 Extension Screw 1
14 Packing 1
15 Reservoir 1
16 Filler Plug 1
17 Nylon Ring 1
18 Top Nut 1
19 O-ring 1
20 Spring Plate 1
21 Spring 2
22 Eye Bolt 2
23 Nut 2
24 Washer 2
25 Pump Cylinder 1
26 O-ring 1
27 Nylon Ring 1
28 Back Up Ring 1
29 Piston 1
# DESCRIPTION QTY
30 Pin 3
31 Presto Pin 1
32 Presto Pin 2
33 Connector 1
34 Handle Bracket 1
35 Ball 1
36 Ball Cup 1
37 Spring 1
38 Screw 1
39 O-ring 1
40 Screw 1
41 Plastic Cup 1
42 Air Motor 1
43 Rotary Joint 1
44 Air Hose 1
45 Lock Lever 1
46 Lever 1
47 Nut 1
48 O-ring 1
49 O-ring 1
50 Packing 1
51 O-ring 1
52 Throttle 1
53 Spring 1
54 Nut 1
55 Screw 1
56 Valve Body 1
57 Hose Connector 1
58 Handle (large) 1
59 Handle (narrow) 1
Page is loading ...
Page is loading ...
Page is loading ...
Page is loading ...
Page is loading ...
Page is loading ...
Page is loading ...
Page is loading ...
Page is loading ...
Page is loading ...
-
 1
1
-
 2
2
-
 3
3
-
 4
4
-
 5
5
-
 6
6
-
 7
7
-
 8
8
-
 9
9
-
 10
10
-
 11
11
-
 12
12
-
 13
13
-
 14
14
-
 15
15
-
 16
16
-
 17
17
-
 18
18
-
 19
19
-
 20
20


Ask a question and I''ll find the answer in the document
Finding information in a document is now easier with AI
in other languages
Related papers
-
Power Fist 8668147 User manual
-
Power Fist 8760605 Owner's manual
-
-
-
-
-
-
-
-
Other documents
-
Powerfist 9096652 Owner's manual
-
-
-
-
-
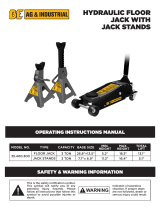 Braber Equipment 3 Ton Hydraulic Floor Jack User manual
-
PROPOINT 9081613 Owner's manual
-
-
-
 BE Power Equipment 35.300.002 User manual

