Electrolux E30MO65GSS Installation guide

Type
Installation guide

Electrolux E30MO65GSS is a versatile convection microwave oven with a range of capabilities to simplify your cooking tasks:

  • It features various cooking modes, including microwave, convection, and a combination of both, providing flexibility for different types of dishes.

  • The built-in exhaust duct system effectively removes smoke and odors while cooking, ensuring a fresher kitchen environment.

  • With its spacious 1.5 cubic feet capacity, it can accommodate a variety of dishes, making it suitable for both everyday meals and entertaining guests.

  • The user-friendly control panel with pushbuttons and a digital display makes it easy to select cooking settings and monitor the progress of your food.

1
CONVECTION MICROWAVE OVEN INSTALLATION INSTRUCTIONS
INSTALLATION AND SERVICE MUST BE PERFORMED BY A QUALIFIED INSTALLER.
IMPORTANT: SAVE FOR LOCAL ELECTRICAL INSPECTOR'S USE.
READ AND SAVE THESE INSTRUCTIONS FOR FUTURE REFERENCE.
The electrical requirements for this oven are 115-120 volts AC, 15 amps or larger.
TINSEB472MRR0
Printed in United States
IMPORTANT - PLEASE READ AND FOLLOW
Before beginning, please read these instructions completely and carefully.
Be sure to DISCONNECT THE PLUG of the microwave oven from the electrical outlet before installing the built-in trim kit.
Remove the turntable from the oven cavity.
Because the kit includes metal parts, caution should be used in handling and installation to avoid the possibility of injury.
Do not remove permanently afxed labels, warnings, or plates from the product. This may void the warranty.
Please observe all local and national codes and ordinances.
The installer should leave these instructions with the consumer who should retain for local inspector’s use and for
future reference.
PARTS INCLUDED IN THE KITS
1) Front Frame Assembly
QTY 1
2) Bottom Duct Assembly
QTY 1
3) Screw A (
¹
"
length)
QTY 5
4) Screw B (1
³" length)
QTY 4
5) Screw C (1
³₁₆
"
length)
QTY 2
6) Duct A
QTY 1
7) Duct B
QTY 1
8) Duct C
QTY 1
9) Duct D
QTY 1
2
CONVECTION MICROWAVE OVEN INSTALLATION INSTRUCTIONS
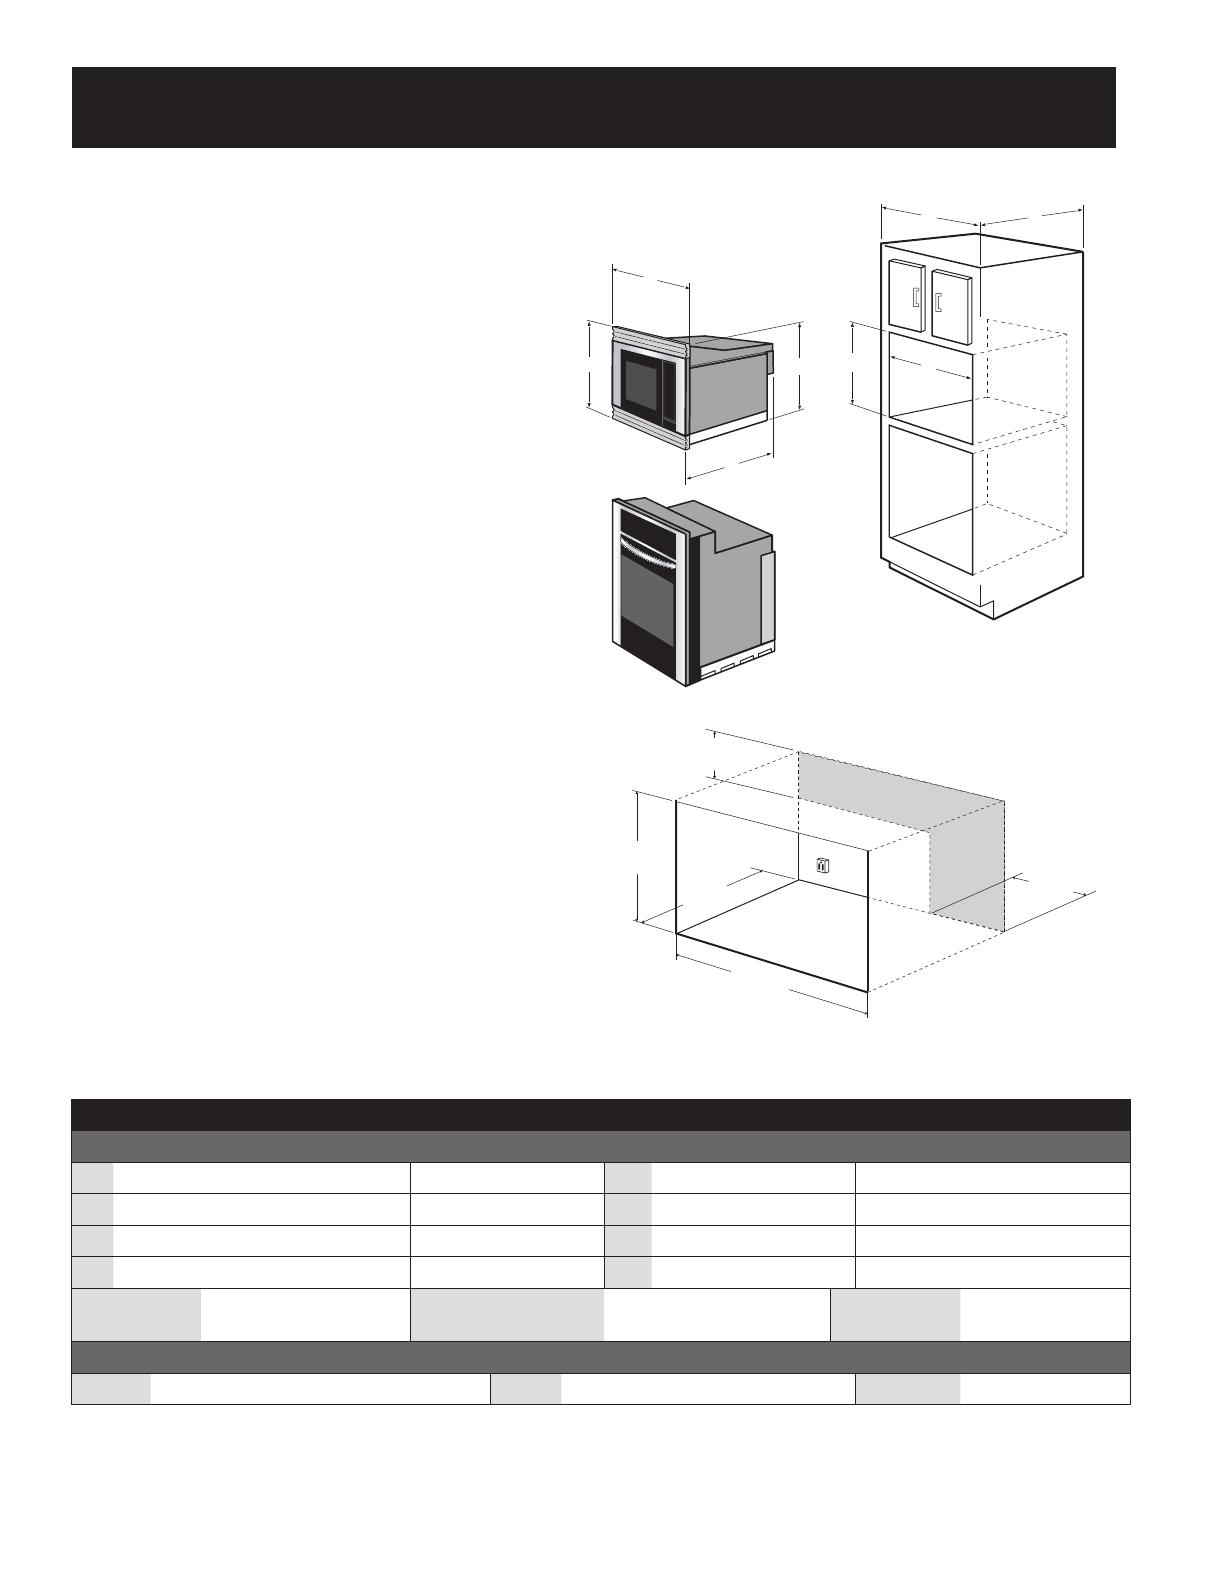
Refer to Figure 1. All dimensions are in inches (cm).
PUSHBUTTON CONVECTION MICROWAVE OVEN
E30MO65GSS
(A) Overall Width 30" (76.2 cm) (E) Cutout Width
26 ¹⁄₂"
(67.3 cm)
(B) Overall Height from Bottom
21 ⁵⁄"
(55.0 cm) (F) Cabinet Depth 24" min. (61.0 cm)
(C) Overall Depth from Rear
20 ¹"
(53.2 cm) (G) Cutout Height 20" (50.8 cm)
(D) Overall Height Top to Bottom Duct
19 ¹¹⁄₁"
(50.0 cm) (H) Cabinet Width 30" min. (76.2 cm)
Electrical
Requirements
120VAC/60 Hz (UL)
117VAC/60 Hz (CSA)
Maximum
Amp Usage
1.55 KW
1.50 KW
13.0 amps (UL)
13 (CSA)
Approximate
Shipping Wt.
60 lbs. (27.2 kg)
TRIM KIT DIMENSIONS
Height
21 ⁵⁄"
(55.0 cm) Width 30" (76.2 cm) Depth 1" (2.54 cm)
BASIC SPECIFICATIONS
NOTE:
1. Base must be capable of supporting 200 pounds
(90.7 kg).
2.
Make sure base is level and front of cabinet is
square. If the cabinet base is not level, the oven will
tend to slide out when opening the door.
3. Provide an opening in the wall or cabinet as
indicated in illustration 1. The depth should be
a minimum of 20
¹⁄₈" (51.1 cm). The floor of the
opening should be constructed of plywood strong
enough to support the weight of the convection
microwave oven (about 100 lbs.) and should be
level for proper operation of the oven.
NOTE: While the proper functioning of the
convection microwave oven does not require that
the opening be enclosed (with sides, ceiling and
rear partition), this may be required by local code,
and it is suggested that the local code be checked
for any such requirement.
4. Outlet should NOT be in the shaded area as
indicated on illustration 1a. At the rear of the
opening, provide a 3-pronged, polarized, electrical
outlet, 115-120 volt AC, 15 amp or larger.
5. Minimum required distance between the
convection microwave oven and the wall oven
should be 2-inches.
Illustration 1
E
H
G
F
B
A
D
C
20"
(50.8 cm)
26 1/2"
(67.3 cm)
5"
(12.7 cm)
23 1/2"
(59.7 cm)
11 1/2"
(29.2 cm)
Illustration 1a
PUSHBUTTON CONVECTION MICROWAVE OVEN
E30MOGSS
(A) Overall Width 30" (76.2 cm) (E) Cutout Width 26.5" (67.3 cm)
(B) Overall Height from Bottom 21.7" (55.0 cm) (F) Cabinet Depth 24" min. (61.0 cm)
(C) Overall Depth from Rear 20.9" (53.1 cm) (G) Cutout Height 20" (50.8 cm)
(D) Overall Height Top to
Bottom Duct
19.6" (49.9 cm) (H) Cabinet Width 30" min. (76.2 cm)
Electrical Requirements 120VAC/60 Hz (UL)
117VAC/60 Hz (CSA)
Max. Amp Usage 1.55 KW
1.50 KW
13.0 amps (UL)
13 (CSA)
Approx. Shipping Wt. 60 lbs. (27.2 kg)
TRIM KIT DIMENSIONS
Height 21.375" (54.3 cm) Width 30" (76.2 cm) Depth 1" (2.54 cm)
3
CONVECTION MICROWAVE OVEN INSTALLATION INSTRUCTIONS
EXHAUST DUCT ASSEMBLY
1. Insert the edge of DUCT (B) into the tab of DUCT (C).
Secure together by using SCREW (A) provided in the kit.
Remove the existing screw (#1) and (#2) at the upper right
and left rear of the oven. Secure DUCT (C) with screw (#1)
and DUCT (B) with SCREW (#2) just removed from the
oven. See illustration 2.
Illustration 3
DUCT A MUST INSERT
INTO DUCT BC
DUCT A
DUCT BC
FLANGE FROM
DUCT A WILL BE
FLUSH WITH CORNER
OF MICROWAVE
SCREW A
DUCT A
DUCT BC
SCREW A
THESE TWO
FLANGES
MUST MATE
TOGETHER
DUCT D MUST
INSERT INTO
DUCT A
DUCT D
DUCT A
SCREW A
SCREW A
DUCT D
Illustration 4
Illustration 2
DUCT C
#1
DUCT B
#2
SCREW A
2.
Position DUCT (A) on the top of the oven inserting edge
of DUCT (BC) assembly into five tabs of DUCT (A). Tighten
two SCREWS (A), securing DUCT (A) to DUCT (BC). See
illustration 3.
3.
Position DUCT (D) on top of the oven and insert it into five
tabs of DUCT (A). Secure DUCT (D) using two SCREWS (A)
provided. See illustration 4.
4
CONVECTION MICROWAVE OVEN INSTALLATION INSTRUCTIONS
MODEL AND SERIAL NUMBER LOCATION
The serial plate is located on the oven faceplate.
When ordering parts for or making inquires about your oven,
always be sure to include the model and serial numbers and
a lot number or letter from the serial plate on your oven.
CABINET INSTALLATION
1. Place oven on the Bottom Duct Assembly.
Adjust the
position of the feet of the oven so that they are fitted
into the recesses of the Bottom Duct Assembly.
Place
assembled unit adjacent to the wall or cabinet opening.
Plug the power cord into the electrical outlet.
2. Carefully guide the oven with the Bottom Duct Assembly
Illustration 5 Illustration 6
FRAME INSTALLATION
Locate tabs on the built in trim kit to the slots on control
panel and slide the built in trim kit to the left to lock the tabs
in place.
in the the prepared opening. See illustration 5. Avoid
pinching the cord between the oven and the wall. When
the Bottom Duct Assembly is in the opening correctly,
the flange will be tightly against the lower edge of the
opening.
Secure the Bottom Duct Assembly with the two
(1
³
⁄₁₆
") SCREWS (C). See illustration 6.
Position and attach the built-in trim kit frame with 4
screws (B) to the cabinet. See illustrations below.
BEFORE YOU CALL FOR SERVICE
Refer to the warranty in your Use & Care Guide for our toll-free
service number and address. Please call or write if you have
inquiries about your product and/or need to order parts.
Slide trim kit to the left to lock
into place. There should be no
gap between the trim kit and
the microwave.
3
No gap
should
be visible.
Insert two tabs on right side
of trim kit into the slots on the
microwave control panel.
1
Swing trim kit until it rests
against cabinet.
2
Screw trim kit to cabinet
using 4 screw (B)'s.
4
SCREW B
Pre-drill 56" hole
SCREW B
SCREW B
SCREW B
BOTTOM DUCT
ASSEMBLY
FOOT
DUCT RECESS
SCREW C
DETAIL A
SCREW C
  • Page 1 1
  • Page 2 2
  • Page 3 3
  • Page 4 4

Electrolux E30MO65GSS Installation guide

Type
Installation guide

Electrolux E30MO65GSS is a versatile convection microwave oven with a range of capabilities to simplify your cooking tasks:

  • It features various cooking modes, including microwave, convection, and a combination of both, providing flexibility for different types of dishes.

  • The built-in exhaust duct system effectively removes smoke and odors while cooking, ensuring a fresher kitchen environment.

  • With its spacious 1.5 cubic feet capacity, it can accommodate a variety of dishes, making it suitable for both everyday meals and entertaining guests.

  • The user-friendly control panel with pushbuttons and a digital display makes it easy to select cooking settings and monitor the progress of your food.

Ask a question and I''ll find the answer in the document

Finding information in a document is now easier with AI