Page is loading ...


2English
Contents
Overview ........................3
Specifications ........................ 4
Installation ......................5
Mounting ............................... 5
Wiring ................................... 6
Operation .....................10
Features .............................. 10
KEY Auto Setup .................. 14
Auto Setup FAQ .................. 17
Error Codes ........................ 19
Troubleshooting ............20
Warranty ......................21

3English
Overview
IMPORTANT SAFETY WARNING
PROLONGED CONTINUOUS OPERATION OF AN AMPLIFIER, SPEAKER, OR
SUBWOOFER IN A DISTORTED, CLIPPED OR OVER-POWERED MANNER
CAN CAUSE YOUR AUDIO SYSTEM TO OVERHEAT, POSSIBLY CATCHING
FIRE AND RESULTING IN SERIOUS DAMAGE TO YOUR COMPONENTS
AND/OR VEHICLE. AMPLIFIERS REQUIRE UP TO 4 INCHES (10CM) OPEN
VENTILATION. SUBWOOFERS SHOULD BE MOUNTED WITH AT LEAST 1
INCH (2.5CM) CLEARANCE BETWEEN THE FRONT OF THE SPEAKER AND
ANY SURFACE. KICKER PRODUCTS ARE CAPABLE OF PRODUCING SOUND
LEVELS THAT CAN PERMANENTLY DAMAGE YOUR HEARING! TURNING UP A
SYSTEM TO A LEVEL THAT HAS AUDIBLE DISTORTION IS MORE DAMAGING
TO YOUR EARS THAN LISTENING TO AN UNDISTORTED SYSTEM AT THE
SAME VOLUME LEVEL. THE THRESHOLD OF PAIN IS ALWAYS AN INDICATOR
THAT THE SOUND LEVEL IS TOO LOUD AND MAY PERMANENTLY DAMAGE
YOUR HEARING. PLEASE USE COMMON SENSE WHEN CONTROLLING
VOLUME.
The KEY automatically improves the sound quality of
your vehicle with the push of a button! Breathe new
life and realism into any audio system with this small,
yet powerful, amplifier and acoustic processor in one.
With simple, one-step, automatic audio calibration,
you’ll have drastically improved audio quality and
soundstage in minutes. You’ll experience symphonic
quality music whether you’re using factory speakers
and radio, or aftermarket products. The KEY-Series
combines our time proven audio designs with state-
of-the-art patented digital technology, to provide
the best audio performance in a vehicle. The KEY
amplifier uses digital circuitry for gain-matching,
frequency crossover control, AutoEQ, Compression,
Limiter, Time Delay and more, that automatically
tunes your system to audiophile performance in your
vehicle. It’s the best of all worlds, packed into a tiny
powerhouse amp that delivers our signature KICKER
Performance for your musical enjoyment.

4English
Model: KEY200.4
RMS Power, AMP1 and AMP2
@ 14.4V, 4Ω stereo, ≤ 1% THD+N 50W x 4
Length [in, cm] 7-3/8, 18.7
Height [in, cm] 1-11/16, 4.3
Width [in, cm] 2-3/4, 7
Frequency Response [Hz] AMPS 1-2: 20Hz–20kHz
Signal-to-Noise Ratio [dB] >90dB, A-weighted, re:
rated power
Input Sensitivity 250mV–10V
Selectable Electronic Crossover OFF, HI-PASS 60Hz, 80Hz,
or 120Hz; 24dB/octave
Specifications

5English
Installation
Mounting
Choose a structurally sound location to mount your
KICKER amplifier. Make sure there are no items
behind the area where the screws will be driven.
Choose a location that allows at least 4” (10cm) of
open ventilation for the amplifier. If possible, mount
the amplifier in the climate-controlled passenger
compartment. Drill four holes using a 7/64” (3mm)
bit and use the supplied #8 screws to mount the
amplifier.

6English
12V
PRT PWR
battery
fuse
left rear
left front
+
–
–
–
–
+
+
+
right front
right rear
remote turn-on
(see page 10)
bare-metal
chassis ground
bare-metal
chassis
ground
≤18”
(45cm)
≤24”
(60cm)
speaker outputs
AMP 1
AMP 2
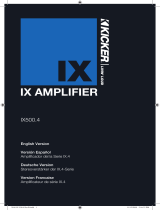
Wiring
Disconnect the vehicle’s battery to avoid an electrical
short. Then connect the ground wire to the amplifier.
Make the ground wire short, 24” (60cm) or less, and
connect it to a paint-and-corrosion-free, solid, metal
area of the vehicle’s chassis. Adding an additional
ground wire of this same gauge (or larger) between
the battery’s negative post and the vehicle chassis
is recommended. Keep the audio signal cable away
from factory wiring harnesses and other power wiring.
If you need to cross this wiring, cross it at a 90
degree angle.

7English
Cut the looped red power cable located in the KEY
carton and install using the 20A fuse. The fuse should
be within 18” (45cm) of the battery and in-line with
the harness’ power cable, which is connected to
your amplifier. If you ever need to remove the amplifier
from the vehicle after it has been installed, the ground
wire should be the last wire disconnected from the
amplifier--just the opposite as when you installed
it. The KEY amplifier is capable of using the wiring
directly from your head unit, but for best results it is
recommended you use power and ground wiring
from the vehicle’s battery and chassis. KICKER
recommends 14 gauge wire.
If needed, cut off the RCA connections to use hi-level
input.

8English
For multiple amplifier installations where distribution
blocks are used, each amplifier should have its
proper-rated fuse, or breaker, installed between the
amplifier and the distribution block within eighteen
inches of the block, or on the distribution block if it
provides for fusing. The primary power wire should
also be fused between the battery and distribution
block, within eighteen inches of the battery’s positive
terminal, with a fuse or breaker rated at least to the
sum of the individual amplifier’s fuse values, but
doesn’t exceed the capacity of your wiring.
12V
external fuse
to amplifiers
≤18”
(45cm)
external fuse
≤18”
(45cm)
external fuse
power distribution block
battery
≤18”
(45cm)

9English
woofer woofer
tweeter tweeter
STANDARD (FULL-RANGE) WIRING
minimum impedance of 4 ohms per channel
BI-AMP WIRING
minimum impedance of 4 ohms per channel
+
+
+
+
+
+
+
+
–
–
–
–
–
–
–
–
woofers must be installed to rear (AMP 2) channels
tweeters must be installed to front (AMP 1) channels
Bi-Amp switch must be ON!

10English
Operation
AMP1
INPUT
AMP2
MIC
INPUT
RADIO
DETECT
LIMITER LIMITER
GAIN
110
GAIN
110
HI-PASS FILTER OPTIONS
TIME DELAY
KICKER EQ
BI-AMP MODE
COMPRESSION
FADER
AUTO TURN-ON
60Hz 80Hz 120Hz OFF
DC
ON
ON DF
12V
OFF
OFF EN
DF
EN
AMP1&2
ON
OFF
Features
Automatic Turn-On Selection: The KEY series
offers two different automatic turn-on modes that can
be selected on the end panel; +12V and DC Offset.
Using the DC Offset mode causes the REM wire to
have +12V out for turning on additional amplifiers.
• Remote Turn-On: Set the switch to +12V to use the
remote turn-on lead from your source unit. Run 18 gauge
wire from the Remote Turn-On Lead on your source unit
to the blue REM wire on KEY amplifier’s wiring harness.
This is the preferred automatic turn-on method.
• If 12V remote turn-on is not available, DC Offset turn-
on can be used if speaker-level audio inputs are being
used. The DC offset mode detects a 3V DC offset on the
speaker wires when the source unit has been turned on.
RADIO DETECT: The RCA inputs on KICKER KEY
amplifiers are capable of receiving either Hi or Low-
level signals from your source unit. If you are using
Hi-Level inputs, but your source unit cannot detect
an audio system present or refuses to play audio
out of one or more speakers, you may need to set
Radio Detect to ON. This will activate a load resistor
at the amplifier’s inputs and tell the source unit there

11English
are speakers present. Do NOT use Radio Detect if
you are using a Low-Level input signal; doing so will
greatly reduce the input signal.
Input Gain Control with Gain Matching: The
input gain control is not a volume control. It matches
the output of the source unit to the input level of
the amplifier and features Gain Matching to prevent
clipping the input. For a quick setup, turn the source
unit up to about 3/4 volume (if the source unit goes
to 30, turn it to 25). KICKER recommends using the
test tones at www.KICKER.com/support/ to reach
the most accurate and best performing settings.
Next, with gain knobs all the way down, slowly turn
(clockwise) the gain up until you see the LIMITER LED
light up or hear audible distortion, then turn it down
a little. If the LIMITER’s LED comes on, the input is
still clipping. This step should be performed after
KEY Auto Setup and crossover settings have been
applied.
MIC INPUT: Connect the included microphone
to the 3.5mm (1/8”) microphone input and use
in conjunction with the Auto Setup process to
automatically set Time Alignment, KICKER EQ, and
Output Level Matching. Install face up to headrest,
pointing as straight as possible to the roof.
TIME DELAY: Set to enable (EN) for all speaker’s
output to reach the driver or microphone location at
the same time. Set to defeat (DF) to turn time delay
off.
KICKER EQ: Set to enable (EN) to turn KICKER EQ
on (recommended), set to defeat (DF) to turn KICKER
EQ off. When OFF, the frequency response curve will
be flat.

12English
BI-AMP MODE: The majority of systems require
this switch to be OFF. Turn ON only if your speakers
are wired in “Bi-Amp” mode (refer to BI-AMP
operation picture on page 9). The Bi-Amp mode is
to be specifically used without passive crossovers.
Possible usages are with component speakers (two
woofers and two tweeters), or with door woofers
and dash speakers. Once the Bi-Amp switch is ON,
the KEY amp will automatically detect and apply Bi-
Amplification settings during the KEY Auto Setup:
• Woofers and Tweeters: 3.2kHz 24dB/oct High Pass for
the tweeters, 3.2 kHz low pass for the woofers.
• Woofers and Dash Speakers: 320 Hz 24dB/oct High
Pass for the dash-speakers, 640 Hz low pass for the
woofers.
COMPRESSION: Set to enable (EN) to turn Auto
Compression on, reducing high amplitude signals
above a certain threshold, giving a more consistent
listening experience and protecting your audio
system. Set to defeat (DF) to turn Auto Compression
off.
FADER: Leave the fader switch to ON if you are
running two sets of inputs (front and rear for example)
to the amplifier. Set the fader switch OFF if you want
to drive all channels from a single stereo input.
HI-PASS: Use the HI-PASS switches of the amplifier
to set the internal crossover. Choose a cutoff of 60Hz,
80Hz, 120Hz, or OFF depending on the configuration
of switches.

13English
LIMITER: The LIMITER may engage for multiple
reasons, as indicated by the LIMITER LEDs. This is
to protect your speakers and allow for continuous
playback. The LIMITER will engage during:
• Engine start: The KEY is a Start-Stop compatible
amplifier; it will not turn off during engine start. When your
vehicle’s engine is starting there is a voltage dip in the
+12V line. In order to prevent a clipped output signal from
reaching your speakers, the LIMITER engages during
that moment. Should you be listening at a moderate or
higher volume level, you may see the LIMITER indicators
light up during engine start and turn off once the engine is
running.
• Low voltage: If the operating voltage fed to the amplifier
is below a level specified for full power operation (+10.8V),
you may see the LIMITER indicators light up at moderate or
high music volume levels.
• Input signal overdrive: When the input signal to the
amplifier causes its output to exceed the maximum rated
power, the LIMTER will engage to prevent severe clipping.
This can be caused by the gain setting or the input signal
being too high, or both. Reduce the gain or the strength of
the input signal.
The LIMITER engages as the amplifier reaches and
surpasses its maximum operational temperature, limiting
the power of the amplifier as the temperature rises.
Consequently, the temperature will take longer to rise until
an equilibrium is achieved in which the temperature won’t
climb any higher, and the output power won’t be limited any
further. This protection does not cutoff the audio abruptly
and it does not output clipped audio to the speakers.
• Compression switch ON: To fully protect your speakers,
you may turn the compression switch ON. This will cause
the LIMITER to engage whenever the amplifier is about to
output a clipped audio signal, though some distortion may
still be audible. If the gain is set properly and the audio
source doesn’t clip, this will provide another fail-safe for
your audio system while limiting the current draw of the
amp, which lowers the load of the amp on the vehicle’s
electrical system.

14English
KEY Auto Setup
The KEY Activation Button is a multi-function button
attached to the included microphone that will begin
the Auto Setup process, toggle between Auto Setup
optimized audio and the original audio once the Auto
Setup process has been completed, or clear previous
Auto Setup settings.
The Auto Setup consists of several tune-up steps
including individual speaker equalization, KICKER EQ,
time delay and speaker sensitivity matching. If a setting
is defeated with the DIP switches on the KEY panel,
the settings will be registered in memory and can be
applied or cleared. Changing the DIP switch positions
does not require a new Auto Setup to be run.
Make sure active noise cancellation and active
noise enhanced are disabled beforehand. You will
need to load a source for pink noise from your head
unit, whether CD, MP3, AUX, Bluetooth, USB etc.
Uncompressed audio is recommended for best results,
as this will ensure full amplitude across the frequency
spectrum (20Hz–20kHz). Visit www.kicker.com/tech
to download the pink noise profile best suited for your
listening habits!
1. Set the KEY amplifier gains (AMP-1 and AMP-2) to
the minimum (fully counter-clockwise). Place all settings
in the signal chain, such as the EQ on your head
unit, to disabled or flat. Disconnect any speakers or
subwoofers not connected to the KEY amplifier, factory
or aftermarket.

15English
2. Close the car windows, turn off the engine, turn
off the HVAC. Install the microphone to the top of the
driver’s side headrest. Make sure the microphone
faces up, pointing as straight as possible to the roof.
run mic wire
mic facing up
headrest
3. In most cases, the Bi-Amp switch should be OFF.
Check if you need to turn the Bi-Amp switch ON.
Refer to page 9 for more information
4. Start the Pink Noise. Set the Pink Noise volume to
a level above conversational (slightly loud) using your
audio source volume control (usually head-unit).

16English
5. Begin the Auto Setup by quick-pressing the KEY
Activation Button. Once initialized, you will hear
repeating tones (beeps), which indicate that you must
exit the vehicle and close the door. You will have 10
seconds until the process begins. Beeps and noises
during the KEY Auto Setup process can be loud. For
your safety, please do not remain inside the vehicle!
KEY Activation Button
6. Once the Auto Setup has completed, you will hear
happy music for a successful setup. You may quick-
press the KEY Activation Button to toggle between
the original, non-optimized audio or re-apply the KEY
optimized audio. Dial in the GAIN settings and you’re
done!
Upon successful completion, if you wish to clear
the Auto Setup settings and revert the KEY amp to
“clean”, press and hold the KEY Activation Button for
10 seconds. You will hear a single long beep. You
can then repeat the Auto Setup process if desired.
If the Auto Setup process did not complete
successfully, you will hear sad music, followed by
beeps that represent an error code. Count the
number of beeps, ranging from 1 to 6, and refer to
the Troubleshooting section. Once you’ve addressed
the cause, you can quick-press the KEY Activation
Button to run the Auto Setup process again.

17English
Auto Setup FAQ
Q: How silent must the ambient noise be in order for
the Auto Setup work properly?
A: As silent as possible, both inside and outside the
vehicle. The HVAC should be off and the windows
rolled up, with as few obstructions in the vehicle as
possible. Lower frequency noises interfere more than
higher frequency noises. In case the ambient noise is
too much, the Auto Setup program will quit with sad
music and error code #6.
Q: Can I put more than one KEY amplifier in my car?
A: Yes, however the Auto Setup program is designed
to optimize the front-sound stage only. Only one KEY
amplifier can use the Auto Setup feature.
Q: Can I use the KEY amplifier in addition to a
subwoofer?
A: Yes, but care must be taken. Make sure you
disconnect your subwoofer prior to the Auto Setup
process. The subwoofer must stay quiet during the
Auto Setup so the KEY amp can hear what the car
speakers sound like without interference.
Upon successful completion of the Auto Setup, you
can reconnect your subwoofer and use the crossover
switches on the KEY amplifier to apply an adequate
hi-pass to your speakers in order to match them with
your subwoofer. If you’ve forgotten to disconnect your
subwoofer and it plays pink noise during Auto Setup,
the Auto Setup program will quit with sad music and
error code #6.
Q: How does the Crossover work on the KEY amp?
A: In case no Auto Setup has been done, or the
Auto Setup process was for Full-Range speakers
(most cases), the 24dB/octave Linkwitz-Riley Hi-

18English
pass crossover will be applied to all speakers. This
crossover is user-selectable via DIP switches with the
following options: OFF, 60 Hz, 80 Hz or 120 Hz.
In case of a Bi-Amp system with woofers and
tweeters, the door speaker’s hi-pass is user
selectable and the lo-pass is 3.2 kHz 24 dB/octave.
The tweeter’s hi-pass is also 3.2 kHz 24db/octave.
In case of a Bi-Amp system with door and dash
woofers, the door woofer’s hi-pass is user selectable
and the low-pass is 640 Hz 24 dB/octave. The dash
woofer’s hi-pass is 320 Hz 24db/octave. The overlap
of 640 Hz low-pass with 320 Hz hi-pass is done on
purpose to enrich the mid-range. The Auto EQ takes
care of trimming excesses that can occur within this
range.
Q: My Auto Setup program did not complete
successfully, I am getting a sad song and beeps at
the end. What is it?
A: The beeps at the end are the error codes of the
Auto Setup program. Upon failure, please count the
number of beeps after the sad song and troubleshoot
with the information below.
Q: The Auto Setup process completed successfully,
but I’m not happy with the sound. What other steps
can I take?
A: Ensure all speakers connected to the KEY amplifier
are wired in phase with each other. Be sure to check
both the amplifier side and the speaker side of the
wiring.
Visit www.kicker.com/tech to download the pink noise
profile best suited for your listening habits!

19English
Error Codes
Beeps Reason Troubleshooting Action
1
Tweeter found, but the BI-
AMP switch is off
Enable the BI-AMP switch
2
BI-AMP switch is on, but
there is no sound from a
channel
Make sure all wiring is properly
connected to the correct amplifier
channels.
3
Auto Time Delay failed
- possible blockage or
disconnected speaker
Check speaker connections for
disonnected wire. Avoid physical
barriers. Possible faulty speaker.
4
Auto EQ failed
Make sure Pink Noise is loaded
and playing on the head unit at an
adequately high volume.
5
Front/Rear sensitivity
correction failed
Check speaker connections for
disonnected wire. Avoid physical
barriers. Possible faulty speaker.
6
Too much ambient noise
Make sure any subwoofers are
disconnected, fans are off, engine is off,
windows are rolled up, doors are shut
and external noise is at a minimum.

20English
Troubleshooting
If your amplifier does not appear to be working, check the obvious things first such as blown
fuses, poor or incorrect wiring connections, incorrect setting of crossover switch and gain
controls, etc. There are Power (PWR) & Protection (PRT) LEDs on the side panel of your
KICKER KEY series amplifier. Depending on the state of the amplifier and the vehicle’s charging
system, the LEDs will glow either green or red. When the green LED is lit, this indicates the
amplifier is turned on and no trouble exists.
Green LED off, no output? With a Volt Ohm Meter (VOM) check the following:
+12 volt
power terminal (should read +12V to +16V)
Remote turn-on terminal (should read +12V to
+16V)
Check for reversed power and ground connections
Ground terminal, for proper
conductivity.
Green LED on, no output? Check the following:
RCA connections
Test speaker
outputs with a “known” good speaker.
Substitute source unit with a “known” good source
unit.
Check for a signal in the RCA cable feeding the amplifier with the VOM meter set to
measure “AC” voltage.
Red (PRT) LED flickering with loud music? The red (PRT) LED indicates low battery
voltage. Check all the connections in your vehicle’s charging system. It may be necessary to
replace or charge your vehicle’s battery or replace your vehicle’s alternator.
Red (PRT) LED on, no output?
Amplifier is very hot = thermal protection is engaged.
Test for proper impedance at the speaker terminals with a VOM meter (see the diagrams in
this manual for minimum recommended impedance and multiple speaker wiring suggestions).
Also check for adequate airflow around the amplifier.
Amplifier shuts down only while vehicle
is running = voltage protection circuitry is engaged. Voltage to the amplifier is not within the
6–16 volt operating range. Have the vehicle’s charging and electrical system inspected.
Amplifier will only play at low volume levels = short circuit protection is engaged. Check for
speaker wires shorted to each other or to the vehicle chassis. Check for damaged speakers
or speaker(s) operating below the minimum recommended impedance.
LIMITER LED on?
Input signal overdrive or gain set too high: Reduce the gain or the
strength of the input signal.
Thermal protection engaged due to heat sink temperature.
Keep amplifier in climate controlled cabin, away from direct sunlight, or in a better ventilated
area.
Low input voltage (+12V line): Check your power supply wires and battery voltage.
Compression switch is on: If not desired, turn the compression switch off.
No or low output?
Check the balance and fader controls on source unit.
Check the
RCA (or speaker input) and speaker output connections.
If using a Low-Level signal, make
sure Radio Detect is OFF.
Check the volume level on your source unit, to include the volume
level of any connected phones or MP3 players.
Alternator noise-whining sound with engine’s RPM?
Check for damaged RCA
(or speaker input) cable
Check the routing of RCA (or speaker input) cable
Check the
source unit for proper grounding
Check the gain settings and turn them down if they are set
too high.
CAUTION: When jump starting the vehicle, be sure that connections made with jumper
cables are correct. Improper connections can result in blown amplifier fuses as well as the
failure of other critical systems in the vehicle.
If you have more questions about the installation or operation of your new KICKER product,
see the Authorized KICKER Dealer where you made your purchase. For more advice on
installation, click on the SUPPORT tab on the KICKER homepage, www.KICKER.com.
Choose the TECHNICAL SUPPORT tab, choose the subject you are interested in, and then
download or view the corresponding information. Please E-mail [email protected] or call
Technical Services (405) 624-8583 for unanswered or specific questions.
/