GE APCD08AXWW Owner's manual

Category
Mobile air conditioners
Type
Owner's manual

This manual is also suitable for

Write the model and serial
numbers here:
Model # _________________
Serial # _________________
Find these numbers on a label on
the side of the air conditioner.
GE is a trademark of the General Electric Company. Manufactured under trademark license.
OWNER’S MANUAL
AND INSTALLATION
INSTRUCTIONS
AIR CONDITIONER
Portable Room
49-5000135 Rev. 0 10-18 GEA
APCD06
APCD08
IMPORTANT SAFETY INFORMATION .... 3
CONTROLS ...........................4
PARTS AND FEATURES ................ 6
INSTALLATION REQUIREMENTS ........ 7
INSTALLATION INSTRUCTIONS ........ 8
AIR CONDITIONER USE ............... 12
AIR CONDITIONER CARE ............. 12
TROUBLESHOOTING ................. 13
LIMITED WARRANTY ................. 15
CONSUMER SUPPORT ................ 16
2 49-5000135
THANK YOU FOR MAKING GE APPLIANCES A PART OF YOUR HOME.
Whether you grew up with GE Appliances, or this is your first, we’re happy to have you in the family.
We take pride in the craftsmanship, innovation and design that goes into every GE Appliances
product, and we think you will too. Among other things, registration of your appliance ensures that we
can deliver important product information and warranty details when you need them.
Register your GE appliance now online. Helpful websites and phone numbers are available in the
Consumer Support section of this Owner’s Manual. You may also mail in the pre-printed registration
card included in the packing material.
49-5000135 3
IMPORTANT SAFETY INSTRUCTIONS
WARNING
To reduce the risk of fire, electrical
shock, injury to persons, or damage when using the air
conditioner, follow basic precautions, including the
following:
Read all of the instructions before using this
appliance.
Plug into a grounded 3 prong outlet.
Do not remove ground prong.
Do not use an adapter.
Do not use an extension cord.
Do not operate the air conditioner if it has a
damaged cord or plug, if it is not working properly, or
if it has been damaged or dropped.
The air conditioner should be serviced only by
qualified service personnel. Call an authorized
service company for examination, repair, or
adjustment.
Disconnect power before servicing.
Disconnect power before cleaning.
NOTE: Turning off power by pressing the Power
button does NOT disconnect the appliance from the
power supply.
Do not install or use the air conditioner in any area
where the atmosphere contains combustible gases
or where the atmosphere is contaminated. Avoid
any chemicals coming in contact with your air
conditioner.
Do not store anything directly on top of the air
conditioner.
Use two or more people to move and install air
conditioner.
Never operate the air conditioner without the filters in
place.
Do not use the air conditioner near a bathtub,
shower or wash basin or other wet area.
READ AND SAVE THESE INSTRUCTIONS
IMPORTANT SAFETY INFORMATION
READ ALL INSTRUCTIONS BEFORE USING THE APPLIANCE
IMPORTANT SAFETY INFORMATION
4 49-5000135
Features and appearance will vary.
Lights next to the touch pads on the air conditioner control panel indicate the selected settings.
Controls
A. Timer Button
Program a time from (1-hour to 24-hours) for the air
conditioner to turn Off or On. When a Time Delay is
programmed, the Timer indicator light will illuminate.
While the air conditioner is operating:
1. Press the Timer button.
2. Press the Up/Down arrow buttons to select the
number of hours you want the air conditioner to
continue to operate before turning Off.
NOTE: Wait approximately 5 seconds for the Turn-Off
time to be saved.
While the air conditioner is off:
1. Press the Timer button.
2. Press the Up/Down arrow buttons to select the
number of hours you want the air conditioner to
remain off before turning On.
NOTE: Wait approximately 5 seconds for the Turn-On
time to be saved.
To cancel the timer:
Press the Timer button once, the hours remaining will
flash, press the timer button again and the timer will
be canceled.
B. Fan Speed Button
The fan speed can be adjusted from Low speed to
High speed when the air conditioner is either in Cool
or Fan mode.
NOTE: The fan speed cannot be adjusted when the
unit is in DEHUM mode.
Press the Fan Speed button to toggle among the two
speeds. The corresponding fan speed indicator will
illuminate.
C. Remote Control Signal Receiving Window
Aim the Remote Control at this window so the Control
will receive the signal.
D. CONTROL PANEL DISPLAY
Displays the Set Temperature in degrees Fahrenheit
or degrees Celsius, or the hours remaining in a
Time Delay. The corresponding indicator light will
illuminate.
E. Up and Down Arrow Buttons
Adjusts the Temperature or Hours in Time Delay.
To Set the Temperature:
The temperature can be set between 62ºF and 86º F
(17ºC and 30º C) when the air conditioner is in Cool
mode.
1. Press the Mode button until the Cool mode is
selected.
2. Press the Up Arrow or Down Arrow buttons to select
the Temperature.
NOTE: The temperature cannot be set when the air
conditioner is in either Fan or Dry mode.
F. Mode Button
Press the Mode button to toggle among the operating
options. The corresponding indicator will illuminate:
Cool – Cools the room to the set temperature
ECO – Cycles fan to cool economically
Dehum – Reduces the humidity in the room
Fan – Circulates the air in the room without cooling
G. Power Button
Turns ON/OFF power to the air conditioner.
NOTE: Turning o power by pressing the Power button
does NOT disconnect the appliance from the power
supply.
Press the Power button. The Power indicator will
illuminate.
REMOTE CONTROL
1. Insert the two batteries (provided).
2. Aim the remote control at the signal receiver on the
control panel to operate the air conditioner.
H. Sleep Button
Increases the set temperature by 2ºF (1ºC) after
2-hours, and then increases the temperature by an
additional 2ºF (1ºC) after another 2-hours.
NOTE: The fan will operate at Low speed and cannot
be adjusted while in Sleep mode. Press the Sleep
button to enter Sleep mode. The Sleep indicator will
illuminate.
To Cancel Sleep Mode:
Press the Sleep button or the Mode button (Cool, Fan
or Dry) on the remote control.
I. ºC/ºF Button
Press the ºC/ºF button to toggle between displaying
the temperature in degrees Fahrenheit or degrees
Celsius. The corresponding indicator will illuminate.
Controls
USING THE AIR CONDITIONER
A
B
F
G
E
C
D
H
High
Low
Sleep
TIMER POWER
TEMP
Cool
Dehum
Fan
C / F
I
49-5000135 5
USING THE AIR CONDITIONER
Controls
Cool Mode
Use the COOL mode for cooling.
To set the COOL mode:
1. Press the MODE pad until the COOL indicator light is lit.
2. Press the FAN pad to set HIGH or LOW fan speed.
3. Press + or - to set the desired temperature between
61°F and 89°F in 1°F increments.
After settings have been made, the display will change
back to show the room temperature.
The temperature control is used to maintain the room
temperature. The compressor will cycle on and off
to keep the room at the set level of comfort. Set the
temperature control at a lower number and the indoor
air will become cooler. Set the temperature control at a
higher number and the indoor air will become warmer.
NOTE: If the air conditioner is off and is then turned on
while set to COOL, it will take approximately 3 minutes
for the compressor to start and cooling to begin.
Cooling Descriptions
For Normal Cooling—Select the COOL mode and
HIGH or LOW fan speed with a middle set temperature.
For Maximum Cooling—Select the COOL mode
and HIGH fan speed with a lower set temperature.
For Quieter & Nighttime Cooling—Select the
COOL mode and LOW fan speed with a middle set
temperature.
NOTE: If you switch from COOL or DEHUM mode
setting to OFF, wait 3 minutes before restarting.
DEHUM Mode—Dehumidification
Use the DEHUM mode to provide dehumidification only.
The fan will run at a fixed speed at this setting, so a fan
speed cannot be set. Keep windows and doors closed
for the best dehumidifying effects.
To set the DEHUM mode:
•Press the MODE pad until the DEHUM indicator light is lit.
In the DEHUM mode, a set temperature will not be
displayed. After DEHUM mode has been set, the display
will change back to show the room temperature.
NOTE: If you switch from a DEHUM setting to OFF or
to a fan setting, wait at least 3 minutes before switching
back to a DEHUM setting.
If using the unit in the DEHUM mode as a dehumidifier
for an extended time.
1 . Unplug the power cord.
2. Connect a drain hose (not included) to the bottom
drain port (see page 10, lower drain #8) and lead
hose to floor drain.
3. Reconnect the power cord and press the MODE pad
until the DEHUM indicator light is lit.
FAN Mode
Use the FAN mode to provide air circulation and filtering
without cooling.
To set the FAN mode:
Press the FAN pad until the desired indicator light for
HIGH or LOW fan speed is lit.
Since fan only settings do not provide cooling, a set
temperature will not be displayed. After FAN speed has
been set, the display will change back to show the room
temperature.
Power Outage Recovery Feature
In the case of a power outage or interruption, the unit will
automatically re-start in the settings last used after the
power is restored.
NOTE: If the TIMER was set before the power outage, it
will need to be reset after power is restored.
The display will always default to show the room temperature.
When the air conditioner is turned on, it will automatically start in the last mode and fan settings selected.
ECO Mode
Use ECO mode for economy cooling.
To set ECO Mode:
1. Press the MODE pad until the ECO indicator light is lit.
2. Press FAN pad to set high or low fan speede.
3. Press + or - to set desired temperature between 61°F
and 89°F in 1°F increments.
In ECO mode, the fan will cycle off with the compressor
when room temperature is reached. Then thefan will
cycle 10 minutes off / 2 minutes on to sample the room
temperature.
6 49-5000135
USING THE AIR CONDITIONER
1
2
3
4
5
6
7
8
9
12
11
10
1. Control Panel
2. Vertical Louvers
3. Horizontal Louvers
4. Casters
5.
Handle (right side for remote control storage)
6. Plug Storage
7. Power Cord Storage
8. Power Cord
9. Drain Hole and Cover
10. Filter
11. Filters
12. Filter
Parts and Features
NOTE: Remove filters (number
11) first, in order to access filters
10 and 12.
49-5000135 7
INSTALLATION REQUIREMENTS
Installation Requirements
TOOLS AND PARTS
Gather the required tools and parts before starting installation.
TOOLS NEEDED
• Flat-blade Screwdriver
• Phillips Screwdriver
PARTS SUPPLIED
Pointed Screws (7)
2 for top window
brackets
1 for security bracket
4 for main
window panel
Exhaust
Nozzle
Exhaust Hose
Top Window
Bracket (2)
Use for Vinyl
Windows
Bottom
Window
Bracket (2)
Use for Vinyl
Windows
Security
Bracket
Main Window
Panel
Extension
Panels (2)
Flat Screws (6)
4 for extension
panels
2 for nozzles
Stuffer Seal
Strip (15 mm x 33
mm x 1200 mm)
Bottom
Foam Seal
(3 mm x 10
mm x 102 cm
Top Foam
Seal
(10 mm x 10
mm x 102 cm
8 49-5000135
Installation Instructions
Questions? Call GE Appliances at 800.GE.CARES (800.432.2737) or visit our Website at: GEAppliances.com.
BEFORE YOU BEGIN
Read these instructions completely and carefully.
IMPORTANT Save these instructions for
local inspector’s use.
IMPORTANT Observe all governing codes
and ordinances.
Note to InstallerBe sure to leave these
instructions with the Consumer.
Note to Consumer – Keep these instructions for
future reference.
Skill level Installation of this appliance requires
basic mechanical skills.
Completion time – Approximately 1 hour
We recommend that two people install this product.
Proper installation is the responsibility of the
installer.
Product failure due to improper installation is not
covered under the Warranty.
You MUST use all supplied parts and use proper
installation procedures as described in these
instructions when installing this air conditioner.
Location Requirements
Place the air conditioner on a flat, level surface in a
location that is at least 30” (76.2 cm) from any wall.
NOTE: A minimum clearance of 30” (76.2 cm) from
the air conditioner to the wall must be maintained to
ensure proper airflow.
Maintain a minimum 30” (76.2 cm) clearance around
the air conditioner to not block airflow.
Keep the air conditioner free of any obstructions
such as drapes, curtains, blinds, etc.
The exhaust hose should be free of any
obstructions.
Do not place the air conditioner on an unstable
or raised surface because it could fall and cause
damage or injury.
Do not place the air conditioner in direct sunlight
or near a heat source such as baseboard heaters,
stoves, etc.
The window panel can be installed in a window with
a minimum 30” (76.2 cm) to a maximum 40” (101.6
cm) opening.
30"
(76.2 cm)
30"
ELECTRICAL REQUIREMENTS
Some models require a 115/120-volt AC,
60-Hz grounded outlet protected with a
15-amp time-delay fuse or circuit breaker.
The 3-prong grounding plug minimizes the possibility
of electric shock hazard. If the wall outlet you plan to
use is only a 2-prong outlet, it is your responsibility
to have it replaced with a properly grounded 3-prong
wall outlet.
CAUTION
Do not, under any circumstances, cut or remove the
third (ground) prong from the power cord.
Do not change the plug on the power cord of this air
conditioner.
Aluminium house wiring may present special
problems—consult a qualified electrician.
Power cord includes a current interrupter device. A
test and reset button is provided on the plug case. The
device should be tested on a periodic basis by first
pressing the TEST button and then the RESET button
while plugged into the outlet. If the TEST button does
not trip or if the RESET button will not stay engaged,
discontinue use of the air conditioner and contact a
qualified service technician.
INSTALLATION INSTRUCTIONS
49-5000135 9
INSTALLATION INSTRUCTIONS
Installation Instructions
1. Unpack the Air Conditioner
WARNING
Excessive Weight Hazard
Use two or more people to move and install air
conditioner.
Failure to do so can result in back or other injury.
Remove packaging materials. Save the carton
and the foam packaging for storing the air
conditioner when not in use.
NOTE: There are NO packing materials inside the
air conditioner to remove—Do Not open the cabinet.
Properly dispose of/recycle all packing material.
Handle the air conditioner gently.
Keep the air conditioner upright and level. Do not
set the air conditioner on its side, front, back or
upside down.
2. Install Exhaust Nozzle to Main
Window Panel
1. Hold the main window panel so that the L-shaped
edges of the panel are facing you.
A
A
L-Shaped
Edges
2. Align the exhaust nozzle with the slots in the
opening, and then insert and slide the nozzle to
access the hole from the back of the main window
panel.
A
B
A
Main
Window
Panel
B
Exhaust
Nozzle (1 or
2 depending
on model)
3. Turn the main window panel over, so that the
nozzle is away from you. Insert a flat screw
through the hole to fasten the window panel to the
adapter.
NOTE: On a dual hose unit, install the smaller hose
nozzle to the left-hand hole in the panel.
A A Flat
Screw
3. Install Main Window Panel and
Extension Panels
NOTE: Depending on the size of your window
opening, use the main panel and one or both of the
extension panels.
1. Open the window and place the main window
panel into the window.
NOTE: The window assembly is designed to
accommodate either a vertical slide or horizontal
slide window.
Vertical Slide Window:
A
A
Main Window Panel
Horizontal Slide Window:
A
Main Window Panel
A
2. Adjust the extension panel(s) to the width or
height of the window as shown.
NOTE: Some window installations may require
the extension panels to be trimmed.
3. Depending on the number of extension panels
used, use two or four flat screws to secure the
extension panel(s) to the main panel. Install from
the back.
NOTE: There are many window types on the
market today. Use the foam strips and brackets
(provided) to secure the extension panels that will
fit the window opening.
4. For vinyl windows only. Skip to step 6 for wood
windows. Place the two top window brackets and
two bottom window brackets where they will best
support the extension panels.
Before assembly: USE ONLY FOR VINYL
A
Top Window Brackets
B
Bottom Window Brackets
A
B
A
B
10 49-5000135
Installation Instructions
3. Install Main Window Panel and
Extension Panels (cont.)
After assembly:
Attach with pointed screws (2)
5.
Apply the top foam strip (provided) across the
top of the window panel assembly, and then
apply the bottom foam strip (provided) across the
bottom front edge of the window panel assembly,
as shown.
Typical Vinyl Window Installation:
A
Top Foam Strip
B
Top Bracket
C
Extension Panel
D
Bottom Bracket
E
Bottom Foam Strip
A
B
C
D
E
6. Place the window panel assembly in the window,
and using the screws provided, fasten the
assembly to the window sill and window frame.
7. Using one pointed screw, install the Security
bracket to the window.
NOTE: The security bracket prevents the window
from being opened from the outside.
B
A
A
Security Bracket
B
Pointed Screw (1)
4. Attach Exhaust Hose to the
Exhaust Nozzle
1. Grasp both ends of the exhaust hose and gently
pull to expand the hose.
NOTE: Do not attach additional hoses to extend
the length. This would decrease cooling efficiency
and may damage the air conditioner.
2. Using a counterclockwise motion, attach the
open end of the exhaust hose to the exhaust
nozzle.
A
A
Exhaust Nozzle
B
C
(1 or 2 depending
on the model)
B
Hose (open end)
C
Hose (connector)
5. Connect Exhaust Hose to the
Air Conditioner
IMPORTANT: When connecting the hose, the air
conditioner must be close enough to the window that
you will not dislodge the window seal plate. Once
the hose is connected, move the air conditioner 20”
(51 cm) from the wall.
1. Extend the flexible exhaust hose to reach out to
the unit.
2. Aim the opening of the hose to the air exhaust
outlet and push it hard straight into the outlet until
it clicks.
INSTALLATION INSTRUCTIONS
49-5000135 11
INSTALLATION INSTRUCTIONS
Installation Instructions
6. Complete Installation
WARNING
Electrical Shock Hazard:
• Plug into a grounded 3 prong outlet.
Do not remove the ground prong from the power
cord plug.
• Do not use an adapter.
• Do not use an extension cord.
Failure to do so can result in death, fire or
electrical shock.
1. Plug the power cord into a grounded 3 prong
outlet.
2. Press the Reset button on the power cord to
ensure the safety plug is providing power to the
air conditioner.
12 49-5000135
IMPORTANT: If the air conditioner has been tilted on its
side, wait 24 hours before turning on the air conditioner to
allow the oil to return to the compressor. This will prevent
the air conditioner from failing prematurely.
Allow 30” (76.2 cm) of space around the unit for proper
air circulation.
Do Not operate the air conditioner without air filters in
place.
Do not spill liquid on the control panel; it may cause
an electrical short to the interior electronic parts that
would either disable them or cause them to function
improperly.
When turning on the air conditioner for the first time
after plugging it into an electrical outlet, the unit will
start in Cooling mode set at 75ºF (24°C), and at High
fan speed. The control panel will display the current
room temperature.
When turning on the unit after previous use, it will
remember the last settings used.
After a normal shut down, please wait for 3 minutes
before restarting the unit.
In Cooling mode, this unit should not require water
to be removed. This model has a unique design that
continuously evaporates the water.
When the unit is operated in high humidity conditions,
you may need to empty the water tank periodically.
The unit will shut down automatically when the water
tank is full. The Water Full indicator illuminates to alert
you of this condition.
Air Conditioner Use
Air Conditioner Care
WARNING
Electrical Shock Hazard:
Disconnect power before cleaning.
Failure to do so can result in death or electrical shock.
Cleaning
1. Unplug or disconnect power.
2. Use only a soft cloth dampened with water to clean the
cabinet.
NOTE: Do not use a liquid or spray cleaner to clean
the air conditioner.
NOTE: DO NOT use chemicals, abrasives, ammonia,
chlorine bleach, concentrated detergents, solvents or
scouring pads. Some of these chemicals/items may
damage and/or discolor your air conditioner.
3. Dry thoroughly with a soft cloth.
4. Plug in or reconnect power.
Air Filters
The air filters should be cleaned at least once a week for
your unit to operate at optimum efficiency.
IMPORTANT: Do Not operate the air conditioner without
the air filters in place.
1. Unplug or disconnect the power.
2. Pull on the tabs to slide out the filters from the back of
the air conditioner.
NOTE: The secondary filters are accessible once the
main filters are removed.
3. Wash or vacuum the dust from the air filters.
NOTE: If washed, gently shake the filter to remove the
excess water and dust particles trapped in the filter.
4. Reinstall the filters.
5. Plug in or reconnect power.
Internal Water Tank
The Water Full indicator illuminates, when the internal
water tank has filled with condensed water.
To Empty the Internal Water Tank:
1. Unplug or disconnect power.
2. Place a shallow 1 quart or larger pan (not included)
below the lower drain located on the back (near the
bottom) of the air conditioner.
3. Remove the cap and the rubber plug and drain the
water tank.
4. Re-insert the drain plug and screw the cap snugly into
place.
5. Plug in or reconnect power.
Storage
If the unit is not being used for a long period of time:
1. Unplug or disconnect power.
2. Drain the water from the water tank. See “Air
Conditioner Care.”
3. Use the original packaging to repack the unit to avoid a
buildup of dust or dirt.
4. Store the air conditioner in a cool, dry location.
AIR CONDITIONER USE / AIR CONDITIONER CARE
49-5000135 13
TROUBLESHOOTING TIPS
Troubleshooting Tips
Problem Possible Causes Solution
Unit does not start or
operate
Power supply cord is not plugged into an
outlet.
Plug the power cord into a grounded 3 prong
outlet.
Power supply cord has tripped. Press and release the RESET button on the
power supply cord.
The Power button has not been pressed. Press the Power button on the Control Panel or
Remote Control to turn ON the air conditioner.
There is no power to the electrical outlet. Plug a working lamp into the outlet to check for
power.
A household fuse has blown or a circuit
breaker has tripped.
Replace the fuse or reset the circuit breaker.
The control was programmed for a Time
Delay.
Cancel the Time Delay. See “Control Panel.”
The batteries in the remote control are
dead.
Replace the batteries.
The internal water tank is full.
NOTE: The air conditioner automatically
turns off, and the Water Full indicator
illuminates to alert you of this condition.
Empty the water tank. See “Air Conditioner
Care.”
Remote control is not
working
Batteries are dead. Replace the batteries.
Batteries are installed incorrectly. Make sure the batteries are inserted in the
correct position.
Air conditioner is
working but the room
is not cooling.
The room temperature is hot.
NOTE: On extremely hot and humid
days,the air conditioner will take longer
to cool the room.
Allow time for the room to cool when you first turn
on the unit.
Make sure the air conditioner has an adequate
BTU rating for the size of the room being cooled.
The control is set incorrectly to Fan or
Dehum mode.
Set the Mode to Cool and the Fan Speed to High.
Airflow is restricted. Remove any obstacles to the airflow and redirect
airflow for uniform cooling.
Temperature set too high. Lower the set temperature.
Air filters are dirty or restricted. Clean the air filter. See “Air Conditioner Care.”
Air conditioner installed incorrectly Check the exhaust hose and window panel for
proper installation.
Doors and windows are open. Close the doors and windows to the room being
cooled to prevent cooled air from escaping.
14 49-5000135
Notes
NOTES
49-5000135 15
Limited Warranty
Staple your receipt here. Proof of the original purchase date
is needed to obtain service under the warranty.
EXCLUSION OF IMPLIED WARRANTIES - Your sole and exclusive remedy is product repair as provided in this
Limited Warranty. Any implied warranties, including the implied warranties of merchantability or fitness for a particular
purpose, are limited to one year or the shortest period allowed by law.
For US Customers: This limited warranty is extended to the original purchaser and any succeeding owner for
products purchased for home use within the USA. If the product is located in an area where service by a GE
Appliances Authorized Servicer is not available, you may be responsible for a trip charge or you may be required to
bring the product to an Authorized GE Appliances Service location for service. In Alaska, the limited warranty excludes
the cost of shipping or service calls to your home.
Some states do not allow the exclusion or limitation of incidental or consequential damages. This limited warranty
gives you specific legal rights, and you may also have other rights which vary from state to state. To know what your
legal rights are, consult your local or state consumer affairs office or your state’s Attorney General.
Warrantor US:
GE Appliances, a Haier company
Louisville, KY 40225
Customer instruction. This owner’s manual provides
information regarding operating instructions and user
controls.
Improper installation. If you have an installation
problem, or if the air conditioner is of improper
capacity, contact your dealer or installer. You
are responsible for providing adequate electrical
connecting facilities.
Failure of the product resulting from modifications
to the product or due to unreasonable use including
failure to provide reasonable and necessary
maintenance.
Replacement of house fuses or resetting of circuit
breakers.
Failure due to corrosion on models not corrosion-
protected.
Damage to the product caused by improper power
supply voltage, accident, fire, floods or acts of God.
Incidental or consequential damage caused by
possible defects with this air conditioner.
Damage caused after delivery.
What Will Not Cover:
For The Period Of: Will Replace:
One Year
From the date of the
original purchase
Replacement, repair, or refund of the original retail price for any product which fails due
to a defect in materials or workmanship. If the unit is exchanged, the replacement unit
is warranted for the remainder of your product’s original one-year warranty period. GE
Appliances will, at its sole discretion, replace the product with a product of the same or
comparable functionality and quality or refund the original retail price.
Properly pack your unit. We recommend using the
original carton and packing materials.
Return the product to the retail location where it was
purchased.
Include in the package a copy of the sales receipt
or other evidence of date of original purchase. Also
print your name and address and a description of the
defect.
In Order to Make a Warranty Claim During the First 90 Days from the Date of Original Purchase:
Locate your original sales receipt and make a note of
your model and serial number.
Call 800.GE.CARES (800.432.2737) or visit
GEAppliances.com/service (in the United States) to
initiate the product replacement process.
You will be asked to provide your name, address, date
of purchase, model and serial number.
GE Appliances will arrange for a carton to be sent to
your home to recover the product.
Please return all requested materials (postage
pre-paid) in the carton provided. Please include a
description of the defect.
You should receive your replacement product or
refund within 7 to 10 business days after your package
is received.
In Order to Make a Warranty Claim During the Remainder of the One-Year Warranty:
LIMITED WARRANTY
16 49-5000135
Printed in China
Consumer Support
GE Appliances Website
Have a question or need assistance with your appliance? Try the GE Appliances Website 24 hours a day, any day
of the year! You can also shop for more great GE Appliances products and take advantage of all our on-line support
services designed for your convenience. In the US: GEAppliances.com
Register Your Appliance
Register your new appliance on-line at your convenience! Timely product registration will allow for enhanced
communication and prompt service under the terms of your warranty, should the need arise. You may also mail in
the pre-printed registration card included in the packing material. In the US: GEAppliances.com/register
Schedule Service
Expert GE Appliances repair service is only one step away from your door. Get on-line and schedule your service at
your convenience any day of the year. In the US: GEAppliances.com/service or call 800.432.2737 during normal
business hours.
Extended Warranties
Purchase a GE Appliances extended warranty and learn about special discounts that are available while your
warranty is still in effect. You can purchase it on-line anytime. GE Appliances Services will still be there after your
warranty expires. In the US: GEAppliances.com/extended-warranty or call 800.626.2224 during normal
business hours.
Remote Connectivity
For assistance with wireless network connectivity (for models with remote enable),visit our website at
GEAppliances.com/connect or call 800.220.6899 in the US.
Parts and Accessories
Individuals qualified to service their own appliances can have parts or accessories sent directly to their homes
(VISA, MasterCard and Discover cards are accepted). Order on-line today 24 hours every day.
In the US: GEApplianceparts.com or by phone at 877.959.8688 during normal business hours.
Instructions contained in this manual cover procedures to be performed by any user. Other servicing
generally should be referred to qualified service personnel. Caution must be exercised, since improper
servicing may cause unsafe operation.
Contact Us
If you are not satisfied with the service you receive from GE Appliances, contact us on our Website with all the
details including your phone number, or write to:
In the US: General Manager, Customer Relations | GE Appliances, Appliance Park | Louisville, KY 40225
GEAppliances.com/contact
CONSUMER SUPPORT
49-5000135 Rev. 0 10-18 GEA
APCD06
APCD08
ACCONDICIONADORES DE AIRE
PARA SALA
Escriba los números de modelo
y serie aquí:
# de Modelo _____________
# de Serie _______________
Puede encontrar estos números
en una etiqueta en el costado
del acondicionador de aire.
GE es una marca registrada de General Electric Company. Fabricado bajo licencia de marca.
MANUAL DEL
PROPIETARIO Y
INSTRUCCIONES
DE INSTALACIÓN
INFORMACIÓN IMPORTANTE DE
SEGURIDAD .......................... 3
PIEZAS Y CARACTERÍSTICAS .......... 4
REQUISITOS DE INSTALACIÓN ......... 6
INSTRUCCIONES DE INSTALACIÓN .....7
PANEL DE CONTROL ..................8
USO DEL ACONDICIONADOR DE AIRE . . 12
CUIDADO DEL ACONDICIONADOR DE AIRE
................................. 12
SOLUCIÓN DE PROBLEMAS ........... 13
GARANTÍA LIMITADA ................. 15
INFORMACIÓN A TENER EN CUENTA . . . 16
2 49-5000135
GRACIAS POR HACER QUE GE APPLIANCES SEA PARTE DE SU HOGAR.
Ya sea que haya crecido usando GE Appliances, o que ésta es su primera vez, nos complace
tenerlo en la familia.
Sentimos orgullo por el nivel de arte, innovación y diseño de cada uno de los electrodomésticos de
GE Appliances, y creemos que usted también. Entre otras cosas, el registro de su electrodoméstico
asegura que podamos entregarle información importante del producto y detalles de la garantía
cuando los necesite.
Registre su electrodoméstico GE ahora a través de Internet. Sitios Web y números telefónicos útiles
están disponibles en la sección de Soporte para el Consumidor de este Manual del Propietario.
También puede enviar una carta en la tarjeta de inscripción preimpresa que se incluye con
el material embalado.
49-5000135 3
INSTRUCCIONES IMPORTANTES DE SEGURIDAD
ADVERTENCIA
Para reducir el riesgo de incendio,
choque eléctrico, lesiones a personas o daños al utilizar el
acondicionador de aire, siga precauciones básicas,
incluyendo las siguientes:
Lea todas las instrucciones antes de usar este
electrodoméstico.
Conecte a un contacto de pared de conexión a tierra de 3
terminales.
• No quite el terminal de conexión a tierra.
• No use un adaptador.
• No use un cable eléctrico de extensión.
No ponga a funcionar el acondicionador de aire si tiene un
cable o enchufe dañado, si no funciona correctamente o si
se ha dañado o caído.
El acondicionador de aire solo debe ser reparado por
personal de servicio competente. Llame a la compañía de
servicio técnico autorizada para su inspección, reparación
o ajuste.
Desconecte el suministro de energía antes de darle
servicio técnico.
Desconecte el suministro de energía antes de limpiarlo..
NOTA: Si apaga la unidad presionando el botón Power
(Encendido), esto NO desconecta el electrodoméstico del
suministro de energía.
No instale ni utilice el acondicionador de aire en áreas
donde la atmósfera contenga gases combustibles o
donde la atmósfera esté contaminada. Evite que cualquier
producto químico entre en contacto con el acondicionador
de aire.
No almacene nada directamente encima del acondicionador
de aire.
Con la ayuda de dos o más personas, mueva e instale el
acondicionador de aire.
Nunca haga funcionar el acondicionador de aire si los filtros
de aire no están colocados en su lugar.
No utilice el acondicionado de aire cerca de una tina, ducha
o lavabo ni otra zona húmeda.
INFORMACIÓN DE SEGURIDAD
INFORMACIÓN IMPORTANTE DE SEGURIDAD
LEA TODAS LAS INSTRUCCIONES ANTES DE USAR
LEA Y GUARDE ESTAS INSTRUCCIONES
4 49-5000135
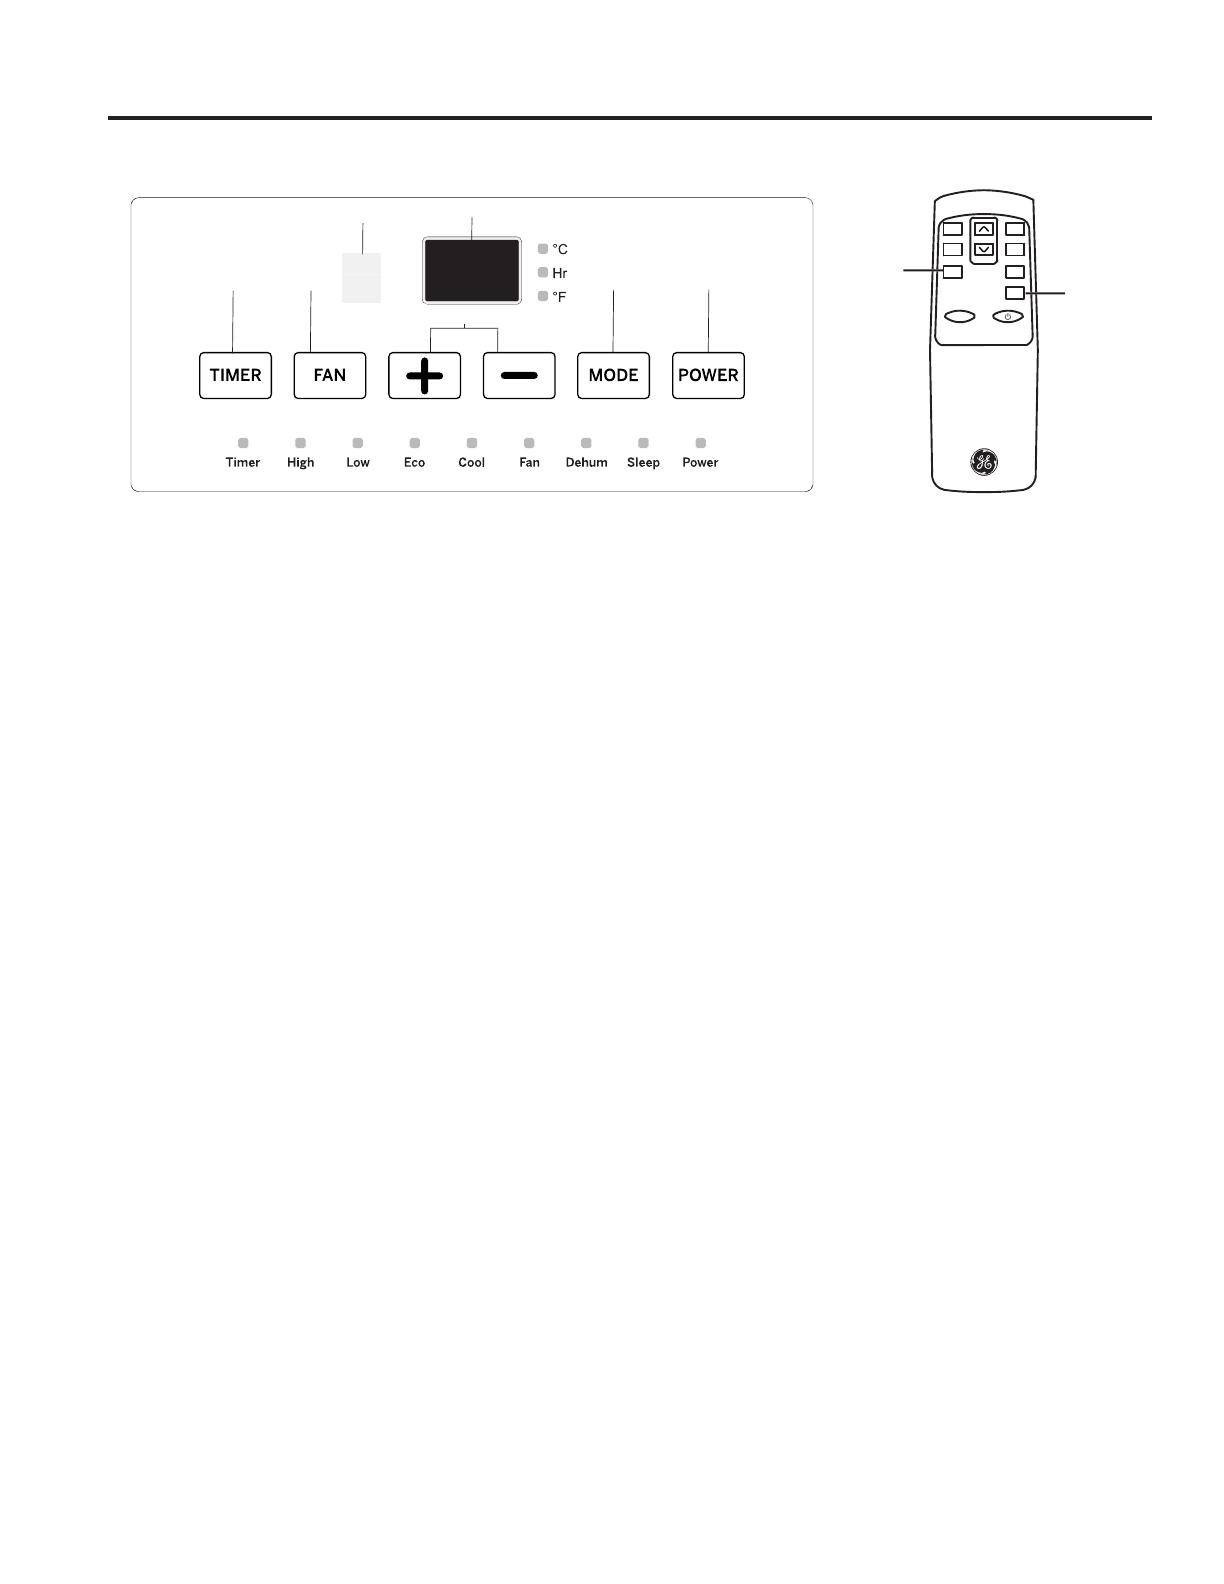
Las luces al lado de las teclas de toque en el panel de control del acondicionador de aire indicarán los ajustes
seleccionados. Las funciones y el aspecto pueden variar.
Controles
A. BOTÓN TIMER (TEMPORIZADOR)
Programe un tiempo desde (1 hora a 24 horas) para que el
acondicionador de aire se apague o se encienda. Cuando
se programa un tiempo diferido, la luz indicadora de Timer
(Temporizador) se iluminará.
Mientras el acondicionador de aire está funcionando:
1. Presione el botón Timer (Temporizador).
2. Presione los botones con flecha hacia arriba/abajo para
seleccionar el número de horas que desea que el acondicionador
de aire continúe funcionando antes de apagarse.
NOTA: Espere unos 5 segundos para que se guarde la hora en que
se apagará.
Mientras el acondicionador de aire está apagado:
1. Presione el botón Timer (Temporizador).
2. Presione los botones con flecha hacia arriba/abajo para
seleccionar el número de horas que desea que el acondicionador
de aire permanezca apagado antes de encenderse.
NOTA: Espere unos 5 segundos para que se guarde la hora en que
se encenderá.
Para cancelar el temporizador:
Presione el botón Timer (Temporizador) una vez, las horas
restantes destellarán, presione el botón Timer (Temporizador) de
nuevo y el temporizador se cancelará.
B. BOTÓN FAN SPEED (VELOCIDAD DEL VENTILADOR) La
velocidad del ventilador se puede regular desde velocidad Low
(Baja) a High (Alta) cuando el acondicionador de aire está en
funcionamiento.
NOTA: La velocidad del ventilador no se puede regular cuando la
unidad está en modo Dehum (Deshumidicar).
Presione el botón Fan Speed (Velocidad del ventilador) para
alternar entre las dos velocidades. El indicador de velocidad del
ventilador correspondiente se iluminará.
C. VENTANA DE SEÑAL DEL CONTROL REMOTO
Dirija el control remoto hacia esta ventana para que el control
reciba la señal.
D. PANTALLA DEL PANEL DE CONTROL
Muestra la temperatura fijada en grados Fahrenheit o grados
centígrados, o las horas restantes de un tiempo diferido. La luz
indicadora correspondiente se encenderá.
E. BOTONES CON FLECHAS HACIA ARRIBA
Y HACIA ABAJO
Ajustan la temperatura o las horas del tiempo diferido.
Para jar la temperatura:
La temperatura puede fijarse entre 62 ºF y 86 ºF (17 ºC y
30 ºC) cuando el acondicionador de aire está en modo Cool
(Enfriamiento).
1. Presione el botón Mode (Modo) hasta que se seleccione el modo
Cool (Enfriamiento).
2. Presione los botones con las flechas hacia arriba o hacia abajo
para seleccionar la temperatura.
NOTA: La temperatura no se puede fijar si el acondicionador de
aire está en el modo Fan (Ventilador) o Dehum (Deshumidificar).
NOTA: Los botones con las flechas hacia arriba y hacia
abajo, cuando se los presiona al mismo tiempo, le permiten
seleccionar entre mostrar la temperatura en ºC o ºF. El indicador
correspondiente se iluminará.
F. BOTÓN MODE (MODO)
Presione el botón Mode (Modo) para alternar entre las opciones
de operación. El indicador correspondiente se iluminará:
Heat (Calor) (en algunos modelos) - Calienta la habitación a la
temperatura establecida
Cool (Enfriamiento): enfría la habitación a la temperatura jada
ECO (Ahorro de Energía) – Hace que el ventilador realice ciclos
para refrigerar de forma económica.
Dehum (Deshumidificar): reduce la humedad en la habitación
Fan (Ventilador): hace circular el aire de la habitación sin enfriar
G. BOTÓN POWER (ENCENDIDO)
ENCIENDE/APAGA el acondicionador de aire.
NOTA: Si apaga la unidad presionando el botón Power
(Encendido), esto NO desconecta el electrodoméstico del
suministro de energía.
Presione el botón Power (Encendido). La luz indicadora de Power
(Encendido) se iluminará.
CONTROL REMOTO
1. Inserte dos pilas (provistas).
2. Dirija el control remoto hacia el receptor de señales del panel de
control para hacer funcionar el acondicionador de aire.
H. BOTÓN SLEEP (SUSPENSIÓN)
Aumenta la temperatura fijada en 2 ºF (1 ºC) después de
2 horas y, a continuación, aumenta la temperatura en
2 ºF (1 ºC) adicionales después de otras 2 horas.
NOTA: El ventilador funcionará a baja velocidad y no puede
regularse mientras está en modo Sleep (Suspensión).
Presione el botón de Sleep (Suspensión) para ingresar al modo
Sleep (Suspensión). La luz indicadora de Sleep (Suspensión) se
iluminará.
Para cancelar el modo Sleep (Suspensión):
Presione el botón Sleep (Suspensión) o el botón Mode (Modo) en
el control remoto.
I. BOTÓN °C/°F
Presione el botón °C/°F para alternar entre la visualización de
la temperatura en grados Fahrenheit y grados centígrados. El
indicador correspondiente se iluminará.
USO DEL ACONDICIONADOR DE AIRE
Controles
A
B
F
G
E
C
D
H
High
Low
Sleep
TIMER POWER
TEMP
Cool
Dehum
Fan
C / F
I
  • Page 1 1
  • Page 2 2
  • Page 3 3
  • Page 4 4
  • Page 5 5
  • Page 6 6
  • Page 7 7
  • Page 8 8
  • Page 9 9
  • Page 10 10
  • Page 11 11
  • Page 12 12
  • Page 13 13
  • Page 14 14
  • Page 15 15
  • Page 16 16
  • Page 17 17
  • Page 18 18
  • Page 19 19
  • Page 20 20
  • Page 21 21
  • Page 22 22
  • Page 23 23
  • Page 24 24
  • Page 25 25
  • Page 26 26
  • Page 27 27
  • Page 28 28
  • Page 29 29
  • Page 30 30
  • Page 31 31
  • Page 32 32

GE APCD08AXWW Owner's manual

Category
Mobile air conditioners
Type
Owner's manual
This manual is also suitable for

Ask a question and I''ll find the answer in the document

Finding information in a document is now easier with AI

in other languages