Page is loading ...
Page is loading ...
Page is loading ...
Page is loading ...

Reinigung der Innenteile
Bevor Sie das GerŠt in Betrieb nehmen, beseitigen
Sie den typischen ÇNeugeruchÈ am besten durch
Auswaschen der Innenteile mit lauwarmem Wasser
und einem neutralen Reinigungsmittel SorgfŠltig
nachtrocknen.
Bitte keine Reinigungs- bzw. Scheuermittel
verwenden, die das GerŠt beschŠdigen
kšnnten.
Gebrauch des Gefrierabteils
Dieses Gefrierabteil ist mit dem
ÇViersterne-È Symbol versehen, was bedeutet,
da§ darin sowohl frische Lebensmittel
eingefroren werden kšnnen als auch
TiefkŸhlkost langfristig gelagert werden kann.
Inbetriebnahme
Netzstecker in die Steckdose einstecken. Das
Aufleuchten der Kontrollampe (E) zeigt an, da§ das
GerŠt unter Spannung steht.
Den Schalter (A) Ÿber die Stellung ÇOÈ drehen. Die
Kontrollampe (D) leuchtet auf.
Den Stillstand erhŠlt man durch Drehen des
Schalters (A) auf Stellung ÇOÈ. Das KŸhlabteil bleibt
in Betrieb.
Temperaturregelung
Die Temperatur wird automatisch geregelt und kann
erhšht werden (wŠrmer) durch Drehen des Thermo-
statknopfes auf niedrigere Einstellungen oder
verringert (kŠlter) durch das Drehen auf hšhere
Zahlen.Die richtige Einstellung erhŠlt man, unter
BerŸcksichtigung folgender, die Innentemperatur
beeinflussender Faktoren:
¥ Raumtemperatur,
¥ HŠufigkeit des TŸršffnens,
¥ Menge der eingelagerten Lebensmittel,
¥ Aufstellung des GerŠtes.
Die mittlere Einstellung ist meistens die
geeignetste.
Wichtig
Hšchste KŠlteeinstellung bei hoher
Raumtemperatur und erheblicher
Lebensmittelmenge kann fortdauernden
KŸhlschrank-Betrieb verursachen, dabei kann
sich eine Reif- oder Eisschicht an der hinteren
Innenwand bilden. In diesem Falle den
Thermostatknopf auf wŠrmere Temperaturen
stellen, damit das automatische Abtauen, mit
folglich geringerem Stromverbrauch,
gewŠhrleistet werden kann.
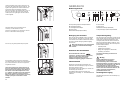
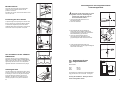
GEBRAUCH
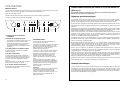
Bedienungsblende
0
1
2
3
3
2
1
0
5
4
4
5
6
B
A
CDE F G H I
6
A.Temperaturregler(Thermostat)Gefrierabteil
B. Schnellgefrierschalter
C. Schnellgefrierkontrollampe
D. Alarm-Lampe
E. Betreibskontollampe(Gefrierabteil)
F. DAC Schalter
G. DAC Lampe
H.Betriebskontrollampe (KŸhlabteil)
I. Temperaturregler (Thermostat) KŸhlabteil
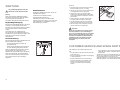
Schnellgefriervorgang
Schalterknopf (B) drucken. Die Kontrollampe (C)
leuchtet auf.
5
68
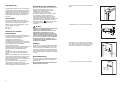
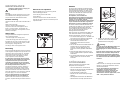
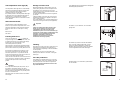
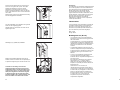
If the appliance is fixed to the side of the kitchen
unit, simply slacken the screws in the fixing brackets
(E), move the brackets as shown in the figure and
re-tighten the screws.
D735
E
E
Open the appliance door and the furniture door at
90¡. Insert the small square (B) into guide (A). Put
together the appliance door and the furniture door
and mark the holes as indicated in the figure.
Remove the squares and drill holes with ¿ 2 mm at
8 mm from the outer edge of the door. Place the
small square on the guide again and fix it with the
screws supplied.
8mm
PR167
A
B
PR168
PR167/1
D
B
Should the lining up of the furniture door be
necessary, use the clearance of slots.
At the end of operations, it is necessary to check if
the door of the furniture closes properly.
Fix cover (D) on guide (B) until it clips into place.
After having reversed the opening direction of
the doors check that all the screws are properly
tightened and that the magnetic seal adheres to
the cabinet. If the ambient temperature is cold
(i.e. in Winter), the gasket may not fit perfectly to
the cabinet. In that case, wait for the natural
fitting of the gasket or accelerate this process by
heating up the part involved with a normal
hairdrier.
Page is loading ...
Page is loading ...

8
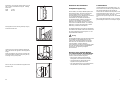
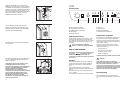
Funktion und Gebrauch des
ÇCRISPÕN FRESHÈ
Die Ÿber die GemŸseschalen befindliche
Glasablageplatte ist mit einem speziellen, ÇCRISPÕN
FRESHÈ genannten Filter ausgestattet. Dieser Filter
bestimmt die richtige BelŸftung und gewŠhrleistet
durch merkliche Verzšgerung der Dehydrierung eine
bessere und lŠngere Haltbarkeit eingelagerten
GemŸses.
Reinigung des Filters
Der Filter wird von zwei durch AndrŸcken fixierte
StŸtzrŠhmchen getragen und ist deshalb fŸr
eventuelle Reinigungsarbeiten einfach
herauszunehmen. Wenden Sie hierzu die
Glasablageplatte und lšsen Sie die Halterungen wie
in der Abbildung gezeigt. Die Reinigung des Filters
kann mit normalem Geschirrsp
Ÿ
lmittel
vorgenommen werden. Der Filter sollte jedoch nicht
im GeschirrspŸler gewaschen werden.
D749
D711
D338
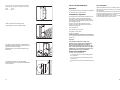
Hšhenverstellbare Abstellregale
Der Abstand zwischen den verschiedenen
Abstellregalen kann je nach Wunsch geŠndert
werden. Dazu die Regale herausnehmen und auf
das gewŸnschte Niveau einsetzen.
Zur besseren Raumnutzung kšnnen die vorderen
Halbteile der Ablagen auf die rŸckwŠrtigen
hinaufgelegt werden.
Hšhenverstellung der
InnentŸrablagen
Zur Einlagerung von Lebensmittel-Packungen
verschiedener Grš§e, sind die Abstellregale der
InnentŸr hšhenverstellbar.
Hierzu wie folgt vorgehen:
das Abstellregal stufenweise in Pfeilrichtung drŸcken
bis es frei wird; dann in der gewŸnschten Hšhe
wieder anbringen.
D009
D007
65
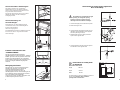
I nstructions for totally built-in appliances
Door reversibility
I nstructions for totally built-
in appliances
Dimensions of the recess
Height 1780 mm
Depth 550 mm
Width 560 mm
For safety reasons, minimum ventilation must be as
shown in Fig. Attention: keep ventilation
openings clear of obstruction.
50 mm
min.
200 cm
2
200 cm
2
min.
D567
B
C
A
The appliance is supplied with the right
door opening. To change the opening
direction of the door proceed as in the
following instructions before installing it.
1. Unscrew the upper pin and remove the spacer
2. Remove the upper door
3. Unscrew the pins (B) and the spacers (C) and
refit them on the middle hinge of the opposite
side. Snap the hinge cover (A).
4. Refit the upper door, the upper pin and the
spacer on the opposite side
5. Unscrew the lower pin and remove the spacer
and refit them on the opposite side

9
Tips fŸr das Einfrieren
FŸr ein einwandfreies Einfrieren der Lebensmittel
geben wir folgende RatschlŠge:
¥ Das Gefriervermšgen des Gefrierabteils (in 24
Std.) kann auf dem Typenschild abgelesen
werden.
¥ Der Gefriervorgang dauert ca. 24 Stunden. In
dieser Zeit sollte keine zusŠtzliche Ware in das
Gefrierabteil eingelegt werden.
¥ Nur erstklassige, frische und gut gesŠuberte
Produkte einfrieren.
¥ Die Nahrungsmittel vor dem Einfrieren in kleine
Portionen einteilen, damit der Gefriervorgang
beschleunigt wird; dies ermšglicht das spŠtere
Auftauen von kleineren Portionen.
¥ Die Lebensmittel in Alu- oder PolyŠthylenfolien
luftdicht verpacken.
¥ Es soll vermieden werden, da§ die
einzufrierenden Lebensmittel mit den bereits
eingefrorenen in BerŸhrung kommen, um eine
WŠrmeŸbertragung an diese zu verhindern.
¥ Es ist zu beachten, da§ mageres Fleisch besser
und lŠnger haltbar ist. Fetthaltiges Fleisch hat
eine geringere Lagerzeit. Ferner reduziert Salz
die Haltbarkeitsdauer.
¥ Speiseeis, direkt aus dem Gefrierfach
genommen, kann KŠlte-Brandwunden
verursachen.
TIPS
Tips fŸr das KŸhlen
Nachstehend einige praktische RatschlŠge:
Fleisch (alle Sorten) in Plastikfolie einpacken und
auf die Glasplatte, die sich Ÿber der GemŸseschale
(Ÿber den GemŸseschalen) befindet, legen.
In dieser Lage kann das Fleisch lŠngstens 1-2
Tage aufbewahrt werden.
Gekochte Nahrungsmittel, kalte Platten, usw.
zugedeckt aufbewahren. Sie kšnnen auf jeden
beliebigen Rost gelegt werden.
Obst und GemŸse: nach vorherigem SŠubern und
Waschen in der GemŸseschale (in den
GemŸseschalen) aufbewahren.
Butter und KŠse: in speziellen BehŠltern aufbe-
wahren oder in Alu- bzw. Plastikfolie einpacken, um
den Kontakt mit der Luft zu vermeiden.
Milch in Flaschen: gut verschlossen auf die Konsol
der InnentŸr stellen.
Wenn Bananen, Kartoffeln, Zwiebeln und
Knoblauch nicht verpackt sind, sollen sie nicht
in den KŸhlschrank gegeben werden.
¥ Es ist empfehlenswert, auf der Verpackung das
Einfrierdatum zu notieren, damit die
Aufbewahrungszeit eingehalten werden kann.
¥ Die Symbole auf den Schubladen zeigen
unterschiedliche Arten von TiefkŸhlgut.
Die Zahlen geben fŸr die jeweilige Art von
TiefkŸhlgut die Lagerzeit in Monaten an. Ob der
obere oder der untere Wert der angegebenen
Lagerzeiten gŸltig ist, hŠngt von der QualitŠt der
Lebensmittel und deren Vorbehandlung vor dem
Einfrieren ab.
¥ Es sollten keine kohlensŠurehaltigen
GetrŠnke in das Gefrierfach eingestellt
werden, da sie explodieren kšnnen.
Tips fŸr TiefkŸhlkost
Um optimale Leistungen des GerŠtes zu erhalten,
sich vergewissern,
¥ da§ die TiefkŸhlkost beim VerkŠufer gut
aufbewahrt wurde
¥ da§ der Transport vom VerkŠufer zum
Verbraucher in kurzer Zeit erfolgt.
¥ TŸr so wenig wie mšglich šffnen und nicht offen
lassen.
¥ Einmal aufgetaute Lebensmittel verderben
schnell und kšnnen kein ein zweites Mal
eingefroren werden.
¥ Das Haltbarkeitsdatum auf der
TiefkŸhlkostverpackung sollte nicht Ÿberschritten
werden.
64
Electrical connection
Before plugging in, ensure that the voltage and
frequency shown on the serial number plate
correspond to your domestic power supply. Voltage
can vary by ±6% of the rated voltage.
For operation with different voltages, a suitably sized
auto-transformer must be used.
The appliance must be earthed.
The power supply cable plug is provided with a
contact for this purpose.
If the domestic power supply socket is not earthed,
connect the appliance to a separate earth in
compliance with current regulations, consulting a
specialist technician.
The Manufacturer declines all responsibility if
the above safety precautions are not observed.
This appliance complies with the following
E.E.C. Directives:
- 87/308 EEC of 2/6/87 relative to radio interference
suppression.
- 73/23 EEC of 19.2.73 (Low Voltage Directive) and
subsequent modifications;
- 89/336 EEC of 3.5.89 (Electromagnetic
Compatibility Directive) and subsequent
modifications.
INSTALLATION
Location
The appliance should be installed well away from
sources of heat such as radiators, boilers, direct
sunlight etc.
For building into kitchen units follow the special Ò
Building-inÓ instructions given.
TECHNICAL INFORMATION
Energy Efficiency Class B
210
70
1,15
420
13
20
Fridge Net Capacity lt.
Energy Consumption kWh/24h
Energy Consumption kWh/annuo
Freezing Capacity kg/24h
Rising Time
Freezer Net Capacity lt.
The Technical info are on the rating plate situated on the left inside the appliance.
Attention
It must be possible to disconnect the appliance from
the mains power supply; the plug must therefore be
easily accessible after installation.

10
WARTUNG
Vor jeder Reinigungsarbeit immer den
Netzstecker aus der Steckdose ziehen.
Stillstandszeiten
Bei lŠngerem Stillstand des GerŠtes, mŸssen Sie
folgenderma§en vorgehen:
den Stecker aus der Steckdose ziehen;
alle Lebensmittel herausnehmen;
GerŠt abtauen, Innenraum und Zubehšrteile
reinigen; die TŸren offen lassen, um im Innern eine
gute Luftzirkulation zu gewŠhrleisten und somit
Geruchsbildung zu vermeiden.
Innenbeleuchtung
Die Innenbeleuchtungslampe im KŸhlabteil ist durch
folgende Arbeitsschritte zugŠnglich:
¥ Lšsen Sie die Befestigungsschraube der
Lampenabdeckung.
¥ Heben Sie den beweglichen Teil ab, indem Sie
wie in der Abbildung gezeigt darauf drŸcken.
Sollte sich die Beleuchtung beim …ffnen der TŸre
nicht einschalten, ist zu ŸberprŸfen, ob die
GlŸhbirne fest eingeschraubt ist; wenn die Stšrung
dennoch bestehen bleibt, die defekte GlŸhbirne
durch eine neue Birne gleicher Leistung ersetzen.
Die maximale Leistung ist am Leuchtkšrper
angegeben.
Achtung
Dieses GerŠt enthŠlt im KŠltekreislauf Kohlen-
wasserstoff. Aus diesem Grund darf die Wartung
und das NachfŸllen aussschlie§lich von
autorisiertem Fachpersonal durchgefŸhrt werden.
RegelmŠ§ige Reinigung
Benutzen Sie nie MetallgegenstŠnde um das GerŠt
zu reinigen, da es beschŠdigt werden kšnnte.
Den Innenraum mit lauwarmem Wasser und Natron
und die lackierten Teile mit einem Poliermittel
reinigen.
Gut nachwaschen und sorgfŠltig trocknen.
Den Kondensator und den Motorkompressor mit
einer BŸrste oder einem Staubsauger reinigen. Dies
begŸnstigt den guten Betrieb mit folglicher
Stromersparnis.
0
1
2
3
3
2
1
0
5
4
4
5
6
6
!
3P007
63
as follows:
1. pull out the plug from the wall socket or turn the
thermostat knob (A) to the ÇOÈ setting;
2. remove any stored food, wrap it in several layers
of newspaper and put it in a cool place;
3. leave the door open, and insert the plastic
scraper in the appropriate seating at the bottom
centre, placing a basin underneath to collect the
defrost water.
4. when defrosting is completed, dry the interior
thoroughly; keep the scraper for future use;
5. turn the thermostat knob back to the required
setting or replace the plug in the power socket.
6. After two or three hours, reload the previously
removed food into the compartment.
Important:
Never use sharp metal tools to scrape off frost
from the evaporator as you could damage it.
Do not use a maechanical device or any artificial
means to speed up the thawing process other
than those recommended by the manufacturer.
A temperature rise of the frozen food packs,
during defrosting, may shorten their safe
storage life.
CUSTOMER SERVICE AND SPARE PARTS
If the appliance is not functioning properly, check
that:
¥ the plug is firmly in the wall socket and the mains
power switch is on;
¥ there is an electricity supply (find out by plugging
in another appliance);
¥ the thermostat knob is in the correct position.
¥ If there are water drops on the bottom of the
cabinet, check that the defrost water drain
opening is not obstructed (see ÒDefrostingÓ
section).
¥ If your appliance is still not working properly after
making the above checks, contact the nearest
service centre.
To obtain fast service, it is essential that when you
apply for it you specify the model and serial number
of your appliance which can be found on the
guarantee certificate or on the rating plate located
inside the appliance, on the bottom left-hand side.
D068

11
ST…RUNGEN
Falls das GerŠt Stšrungen aufweisen sollte,
ŸberprŸfen Sie zuerst folgendes:
¥ Steckt der Netzstecker in der Steckdose?
¥ Befindet sich der Hauptschalter der elektrischen
Anlage in der richtigen Stellung?
¥ Ist die Stromzufuhr unterbrochen?
¥ Befindet sich der Thermostatknopf in richtiger
Stellung?
¥ WasserpfŸtze auf dem Boden des KŸhlfaches:
¥ Abtauwasserloch verstopft? (siehe Abschnitt
ÒAbtauenÓ)
Sollten Sie nach o.e. PrŸfungen zu keinem Resultat
kommen, so wenden Sie sich bitte an unseren
nŠchsten Kundendienst.
Um ein rasches Beheben des Schadens zu
ermšglichen, ist es beim Anruf an den
Kundendienst notwendig, die Modell- und
Seriennummer anzugeben, die Sie dem
Garantieschein oder dem Typenschild (Ð linke
Seite Ð unten) entnehmen kšnnen.
Abtauen
Die sich auf dem Verdampfer des KŸhlschrankes
bildende Reifschicht taut jedesmal in den Stillstand-
zeiten des Motorkompressors von selbst ab. Das
Tauwasser lŠuft durch eine Rinne in eine Plastik-
schale auf der RŸckseite des GerŠtes (Ÿber dem
Kompressor) und verdunstet dort.
Wir empfehlen, das in der Mitte der
Abtauwasserrinne des KŸhlraumes befindliche
Ablaufloch fŸr das Abtauwasser regelmŠ§ig zu
reinigen, um zu vermeiden, da§ das
Abtauwasser auf die eingelagerten Lebensmittel
tropft. Verwenden Sie den dafŸr vorgesehenen
Reiniger,der sich schon im Ablaufloch befindet.
Die sich im Gefrierfach bildende Reifschicht soll,
sobald diese eine StŠrke von 4 mm erreicht hat, mit
dem mitgelieferten Plastikschaber abgekratzt
werden. WŠhrend dieses Vorganges ist es nicht
nštig, das GerŠt auszuschalten und die
Nahrungsmittel herauszunehmen.
Wenn sich jedoch eine dicke Eisschicht bildet, mu§
man vollkommen abtauen. Um ein vollstŠndiges
Abtauen durchzufŸhren, geht man wie folgt vor:
1. Den Thermostatknopf (A) auf ÇOÈ einstellen oder
den Stecker aus der Steckdose herausziehen.
2. Die eventuell im Frosterfach liegenden
Lebensmittel herausnehmen, sie in
Zeitungspapier einwickeln und sehr kŸhl
aufbewahren.
3. Die TŸr offen lassenund den Plastikschaber, der
als Rinne dient, am vorgesehenen Platz
einsetzen, soda§ das Abtauwasser in ein
geeignetes, darunter gestelltes GefŠ§ flie§en
kann.
4. Nach beendetem Abtauproze§ das Fach gut
trocknen. Plastikschaber fŸr spŠteren Gebrauch
aufbewahren.
5. Den Thermostatknopf wieder in die gewŸnschte
Stellung drehen bzw. den Stecker wieder
einstecken.
D037
D068
6. Nachdem das GerŠt fŸr 2-3 Std. in Betrieb
genommen wurde, kšnnen tiefgefrorene
Lebensmittel darin zurŸckgelegt
Achtung:
Benutzen Sie niemals MetallgegenstŠnde, um
die Reifschicht abzukratzen, damit eine
BeschŠdigungen des GerŠtes vermieden werden
kann.
Benutzen Sie kein mechanisches oder anderes
Mittel fŸr einen schnelleren Abtauproze§ mit
Ausnahme der vom Hersteller empfohlenen.
Ein Temperaturanstieg der TiefkŸhlkost wŠhrend
des Abtauens kšnnte die Aufbewahrungsdauer
verkŸrzen.
62
Interior light
The light bulb inside the refrigerator compartment
can be reached as follows:
- unscrew the light cover securing screw.
- unhook the moving part as shown in the figure.
If the light does not come on when the door is open,
check that it is screwed into place properly. If it still
does not light up, change the bulb.
The rating is shown on the light bulb cover.
Defrosting
Frost is automatically eliminated from the evaporator
of the refrigerator compartment every time the motor
compressor stops, during normal use. The defrost
water drains out through a trough into a special
container at the back of the appliance, over the
motor compressor, where it evaporates.
It is important to periodically clean the defrost
water drain hole in the middle of the refrigerator
compartment channel to prevent the water
overflowing and dripping onto the food inside.
Use the special cleaner provided, which you will
find already inserted into the drain hole.
The freezer compartment, however, will become
progressively covered with frost. This should be
removed with the special plastic scraper provided,
whenever the thickness of the frost exceeds 4 mm.
During this operation it is not necessary to switch off
the power supply or to remove the foodstuffs.
Never use sharp metal tools to scrape off frost
from the evaporator as you could damage it.
However, when the ice becomes very thick on the
inner liner, complete defrosting should be carried out
D037
MAINTENANCE
Unplug the appliance before carrying out
any maintenance operation.
Warning
This appliance contains hydrocarbons in its cooling
unit; maintenance and recharging must therefore
only be carried out by authorized technicians.
Periods of non-operation
When the appliance is not in use for long periods,
take the following precautions:
remove the plug from the wall socket;
remove all food;
defrost and clean the interior and all accessories;
leave the door ajar to allow air to circulate to prevent
unpleasant smells.
Periodic cleaning
Clean the inside with warm water and bicarbonate of
soda.
Rinse and dry thoroughly.
Clean the condenser (black grill) and the
compressor at the back of the appliance with a
brush or a vacuum cleaner. This operation will
improve the performance of the appliance and save
electricity consumption.
0
1
2
3
3
2
1
0
5
4
4
5
6
6
!
3P007

12
INSTALLATION
Aufstellung
Das GerŠt sollte nicht in der NŠhe von
WŠrmequellen wie Heizkšrpern oder …fen
aufgestellt und vor direkter Sonneneinstrahlung
geschŸtzt werden.
FŸr den Einbau bitte den entsprechenden Abschnitt
durchlesen.
Elektrischer Anschlu§
Bevor Sie den Stecker in die Steckdose einstecken,
ŸberprŸfen Sie bitte, da§ die auf dem Typenschild
des GerŠtes angegebene Spannung sowie
Frequenz mit dem Anschlu§wert des Hauses
Ÿbereinstimmen. Eine Abweichung von ±6% von der
Nominalspannung ist zulŠssig. FŸr die Anpassung
des GerŠtes an andere Spannungen mu§ ein
Spartransformator angemessener Leistung
vorgeschaltet werden.
Das GerŠt mu§ unbedingt vorschriftsmŠ§ig geerdet
werden. Zu diesem Zweck ist der Stecker des
Speisekabels mit dem dafŸr vorgesehenen Kontakt
versehen. Sollte die Netzleitung im Haus nicht mit
einer Erdleitung versehen sein, so mu§ das GerŠt
an eine getrennte Erdleitung vorschriftsmŠ§ig und
unter Hinzuziehung eines Fachmanns
angeschlossen werden.
Die Erzeugerfirma lehnt jede Verantwortung ab,
falls diese UnfallverhŸtungsvorschrift nicht
beachtet wird.
Dieses GerŠt entspricht der folgende
EWG Richtlinie:
- 87/308 EWG vom 2.6.87 (Deutschland-
AusfŸhrung) bzw. der …VE-Richtlinie Nr. F 61/84
(…sterreich-AusfŸhrung) bezŸglich
Funkentstšrung.
- 73/23 EWG vom 19/02/73 (Niederspannung) und
folgende €nderungen;
- 89/336 EWG vom 03/05/89 (Elektromagnetische
VertrŠglichkeit) und folgende €nderungen.
TECHNISCHE DATEN
Euro- Effizenz-Klasse B
210
70
1,15
420
13
20
Nutzinhalt des KŸhlschrankes in Liter
Energieverbrauch in kWh/24h
Energieverbrauch in kWh/Jahr
Gefrierleistung kg/24h
Lagerzeit bei Stšrung -18¡/-9¡C in h
Nutzinhalt des Gefrierschrankes in Liter
Die Technische Daten kšnnen Sie auf dem Typschild feststellen. Das Typschild befindet sich links unten an der
Seitewand.
Wichtig
Es mu§ mšglich sein, das GerŠt vom Netz zu
trennenn; Nach der Installation mu§ die Steckdose
daher zugŠnglich bleiben.
61
Hints for freezing
To help you make the most of the freezing process,
here are some important hints:
¥ the maximum quantity of food which can be
frozen in 24 hrs. is shown on the rating plate;
¥ the freezing process takes 24 hours. No further
food to be frozen should be added during this
period;
¥ only freeze top quality, fresh and thoroughly
cleaned, foodstuffs;
¥ prepare food in small portions to enable it to be
rapidly and completely frozen and to make it
possible subsequently to thaw only the quantity
required;
¥ wrap up the food in aluminium foil or polythene
and make sure that the packages are airtight;
¥ do not allow fresh, unfrozen food to touch food
which is already frozen, thus avoiding a rise in
temperature of the latter;
¥ lean foods store better and longer than fatty
ones; salt reduces the storage life of food;
¥ water ices, if consumed immediately after
removal from the freezer compartment, can
possibly cause the skin to be freeze burnt;
¥ it is advisable to show the freezing-in date on
each individual pack to enable you to keep tab of
the storage time;
HINTS
Hints for refrigeration
Useful hints:
Meat (all types): wrap in polythene bags and place
on the glass shelf above the vegetable drawer.
For safety, store in this way only one or two days
at the most.
Cooked foods, cold dishes, etc..: these should be
covered and may be placed on any shelf.
Fruit and vegetables: these should be thoroughly
cleaned and placed in the special drawer(s)
provided.
Butter and cheese: these should be placed in
special airtight containers or wrapped in aluminium
foil or polythene bags to exclude as much air as
possible.
Milk bottles: these should have a cap and should
be stored in the bottle rack on the door.
Bananas, potatoes, onions and garlic, if not
packed, must not be kept in the refrigerator.
Hints for storage of frozen food
To obtain the best performance from this appliance,
you should:
¥ make sure that the commercially frozen
foodstuffs were adequately stored by the retailer;
¥ be sure that frozen foodstuffs are transferred
from the foodstore to the freezer in the shortest
possible time;
¥ not open the door frequently or leave it open
longer than absolutely necessary.
¥ Once defrosted, food deteriorates rapidly and
cannot be refrozen.
¥ Do not exceed the storage period indicated by
the food manufacturer.
¥ The symbols on the drawers show different types
of frozen goods.
The numbers indicate storage times in months
for the appropriate types of frozen goods.
Whether the upper or lower value of the indicated
storage time is valid depends on the quality of
the foods and pre-treating before freezing.
¥ do not put carbonated liquids (fizzy drinks,
etc.) in the freezer compartment as they may
burst.

13
Anweisungen fŸr den integrierten Einbau
TŸranschlagwechsel
Anweisungen fŸr den
integrierten Einbau
Nischenma§e
Hšhe 1780 mm
Tiefe 550 mm
Breite 560 mm
Aus GrŸnden der Sicherheit mu§ eine MindestbelŸf-
tung gesichert sein, wie aus der Abb. hervorgeht:
Achtung: Die Ventilations - …ffnungen mŸssen
immer saubergehalten werden.
50 mm
min.
200 cm
2
200 cm
2
min.
D567
B
C
A
Das GerŠt wird mit TŸranschlag von rechts
geliefert. Falls einen TŸranschlag links
erfordert wird; gehen Sie wie folgt vor
bevor Sie das GerŠt einbauen.
1. Obere Scharnierstift abschrauben und
Kunstoffteil entfernen.
2. Obere TŸr abnehmen.
3. Scharnierstifte (B) und Kunstoffteile (C)
abschrauben und auf mittlere Scharnier der
gegenŸberliegenden Seite wieder anschrauben.
Scharnierabdeckung (A) aufstecken.
4. Obere TŸr wieder einsetzen.Oberen
Scharnierstift mit den Kunstoffteil und auf
gegenŸberliegende Seite wieder anmontieren.
5. Untere Scharnierstift abschrauben und
Kunstoffteil entfernen und auf gegenŸberliegende
Seite wieder anmontieren.
60
Positioning the door shelves
To permit storage of food packages of various sizes,
the door shelves can be placed at different heights.
To make these adjustments proceed as follows:
Gradually pull the shelf in the direction of the arrows
until it comes free, then reposition as required.
D009
Movable shelves
The walls of the refrigerator are equipped with a
series of runners so that the shelves can be
positioned as desired.
For better use of space, the front half-shelves can lie
over the rear ones.
Use and features of the ÇCRISPÕN
FRESHÈfilter
The glass shelf on top of the vegetable drawer is
fitted with a special filter called ÇCRISPÕN FRESHÈ
which ensures the correct amount of ventilation, and
significantly reduces the rate of food dehydration;
vegetables therefore store better and keep longer.
D749
D007
Cleaning the filter
The filter is held by two small support frames which
press into position and are therefore easily removed
for clearing. To do this, turn the glass shelf upside
down and release the frames as shown in the
illustration. The filter may be washed in normal
washing-up liquids. Do not place in dishwasher.
D711
D338

14
A
D023
D
C
D723
D724
GerŠt in die Nische einschieben bis die
Anschlagleiste (A) unten am Mšbel anliegt.
TŸr šffnen und GerŠt gegenŸber der Bandseite an
die Mšbelseitenwand anrŸcken. GerŠt mit den 4 bei-
liegenden Schrauben befestigen.
BelŸttungsgitter (C) und Scharnierabdeckung (D)
aufstecken.
Fugenabdeckprofiloben um die Winkeldicke
ausschneiden und zwischen GerŠt und Mšbelseiten-
wand eindrŸcken.
PR01
540
50
B
T
H
Ferner ist auch am hinteren Einbauschrankteil ein
LŸftungskamin mit folgenden Ma§sen notwendig:
Tiefe 50 mm
Breite 540 mm
59
Important
If the ambient temperature is high or the
appliance is fully loaded, and the appliance is
set to the lowest temperatures, it may run
continuously causing frost to form on the rear
wall. In this case the dial must be set to a higher
temperature to allow automatic defrosting and
therefore reduced energy consumption.
Fresh food refrigeration
To obtain the best performance:
¥ do not store warm food or evaporating liquids in
the refrigerator;
¥ do cover or wrap the food, particularly if it has a
strong flavour.
¥ Position food so that air can circulate freely round
it.
USE OF THE REFRIGERATOR
Operation
The temperature inside the refrigerator compartment
can be selected using thermostat (I).
Temperature regulation
The temperature is automatically regulated and can
be increased to achieve a higher temperature
(warmer) by rotating the thermostat knob toward
lower settings or reduced (colder) rotating the knob
towards higher settings.
However, the exact setting should be chosen
keeping in mind that the temperature inside the
refrigerator depends on:
room temperature;
how often the door is opened;
the quantity of food stored;
location of appliance.
A medium setting is generally the most suitable.
To stop operation, simply turn the thermostat knob to
position ÇOÈ.
Air circulation
Inside the appliance, there is a fan (DAC) which is
turned on by means of the switch (F). The pilot light
(G) will light up.
It is recommended that the fan be used when the
ambient temperature is above 25 ¡C with the knob
set to the position identified by the symbol.
At ambient temperatures up to 25 ¡C, the fan may
be used with the knob set to any position.

15
D726
B
PR266
A
B
C
D
Die Teile A, B, C, D abnehmen, wie in der Abb.
gezeigt wird.
Die Schiene (A) auf der Innenseite der MšbeltŸr
oben und unten auflegen (siehe Abb.) und die
Position der Šu§eren Bohrlšcher anzeichnen.
Nachdem die Lšcher gebohrt wurden, die Schiene
mit den mitgelieferten Schrauben befestigen.
20 mm
A
50mm
PR166
PR33
C
A
Die Abdeckung (C) in die Schiene (A) eindrŸcken,
bis sie einrastet.
In die Befestigungsund Scharnierlšcher beiliegende
Abdeckkappen (B) eindrŸcken.
58
Thawing
Deep-frozen or frozen food, prior to being used, can
be thawed in the refrigerator compartment or at
room temperature, depending on the time available
for this operation.
Small pieces may even be cooked still frozen,
directly from the freezer: in this case, cooking will
take longer.
Ice-cube production
This appliance is equipped with one or more trays
for the production of ice-cubes. Fill these trays with
water, then put them in the freezer compartment.
Do not use metallic instruments to remove the
trays from the freezer.
The temperature alarm light (D)
The temperature alarm light turns on automatically
whenever the temperature within the freezer rises
above a certain value which might endanger
satisfactory long-term conservation.
It is perfectly normal for the temperature alarm light
to remain lit up for a short time after the freezer is
initially turned on. It will remain lit up until the
optimum temperature for the conservation of frozen
food is attained.
Internal thermometer
This indicates the internal temperature of the
freezer. It may indicate a temperature above -18¡C
when large quantities of food are placed inside for
freezing or when the door is left open for a long
time.
Blue: normal
Red: alarm
Storage of frozen food
When first starting-up or after a period out of use,
before putting the products in the compartment let
the appliance run for at least two hours on the
coldest setting, then turn the thermostat knob to the
normal operating position.
To obtain the best performance from this appliance,
you should:
if large quantities of food are to be stored, remove
all drawers and baskets from appliance and place
food on cooling shelves.
Pay careful attention not to exceed load limit stated
on the side of the upper section (where applicable).
Important
If there is a power failure when food is in the
freezer, do not open the door of the freezer
compartment. The frozen food will not be
affected if the power cut is of short duration (up
to 6-8 hours) and the freezer compartment is full,
otherwise, it is recommended that the food
should be used within a short time (a
temperature increase of the frozen food
shortens its safe storage period).
Freezing fresh food
The 4-star compartment is suitable for
long term storage of commercially frozen food, and
for freezing fresh food. Do not exceed the storage
times shown by the manufacturer on the
commercially frozen food packets.
Set the freezer to quick-freezing operational status.
Wait at least 3 hours before introducing fresh foods
into the freezer if it has only recently been turned on
.
If the freezer has already been working for some
time, turn the respective knob to the thermostat
knob with respect to the ÇSÈ position at least 24
hours before introducing the food into the freezer in
order to ensure better freezing results.
Under normal circumstances, to freeze fresh foods it
is not necessary to change the setting of the thermo-
stat knob with respect to the normal running
position.
Important
Do not put carbonated liquids (fizzy drinks, etc.) in
the freezing compartment as they may burst.
Water ices, if consumed immediately after removal
from the freezing compartment, can possibly cause
the skin to be freeze burnt.
Remember that, once thawed, frozen food deterio-
rates rapidly.

16
Das GerŠt ist mit 2 Winkeln (E) ausgestattet. Diese
sind zur seitlichen Befestigung des GerŠtes am
Mšbel zu verwenden.
D735
E
E
GerŠtetŸr und MšbeltŸr auf ca. 90¡ šffnen. Den
Winkel (B) in der Schiene (A) einsetzen. GerŠtetŸr
und MšbeltŸr zusammenhalten und die Bohrlšcher
anzeichnen (siehe Abb.). Winkel abnehmen und die
Bohrlšcher mit ¯ 2mm und einem Abstand von 8
mm von der TŸrau§enkante ausfŸhren. Den Winkel
wieder auf der Schiene anbringen und mit den
mitgelieferten Schrauben befestigen.
8mm
PR167
A
B
PR168
PR167/1
D
B
FŸr eine allfŠllig notwendige Ausrichtung der
MšbeltŸr, den Spielraum der Langlšcher nutzen.
Nach Beendigung der Arbeiten den einwandfreien
Verschlu§ der GerŠtetŸr ŸberprŸfen.
Die Abdeckung (D) in die Schiene (B) eindrŸcken,
bis sie einrastet.
Vergewissern Sie sich nach AusfŸhrung des
Anschlagwechsels der TŸren, da§ alle
Schrauben fest angezogen sind und ŸberprŸfen
Sie auch, ob die Magnetdichtung am Mšbel
perfekt anliegt. Bei einer niedrigen
Raumtemperatur (z.B. im Winter) kann es
vorkommen, dass die Dichtung nicht perfekt am
Schrank haftet. Die Wiederherstellung der
Dichtung erfolgt automatisch nach gewisser
Zeit. Wollen Sie aber diesen Prozess
beschleunige, so genšgt es die Dichtung mit
einem Fšn zu erwŠrmen.
57
Cleaning the interior
Before using the appliance for the first time, wash
the interior and all internal accessories with luke-
warm water and some neutral soap so as to remove
the typical smell of a brand-new product, then dry
thoroughly.
Do not use detergents or abrasive
powders, as these will damage the finish.
USE OF THE FREEZER
This freezer compartment has been marked with
the symbol , which means that it is
suited to the freezing of fresh foods, the
conservation of frozen foods and the production
of ice-cubes.
Starting
Insert the power supply plug into the nearest wall
socket (the function indicator light (E) will light up
indicating that the freezer is receiving electrical
input.)
Turn the thermostat knob (A) to the right to a
medium setting (the temperature alarm light (D) will
light up).
To turn off the freezer, turn the thermostat knob to
the ÇOÈ position.
The refrigerator compartment will remain operating.
Temperature regulation
The temperature is automatically regulated and can
be increased to achieve a higher temperature
(warmer) by rotating the thermostat knob toward
lower settings or reduced (colder) rotating the knob
towards higher settings.
However, the exact setting should be chosen
keeping in mind that the temperature inside the
refrigerator depends on:
¥ room temperature;
¥ how often the door is opened;
¥ the quantity of food stored;
¥ location of appliance.
A medium setting is generally the most suitable.
Important
If the ambient temperature is high or the
appliance is fully loaded, and the appliance is
set to the lowest temperatures, it may run
continuously causing frost to form on the rear
wall. In this case the dial must be set to a higher
temperature to allow automatic defrosting and
therefore reduced energy consumption.
Quick-freezing
For quick-freezing, press the Super knob (B).
The quick-freezing indicator light (C) will then light
up.
USE
Control panel
0
1
2
3
3
2
1
0
5
4
4
5
6
B
A
CDE F G H I
6
A. Thermostat knob (freezer)
B. Super (quick-freezing) switch
C. SUPER operating control light
D. Warning light
E. Pilot light (freezer)
F. DAC knob
G. Pilot light DAC
H. Pilot light (refrigerator)
I. Thermostat knob (refrigerator)

17
AVERTISSEMENTS IMPORTANTS
Conservez cette notice dÕutilisation avec votre
appareil. Si lÕappareil devait •tre vendu ou cŽdŽ
ˆ une autre personne, assurez-vous que la
notice dÕutilisation lÕaccompagne. Le nouvel
utilisateur pourra alors •tre informŽ du
fonctionnement de celui-ci et des
avertissements sÕy rapportant.
Ces avertissements ont ŽtŽ rŽdigŽs pour votre
sŽcuritŽ et celle dÕautrui.
Utilisation
¥ Cet appareil a ŽtŽ con•u pour •tre utilisŽ par des
adultes. Veillez ˆ ce que les enfants nÕy touchent
pas et ne lÕutilisent pas comme un jouet.
¥ A la rŽception de lÕappareil, dŽballez-le ou faites-
le dŽballer immŽdiatement. VŽrifiez son aspect
gŽnŽral. Faites les Žventuelles rŽserves par Žcrit
sur le bon de livraison dont vous garderez un
exemplaire.
¥ Votre appareil est destinŽ ˆ un usage
domestique normal. Ne lÕutilisez pas ˆ des fins
commerciales ou industrielles ou pour dÕautres
buts que celui pour lequel il a ŽtŽ con•u.
¥ Ne modifiez pas ou nÕessayez pas de modifier
les caractŽristiques de cet appareil. Cela
reprŽsenterait un danger pour vous.
¥ Ne consommez pas certains produits tels que les
b‰tonnets glacŽs d•s leur sortie de lÕappareil; la
tempŽrature tr•s basse ˆ laquelle ils se trouvent
peut provoquer des bržlures.
¥ Les rŽfrigŽrateurs et / ou congŽlateurs mŽnagers
sont destinŽs uniquement ˆ la conservation et /
ou congŽlation des aliments.
¥ Un produit dŽcongelŽ ne doit jamais •tre
recongelŽ.
¥ Suivez les indications du fabricant pour la
conservation et / ou congŽlation des aliments.
¥ Dans tous les appareils de rŽfrigŽration et
congŽlation certaines surfaces peuvent se
couvrir de givre. Suivant le mod•le, ce givre peut
•tre ŽliminŽ automatiquement (dŽgivrage
automatique) ou bien manuellement.
¥ NÕessayez jamais dÕenlever le givre avec un objet
mŽtallique, vous risqueriez dÕendommager
irrŽmŽdiablement lÕŽvaporateur rendant du m•me
coup lÕappareil inutilisable.NÕemployez pour cela
quÕune spatule en plastique.
¥ Ne dŽcollez pas les bacs ˆ gla•ons avec un
couteau ou ou tout autre objet tranchant.
¥ Ne placez ni bouteilles ni bo”tes de boissons
gazeuses dans le congŽlateur/compartiment ˆ
basse tempŽrature, elles pourraient Žclater.
¥ DŽbranchez toujours la prise de courant avant de
procŽder au nettoyage intŽrieur et extŽrieur de
lÕappareil et au remplacement de la lampe
dÕŽclairage (pour les mod•les qui en sont
ŽquipŽs).
Stockage des denrŽes dans Ies rŽfrigŽrateurs et
r•gles dÕhygi•ne alimentaire
La consommation croissante de plats prŽparŽs et
dÕautres aliments fragiles, sensibles en particulier
au non-respect de la cha”ne de froid (1) rend
nŽcessaire une meilleure ma”trise de la
tempŽrature de transport et de stockage de ces
produits. A la maison, le bon usage du
rŽfrigŽrateur et le respect de r•gles dÕhygi•ne
rigoureuses contribuent de fa•on significative et
efficace ˆ lÕamŽlioration de la conservation des
aliments.
Ma”trise de la tempŽrature
¥ Stockez les aliments les plus sensibles dans la
zone la plus froide de lÕappareil, conformŽment
aux indications figurant dans cette notice.
¥ Attendez le complet refroidissement des
prŽparations avant de les stocker (ex: soupe).
¥ Limitez le nombre dÕouvertures de la porte.
¥ Positionnez la commande de rŽglage du
thermostat de fa•on ˆ obtenir une tempŽrature
plus basse. Ce rŽglage doit se faire
progressivement afin de ne pas provoquer le gel
des denrŽes.
¥ La mesure de la tempŽrature dans une zone
(sur une clayette, par exemple) peut se faire au
moyen dÕun thermom•tre placŽ, d•s le dŽpart,
dans un rŽcipient rempli dÕeau (verre). Pour avoir
une reprŽsentation fid•le de la rŽalitŽ, lisez la
tempŽrature sans manipulation des commandes
ni ouverture de porte.
ImprimŽ sur du papier recyclŽ
56
CONTENTS
Warnings 55
Use 57
Cleaning the interior 57
Use of the freezer - Starting 57
Temperature regulation 57
Quick-freezing 57
The temperature alarm light 58
Internal temperature 58
Freezing fresh food 58
Storage of frozen food 58
Thawing 58
Ice-cube production 58
Use of the refrigerator - Operation 59
Temperature regulation 59
Fresh food refrigeration 59
Air circulation 59
Movable shelves 60
Positioning the door shelves 60
Use and features of the ÇCRISPÕN FRESHÈfilter 60
Cleaning the filter 60
Hints 61
hints for refrigeration 61
Hints for freezing 61
Hints for storage of frozen food 61
Maintenance 62
Periodic cleaning 62
Periods of no operation 62
Interior light 62
Defrosting 62
Customer service and spare parts 63
Technical information 64
Installation 64
Location 64
Electrical connection 64
Changing the opening direction of the doors 65
Instructions for totally built-in 65
speed up the thawing process other than those
recommended by the manufacturer. Never use
metal objects for cleaning your appliance as it
may get damaged.
Installation
¥ During normal operation, the condenser and
compressor at the back of the appliance heat up
considerably. For safety reasons, minimum
ventilation must be as shown in the instructions.
Attention: keep ventilation openings clear of
obstruction.
¥ Care must be taken to ensure that the appliance
does not stand on the electrical supply cable.
Important: if the supply cord is damaged, it must
be replaced by a special cord or assembly availa-
ble from the manufacturer or its service agent.
¥ If the appliance is transported horizontally, it is
possible that the oil contained in the compressor
flows in the refrigerant circuit. It is advisable to
wait at least two hours before connecting the
appliance to allow the oil to flow back in the
compressor.
¥ There are working parts in this product which
heat up. Always ensure that there is adequate
ventilation as a failure to do this will result in
component failure and possible food loss. See
installation instructions.
¥ Parts which heat up should not be exposed.
Wherever possible the back of the product
should be against a wall.
Environment Protection
This appliance does not contain gasses which
could damage the ozone layer, in either its
refrigerant circuit or insulation materials. The
appliance shall not be discarded together with
the urban refuse and rubbish. Avoid damaging
the cooling unit, especially at the rear near the
heat exchanger. Information on your local
disposal sites may be obtained from municipal
authorities. The materials used on this appliance
marked by the symbol are recyclable.

18
Respect des r•gles
dÕhygi•ne alimentaire
¥ Retirez les emballages du commerce avant de
placer les aliments dans le rŽfrigŽrateur
(exemple: emballage des packs de yaourts, des
packs de lait ).
¥ Emballez systŽmatiquement la nourriture pour
Žviter les Žchanges de bactŽries entre aliments.
¥ Disposez les aliments de telle sorte que lÕair
puisse circuler librement autour.
¥ Consultez la notice dÕutilisation de lÕappareil en
toutes circonstances et en particulier pour les
conseils dÕentretien.
¥ Nettoyez frŽquemment lÕintŽrieur du rŽfrigŽrateur
en utilisant un produit dÕentretien doux sans effet
oxydant sur Ies parties mŽtalliques.
¥ Couvrez les aliments.
1 ) Cha”ne de froid: maintien sans rupture de la
tempŽrature requise dÕun produit, depuis sa
prŽparation et son conditionnement jusquÕˆ son
utilisation par le consommateur.
Installation
¥ Assurez-vous, apr•s avoir installŽ lÕappareil, que
celui-ci ne repose pas sur le c‰ble dÕalimentation.
Important: en cas de dommage du c‰ble
dÕalimentation, il ne doit •tre remplacŽ que par un
professionnel qualifiŽ.
¥ LÕappareil se rŽchauffe sensiblement au niveau
du condenseur et du compresseur. Veillez ˆ ce
que lÕair circule librement tout autour de
lÕappareil. Une ventilation insuffisante entra”nerait
un mauvais fonctionnement et des dommages
sur lÕappareil.
¥ Suivez les instructions donnŽes pour
lÕinstallation.
¥ Apr•s la livraison attendez 2 heures avant de
brancher lÕappareil pour que le circuit frigorifique
soit stabilisŽ.
¥ Cet appareil est lourd. Faites attention lors de
son dŽplacement.
Veuillez lire attentivement ces remarques avant
dÕinstaller et dÕutiliser votre appareil. Nous vous
remercions de votre attention.
Protection de
lÕenvironnement
Tous les matŽriaux marquŽs par le symbole sont
recyclables. DŽposez-les dans une dŽchetterie
prŽvue ˆ cet effet (renseignez-vous aupr•s des
services de votre commune) pour quÕils pulssent
•tre rŽcupŽrŽs et recyclŽs.
¥ Le syst•me frigorifique et lÕisolation de votre
appareil ne contiennent pas de C.F.C.
contribuant ainsi ˆ prŽserver
lÕenvironnement.
¥ Les C.F.C. sont remplacŽs par des
hydrocarbures.
¥ Le circuit rŽfrigŽrant de cet appareil contient
de lÕisobutane (R 600 A): les interventions
doivent •tre effectuŽes exclusivement par des
personnes qualifiŽes ayant re•ues une
formation spŽcifique pour le R 600 A.
Ce gaz est nŽanmoins inflammable:
1. Ne faites pas fonctionner dÕappareils
Žlectriques (par exemple: sorbeti•res
Žlectriques, mŽlangeurs ou de s•che cheveux
pour accŽlŽrer le dŽgivrage,...) ˆ lÕintŽrieur de
votre appareil.
2. Pendant le transport et lÕinstallation de votre
appareil, assurez-vous quÕaucune partie du
circuit nÕest endommagŽe. Si tel est le cas:
¥ Evitez les flammes vives (briquet) et tout
autre allumage (Žtincelles).
¥ AŽrez la pi•ce o• se trouve lÕappareil.
¥ Si vous vous dŽbarrassez de votre appareil,
veillez ˆ ne pas dŽtŽriorer les circuits.
¥ Cet appareil est muni de fermetures
magnŽtiques. SÕil remplace un appareil ŽquipŽ
dÕune fermeture ˆ ressort, nous vous conseillons
de rendre celle-ci inutilisable avant de vous en
dŽbarrasser, ceci afin dÕŽviter aux enfants de
sÕenfermer dans lÕappareil et de mettre ainsi leur
vie en danger. Veillez Žgalement ˆ couper le
c‰ble dÕalimentation Žlectrique au ras de
lÕappareil.
En cas dÕanomalie de fonctionnement, reportez-
vous ˆ la rubrique ÒEN CAS DÕANOMALIE DE
FONCTIONNEMENTÓ. Si malgrŽ toutes les
vŽrifications, une intervention sÕav•re nŽcessaire, le
vendeur de votre appareil est le premier habilitŽ ˆ
intervenir. A dŽfaut (dŽmŽnagement de votre part,
fermeture du magasin o• vous avez effectuŽ
lÕachat...), veuillez consulter lÕAssistance
Consommateurs qui vous communiquera alors
lÕadresse dÕun Service Apr•s-Vente.
En cas dÕintervention sur votre appareil, exigez
du service apr•s-vente Ies pi•ces de rechange
certifiŽes Constructeur
55
WARNINGS
It is most important that this instruction book should be retained with the appliance for future
reference. Should the appliance be sold or transferred to another owner, or should you move house
and leave the appliance, always ensure that the book is supplied with the appliance in order that the
new owner can be acquainted with the functioning of the appliance and the relevant warnings.
If this appliance featuring magnetic door seals is to replace an older appliance having a spring lock
(latch) on the door or lid, be sure to make that spring lock unusable before you discard the old
appliance. This will prevent it from becoming a death-trap for a child.
These warnings are provided in the interest of safety. You must read them carefully before installing or
using the appliance.
General Safety
¥ This appliance is designed to be operated by
adults. Children should not be allowed to tamper
with the controls or play with the product.
¥ It is dangerous to alter the specifications or
modify this product in any way.
¥ Before any cleaning or maintenance work is carried
out, be sure to switch off and unplug the appliance.
¥ This appliance is heavy. Care should be taken
when moving it
¥ Ice lollies can cause frost burns if consumed
straight from the appliance.
¥ Take utmost care when handling your
appliance so as not to cause any damages to
the cooling unit with consequent possible
fluid leakages.
¥ The appliance must not be located close to
radiators or gas cookers.
¥ Avoid prolonged exposure of the appliance to
direct sunlight.
¥ There must be adequate ventilation round the
back of the appliance and any damage to the
refrigerant circuit must be avoided.
¥ For freezers only (except built-in models): an
ideal location is the cellar or basement.
¥ Do not use other electrical appliances (such
as ice cream makers) inside of refrigerating
appliances.
Service/Repair
¥ Any electrical work required to install this
appliance should be carried out by a qualified
electrician or competent person
¥ This product should be serviced by an authorized
Service Centre, and only genuine spare parts
should be used.
¥ Under no circumstances should you attempt to
repair the appliance yourself. Repairs carried out
by inexperienced persons may cause injury or
more serious malfunctioning. Refer to your local
Service Centre, and always insist on genuine
spare parts.
¥ This appliance contains hydrocarbons in its
cooling unit; maintenance and recharging must
therefore only be carried out by authorized
technicians.
Use
¥ The domestic refrigerators and freezers are
designed to be used specifically for the storage
of edible foodstuffs only.
¥ Best performance is obtained with ambient
temperature between +18¡C and +43¡C (class
T); +18¡C and +38¡C (class ST); +16¡C and
+32¡C (class N); +10¡C and +32¡C (class SN).
The class of your appliance is shown on its rating
plate.
Warning: when the ambient temperature is not
included within the range indicated for the class
of this appliance, the following instructions must
be observed: when the ambient temperature
drops below the minimum level, the storage
temperature in the freezer compartment cannot
be guaranteed; therefore it is advisable to use
the food stored as soon as possible.
¥ Frozen food must not be re-frozen once it has
been thawed out.
¥ ManufacturersÕ storage recommendations should
be strictly adhered to. Refer to relevant
instructions.
¥ The inner lining of the appliance consists of
channels through which the refrigerant passes. If
these should be punctured this would damage the
appliance beyond repair and cause food loss. DO
NOT USE SHARP INSTRUMENTS to scrape off
frost or ice. Frost may be removed by using the
scraper provided. Under no circumstances should
solid ice be forced off the liner. Solid ice should be
allowed to thaw when defrosting the appliance.
¥ Do not place carbonated or fizzy drinks in the
freezer as it creates pressure on the container,
which may cause it to explode, resulting in
damage to the appliance. Do not use a
mechanical device or any artificial means to
Printed on recycled paper
Page is loading ...
Page is loading ...
Page is loading ...
Page is loading ...
Page is loading ...
Page is loading ...
Page is loading ...
Page is loading ...
Page is loading ...
Page is loading ...
Page is loading ...
Page is loading ...
Page is loading ...
Page is loading ...
Page is loading ...
Page is loading ...
Page is loading ...
Page is loading ...
-
 1
1
-
 2
2
-
 3
3
-
 4
4
-
 5
5
-
 6
6
-
 7
7
-
 8
8
-
 9
9
-
 10
10
-
 11
11
-
 12
12
-
 13
13
-
 14
14
-
 15
15
-
 16
16
-
 17
17
-
 18
18
-
 19
19
-
 20
20
-
 21
21
-
 22
22
-
 23
23
-
 24
24
-
 25
25
-
 26
26
-
 27
27
-
 28
28
-
 29
29
-
 30
30
-
 31
31
-
 32
32
-
 33
33
-
 34
34
-
 35
35
-
 36
36


Ask a question and I''ll find the answer in the document
Finding information in a document is now easier with AI
in other languages
- français: Zanussi ZI722/10DAC Manuel utilisateur
- Deutsch: Zanussi ZI722/10DAC Benutzerhandbuch
- Nederlands: Zanussi ZI722/10DAC Handleiding
Related papers
Other documents
-
Electrolux ER8124I User manual
-
-
-
Juno-Electrolux JRZ94125 User manual
-
-
Juno-Electrolux JDZ9468 User manual
-
Electrolux ER7625B User manual
-
-
-