Page is loading ...

Micro Capture
Software
User
Manual
Ver2.0

CONTENT
CHAPTER 1 : SOFTWARE INSTALLATION ‐‐‐‐‐‐‐‐‐‐‐‐‐‐‐‐‐‐‐‐‐‐‐‐‐‐‐‐‐‐‐‐‐‐‐‐‐‐‐‐‐‐‐‐‐‐‐‐‐‐‐‐‐‐‐‐‐ ‐ 1 ‐
1.1Environmental Requirements for Software
Installation
‐‐‐‐‐‐‐‐‐‐‐‐‐‐‐‐‐‐‐‐‐‐‐‐‐‐‐‐‐‐‐‐‐‐‐‐‐‐‐‐‐‐‐‐ ‐ 1 ‐
1.2 Installation ‐‐‐‐‐‐‐‐‐‐‐‐‐‐‐‐‐‐‐‐‐‐‐‐‐‐‐‐‐‐‐‐‐‐‐‐‐‐‐‐‐‐‐‐‐‐‐‐‐‐‐‐‐‐‐‐‐‐‐‐‐‐‐‐‐‐‐‐‐‐‐‐‐‐‐‐‐‐‐‐‐‐‐‐‐‐‐‐‐‐‐‐‐‐‐‐‐‐‐ ‐ 1 ‐
CHAPTER 2: SOFTWARE INSTRUCTIONS ‐‐‐‐‐‐‐‐‐‐‐‐‐‐‐‐‐‐‐‐‐‐‐‐‐‐‐‐‐‐‐‐‐‐‐‐‐‐‐‐‐‐‐‐‐‐‐‐‐‐‐‐‐‐‐‐‐‐ ‐ 5 ‐
2.1 Software Operation Interface and Instruction‐‐‐‐‐‐‐‐‐‐‐‐‐‐‐‐‐‐‐‐‐‐‐‐‐‐‐‐‐‐‐‐‐‐‐‐‐‐‐‐‐‐‐‐‐‐‐‐‐‐‐‐‐‐‐‐ ‐ 5 ‐
2.2 Title
Panel
‐‐‐‐‐‐‐‐‐‐‐‐‐‐‐‐‐‐‐‐‐‐‐‐‐‐‐‐‐‐‐‐‐‐‐‐‐‐‐‐‐‐‐‐‐‐‐‐‐‐‐‐‐‐‐‐‐‐‐‐‐‐‐‐‐‐‐‐‐‐‐‐‐‐‐‐‐‐‐‐‐‐‐‐‐‐‐‐‐‐‐‐‐‐‐‐‐‐‐‐ ‐ 6 ‐
2.3 Main Tab ‐‐‐‐‐‐‐‐‐‐‐‐‐‐‐‐‐‐‐‐‐‐‐‐‐‐‐‐‐‐‐‐‐‐‐‐‐‐‐‐‐‐‐‐‐‐‐‐‐‐‐‐‐‐‐‐‐‐‐‐‐‐‐‐‐‐‐‐‐‐‐‐‐‐‐‐‐‐‐‐‐‐‐‐‐‐‐‐‐‐‐‐‐‐‐‐‐‐‐‐‐ ‐ 7 ‐
CHAPTER 3: FUNCTION INTRODUCTION OF “SCAN”WORK MODE ‐‐‐‐‐‐‐‐‐‐‐‐‐‐‐‐‐‐ ‐ 8 ‐
3.1 Upper
T
oo
lbar
‐‐‐‐‐‐‐‐‐‐‐‐‐‐‐‐‐‐‐‐‐‐‐‐‐‐‐‐‐‐‐‐‐‐‐‐‐‐‐‐‐‐‐‐‐‐‐‐‐‐‐‐‐‐‐‐‐‐‐‐‐‐‐‐‐‐‐‐‐‐‐‐‐‐‐‐‐‐‐‐‐‐‐‐‐‐‐‐‐‐‐‐‐‐‐ ‐ 8 ‐
3.2 Left Toolbar‐‐‐‐‐‐‐‐‐‐‐‐‐‐‐‐‐‐‐‐‐‐‐‐‐‐‐‐‐‐‐‐‐‐‐‐‐‐‐‐‐‐‐‐‐‐‐‐‐‐‐‐‐‐‐‐‐‐‐‐‐‐‐‐‐‐‐‐‐‐‐‐‐‐‐‐‐‐‐‐‐‐‐‐‐‐‐‐‐‐‐‐‐‐‐‐‐‐ ‐ 9 ‐
3.2.1
Standard
‐‐‐‐‐‐‐‐‐‐‐‐‐‐‐‐‐‐‐‐‐‐‐‐‐‐‐‐‐‐‐‐‐‐‐‐‐‐‐‐‐‐‐‐‐‐‐‐‐‐‐‐‐‐‐‐‐‐‐‐‐‐‐‐‐‐‐‐‐‐‐‐‐‐‐‐‐‐‐‐‐‐‐‐‐‐‐‐‐‐‐‐‐‐‐‐‐ 10 ‐
3.2.2 Video Parameter Ad
j
u
stme
n
t
‐‐‐‐‐‐‐‐‐‐‐‐‐‐‐‐‐‐‐‐‐‐‐‐‐‐‐‐‐‐‐‐‐‐‐‐‐‐‐‐‐‐‐‐‐‐‐‐‐‐‐‐‐‐‐‐‐‐‐‐‐‐‐‐‐‐‐‐‐‐‐ 12 ‐
3.2.3 Draw ‐‐‐‐‐‐‐‐‐‐‐‐‐‐‐‐‐‐‐‐‐‐‐‐‐‐‐‐‐‐‐‐‐‐‐‐‐‐‐‐‐‐‐‐‐‐‐‐‐‐‐‐‐‐‐‐‐‐‐‐‐‐‐‐‐‐‐‐‐‐‐‐‐‐‐‐‐‐‐‐‐‐‐‐‐‐‐‐‐‐‐‐‐‐‐‐‐‐‐‐‐ 14 ‐
3.2.4 Ins
ert
‐‐‐‐‐‐‐‐‐‐‐‐‐‐‐‐‐‐‐‐‐‐‐‐‐‐‐‐‐‐‐‐‐‐‐‐‐‐‐‐‐‐‐‐‐‐‐‐‐‐‐‐‐‐‐‐‐‐‐‐‐‐‐‐‐‐‐‐‐‐‐‐‐‐‐‐‐‐‐‐‐‐‐‐‐‐‐‐‐‐‐‐‐‐‐‐‐‐‐‐‐ 17 ‐
3.2.5 Calibration and M
easu
r
ement
‐‐‐‐‐‐‐‐‐‐‐‐‐‐‐‐‐‐‐‐‐‐‐‐‐‐‐‐‐‐‐‐‐‐‐‐‐‐‐‐‐‐‐‐‐‐‐‐‐‐‐‐‐‐‐‐‐‐‐‐‐‐‐‐‐‐‐‐‐‐ 18 ‐
3.2.6 Tool ‐‐‐‐‐‐‐‐‐‐‐‐‐‐‐‐‐‐‐‐‐‐‐‐‐‐‐‐‐‐‐‐‐‐‐‐‐‐‐‐‐‐‐‐‐‐‐‐‐‐‐‐‐‐‐‐‐‐‐‐‐‐‐‐‐‐‐‐‐‐‐‐‐‐‐‐‐‐‐‐‐‐‐‐‐‐‐‐‐‐‐‐‐‐‐‐‐‐‐‐‐‐ 20 ‐
3.2.6 Erase ‐‐‐‐‐‐‐‐‐‐‐‐‐‐‐‐‐‐‐‐‐‐‐‐‐‐‐‐‐‐‐‐‐‐‐‐‐‐‐‐‐‐‐‐‐‐‐‐‐‐‐‐‐‐‐‐‐‐‐‐‐‐‐‐‐‐‐‐‐‐‐‐‐‐‐‐‐‐‐‐‐‐‐‐‐‐‐‐‐‐‐‐‐‐‐‐‐‐‐‐‐ 21 ‐
3.3 Lower Toolbar‐‐‐‐‐‐‐‐‐‐‐‐‐‐‐‐‐‐‐‐‐‐‐‐‐‐‐‐‐‐‐‐‐‐‐‐‐‐‐‐‐‐‐‐‐‐‐‐‐‐‐‐‐‐‐‐‐‐‐‐‐‐‐‐‐‐‐‐‐‐‐‐‐‐‐‐‐‐‐‐‐‐‐‐‐‐‐‐‐‐‐‐‐‐‐ 21 ‐
3.4 Add Wireless Device ‐‐‐‐‐‐‐‐‐‐‐‐‐‐‐‐‐‐‐‐‐‐‐‐‐‐‐‐‐‐‐‐‐‐‐‐‐‐‐‐‐‐‐‐‐‐‐‐‐‐‐‐‐‐‐‐‐‐‐‐‐‐‐‐‐‐‐‐‐‐‐‐‐‐‐‐‐‐‐‐‐‐‐‐‐‐ 24 ‐
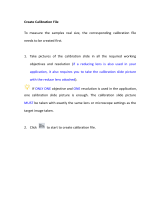
3.5 Detailed Operation for Calibration Fu
ncti
on ‐‐‐‐‐‐‐‐‐‐‐‐‐‐‐‐‐‐‐‐‐‐‐‐‐‐‐‐‐‐‐‐‐‐‐‐‐‐‐‐‐‐‐‐‐‐‐‐‐‐‐‐‐‐‐‐‐ 25 ‐
CHAPTER 4: “DOCUMENT MODE” FUNCTION INTRODUCTION ‐‐‐‐‐‐‐‐‐‐‐‐‐‐‐‐‐‐‐‐‐‐‐ 30 ‐
4.1 Upper toolbar‐‐‐‐‐‐‐‐‐‐‐‐‐‐‐‐‐‐‐‐‐‐‐‐‐‐‐‐‐‐‐‐‐‐‐‐‐‐‐‐‐‐‐‐‐‐‐‐‐‐‐‐‐‐‐‐‐‐‐‐‐‐‐‐‐‐‐‐‐‐‐‐‐‐‐‐‐‐‐‐‐‐‐‐‐‐‐‐‐‐‐‐‐‐‐‐ 30 ‐
4.2 Left toolbar of Document‐‐‐‐‐‐‐‐‐‐‐‐‐‐‐‐‐‐‐‐‐‐‐‐‐‐‐‐‐‐‐‐‐‐‐‐‐‐‐‐‐‐‐‐‐‐‐‐‐‐‐‐‐‐‐‐‐‐‐‐‐‐‐‐‐‐‐‐‐‐‐‐‐‐‐‐‐‐‐‐‐ 32 ‐
4.2.1
Standard
‐‐‐‐‐‐‐‐‐‐‐‐‐‐‐‐‐‐‐‐‐‐‐‐‐‐‐‐‐‐‐‐‐‐‐‐‐‐‐‐‐‐‐‐‐‐‐‐‐‐‐‐‐‐‐‐‐‐‐‐‐‐‐‐‐‐‐‐‐‐‐‐‐‐‐‐‐‐‐‐‐‐‐‐‐‐‐‐‐‐‐‐‐‐‐‐‐ 32 ‐
4.2.2 Draw ‐‐‐‐‐‐‐‐‐‐‐‐‐‐‐‐‐‐‐‐‐‐‐‐‐‐‐‐‐‐‐‐‐‐‐‐‐‐‐‐‐‐‐‐‐‐‐‐‐‐‐‐‐‐‐‐‐‐‐‐‐‐‐‐‐‐‐‐‐‐‐‐‐‐‐‐‐‐‐‐‐‐‐‐‐‐‐‐‐‐‐‐‐‐‐‐‐‐‐‐‐ 34 ‐
4.2.3 Ins
ert
‐‐‐‐‐‐‐‐‐‐‐‐‐‐‐‐‐‐‐‐‐‐‐‐‐‐‐‐‐‐‐‐‐‐‐‐‐‐‐‐‐‐‐‐‐‐‐‐‐‐‐‐‐‐‐‐‐‐‐‐‐‐‐‐‐‐‐‐‐‐‐‐‐‐‐‐‐‐‐‐‐‐‐‐‐‐‐‐‐‐‐‐‐‐‐‐‐‐‐‐‐ 34 ‐
4.2.4 Calibration and M
easu
r
ement
‐‐‐‐‐‐‐‐‐‐‐‐‐‐‐‐‐‐‐‐‐‐‐‐‐‐‐‐‐‐‐‐‐‐‐‐‐‐‐‐‐‐‐‐‐‐‐‐‐‐‐‐‐‐‐‐‐‐‐‐‐‐‐‐‐‐‐‐‐‐ 34 ‐
4.2.5Tool ‐‐‐‐‐‐‐‐‐‐‐‐‐‐‐‐‐‐‐‐‐‐‐‐‐‐‐‐‐‐‐‐‐‐‐‐‐‐‐‐‐‐‐‐‐‐‐‐‐‐‐‐‐‐‐‐‐‐‐‐‐‐‐‐‐‐‐‐‐‐‐‐‐‐‐‐‐‐‐‐‐‐‐‐‐‐‐‐‐‐‐‐‐‐‐‐‐‐‐‐‐‐‐ 35 ‐
4.2.6 Erase ‐‐‐‐‐‐‐‐‐‐‐‐‐‐‐‐‐‐‐‐‐‐‐‐‐‐‐‐‐‐‐‐‐‐‐‐‐‐‐‐‐‐‐‐‐‐‐‐‐‐‐‐‐‐‐‐‐‐‐‐‐‐‐‐‐‐‐‐‐‐‐‐‐‐‐‐‐‐‐‐‐‐‐‐‐‐‐‐‐‐‐‐‐‐‐‐‐‐‐‐‐ 35 ‐
4.3 Lower toolbar ‐‐‐‐‐‐‐‐‐‐‐‐‐‐‐‐‐‐‐‐‐‐‐‐‐‐‐‐‐‐‐‐‐‐‐‐‐‐‐‐‐‐‐‐‐‐‐‐‐‐‐‐‐‐‐‐‐‐‐‐‐‐‐‐‐‐‐‐‐‐‐‐‐‐‐‐‐‐‐‐‐‐‐‐‐‐‐‐‐‐‐‐‐‐‐ 36 ‐
4.4 Thumbnail display area ‐‐‐‐‐‐‐‐‐‐‐‐‐‐‐‐‐‐‐‐‐‐‐‐‐‐‐‐‐‐‐‐‐‐‐‐‐‐‐‐‐‐‐‐‐‐‐‐‐‐‐‐‐‐‐‐‐‐‐‐‐‐‐‐‐‐‐‐‐‐‐‐‐‐‐‐‐‐‐‐‐‐‐ 37 ‐

- 1 -
Chapter 1 : Software Installation
1.1Environmental Requirements for Software Installation
Compatible system: XPsp3,Win7 ,Win8,Win8.1
Note: Partial function of this software relies on the installation of the following softwares:
Microsoft Word 2003 or version above (with functionof Word Export for calibration result)
Microsoft Excel2003 or version above (with function of Excel Export for calibration result)
Microsoft Outlook 2003 or version above (with function of picture delivery by email)
Internet Explorer7.0 or version above (with wireless connection function ofsoftware)
1.2 Installation
Step 1. Activate the computer and insert the installation disk into the DVD.
Step 2. Double click the file“MicroCapture Install” under the disk catalogue. When the following
window pops up, please select the installation guide language and press the button“
”.
Note: The installation guide language is independent of the software interface language. If you need to
change the software interface language, please refer to 2.2 - Modification of Language Function.

- 2 -
Step 3.When the window“Welcome to use MicroCapture Installation Guide” pops up, please click the
button “
”.
Step 4. When the window “Please select the target location”pops up, click “Browse” to choose the file
path for installation (usually default),and then click “
” to continue.

- 3 -
Step 5. When following window appears, select the shortcut you need, and then click the button
“ ”.
Step 6. Confirm information like “the target location”of software installation. After confirmation,
please click the button “
”.
Step 7. An installation progress bar will appear during the softwareinstallation procedure. The software
installation necessitates the registration of some runtime libraries, which might be intercepted by some
antivirus software. If such interception pops up, please allow the procedure to continue.

- 4 -
Step 8. An installation progress bar will appear during the software installation procedure. When the
following window appears, the software has been installed successfully. Then click the button
“ ”to complete the installation. After closing the window, check the icon
on your desk.
If you fail to find it, please find it from the path “Start”→“All programs”.

- 5 -
Chapter
2: Software Instructions
2.1 Software Operation Interface and Instruction

- 6 -
2.2 Title Panel
Setup Menu : Click this button to display relevant menu bar.
Setup :
Set the photo shooting path, videofiles and save path of OCR
files, as shown below.
Language :
Set the software interface language.After successful setup, the
software interface language and prompt language will be
changed.
Skin :
Set up the background color of the software. Clicking this button
will display the interface below:
After change the tab“
”or“ ”, select
“ ”for confirmation, as shown below:

- 7 -
2.3 Main Tab
Function:
Scan : Camera is activated. Operation like adjusting the
camera screen is available.
Document : Make the currently displayed picture editable.

- 8 -
Chapter 3: Function Introduction of “Scan”Work Mode
Open the MicroCapture procedure. The default work
mode is shown as “ ”.
The
software operation interface is displayed as above.
3.1 Upper Toolbar
Revoke
Redo
: Revoke the previous action, only valid for editing.
: Redo the previous action, only valid for editing.
Select object
:
Select an object
in the picture, only valid for
objects in the editing picture.
Drag
:
Drag
the video screen randomly inside the
preview area.
Upturn object
Drop down object
Object Copy
: Upturn the selected object to a higher layer.
: Drop down the selected object to a lower layer.
: Copy the selected object.

- 9 -
Object Cut : Cut the selected object.
Object Paste : Paste the object already beencut or copied.
Object Delete : Delete the selected object.
Print : Print the current preview and generate a photo.
Convert to PDF :
Convert the current preview to PDF and generate
a file.
Email :
Email forward the current preview and generate a
file.
Rapid OCR :
Process OCR for the current preview and generate
a photo (For detailed OCR function, please refer
to the notes below).
Select device :
Display current operating devices. When the
software searches out various video devices,
several device names will be displayed for
selection.
3.2 Left Toolbar
Standard : For wireless device connection, resolution setup or photo type
setup.

- 10 -
Video Parameter
Adjustment
: Basic parameter setup for the device camera, such as focusing,
exposure and white balance.
Draw : Draw lines for the current preview picture.
Insert : Insert words, specified pictures and screenshots into the
current preview.
Measure : Execute measurement on current preview window
Tool : Cover the screen.
Erase : Erase the drawing object inserted into the current preview.
3.2.1 Standard
You can adjust relevant parameters according to your needs to achieve desirableeffects for preview and
photograph, as shown in image on the right:

- 11 -
Wireless Device
Connection
:
When this option is ticked, “Wireless Device”
will display in the device selection window. Then a
wireless device can be connected. For detailed
operation information, please refer to “Wireless
Connection Operation”.
Preview Resolution :
You can select any desirable preview resolution
under this drop down box for preview.
Note 1: The higher the preview resolution, the
lower the frame rate.
Note 2: Resolution supported by different devices
varies.
Save Resolution :
This option is used to select photo resolution. The
proportion of the preview resolution keeps
consistent with that of the save resolution. When
the preview resolution ratio is 4:3, the save
resolution ratio can only be 4:3 and the default
maximum save resolution is 2592×1944. When the
preview resolution is 16:9, the save resolution can
only be 16:9 and the default save resolution ratio
for 16:9 is 1280×720.
Note: The resolution supported by different devices
varies.
Save Format :
There are four save formats, namely pdf, bmp ,jpg
and png. The default format for this procedure is
jpg. You can choose any of the four save formats
according to your need.
Lock:
Unlock:
Lock and unlock
status
:
Under the status of Locking“ ”, the preview
resolution keeps consistent with the photo
resolution. The preview displays the same picture
as that in camera. Under the status of
Unlocking“
”, the preview resolution is
inconsistent with the photo resolution and the
preview might show difference with the camera
photograph.

- 12 -
3.2.2 Video Parameter Adjustment
You can adjust relevant parameter for desirable preview and scan effects, as shown in image on the
right:
Note: Function supported by different devices varies.
Auto Focus :
When this option is ticked, the preview
changes and auto focus will be triggered if the
connected device supports auto focus
function. Then the“manual focus”function
below is invalid.
Manual Focus :
Drag to adjust the focus distance of the device
according to the service environment.
Auto Exposure :
When this option is ticked, the device will
process auto exposure according to the service
environment. This function is valid when the
option is ticked. You can also apply
“Exposure” for adjustment when this option is
not ticked.
Manual Exposure :
Drag to adjust the exposure parameter of the
device according to the service environment.
This parameter is adjusted around the auto
exposure and only valid when the “Auto
Exposure” option is not ticked.

- 13 -
Auto White Balance :
When this option is ticked, the device will
process auto white balance according to the
service environment. The “Manual White
Balance” below can also be applied for
adjustment when this option is not ticked.
Note: When shooting colorful objects, color
abnormity might occur. Thus manual
calibration needs to be made for auto white
balance.Detailed operation method: align the
device with white paper, remove the tick
on“Auto White Balance”option, and tick it
again, making the device process auto white
balance once. After that, remove the tick on
the “Auto White Balance” option.
Manual White Balance :
Drag to adjust the white balance parameter of
the device according to the service
environment. This parameter is adjusted up
and down on the basis of auto white balance
and only valid when the “Auto White
Balance” option is not ticked.
Brightness Control :
Drag it to change the entire brightness of the
screen. Brightness control usually coordinates
with contrast control to achieve the best
effect.
Contrast Control :
Drag it to change the contrast between the
brightness and darkness of the screen.
Contrast control usually coordinates with
brightness control to achieve the best effect.
Saturation Control :
Drag it to change the color saturation of the
screen to achieve the best effect.
Backlight Compensation :
Drag it to raise the brightness of the preview
environment when the device is used in
relatively dark environment.
Note: Partial device doesn’t support this
function.

- 14 -
3.2.3 Draw
LED Illuminating :
Auxiliary LED light has 6 levels of brightness.
A tick on this option stands for the first level
of brightness. You can also adjust the
brightness of LED light by yourself. When
this option is not ticked, the LED light will
turn off automatically.
Note: Some product doesn’t support this
function.
Power Line Control :
This function makes the voltage of the device
under the same frequency with that of the
service environment to reduce the “crinkle”
jamming effect of the preview screen.
Note: Power supply frequency currently
supports 50/60Hz. Please select it according to
the supply frequency of your location.
Default :
Back to default settings.
Making drawing in the editing panel according to requirements, as shown inimage on theright:
Pencil : Draw with pencil.
Pen : Draw with pen.
Writing Brush : Draw withwriting brush.

- 15 -
Chalk : Draw with chalk.
Brush : Draw with brush.
Texture : Draw with texture pen.
Fill : Paint bucket tool for filling color to selected
closed area.
Upper layer : Move the selected object to a higher layer
Lower layer : Move the selected object to a lower layer
Straight Line : Draw straight line.
Straight Line with single
head arrow
Straight
LinewithDouble-headed
arrow
: Draw straight linewith single head arrow.
: Draw straight line with double-headed arrow.
Curve : Draw curve line.
Arrow Curve : Draw curve with an arrow.
Broken Line : Draw broken line.
Broken Line with single
head arrow
: Draw broken line with single head arrow.
Broken Line with
double-headed arrow
: Draw broken line with double-headed arrow.
Rectangle : Draw rectangle.
Rounded Rectangle : Draw rounded rectangle.
Parallelogram : Draw parallelogram.
Rhombus : Draw rhombus.
Polygon : Draw polygon.

- 16 -
Isosceles Triangle : Draw isosceles triangle.
Right triangle : Draw right triangle.
Concentric Circles : Draw concentric circles.
Ellipse : Draw ellipse.
Cylinder : Draw cylinder.
Cube : Draw cube.
Prism : Draw prism.
Arc : Draw arch.
Hollow Arc : Draw hollow arch.
Moon Shape : Draw moon shape.
Smile Face : Draw smile face.
Heart Shape : Draw heart shape.
Dog ear : Draw dog ear.
Forbidden Sign : Draw forbidden sign.
cruciform : Draw cruciform.
Tick : Tick shapes without change in size.
Cross : Cross shape without change in size.
Line Type : Set line shape of drawing with five types
available.
Line Width : Set pixel value of the drawing line width with
pixel rangefrom 1 to 8.
Transparency : Set the transparency of the drawing line.
Color : Set the color of the drawing line.

- 17 -
Hide current program
:
With this option ticked, current program will hid
e
when screenshot happens.Otherwise the
program will
be shown as normal.
Trim
:
To trim the rectangular area.
Screenshot to Clipboard
:
Put screenshot on clipboard and cut the square area on
the clipboard.
Random Screenshot
:
Random screenshot for any drawn area.
Rectangle Screenshot
:
Rectangle screenshot for drawn rectangle area.
Window Screenshot
:
Window screenshot for the whole window area.
Screenshot
:
Screenshot for the whole screen area.
Words
:
Insert words.
Picture
:
Insert pictures.
Font
Color
:
:
Setup font, pattern, size and effects of in
serted
characters.
Setup the display color of inserted characters.
3.2.4 Insert
Insert specified object according to requirements.

- 18 -
3.2.5 Calibration and Measurement
With calibration and measurement function, precise measurement can be made to video in the editing
area.
Note: For precise measurement, first set calibration.
As shown in image on the right:
Straight Line Measurement :
Measure the straight line distance between two points.
Broken Line Measurement : Measure the perimeter of the broken line.
Concentric Circles Measurement : Measure distance between concentric circles and area of
two circles.
Arc Measurement : Measure the length of arc.
Angle Measurement : Measure angle degree with three points.
Quadri Angle Measurement : Measure angle degree with four points.
Rectangle Measurement : Measure the perimeter and area of the rectangle.
Polygon Measurement : Measure the perimeter and area of the polygon.
/