Philips GC 2011 User manual
- Category
- Steam ironing stations
- Type
- User manual

Mistral
GC2032,GC2030,GC2025,GC2020,GC,2016,GC2015,
GC2012,GC2011,GC2010,GC2006,GC2005
Page is loading ...


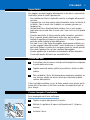
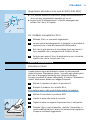
Important
For optimal safety, read these instructions carefully and look at the
illustrations before you start using the appliance.
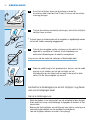
- Never leave the iron unattended when it is connected to the
electrical outlet.
- Young children should not be allowed to use the appliance without
supervision.Keep an eye on children to make sure that they do not
play with the appliance.
- The soleplate of the iron can become extremely hot and may cause
burns if touched. Do not allow the cord to come into contact with
the soleplate when it is hot.
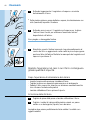
- When you have finished ironing,when you clean the appliance,when
you fill or empty the water tank and also when you leave the iron
even for a short while: set the steam control to position O,put the
iron on its heel and remove the plug from the wall socket.
- If the cord of this appliance is damaged,it must always be replaced
by Philips or a service centre authorised by Philips,as special tools
and/or parts are required.
- Never use the appliance if it is damaged in any way.
- This appliance is intended for household use only.
- Save these instructions for future reference.
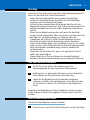
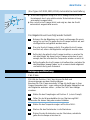
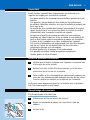
Before first use
1 Check if the voltage indicated on the type plate corresponds to
the voltage in your home before you connect the appliance.
2 Remove any sticker,protective foil or storage cover from the
soleplate.
3 Heat up the iron to maximum temperature and pass the iron
over a piece of damp cloth for several minutes to remove any
residue from the soleplate.
The iron may give off some smoke when you use it for the first time.
This will cease after a short while.
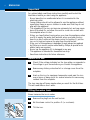
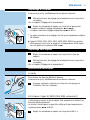
Filling the water tank
Never immerse the iron in water.
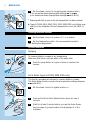
1 Remove the plug from the wall socket.
C
2 Set the steam control to position O (= no steam).
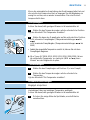
3 Tilt the iron.
ENGLISH4

C
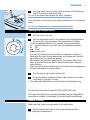
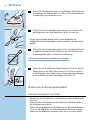
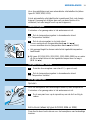
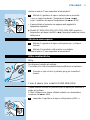
4 Pour tap water into the water tank by means of the filling jug
and fill the tank to maximum level.
Do not fill the water tank beyond the MAX indication.
If the tap water in your area is very hard,we advise you to use distilled
water.
Do not use vinegar,starch or chemically descaled water.
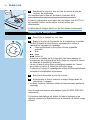
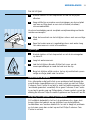
Setting the temperature
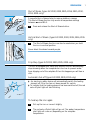
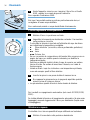
1 Put the iron on its heel.
C
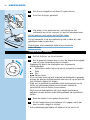
2 Set the temperature dial to the required ironing temperature
by turning it to the position of the temperature indicator.
- Check the garment label for the required ironing temperature.
- 1 Synthetic fabrics (e.g. acrylic, viscose,polyamide,polyester)
- 1 Silk
- 2 Wool
- 3 Cotton,linen
- If you do not know what kind of fabric(s) a garment is made of,
determine the right ironing temperature by ironing a part that will
be invisible when you wear the garment.
- Silk,woollen and synthetic materials:iron the reverse side of the
fabric to prevent shiny patches.To prevent stains,avoid using the
spray function.
- Start ironing the articles that require the lowest ironing temperature,
such as those made of synthetic fibres.
3 Put the plug in a grounded wall socket.
4 When the amber temperature pilot light has gone out,wait a
while before you start ironing.
B
The amber pilot light will come on from time to time during ironing.
For auto-shut-off versions (types GC2032, 2030,2012 only):
If the auto-shut-off function has been activated (red pilot light blinks),
move the iron slightly to deactivate it (red pilot light stops blinking).
Steam ironing
Make sure that there is enough water in the water tank.
1 Set the temperature dial to the recommended position.
See 'Setting the temperature'.
ENGLISH 5
N
Y
L
O
N
S
O
I
E
L
A
I
N
E
C
O
T
O
N
L
I
N
N
Y
L
O
N
S
I
L
K
W
O
O
L
C
O
T
T
O
N
L
I
N
E
N

C
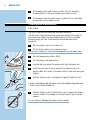
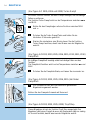
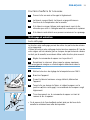
2 Set the steam control to the appropriate steam position.
- q for moderate steam (temperature settings 2 to 3)
- w for maximum steam (temperature settings 3 to MAX)
B
Steaming will start as soon as the set temperature has been reached.
◗ Types GC2016,2015,2012,2011,2010,2006,2005 only:Water may
leak from the soleplate if the set temperature is too low (MIN to
2).
Ironing without steam
1 Set the steam control to position O ( = no steam).
2 Set the temperature dial to the recommended position.
See 'Setting the temperature'.
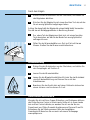
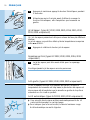
Other features
Spraying
To remove stubborn creases at any temperature
Make sure that there is enough water in the water tank.
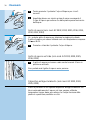
C
1 Press the spray button a couple of times to moisten the
laundry.
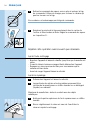
Extra Steam (types GC2020,2006,2005 only)
This function provides extra steam to remove stubborn creases.
The Extra Steam function only works at temperature settings between
3 and MAX.
C
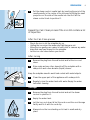
1 Set the steam control to highest position q.
C
2 Press and hold the Extra Steam button down for max.5
seconds.
3 Wait for at least 1 minute before you use the Extra Steam
function again to prevent water from dripping out of the
soleplate.
ENGLISH6

Shot of Steam (types GC2032,2030,2025,2016,2015,2012,
2011,2010 only)
A powerful shot of steam helps to remove stubborn creases.
The Shot-of-Steam function only works at temperature settings
between 2 and MAX.
C
1 Press and release the Shot-of-Steam button.
Vertical Shot of Steam (types GC2032,2030,2025,2016,2015
only)
C
1 The Shot of Steam function can also be used when you hold
the iron in vertical position.
Never direct the steam towards people.
Drip Stop (types GC2032,2030,2025,2020 only)
This iron is equipped with a drip stop function: the iron automatically
stops steaming when the temperature is too low to prevent water
from dripping out of the soleplate.When this happens you will hear a
click.
Automatic shut-off (types GC2032,2030,2012 only)
C
◗ An electronic safety device will automatically switch the heating
element off if the iron has not been moved for a while.
◗ To indicate that the heating element has been switched off,the red
auto-off pilot light will start blinking.
To heat up the iron again:
1 Pick up the iron or move it slightly.
2 The red auto-off pilot light will go out.The amber temperature
pilot light will come on,depending on the soleplate
temperature.
ENGLISH 7

3 If the amber pilot light comes on after the iron has been
moved,wait for it to go out before you start ironing.
4 If the amber light does not come on after the iron has been
moved,the iron is ready for use.
Cleaning and maintenance
Calc-Clean
The Calc-Clean function removes scale and impurities.
Use the Calc-Clean function once every two weeks.If the water in
your area is very hard (i.e.when flakes come out of the soleplate
during ironing), the Calc-Clean function should be used more
frequently.
1 Set the steam control to position O.
2 Fill the water tank to the maximum level.
Do not pour vinegar or other descaling agents into the water tank.
3 Set the temperature dial to MAX.
4 Put the plug in the wall socket.
5 Unplug the iron when the amber pilot light has gone out.
C
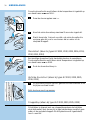
6 Hold the iron over the sink and set the steam control to
position 1(Calc-Clean).The steam control knob will spring up
slightly.
C
7 Pull the steam control up slightly and gently shake the iron.
B
Steam and boiling water will come out of the soleplate.Impurities and
scale (if any) will be flushed out.
C
8 Pull the steam control knob further up to remove the steam
control needle.Use vinegar to remove scale,if any,from the
needle.
Do not bend or damage the steam control needle.
ENGLISH8

C
9 Put the steam control needle back by inserting the point of the
needle exactly in the centre of the hole and by fitting the small
projection on the side of the needle into the slot.Set the
steam control knob to position O.
Repeat the Calc-Clean process if the iron still contains a lot
of impurities.
After the Calc-Clean process
- Plug in the iron to let the soleplate dry up.
- Unplug the iron when the amber pilot light has gone out.
- Move the iron gently over a piece of used cloth to remove any water
stains that may have formed on the soleplate.
- Let the iron cool down before you store it.
After ironing
1 Remove the plug from the wall socket and let the iron cool
down.
2 Wipe scale and any other deposits off the soleplate with a
damp cloth and a non-abrasive (liquid) cleaner.
Keep the soleplate smooth:avoid hard contact with metal objects.
3 Clean the upper part of the appliance with a damp cloth.
C
4 Regularly rinse the water tank with water.Empty the water
tank after cleaning.
Storage
1 Remove the plug from the wall socket and set the steam
control to position O.
2 Empty the water tank.
C
3 Let the iron cool down.Wind the cord round the cord storage
facility and fix it with the cord clip.
4 Always store the iron standing on its heel in a safe and dry
place.
ENGLISH 9

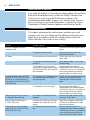
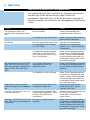
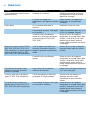
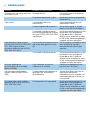
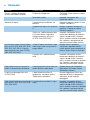
Solution
Check the cord,the plug and the wall
socket.
Set the temperature dial to the
required temperature.
Fill the water tank (see Filling the
water tank).
Set to steam position q or w (see
Steam ironing).
Set the temperature dial to a
temperature in the steam area (2
to MAX).Put the iron on its heel and
wait until the amber pilot light has
gone out before you start ironing.
Put the iron in horizontal position and
wait for a while before using the
(Vertical) Shot of Steam function
again.
Set the temperature dial to a
temperature in the steam area (2
to MAX).Put the iron on its heel and
wait until the amber pilot light has
gone out before you start ironing.
Use the Calc-Clean function a few
times (see 'Calc-Clean').
Shake the iron lightly to deactivate
the auto shut-off function:the pilot
light will stop blinking.
Set the temperature dial to a
temperature in the steam area (2
to MAX).Put the iron on its heel and
wait until the amber pilot light has
gone out before you start ironing.
Possible cause(s)
Connection problem.
Temperature dial set at MIN.
Not enough water in the water tank.
The steam control has been set to
position O.
The soleplate is not hot enough
and/or the Drip Stop function (types
GC2032,2030,2025,2020 only) has
been activated.
The (Vertical) Shot of Steam function
has been used too often within a
very short period.
The soleplate is not hot enough.
Hard water forms flakes inside the
soleplate.
The auto shut-off function has been
activated.See "Automatic shut-off"
section.
The temperature has been set too
low.
Problem
The iron is plugged in but the
soleplate is cold.
No steam
No Shot of Steam (types GC2032,
2030,2025,2016,2015,2012,2011,
2010 only) or no Vertical Shot of
Steam (types GC2032,2030, 2025,2
016,2015 only).
Flakes and impurities come out of
the soleplate during ironing.
Red pilot light is blinking (type
GC2032,2030 only).
Water drips out of the soleplate
(types GC2016,2015, 2012, 2011,
2010,2006, 2005 only).
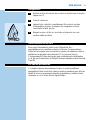
Information & service
If you need information or if you have a problem,please visit the Philips
Web site at www.philips.com or contact the Philips Customer Care
Centre in your country (you will find its phone number in the
worldwide guarantee leaflet).If there is no Customer Care Centre in
your country, turn to your local Philips dealer or contact the Service
Department of Philips Domestic Appliances and Personal Care BV.
Troubleshooting
This chapter summarises the most common problems you could
encounter with your iron.Please read the different sections for more
details.If you are unable to solve the problem,please contact the
Philips Customer Care Centre in your country.
ENGLISH10
Page is loading ...
Page is loading ...
Page is loading ...
Page is loading ...
Page is loading ...
Page is loading ...
Page is loading ...
Page is loading ...
Page is loading ...
Page is loading ...
Page is loading ...
Page is loading ...
Page is loading ...
Page is loading ...
Page is loading ...
Page is loading ...
Page is loading ...
Page is loading ...

NEDERLANDS 29
Voor stoomstrijkijzers met een automatische uitschakelfunctie (alleen
types GC2032,2030, 2012):
Als de automatische uitschakelfunctie is geactiveerd (het rode lampje
knippert),beweeg het strijkijzer dan even om deze functie uit te
schakelen (het rode lampje houdt op met knipperen).
Stoom-strijken
Controleer of er genoeg water in het waterreservoir zit.
1 Zet de temperatuurregelaar in de aanbevolen stand.
Zie 'Temperatuur instellen'.
C
2 Zet de stoomregelaar in de juiste stand.
- q voor weinig stoom (temperatuurstand 2 tot 3)
- w voor maximum stoom (temperatuurstand 3 tot MAX)
B
Het apparaat begint te stomen zodra het de ingestelde temperatuur
heeft bereikt
◗ Bij types GC2016,2015,2012,2011,2010,2006,2005 kan er water
uit de zoolplaat lekken als de ingestelde temperatuur te laag is
(MIN tot 2).
Strijken zonder stoom
1 Draai de stoomregelaar naar stand O (= geen stoom).
2 Zet de temperatuurregelaar in de aanbevolen stand.
Zie 'Temperatuur instellen'.
Overige functies
Sproeien
Voor het verwijderen van hardnekkige kreuken op elke temperatuur.
Controleer of er genoeg water in het waterreservoir zit.
C
1 Druk een paar keer op de sproeiknop om de stof vochtig te
maken.
Extra stoom (alleen bij types GC2020,2006 en 2005)
Deze functie levert extra stoom voor het verwijderen van hardnekkige
kreuken.
Page is loading ...
Page is loading ...
Page is loading ...

NEDERLANDS 33
Na het strijken
1 Haal de stekker uit het stopcontact en laat het strijkijzer
afkoelen.
2 Veeg schilfertjes en andere verontreinigingen van de zoolplaat
met een vochtige doek en een niet-schurend (vloeibaar)
schoonmaakmiddel.
Voorkom beschadiging van de zoolplaat:vermijd aanraking met harde
metalen voorwerpen.
3 Maak de bovenkant van het strijkijzer schoon met een vochtige
doek.
C
4 Spoel het waterreservoir regelmatig schoon met water.Leeg
het waterreservoir na het schoonmaken.
Opbergen
1 Haal de stekker uit het stopcontact en zet de stoomregelaar
op stand O.
2 Leeg het waterreservoir.
C
3 Laat het strijkijzer afkoelen.Wikkel het snoer om de
snoeropwindhaspel en maak het vast met de clip.
4 Berg het stijkijzer altijd op door het op zijn achterkant op een
veilige en droge plaats neer te zetten.
Informatie & service
Als u informatie nodig heeft of als u een probleem heeft,bezoek dan
onze Website (www.philips.com), of neem contact op met het Philips
Customer Care Centre in uw land (u vindt het telefoonnummer in het
'worldwide guarantee' vouwblad).Als er geen Customer Care Centre
in uw land is,ga dan naar uw Philips dealer of neem contact op met de
afdeling Service van Philips Domestic Appliances and Personal Care BV.
Hulp bij het oplossen van problemen
Dit hoofdstuk behandelt in het kort de problemen die u tegen kunt
komen tijdens het gebruik van uw strijkijzer.Lees de betreffende
hoofdstukken voor verdere details.Als u er niet in slaagt het probleem
op te lossen,neem dan contact op met het Philips Customer Care
Centre in uw land.
Page is loading ...
Page is loading ...
Page is loading ...
Page is loading ...
Page is loading ...
Page is loading ...
Page is loading ...
Page is loading ...
Page is loading ...

43
-
 1
1
-
 2
2
-
 3
3
-
 4
4
-
 5
5
-
 6
6
-
 7
7
-
 8
8
-
 9
9
-
 10
10
-
 11
11
-
 12
12
-
 13
13
-
 14
14
-
 15
15
-
 16
16
-
 17
17
-
 18
18
-
 19
19
-
 20
20
-
 21
21
-
 22
22
-
 23
23
-
 24
24
-
 25
25
-
 26
26
-
 27
27
-
 28
28
-
 29
29
-
 30
30
-
 31
31
-
 32
32
-
 33
33
-
 34
34
-
 35
35
-
 36
36
-
 37
37
-
 38
38
-
 39
39
-
 40
40
-
 41
41
-
 42
42
-
 43
43


Philips GC 2011 User manual
- Category
- Steam ironing stations
- Type
- User manual
Ask a question and I''ll find the answer in the document
Finding information in a document is now easier with AI
in other languages
- italiano: Philips GC 2011 Manuale utente
- français: Philips GC 2011 Manuel utilisateur
- Deutsch: Philips GC 2011 Benutzerhandbuch
- Nederlands: Philips GC 2011 Handleiding
Related papers
Other documents
-
Tefal FS4030M0 User manual
-
 Russell Hobbs 19330-56 User manual
-
Bosch TDA5028110 User manual
-
Bosch TDA-502811 S Sensixx x DA 50 StoreProtect User manual
-
 Russell Hobbs 18616-56 User manual
-
Bosch TDA7647BOX/01 User manual
-
 Russell Hobbs 19330-56 User manual
-
 Russell Hobbs 18651-56 User manual
-
 Russell Hobbs 23300-56 User manual
-
 Russell Hobbs 25400-56 User manual


