Page is loading ...

DVR
®
2000E+/EC+
User Manual
A Regal Brand
GPN046COVER 04-13.indd 1 4/5/13 10:32 AM

Read and Save These Instructions
Safety Instructions
This is the safety alert symbol. It is used to alert you to potential personal injury hazards.
Obey all safety messages that follow this symbol to avoid possible injury or death.
Warning indicates a potentially hazardous situation which, if not avoided, could result in
death or serious injury.
Caution indicates a potentially hazardous situation which, if not avoided, may result in
minor or moderate injury.
Notice indicates a situation not related to personal injury which, if not avoided, may result
in generator or equipment damage.
Before installing, using, or servicing this product, carefully read and fully understand the instructions
including all warnings, cautions, and safety notice statements. To reduce risk of personal injury, death and/
or property damage, follow all instructions for proper generator installation, operation and maintenance.
Although you should read and follow these instructions, they are not intended as a complete listing of all
details for installation, operation, and maintenance. If you have any questions concerning any of the
procedures, or if you have a safety concern not covered by the instructions, STOP, and contact the
generator manufacturer.
GPN046COVER 04-13.indd 2 4/5/13 10:32 AM

Table of Contents
1
SECTION 1 – SAFETY ............................................................................................................................. 3
SECTION 2 – GENERAL
Overview ...................................................................................................................................... 4
Manual Conventions ................................................................................................................... 4
Regulator Modes ......................................................................................................................... 4
Features ....................................................................................................................................... 4
Protection .................................................................................................................................... 4
SECTION 3 – SPECIFICATIONS
Operating Power ......................................................................................................................... 5
Generator Voltage Sensing ......................................................................................................... 5
Generator Current Sensing ......................................................................................................... 5
Contact Inputs ............................................................................................................................. 5
Fault Contact Output .................................................................................................................. 5
Field Output ................................................................................................................................. 5
AVR1 and 3 Operating Modes .................................................................................................... 5
FCR Operating Mode .................................................................................................................. 5
VAR Operating Mode (EC+) ........................................................................................................ 5
PF Operating Mode (EC+) ........................................................................................................... 5
Parallel Compensation ................................................................................................................ 5
Serial Communication Port ......................................................................................................... 5
CAN Communication Port ........................................................................................................... 5
Over Excitation Protection .......................................................................................................... 6
Under Excitation Protection ........................................................................................................ 6
Field Current Limit Protection ..................................................................................................... 6
Power Limit Protection................................................................................................................ 6
Field Instantaneous Over Current Protection ............................................................................ 6
Generator Over Voltage Protection ............................................................................................ 6
Generator Under Voltage Protection .......................................................................................... 6
Reverse Power Protection .......................................................................................................... 6
Soft-Start Function ...................................................................................................................... 6
Auxiliary Input .............................................................................................................................. 6
Metering ....................................................................................................................................... 6
Environmental .............................................................................................................................. 7
Environmental Tests .................................................................................................................... 7
Electromagnetic Compatibility ................................................................................................... 7
Electromagnetic Compatibility Tests .......................................................................................... 7
Mechanical Tests ......................................................................................................................... 7
Physical........................................................................................................................................ 7
Mating Connectors ...................................................................................................................... 7
SECTION 4 – FEATURES AND PROTECTION
Introduction ................................................................................................................................. 8
DVR
®
Function Blocks ................................................................................................................. 8
GPN046 04-13.indd 1 4/5/13 10:24 AM

Table of Contents
2
DVR
®
Operating Features ......................................................................................................... 10
Regulation Modes ..................................................................................................................... 10
Auxiliary Input ............................................................................................................................ 10
Load Sharing ............................................................................................................................. 11
Generator Soft Start .................................................................................................................. 12
DVR
®
Protection Functions ....................................................................................................... 13
SECTION 5 – INSTALLATION
General....................................................................................................................................... 17
Mounting .................................................................................................................................... 17
Connections .............................................................................................................................. 21
Preliminary Set-up ..................................................................................................................... 32
SECTION 6 – HUMAN-MACHINE INTERFACE (HMI)
General....................................................................................................................................... 34
Front Panel Display ................................................................................................................... 35
Making Settings Changes ........................................................................................................ 37
SECTION 7 – DVRPortal™ GRAPHICAL USER INTERFACE (GUI)
Parameter Edit Buttons ............................................................................................................. 38
Header ...................................................................................................................................... 38
Metering Tab .............................................................................................................................. 40
CongurationTab ...................................................................................................................... 41
Operating Modes Sub Panel ..................................................................................................... 42
Set Points Sub Panel ................................................................................................................ 44
Protection Settings Sub Panel .................................................................................................. 47
Limits ........................................................................................................................................ 49
CANBusCongurationSubPanel ........................................................................................... 50
IdenticationTab ....................................................................................................................... 52
SECTION 8 – MAINTENANCE AND TROUBLESHOOTING
Preventative Maintenance ........................................................................................................ 53
Troubleshooting ......................................................................................................................... 54
APPENDIX A
Alarm Codes .............................................................................................................................. 61
Fault Codes ............................................................................................................................... 61
APPENDIX B
Connector Pin-out Figures and Tables ..................................................................................... 62
APPENDIX C
Quick Start Programming Guide............................................................................................... 65
APPENDIX D
Abbreviations and Acronyms .................................................................................................... 66
GPN046 04-13.indd 2 4/5/13 10:24 AM

Safety
DEFINITION: The word Generator, as used in this
publication, includes only the products of Marathon
Electric, a subsidiary of RBC Manufacturing
Corporation, and does not include the prime mover
or any of the prime mover related systems or
accessories.
ELECTRICAL SAFETY
ELECTRICAL HAZARD
Failure to connect the voltage regulator in accor-
dance with the manufacturer’s documentation may
result in serious personal injury, death, and/or
property damage.
ELECTRICAL SHOCK HAZARD
Failure to follow these instructions may result in
serious personal injury, death, and/or property
damage.
Installation and repair of electrical generators
and voltage regulators should be attempted
by qualified personnel only. Electrical con-
nections shall be made by a qualified electri-
cian in accordance with all local, national,
international and/or other applicable codes,
rules or regulations and sound practices.
Do not touch electrically live parts.
Disconnect, lockout and tag prime mover
and input power supplies before installing or
servicing voltage regulator. Use a voltmeter
to verify that power is off before contacting
conductors.
Do not open terminal box or touch unpro-
tected terminals while the generator shaft
is rotating. Shaft rotation produces voltage
in generators even when no excitation is
applied. Residual voltage is present at the
generator leads and regulator connections
even when the regulator fuse is removed.
Ground (earth) regulator in accordance with
local, national, international and/or other
applicable codes, rules or regulations.
MAGNETIC FIELD HAZARD
Permanent magnet generator (PMG) rotors, when
removed from the stator, expose surrounding
personnel and equipment to powerful magnetic
fields which may cause serious health hazards to
persons with pacemakers, hearing aids, or other
implanted electronic medical devices and may
impact other electronic devices such as mobile
phones, credit cards, etc.
EXPLOSION HAZARD
Beware of arcing when connecting test leads.
Arcing could spark an explosion if exposed to
battery gases, fuel vapors or other hazardous
atmospheres. Failure to follow these instructions
could result in serious personal injury, death and/
or property damage.
MECHANICAL SAFETY
ROTATING PARTS HAZARD
Keep extremities, hair, jewelry and clothing away
from moving parts. Failure to follow these instruc-
tions could result in serious personal injury, death
and/or property damage.
OVERSPEED HAZARD
Do not exceed the rated speed of the generator.
Excessive centrifugal forces could damage the
rotating fields and cause parts to be expelled at a high
rate of speed. Failure to follow these instructions
could result in serious personal injury, death and/
or property damage.
DO NOT DISASSEMBLE
Only qualified personnel who know local, national,
international and/or other applicable codes, rules
or regulations and sound practices should install or
repair electric generators and voltage regulators.
Failure to follow these instructions could result
in serious personal injury, death and/or property
damage.
3
1
GPN046 04-13.indd 3 4/5/13 10:24 AM

4
OVERVIEW
This manual provides details on how to install,
operate and maintain a DVR
®
2000E+ or
DVR
®
2000EC+ digital voltage regulator (DVR
®
)
with Marathon Electric synchronous generators.
Additional publications are available for Controller
Area Network (CAN) communications and MODBUS
communications.
The DVR
®
is a control device that regulates the
output voltage of a brushless, AC generator by
controlling the current into the generator exciter
field. Input power to the DVR
®
is derived from a
single phase permanent magnet generator (PMG).
The DVR
®
is supplied in an encapsulated package
designed for behind-the-panel mounting. It is held
in place by thread-forming screws that thread into
mounting holes in the face of the DVR
®
. The front
panel display annunciates regulator status and
system conditions.
MANUAL CONVENTIONS
This manual describes details for the DVR
®
2000E+
and DVR
®
2000EC+.
Features that are exclusive to the DVR
®
2000EC+ are
noted.
NEW/ENHANCED FUNCTIONS
New and enhanced functions are indicated in the
lists below. Legacy DVR’s may not support new and
enhanced functions.
REGULATION MODES
Three regulation modes:
• Singlephaseautomaticvoltageregulation(AVR1)
• Threephaseautomaticvoltageregulation(AVR3)
• Fieldcurrentregulation(FCR).
The DVR
®
2000EC+ adds two regulation modes:
• Reactivepowerregulation(VAR)
• Powerfactorregulation(PF)
FEATURES
The DVR
®
has the following features:
•Preset stability settings based on generator
frame size
• AdjustablesoftstartinAVR1orAVR3regulation
modes
• Underfrequency(Volts/Hertz)regulation
• TrueRMSThree-phaseorsingle-phase
generator voltage sensing
• TrueRMSThree-phaseorsingle-phase
generatorcurrentsensing(optionalCT’srequired)
• TrueRMSthree-phasepowermetering(optional
CT’srequired)
• Fieldcurrentsensing
• Fieldvoltagemonitoring
• Contactinputsforsysteminterfacecapability
• Contactoutputforfaultindication
• Generator paralleling with reactive droop com-
pensation and reactive differential compensation
(Enhanced)
• Front-panel human-machine interface (HMI) for
status and configuration
• MODBUSprotocolviaRS232forexternal
communication (Enhanced)
•DVRPortal™ Windows
®
-based software for
configuration and monitoring (Enhanced)
• CANinterfacewithCAN2.0BJ1939protocolfor
metering and control (Enhanced)
• “Poweron”LEDindicator
• Configurable auxiliary input for metering and
control (Enhanced)
• Simulatedreactivepowerfordroopset-up(New)
• Generatorpowerlimitingmode(New)
PROTECTION
The DVR
®
has the following protection features:
• FieldOverExcitationShutdown
• FieldUnderExcitationShutdown(New)
• GeneratorOverVoltageShutdown(Enhanced)
• GeneratorUnderVoltageShutdown
• GeneratorVoltageImbalanceShutdown
(Enhanced)
• LossofGeneratorSensingShutdown
• InstantaneousFieldOverCurrentShutdown
• RegulatorOverTemperatureShutdown
• GeneratorReversePowerShutdown(Enhanced)
• Generator Start Up Fault Shutdown (EC+ only)
(New)
• FieldCurrentLimitingAlarm(Enhanced)
• GeneratorUnderFrequencyAlarm
• GeneratorPowerLimitAlarm(New)
• LossofCANCommunicationAlarm(Enhanced)
2
General
GPN046 04-13.indd 4 4/5/13 10:24 AM

5
Operating Power
Type: 1-phase, ungrounded PMG
Range: 180 - 240 Vac, 250 - 300 Hz
Burden: 350 VA
Fuse Type : Time delay 250V - 4.0 A
Terminals: 3, 4
Generator Voltage Sensing
Type: 1-phase/3-phase
Range: 100to600Vac,50/60Hz
Burden: <1 VA per phase
Terminals: E1, E2, E3
Generator Current Sensing
Type: 1-phase(BØ)/3-phase
Rating: 5Aaccontinuous,50/60Hz
InputImpedance: <10mΩ
Terminals: CT1, CT2 for 1-phase (BØ)
J2-1,J2-12for3-phase(AØ)
J2-2,J2-11for3-phase(BØ)
J2-3,J2-10for3-phase(CØ)
Contact Inputs
Type: Dry Contact
Input PU Voltage: 3.3 Vdc
Terminals:
DROOP_OFF: J1-10,J1-4
UP: J1-2,J1-4
DOWN: J1-3,J1-4
EXCITATION_OFF: J1-11,J1-4
VAR/PF_OFF: J1-9,J1-4(EC+only)
Fault Contact Output
Type: Form A
Rated Load: 3 A continuous
Break: 3Aac/0.1Adc
OperatingVoltage: 240Vac/250Vdcmaximum
Terminals: J1-6,J1-7
Field Output
Continuous Rating: 75 Vdc, 3.0 Adc
10 Second Forcing Rating
200 Vac Power Input: 150 Vdc, 6.5 Adc
FieldResistance: 18to35Ω
Terminals: F+, F-
AVR1 and AVR3 Operating Modes
Range: 100.0 to 600.0 Vac
Voltage Regulation: ±0.25 % over load range
at rated power factor and constant generator
frequency.
Temperature Drift: ±0.0125 % per degree C
Underfrequency(V/Hz)
Slope: 1.00 to 3.00 PU
Knee: 40.0 to 70.0 Hz
FCR Operating Mode
Range: 0.000 to 3.000 Adc
Current Regulation: ±1.0% over 18 to 35 Ohms of
exciter resistance
Temperature Drift: ±0.0125% per degree C
VAR Operating Mode (EC+ Only)
Range: -100.0% - +100.0% of rated
kVAR
VAR Regulation: ±3.0 % of rated kVAR
Temperature Drift: ±0.0125 % per degree C
PF Operating Mode (EC+ Only)
Range: -0.600 to +0.600 PU
PF Regulation: ±0.02 PU
Temperature Drift: ±0.0125 % per degree C
Parallel Compensation
Modes: Reactive Droop and
Reactive Differential
(cross-current)
Droop Range: 0.0 to 10.0 %
Serial Communication Port
Interface: Full Duplex RS-232
Connector: DB-9 connector (rear panel)
Baud: 4800
Data Bits: 8
Parity: None
Stop Bit: 1 or 2
Handshaking: None
CAN Communication Port
Connector: J3
Protocol: SAEJ1939
DataRate: 250kbits/sec
3
Specifications
GPN046 04-13.indd 5 4/5/13 10:24 AM

6
3
Over Excitation Protection
Threshold: 0.500 to 4.000 Adc
Timer: 1.0 to 15.0 seconds
Under Excitation Protection
Threshold: -100.0% to -5.0% of rated
kVAR
Timer: 1.0 to 15.0 seconds
Field Current Limit
Threshold: 0.500 to 6.500 Adc
Power Limit
Threshold: 5.0to115.0%ofratedkW
Field Instantaneous Over Current Protection
Threshold: 11 Adc
Generator Over Voltage Protection
Threshold: 5.0 to 20.0 % of voltage
set point
Timer: 0.1 to 15.0 seconds
Generator Under Voltage Protection
Threshold: 5.0 to 50.0 % of voltage
set point
Timer: 1.0 to 15.0 seconds
Generator Reverse Power Protection
Threshold: 5.0to100.0%ofratedkW
Timer: 1.0 to 15.0 seconds
Soft-Start Function
Range: 2 to 120 seconds
Auxiliary Input
Auxiliary – Control1 Mode (AVR3, AVR1, VAR or
PF regulation)
Voltage Range: -3 Vdc to +3 Vdc
Set Point Range: -X to +X % shift where
X = 1.0 to 30.0
Burden: 2260Ω
Terminals: J1-1(+),J1-12(-)
Auxiliary – Control1 Mode (FCR regulation)
Voltage Range: -3 Vdc to +3 Vdc
Set Point Range: -3.000 Adc to + 3.000 Adc
Increment: 1 mA per 1mV
Burden: 2260Ω
Terminal: J1-1(+),J1-12(-)
Auxiliary – Control2 Mode (AVR3, AVR1, VAR or
PF regulation)
Current Range 4 mA to 20 mA
Set Point Range: -X to +X % shift where X =
1.0 to 30.0
Burden: 250Ω
Terminals: J1-1(+),J1-12(-)
Jumper: J1-5toJ1-8
Auxiliary – Control2 Mode (FCR regulation)
Current Range 4 mA to 20 mA
Set Point Range: -3.000 Adc to + 3.000 Adc
Increment: 1 mA per 2.67 uA
Burden: 250Ω
Terminal: J1-1(+),J1-12(-)
Jumper: J1-5toJ1-8
Auxiliary – Meter (Voltage input)
Voltage Range: -5 Vdc to 5 Vdc
Scale Factor: User-defined
Burden: 2260Ω
Terminal: J1-1(+),J1-12(-)
Auxiliary – Meter (Current input)
Current Range: 4 mA to 20 mA
Scale Factor: User-defined
Burden: 250Ω
Terminal: J1-1(+),J1-12(-)
Jumper: J1-5toJ1-8
Metering
Accuracy of all metering values assumes 25° C,
50/60Hzandlessthan20%THD.
Regulator-side Metering
Generator Voltage
Range: 10 Vac to 600 Vac
Accuracy: 0.5 %
Generator Current
Range: 0.1 to 5.000 Aac (5 Aac CTs)
Accuracy: 0.5 %
Specifications
GPN046 04-13.indd 6 4/5/13 10:24 AM

7
Power (Apparent, Real and Reactive)
Range: 0to5200VAandW
0to4160VARleading/lagging
Accuracy: 3.0 %
Power Factor
Range: 0.6to1.0leading/lagging
Accuracy: 0.02
Frequency
Range: 40 to 75 Hz
Accuracy: 0.2 Hz
Field Voltage
Range: 0 to 200 Vdc
Accuracy: 5.0 %
Field Current
Range: 0 to 8.0 Adc
Accuracy: 0.5 %
Generator-side (Scaled) Metering
Generator Voltage
Range: 10 V to 15 kV
Accuracy: 0.5 %
Generator Current
Range: 0.1 to 5,000 Aac (5 Aac CTs)
Accuracy: 0.5 %
Power (Apparent, Real and Reactive)
Range: 0to10MVAandMW
0to8MVARleading/lagging
Accuracy: 3.0 %
Environmental
Operating Temperature:
-40° C - +70° C (-40° F - +158° F)
Storage Temperature:
-40° C - +85° C (-40° F - +185° F)
Relative Humidity: < 95 %, non-condensing
Ingress Protection: IP52 (Front, mounted)
IP10 (rear with cover)
Environmental Tests
Humidity: Tested per MIL-STD-705B,
Method 711-D
Salt Fog: Tested per MIL-STD-810E
Electromagnetic Compatibility
Immunity: Meets EN 61000-6-2: 2005 Electromagnetic
compatibility (EMC) – Part 6-2: Generic standards –
Immunity for industrial environments
Emission: Meets EN 61000-6-4: 2007 Electromagnetic
compatibility (EMC) – Part 6-4: Generic standards –
Emission standard for industrial environments
Electromagnetic Compatibility Tests
Immunity
Electrostatic Discharge (ESD): IEC 61000-4-2
Radiated RF: IEC 61000-4-3
ElectricalFastTransient(EFT)/Burst: IEC61000-4-4
Conducted RF: IEC 61000-4-6
PowerFrequencyandMagneticField: IEC61000-4-8
Emission
Radiated RF:
EN 61000-6-4: 2007, 30 MHz to 1000 MHz
Mechanical Tests
Shock: 20 Gs in 3 perpendicular planes
Vibration: 2.5 Gs at 5 to 26 Hz
0.050”doubleamplitude(27to52Hz)
7 Gs at 53 to 500 Hz
Physical
Weight: 3.5lb.(1590g)
Mating Connectors
J1:
Mating Plug Housing: Deutsch DT06-12SB-P012
MatingPlugWedgeLock:W12S-P012
Mating Plug Terminals: 0462-201-16141
J2:
Mating Plug Housing: Deutsch DT06-12SA-P012
MatingPlugWedgeLock:W12S-P012
Mating Plug Terminals: 0462-201-16141
J3:
MatingPlugHousing: Amp/Tyco172166-1
Mating Plug Terminals: 170366-3
3
Specifications
GPN046 04-13.indd 7 4/5/13 10:24 AM

8
4
Features and Protection
INTRODUCTION
This section describes how the DVR
®
functions and
explains its operating features. DVR
®
functions are
illustrated in the block diagram of Figure 4-1.
DVR
®
FUNCTION BLOCKS
The following paragraphs describe each of the func-
tion blocks, inputs and outputs. Refer to Figure 4-1.
Generator Voltage
Generator voltage is measured at terminals E1
(A-phase), E2 (B-phase), and E3 (C-phase), for ABC
rotation, or E1 (C-phase), E2 (B-phase), and E3
(A-phase) for CBA Rotation. Nominal voltages of up
to 600Vac may be sensed at these terminals. Voltage
applied to these inputs is scaled, conditioned and
applied to the controller.
Line Currents
Generator line currents (IA, IB, IC) are measured
viaCT’satconnectorJ2orterminalsCT1andCT2.
Current up to 5 Arms may be monitored at these
terminals. These currents are scaled, conditioned
and applied to the controller. Refer to Section 3 –
Specifications, for connector pin assignments.
Field Voltage
Voltage across the regulator field is monitored at
terminals, F+ and F-.
Field Current
Current through the exciter field winding is measured
at terminal F+. Field current is scaled, conditioned
and applied to the input of the controller.
Contact Input Circuits
Five contact input circuits powered from an in-
ternal 3.3 Vdc supply provide input control from
user-supplied contacts: UP, DOWN, DROOP_OFF,
EXCITATION_OFFandVAR/PF_OFF(EC+only).
UP
Closing the UP contact across terminals J1-2 and
J1-4causestheactiveoperatingsetpointtoincrease.
Figure 4-1. Simplified Block Design
GPN046 04-13.indd 8 4/5/13 10:24 AM

9
DOWN
Closing the DOWN contact across terminals J1-3
and J1-4 causes the active operating set point to
decrease.
Keeping either contact closed will continue to
increase(UP)ordecrease(DOWN)theoperatingset
point until a limit is reached. The limit is determined
by the Maximum External Contact Adjust field of
DVRPortal™. The effect generated by the contacts
is displayed in DVRPortal™ on the Set Points Tab as
thevalue“ContactOffset.”
Note: If power is removed from the DVR
®
, the settings
from the remote UP/DOWN contacts will be lost.
DROOP_OFF
This function enables reactive load sharing between
generators operating in parallel. Closing the DROOP_
OFF contact across terminals J1-10 and J1-4 dis-
ables voltage droop. Opening the contact enables
voltage droop.
EXCITATION_OFF
This contact input enables removal of excitation
without removing power to the regulator. Closing the
EXCITATION_OFF contact across terminals J1-11
andJ1-4disablesfieldexcitation.Openingthecon-
tact enables field excitation with a soft start and
clears any alarms or faults.
VAR/PF_OFF (EC+ only)
NOTE: Operation in VAR or PF modes should only
be enabled when generator is paralleled with utility
(infinite bus).
This function enables VAR or PF regulation when the
generator is paralleled to utility. Opening the VAR/
PF_OFF contact across terminals J1-9 and J1-4
enables VAR or PF control. Closing the contact
disables VAR or PF regulation and defaults to AVR3
regulation.
Communication Port (RS-232)
The communication port provides an isolated inter-
face for user programming of the DVR
®
through
DVRPortal™. The connection is made to the female
RS-232 (DB-9) connector with a user-supplied,
standard 9-pin cable. A null modem cable will not
function.
CAN Port
The CAN port provides an isolated interface for
communication with and control of the DVR
®
. This
permits the integration of the DVR
®
as a node on
a CAN network. The connection is made to the
J3 connector with a user-supplied Amp/Tyco Mini
Mate-N-Lok plug. The communication is powered
from a transformer-isolated supply. Refer to Section
3 – Specifications, for connector details.
Controller
The controller portion of the DVR
®
includes the
microprocessor and performs measurement, com-
putation, control and communication functions.
Power Input Stage
Input power is applied to terminals 3 and 4 from a
PMG. It is rectified and filtered before being applied
to the power amplifier and the power supply.
Power Supply
The internal switch-mode power supply is fed from
the power input stage and supplies power at the
requiredDCvoltagelevelstotheinternalcircuitryof
the DVR
®
.
Power Amplifier Stage
The power amplifier is fed from the power input
stage and supplies a controlled amount of power to
the exciter field via terminals F+ and F-.
HMI Display
A four-character light-emitting-diode (LED) display
indicates various operating modes, protective func-
tions,andadjustments.Section 6 – Human-Machine
Interface provides more information about the front
panel display.
HMI Buttons
Changes to settings can be made at the front panel
using the four buttons:
SELECT,UP,DOWNandENTER
Refer to Section 6 – Human-Machine Interface for
more information about the front panel switches.
4
Features and Protection
h
•
i
;
GPN046 04-13.indd 9 4/5/13 10:24 AM

10
4
Fault Output Contact
A fault output contact is provided through terminals
J1-6 and J1-7. This normally-open, form-A contact
closes in the event of a protective shutdown.
DVR
®
OPERATING FEATURES
Regulation Modes
The DVR
®
2000E+ provides three modes of regulation
selectable through the HMI or through DVRPortal™.
The DVR2000EC+ adds two more regulation modes.
Automatic Voltage Regulation Modes
There are two automatic voltage regulation modes.
AVR1 should be selected if the regulator is con-
nected for single phase voltage sensing and AVR3
should be selected if the regulator is connected for
three phase voltage sensing. In either mode, the
DVR
®
regulates the RMS generator output voltage.
Regulation is accomplished by sensing generator
output voltage and adjusting dc output excitation
current to maintain voltage at the regulation set
point.TheregulationsetpointisadjustedviatheUP
andDOWNcontactinputs,theauxiliaryinput(when
enabled), the HMI or DVRPortal™. The Droop and
UnderFrequencyfunctionsmayinfluencetheregu-
lation set point.
Field Current Regulation Mode
In FCR mode, the DVR
®
maintains DC excitation
current at a commanded level. The regulation set
point is adjusted via the UP and DOWN contact
inputs, the auxiliary input (when enabled), the HMI or
DVRPortal™.
Reactive Power Regulation Mode (EC+ only)
In Reactive Power Regulation (VAR) mode, the DVR
®
maintains the generator’s reactive power at a com-
manded level.The regulation set point is adjusted
via the UP and DOWN contact inputs, the auxiliary
input (when enabled), the HMI or DVRPortal™. This
mode can only be entered by selecting “VAR” as
the regulation mode and opening the VAR/PF_OFF
contact input.
Power Factor Regulation Mode (EC+ Only)
In Power Factor Regulation (PF) mode, the DVR
®
maintains the generator’s power factor at a com-
manded level.The regulation set point is adjusted
via the UP and DOWN contact inputs, the auxiliary
input (when enabled), the HMI or DVRPortal™. This
modecanonlybeenteredbyselecting“PF”asthe
regulation mode andopeningtheVAR/PF_OFFcon-
tact input.
Auxiliary Input
NOTE: If the DC voltage is removed from the aux-
iliary input, the operating set point will no longer
be modified and the regulator will regulate to the
programmed regulation set point.
Functionality of the auxiliary input is dependent on
the configuration of the modes described below. The
auxiliary input can be set to Off, Control1, Control2
or Meter modes through the HMI or DVRPortal™.
The effect of the auxiliary input on the set point is
displayed in DVRPortal™.
Auxiliary – Off
In this mode, any signal applied to the auxiliary input
will be displayed in DVRPortal™, but will have no
effect on the set point of the regulator.
Auxiliary – Control1
This mode allows modification of the regulation set
point by the application of a positive or negative DC
voltage across terminals J1-1 (+) and J1-12 (-).A
voltageupto+/-3Vdcmaybeappliedatthisinput.
When in AVR3 or AVR1:
The application of a +/- 3.000 Vdc signal corre-
spondstoapercentageoffsetofupto+/-30.0%to
the set point.
Example: A programmed regulation set point of 480
Vrms, with an auxiliary input scale factor of 30% and
an auxiliary input of -1 Vdc will result in a –48 Vrms
offset to the set point. Therefore the regulator will
regulate to a reference voltage of 432 Vrms.
When in FCR:
Theapplicationofa+/-3.000Vdcsignalcorresponds
to a -3.000 to3.000 Adc field current set point. The
auxiliary input scale factor is disabled in FCR mode.
Note: Any field current reference less than 0.000 Adc
will become 0.000 Adc.
Features and Protection
GPN046 04-13.indd 10 4/5/13 10:24 AM

11
4
Example: The application of a 1.25 Vdc signal will
result in a field current of 1.250 Adc.
When in VAR (EC+ only):
The application of a +/- 3.000 Vdc signal corre-
spondstoapercentageoffsetofupto+/-30.0%to
the VAR set point.
Example: A programmed VAR regulation set point of
50.0% with an auxiliary input scale factor of 30.0%
and an auxiliary input of -1 Vdc will result in a –10.0%
offset to the VAR set point. Therefore the regulator
will regulate to 40.0% of rated VAR’s.
When in PF (EC+ only):
The application of a +/- 3.000 Vdc signal corre-
sponds to an offset of up to +/- 0.300 PU to the
power factor set point.
Example: A programmed power factor regulation set
point of 0.950 (lagging power factor) with an auxiliary
input scale factor of 30.0% and an auxiliary input of
-1 Vdc will result in a –0.100 offset to the power fac-
tor set point. Therefore the regulator will regulate
to a power factor of -0.950. In this case, the power
factor has gone from a lagging to a leading state.
Auxiliary – Control2
This mode allows modification of the regulation set
point by the application of a 4 mA to 20 mA current
controlsignalinterminalsJ1-1(+)andJ1-12(-).This
mode requires the placement of a jumper across
terminalsJ1-5andJ1-8(AUX_LOOP).
When in AVR3 or AVR1:
The application of a 4 mA to 20 mA input corre-
spondstoapercentageoffsetofupto+/-30.0%to
the voltage set point.
Example: A programmed regulation set point of 480
Vrms, with an auxiliary input scale factor of 30% and
an auxiliary input of 9.33 mA will result in a –48 Vrms
offset to the set point. Therefore the regulator will
regulate to a reference voltage of 432 Vrms.
When in FCR:
The application of a 4 mA to 20 mA signal corre-
sponds to a -3.000 to +3.000 Adc field current set
point. The auxiliary input scale factor is disabled in
FCR mode. Note: Any field current reference less than
0.000 Adc will become 0.000 Adc.
Example: A field current set point of 1.000 Adc with
the application of a 10.67 mA signal will result in a
total field current of 0.500 Adc.
When in VAR (EC+ only):
The application of a 4 mA to 20 mA signal corre-
spondstoapercentageoffsetofupto+/-30.0%to
the VAR set point.
Example: A programmed VAR regulation set point of
50.0% with an auxiliary input scale factor of 30.0%
and an auxiliary input of 9.33 mA will result in a
–10.0% offset to the VAR set point. Therefore the
regulator will regulate to 40.0% of rated VARs.
When in PF (EC+ only):
In the PF regulation mode, the application of a 4 mA
to20mAsignalcorrespondstoanoffsetofupto+/-
0.300 PU to the power factor set point.
Example: A programmed power factor regulation set
point of 0.950 (lagging power factor) with an auxiliary
input scale factor of 30.0% and an auxiliary input of
9.33 mA will result in a –0.100 offset to the power
factor set point. Therefore the regulator will regulate
to a power factor of -0.950. In this case, the power
factor has gone from a lagging to a leading state.
Auxiliary – Meter
In this mode, the auxiliary input functions as a meter
withuser-definedscaling.Avoltageupto+/-5.000
Vdc or a current of 4 mA to 20 mA may be applied to
terminalsJ1-1(+)andJ1-12(-).Thecircuitimposes
a 2260-ohm burden on the DC source for voltage
input. The circuit imposes a 250-ohm burden on the
DCsourceforcurrentinputwhenajumperisapplied
across terminals J1-5 and J1-8 (AUX_LOOP). The
default scaling is 5000 PU counts for a +5.000 Vdc
voltage input and 5000 PU counts for a 20 mA cur-
rent input. The user provides further scaling through
DVRPortal™.
Example: For a scale factor of 0.20 units, the metered
value corresponding to a +5.000 Vdc voltage input
will be +100 units. The metered value corresponding
to a 20 mA current input will be +100 units.
Load Sharing
NOTE: The machine nameplate rated power, rated
power factor, CT Ratio and PT Ratio (if applicable)
MUST be entered in DVRPortal™ (and cannot be
Features and Protection
GPN046 04-13.indd 11 4/5/13 10:24 AM

12
4
entered via the HMI) to calculate the proper rated
reactive power for the droop reference.
The DVR
®
provides a reactive droop compensa-
tion feature to enable reactive load sharing during
parallel generator operation.When this feature is
enabled, the DVR
®
calculates the reactive portion of
the generator load using the sensed generator out-
putvoltageandcurrentquantitiesandthenmodifies
the voltage regulation set point accordingly.
A unity power factor generator load results in almost
no change in generator output voltage. A lagging
power factor generator load (inductive) results in a
reduction of generator output voltage. A leading
power factor generator load (capacitive) results in an
increase of generator output voltage.
Droopisadjustableupto10.0%withratedreactive
power (VAR’s) and rated power factor. The effect of
droop on the set point is displayed in DVRPortal™.
The droop feature is enabled and disabled through
the DROOP_OFF contact input circuit (terminals
J1-10 and J1-4).When single-phase current sens-
ing is used, the droop function responds to phase B
current.Whenthree-phasecurrentsensingisused,
the droop function responds to the average phase
current.
Generator Soft Start
The DVR
®
incorporates an adjustable soft start
feature that controls the time for generator voltage
to ramp to the regulation set point. This feature
is enabled in AVR3 and AVR1 regulation modes.
The ramp rate is adjustable from 2 to 120 seconds
(default of 3 seconds).This adjustment is made
through DVRPortal™ and cannot be made through
the HMI.The Generator Under Frequency feature
is also active during Generator Soft Start and takes
priority in control of the generator voltage.
Features and Protection
GPN046 04-13.indd 12 4/5/13 10:24 AM

13
4
DVR
®
PROTECTION FUNCTIONS
Features and Protection
Protection
Feature
Congurable Threshold
Range
Threshold
Units
Basis Timer
Range
Timer
Units
Alarm
Code
Fault
Code
Field Over
Excitation
Yes 0.500 - 4.000 A N/A 1.0 - 15.0 S A008 F008
Field Under
Excitation
Yes
-100.0 to
-5.0
%
Rated
Reactive
Power
(kVAR)
1.0 - 15.0 S A002 F002
Generator
Over Voltage
Yes 5.0 - 20.0 %
Voltage
Set Point
0.1 - 15.0 S A013 F013
Generator
Under Voltage
Yes 5.0 - 50.0 %
Voltage
Set Point
1.0 - 15.0 S A012 F012
Generator
Imbalance
Yes 20.0 - 50.0 %
Voltage
Set Point
1.0 - 15.0 S A016 F016
Generator
Loss of
Sensing
No N/A N/A N/A N/A N/A N/A F011
Instantaneous
Field Over
Current
No 11 Adc N/A N/A N/A N/A F009
Regulator
Over
Temperature
No N/A N/A N/A N/A N/A A007 F007
Generator
Reverse
Power
Yes 5.0 - 100.0 %
Rated
Power
(kW)
1.0 - 15.0 S A014 F014
Generator
Start Up
No N/A N/A N/A N/A N/A N/A F004
Generator
Under
Frequency
Yes 40.0 - 70.0 Hz N/A N/A N/A A015 N/A
Field Current
Limiting
Yes 0.5 - 6.5 A N/A N/A N/A A010 N/A
Power
Limiting
Yes 5.0 - 115.0 %
Rated
Power
(kW)
N/A N/A A001 N/A
Loss of CAN Yes N/A N/A N/A 1.0 - 45.0 S A006 N/A
Table 4-1
GPN046 04-13.indd 13 4/5/13 10:24 AM

14
4
Configurable Protection Shutdowns
All configurable protection features have a user-
defined threshold and timer value. If the threshold
condition for a particular protection feature is met,
an alarm is triggered. The DVR
®
displays an alarm
signal on the HMI and in DVRPortal™. An indepen-
dent timer starts at the moment the alarm condition
is triggered.
If the timer threshold is exceeded before the alarm
condition is removed, a fault is then triggered and
the excitation current to the field is shutdown. A fault
signal is displayed on the HMI and in DVRPortal™.
Table 4-1 shows the details of the timer-based pro-
tection features in the DVR
®
.
Field Over Excitation Shutdown
The Field Over Excitation protection feature is
triggered if field current exceeds the threshold. The
fault is triggered if field current doesn’t fall below
90% of the threshold within the timer period.
Field Under Excitation Shutdown
The Field Under Excitation protection feature is
triggered if the absorbed VAR’s exceed the
threshold. The fault is triggered if the absorbed
VAR’s do not fall below the threshold within the timer
period.
Generator Over Voltage Shutdown
The Generator Over Voltage protection feature is
triggered if generator voltage exceeds the threshold.
The fault is triggered if generator voltage does not
fall below the threshold within the timer period.
Generator Under Voltage Shutdown
The Generator Under Voltage protection feature
is triggered if generator voltage drops below the
threshold. The fault is triggered if generator voltage
stays below the threshold for the duration of the
timer.
Generator Voltage Imbalance Shutdown
The Generator Voltage Imbalance protection feature
is triggered if a voltage imbalance is detected in
AVR3, VAR or PF regulation modes, imbalance differ-
ence between any single phase and the average of
the three phases of more than the threshold is inter-
preted as a voltage imbalance. The fault is triggered
if the voltage imbalance condition continues for the
duration of the timer.
In AVR1 and FCR regulation modes, generator
voltage imbalance protection is disabled.
Generator Reverse Power Shutdown
The Generator Reverse Power protection feature is
triggered if generator reverse power exceeds the
threshold. The fault is triggered if generator reverse
power stays above the threshold for the duration of
the timer.
Non-Configurable Protection Shutdowns
Non-configurable protection features have factory-
defined settings for thresholds and timers, if appli-
cable. Each shutdown feature below describes the
details of the conditions for the shutdown event to
occur.
Loss of Generator Sensing Shutdown
The Loss of Generator Sensing protection feature is
triggered if sensing input continuity is lost. There is
no alarm for this condition – the fault and shutdown
is triggered shortly after the condition is met.
Note: In AVR1, AVR3, VAR and PF regulation modes,
Loss of Sensing is not enabled until a speed of 850
RPM is detected.
Instantaneous Field Over Current Shutdown
The Instantaneous Field Over Current protection fea-
ture triggers a fault if generator field current exceeds
11 Adc. There is no alarm for this condition – the fault
and shutdown is triggered shortly after the condition
is met.
Regulator Over Temperature Shutdown
The Regulator Over Temperature protection feature
is triggered if the internal regulator temperature
exceeds a factory default alarm threshold. A fault is
triggered if the regulator temperature exceeds a fac-
tory default shutdown threshold.
Features and Protection
GPN046 04-13.indd 14 4/5/13 10:24 AM

15
4
Generator Start Up Shutdown (EC+ Only)
The Generator Start Up Shutdown protection feature
is triggered if the generator is started up in either
VAR or PF regulation modes with the VAR/PF_OFF
input contact open.
CONFIGURABLE PROTECTION ALARMS
Generator Under Frequency Alarm
The Generator Under Frequency Alarm triggers if
generator frequency drops below the under fre-
quencyknee.Thevoltagesetpointisautomatically
adjusted by the DVR
®
so that generator voltage
follows the selected V/Hz curve.If generator fre-
quency drops below 25 Hz, the regulator will stop
providing generator excitation and AC metering.
Note: If generator frequency drops below a detectable
level and generator speed is greater than 850 RPM, a
short circuit condition is assumed and the regulator will
force current up to the Field Current Limit value (see
Field Current Limiting below).
The V/Hz slope is dependent upon the under fre-
quency knee and the slope multiplier.The base
slope is defined according to the following (see
Figure 4-2):
• Foranunderfrequencykneebetween40.0and
50.0Hz,thebaseslopeis1/50(0.02)VPU/Hz,
• For an under frequency between 50.1 and 60.0
Hz,thebaseslopeis1/60(0.0167)VPU/Hz,
• For an under frequency between 60.1 and 70.0
Hz,thebaseslopeis1/70(0.0143)VPU/Hz,
where VPU = 1.0 at regulator voltage set point. The
base slope is modified by the slope multiplier to
achieve a desired voltage roll-off characteristic. See
Figure 4-3 for examples.
Features and Protection
Figure 4-2. Volts/Hertz Slopes vs. Knee Frequency
GPN046 04-13.indd 15 4/5/13 10:24 AM

16
4
Field Current Limiting Alarm
The Field Current Limit protection feature limits the
amount of DC current that flows in the exciter. It is
engaged if load conditions require a field current
larger than the limit. Under such conditions, the
current is limited to the Field Current Limit value in
DVRPortal™. The HMI and DVRPortal™ display this
alarm condition.
Power Limiting Alarm
The Power Limit protection feature limits the amount
of output power from the generator by modifying
voltage to maintain constant output power at the
limit. The HMI and DVRPortal@ display an alarm
when this condition is met. This limiter can be
enabled or disabled in the Protection Settings Tab
in DVRPortal@ under the Limits panel. The limiter
dynamics (PID gains) can also be adjusted in the
Operating Modes Tab in DVRPortal@.
Loss of CAN Communication Alarm
The Loss of CAN Communication protection feature
indicates an alarm if communication traffic between
the DVR
®
and any Electronic Control Unit (ECU) on
the CAN bus. The alarm is triggered if the regulator
does not receive a “VR Heartbeat” message within
the threshold time. Refer to the DVR2000E+/EC+
CAN Bus Interface User Guide for details.
Features and Protection
Figure 4-3. Examples of Under Frequency and Slope
Note: Arrows indicate hysteresis of cut-in and cut-out transitions between IDLE and RUN states.
GPN046 04-13.indd 16 4/5/13 10:24 AM

17
ELECTRICAL HAZARD
Failure to connect the voltage regulator in accor-
dance with the manufacturer’s documentation may
result in serious personal injury, death, and/or
property damage.
ELECTRICAL SHOCK HAZARD
Failure to follow these instructions may result in
serious personal injury, death, and/or property
damage.
Installation and repair of electrical generators
and voltage regulators should be attempted
by qualified personnel only. Electrical
connections shall be made by a qualified elec-
trician in accordance with all local, national,
international and/or other applicable codes,
rules or regulations and sound practices.
Do not touch electrically live parts.
Disconnect, lockout and tag prime mover
and input power supplies before installing or
servicing voltage regulator. Use a voltmeter
to verify that power is off before contacting
conductors.
Do not open terminal box or touch unpro-
tected terminals while the generator shaft
is rotating. Shaft rotation produces voltage
in generators even when no excitation is
applied. Residual voltage is present at the
generator leads and regulator connections
even when the regulator fuse is removed.
Ground (earth) regulator in accordance with
local, national, international and/or other
applicable codes, rules or regulations.
MAGNETIC FIELD HAZARD
Permanent magnet generator (PMG) rotors, when
removed from the stator, expose surrounding per-
sonnel and equipment to powerful magnetic fields
which may cause serious health hazards to persons
with pacemakers, hearing aids, or other implanted
electronic medical devices and may impact other
electronic devices such as mobile phones, credit
cards, etc.
EXPLOSION HAZARD
Beware of arcing when connecting test leads.
Arcing could spark an explosion if exposed to
battery gases, fuel vapors or other hazardous
atmospheres. Failure to follow these instructions
could result in serious personal injury, death and/
or property damage.
MECHANICAL SAFETY
ROTATING PARTS HAZARD
Keep extremities, hair, jewelry and clothing away
from moving parts. Failure to follow these instruc-
tions could result in serious personal injury, death
and/or property damage.
OVERSPEED HAZARD
Do not exceed the rated speed of the generator.
Excessive centrifugal forces could damage the
rotating fields and cause parts to be expelled at a
high rate of speed. Failure to follow these instruc-
tions could result in serious personal injury, death
and/or property damage.
DO NOT DISASSEMBLE
Only qualified personnel who know local, national,
international and/or other applicable codes, rules
or regulations and sound practices should install or
repair electric generators and voltage regulators.
Failure to follow these instructions could result
in serious personal injury, death and/or property
damage.
GENERAL
Generally the DVR
®
is supplied mounted to the
conduit box of the generator. The purpose of this
section is to provide mounting information to cus-
tomers replacing an existing regulator with the DVR
®
or those wishing to mount the regulator remotely.
If the unit is not installed immediately, store it in the
original shipping package in an environment free of
moisture and dust.
MOUNTING
The DVR
®
is normally located in the generator
conduit box. It is designed for behind-the-panel
mounting and requires a cutout for front panel
viewing and access. Mounting hardware consists of
six customer-supplied, #12 thread-forming screws
that pass through holes in the conduit box and
thread into the mounting holes in the DVR
®
. The
recommended torque range for the steel mounting
screws is 36 to 40 inch-pounds (4.1 to 4.5 Newton-
5
Installation
GPN046 04-13.indd 17 4/5/13 10:24 AM

18
meters). Refer to Section 3 – Specifications, for envi-
ronmentalrequirements.
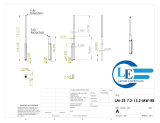
DVR
®
front panel and uncovered rear dimensions are
shown in Figure 5-1.
DVR
®
rear panel with cover dimensions are shown in
Figure 5-2.
Cutout and drilling dimensions are shown in Figure
5-3.
5
Installation
Figure 5-1. DVR
®
Front dimensions without cover. Valid for E+ & EC+ versions.
GPN046 04-13.indd 18 4/5/13 10:24 AM
/
![Habor[2 Pack] Hygrometer Indoor Thermometer](http://vs1.manuzoid.com/store/data/000916902_2-3c87b04807d0857897e7e931f05d834f-160x210.png)