Panasonic PACIFIC User manual

Type
User manual

Panasonic PACIFIC: The Smart Lighting Solution

Experience the future of home lighting with Panasonic PACIFIC, a cutting-edge device that transforms your living space with its advanced features. Say goodbye to traditional switches and embrace the convenience of voice control and smartphone connectivity.

Strip the wire (1) for 11 mm so that the conductor part to the terminal slot (2) by
pushing terminal press tting (3). After the wire is placed into terminal slot (2),
release the terminal press tting (3) to complete the wire assembly. By rotating the
wire, ensure that it's securely inserted in its place. Drilling and opening bleed port (7)
specied as ''OPEN HERE'' and shown with '' '' mark with a sharp object for
whatsoever is important to discharge the water inside of the case. Insert connection
cables into the connection points (4,5,6).
1- Wire
2- Terminal Slot
3- Terminal Press Fitting
4- Lower Case Wire Connection Point
5- Upper Seal Wire Connection Point
6- Lower Seal Wire Connection Point
7- Bleed Port (OPEN HERE)
, (10 A için; LED/CFL Lamba yükü 100 W’dır.)
Vida bağlantılı / çabuk bağlantılı montaj tipi
Screw Terminal / Quick Connection
, (For 10A; Rated LED/CFL Lamp load is 100W.)
11 mm
11 mm
1- Kablo
2- Bağlatı Ucu Yuvası
3- Bağlantı Ucu Baskı Parçası
4- Alt Gövde Kablo Bağlantı Noktası
5- Üst Conta Kablo Bağlantı Noktası
6- Alt Conta Kablo Bağlantı Noktası
7- Tahliye Kanalı (OPEN HERE)
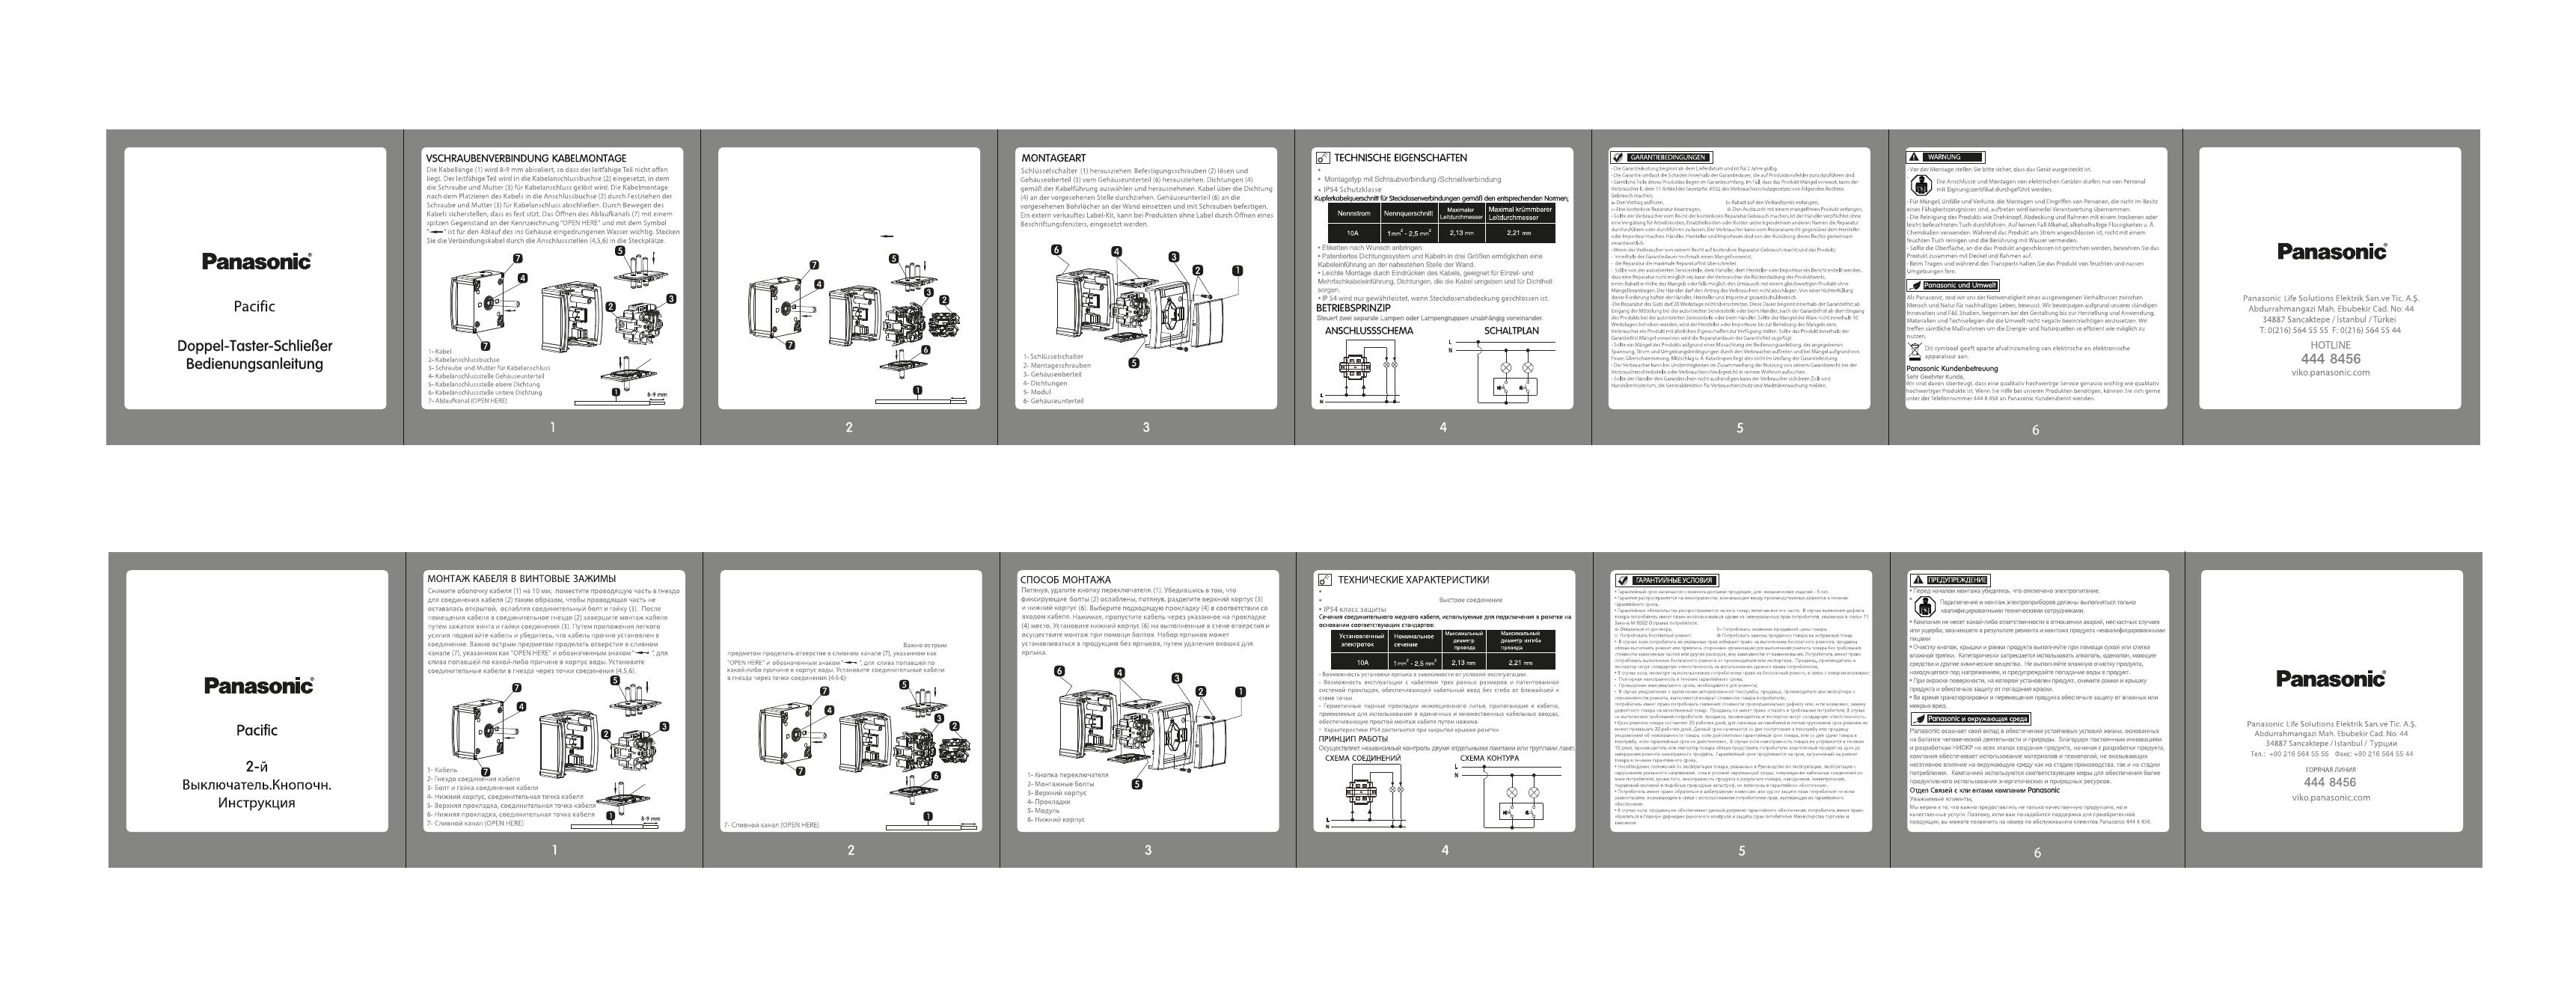
KABELMONTAGE OHNE SCHRAUBEN
(SCHNELLVERBINDUNG)
Das Kabel (1) längs 11 mm absetzen, so dass kein blanker Leitabschnitt im oenen
bleibt und den Leiterabschnitt in die Anschlussbuchse (2) durch Drücken des
Druckteils (3) platzieren. Nachdem das Kabel in die Verbindungs buchse (2) platziert
wurde wird das Druckten (3) der Verbindungsenden los gelassen und somit die
Kabelmontage abgeschlos¬sen. Durch Bewegen des Kabels sicherstellen, dass es fest
sitzt. Das Önen der Ablaufönung (7) mit einem spitzen Gegenstand an der
Kennzeichnung "OPEN HERE" und mit dem Symbol " " ist für den Ablauf des ins
Gehäuse eingedrungenen Wasser wichtig. Sie die Vervindungskabel durch die
Anschlussstellen (4,5,6) in die Steckplätze.
1- Kabel
2- Verbindungsendenbuchse
3- Verbindungsendenbuchse Druckteil
4- Kabelanschlussstelle unterer Körper
5- Kabelanschlussstelle obere Dichtung
6- Kabelanschlussstelle untere Dichtung
7- Ablaufkanal (OPEN HERE)
10 AX, 250 V
~
, (Für 10A; Die LED / CFL-Lampenlast beträgt 100W.)
16A
1- Кабель
2- Гнездо соединительного конца
3- Нажимная пластина соединительного конца
4- Нижний корпус, соединительная точка кабеля
5- Верхняя прокладка, соединительная точка кабеля
6- Нижняя прокладка, соединительная точка кабеля
МОНТАЖ КАБЕЛЯ В БЕЗВИНТОВЫЕ ЗАЖИМЫ
(БЫСТРОСОЕДИНЯЕМЫЕ)
Снимите оболочку кабеля (1) на 11 мм. Поместите провод в гнездо для
соединения конца кабеля (2) и закрепите, путем нажатия на пластину
соединительного конца (3). После размещения соединительного конца кабеля в
гнездо (2) , монтаж завершается после отпускания нажимной пластины
концевого соединения (3). Путем приложения легкого усилия подвигайте кабель
и убедитесь, что кабель прочно установлен в соединение.
10 AX, 250 V
~
, (Для 10А; Нагрузка лампы LED / CFL составляет 100 Вт.)
Монтаж с винтовым соединением /
11 mm
11 mm
  • Page 1 1
  • Page 2 2

Panasonic PACIFIC User manual

Type
User manual

Panasonic PACIFIC: The Smart Lighting Solution

Experience the future of home lighting with Panasonic PACIFIC, a cutting-edge device that transforms your living space with its advanced features. Say goodbye to traditional switches and embrace the convenience of voice control and smartphone connectivity.

Ask a question and I''ll find the answer in the document

Finding information in a document is now easier with AI