Metabo SPA 1200 User manual

Type
User manual

Metabo SPA 1200 dust extractor is designed for the extraction of wood and plastic chips as well as wood dust from woodworking machines. It features an electric motor, ON/OFF switch, dust collection bag, suction hose, and transport handle. The device's compact design and castors allow for easy mobility, while its powerful motor ensures efficient dust extraction.

Metabo SPA 1200 dust extractor is designed for the extraction of wood and plastic chips as well as wood dust from woodworking machines. It features an electric motor, ON/OFF switch, dust collection bag, suction hose, and transport handle. The device's compact design and castors allow for easy mobility, while its powerful motor ensures efficient dust extraction.

SLO
170 28 9950 - 0123
Originalbetriebsanleitung . . . . . . . . . . . . . . . . . . . . . 3
Original operating instructions . . . . . . . . . . . . . . . . 10
Instructions d’utilisation originales . . . . . . . . . . . . . 17
Origineel gebruikaanwijzing . . . . . . . . . . . . . . . . . . 24
Oryginalna instrukcja obsługi . . . . . . . . . . . . . . . . . 31
Originální návod k osbluze . . . . . . . . . . . . . . . . . . . 38
Izvirna navodila za uporabo . . . . . . . . . . . . . . . . . . 45
Originál használati utasítás . . . . . . . . . . . . . . . . . . . 52
Оригинальное руководство по эксплуатации. . 59
SPA 1200
ENGLISH
10
1. Components and Parts (standard delivery)
2
3
5
1
4
6
7
Operating elements
1Dust bag
2Electric motor
3ON/OFF switch
4Fan housing
5Dust collection bag
6Suction hose
7Transport handle
Machine documents
Operating instructions
Spare parts list
XW0019EN1.fm Original manual Original operating instructions
ENGLISH
11
1. Components and Parts
(standard delivery)
2. Please read first!
3. Safety
3.1 Specified Conditions of Use
3.2 General Safety Instructions
3.3 Symbols on the Machine
4. Assembly
4.1 Mains Connection
4.2 Electrostatic Charging
4.3 Overload Protection
5. Operation
6. Care and Maintenance
6.1 Maintenance
6.2 Cleaning
6.3 Storage
6.4 Repairs
7. Available Accessories
8. Disposal
9. Technical Specifications
These operating instructions have been
written to make it easier for you, the us-
er, to learn how to operate this machine
and to do so safely. Here is how to use
the instructions:
Read these instructions before use.
Pay special attention to the safety
information.
These instructions are intended for
persons having a basic technical
knowledge of the operation of ma-
chines like the one described here-
in. If you have no experience what-
soever, we strongly recommend to
seek the advise of an experienced
person.
Keep all documents supplied with
this machine for future reference.
Retain your proof of purchase in
case of a future warranty claim.
This machine must not be sold or
lent to someone else without being
accompanied by these operating in-
structions and all other machine
documents.
The manufacturer is not liable for
any damage resulting from neglect
of these operating instructions.
Information in these instructions is de-
noted as under:
ADanger!
Risk of personal injury or environmental
damage.
BRisk of electric shock!
Risk of personal injury by electric
shock.
ACaution!
Risk of material damage.
3Note:
Additional information.
At times, numbers are used in illus-
trations (1, 2, 3, ...). These numbers
indicate component parts;
are consecutively numbered;
correspond with the number(s) in
brackets (1), (2), (3) ... in the
neighbouring text.
Numbered steps must carried out in
sequence.
Instructions which can be carried
out in any order are indicated by a
bullet point (•).
Listings are marked by a dash (–).
3.1 Specified Conditions
of Use
This machine is designed for
the extraction of wood and
plastic chips as well as wood
dust from woodworking ma-
chines.
Inflammable gases (eg paint
or varnish mist) and explosive
media must not be extracted.
CAUTION - This device is not
suitable for extracting dust that
is hazardous to health.
Industrial use, use in vocation-
al training, in schools, etc ist
not permitted.
Polyethylene dust collection
bags of 0.10 mm minimum
thickness must be used.
When using dust collection
bags made of other materials,
these must have the same
strength against mechanical
damage.
Any use other than the use
specified above is not al-
lowed. Any modification of the
machine or use of spare parts
not tested and approved by
the manufacturer may cause
unforeseeable damage!
3.2 General Safety Instruc-
tions
When using this tool ob-
serve the following safety
instructions, to exclude the
risk of personal injury or
material damage.
Please also observe the
special safety instructions
in the respective chapters.
Also follow the instructions
of the woodworking ma-
chine the dust extractor is
connected to.
In case of a fault unplug the
machine immediately. Nev-
er start the machine without
the upper dustbag in place.
Use the machine only to
extract dust from wood-
working machines.
Ignition sources must not
be extracted.
Should the machine catch
fire, unplug immediately or
interrupt the power supply
by turning the fuse/circuit
breaker OFF. Extinguish
the fire immediately with
Table of Contents
2. Please read first!
3. Safety
ENGLISH
12
water or foam. Do not oper-
ate the machine again.
WARNING - Operating staff
must be provided with ap-
propriate instruction on how
to use these machines.
Always pay attention to the
stability of the device. The
ground must be firm, hori-
zontal and even. Secure the
device against rolling away,
tilting and slipping.
AGeneral hazards!
Keep your work area tidy –
a messy work area invites
accidents.
Be alert. Know what you
are doing. Set out to work
with reason. Do not operate
the machine .
Do not operate the ma-
chine if you lack concentra-
tion.
Consider environmental
conditions: keep work area
well lighted.
Do not operate the ma-
chine near inflammable liq-
uids or gases.
This machine may only be
started and operated by
persons familiar with the
operation of electric tools
who are aware of the risks
involved by using such ma-
chine.
This device can be used by
children from 8 years of age
and, in addition, by per-
sons with impaired physi-
cal, sensory or mental abili-
ty or lack of experience or
knowledge if they are su-
pervised or have received
induction training on the
use of the device and un-
derstand the associated
risks.
Children may not play with
the device.
Cleaning and user mainte-
nance may not be per-
formed by children unless
supervised.
Keep bystanders, particu-
larly children, out of the
danger zone. Do not permit
other persons to touch the
machine or power cable
while it is running.
Do not overload tool – use
it only within the perfor-
mance range it was de-
signed for (see "Technical
Specifications").
Turn power off if the tool is
not used.
B
Danger! Risk of electric
shock!
WARNING - This device is
only intended for dry use.
CAUTION - This device is
designed for use indoors.
CAUTION - This device
may only be stored indoors.
Do not expose machine to
rain.
Do not operate machine in
damp or wet environment.
Prevent body contact with
earthed objects such as ra-
diators, pipes, cooking
stoves, refrigerators when
operating this tool.
Do not use the power cable
for any purpose it is not in-
tended for.
Make sure the power cable
is unplugged before servic-
ing or troubleshooting.
At low temperatures, the
device may not be used
outdoors.
AHazard generated by
insufficient personal protec-
tion gear!
Wear hearing protection.
Wear safety glasses.
Wear dust mask.
Wear suitable work clothes.
When working outdoors
wearing of non-slip shoes
is recommended.
ARisk of injury by inhal-
ing wood dust!
Dust of certain timber spe-
cies (e.g. beech, oak, ash)
can cause cancer when in-
haled.
Make sure that as little as
possible wood dust can es-
cape into the environment:
remove wood dust de-
posits in the work area
(do not blow away!);
fix any leakages on the
dust collector;
ensure good ventilation.
AHazard generated by
modification of the ma-
chine or the use of non-
OEM parts not tested and
approved by the manufac-
turer!
Assemble the machine in
strict accordance with
these instructions.
Use only parts approved by
the manufacturer. This ap-
plies particularly to safety
ENGLISH
13
devices (see Spare Parts
List for stock numbers).
Do not change any parts.
AHazard generated by
tool defects!
Keep machine and acces-
sories in good repair. Ob-
serve the maintenance in-
structions.
Before each use check the
machine for possible dam-
age: before operating the
machine carefully check all
safety devices, protective
guards and slightly dam-
aged parts for proper func-
tion. Check to see that all
moving parts work properly
and do not jam. All parts
must be correctly installed
and meet all conditions
necessary for the proper
operation of the machine.
The machine must not be
operated when the electric
motor, ON/OFF switch or
fan housing are damaged
Never use the machine if
the power supply cable is
damaged. Risk of electric
shock. Have a damaged
power supply cable re-
placed by a qualified elec-
trician immediately.
Damaged protection devic-
es or parts must be re-
paired or replaced by a
qualified specialist. Have
damaged switches re-
placed by a service centre.
Do not operate machine if
the switch can not be
turned ON or OFF.
3.3 Symbols on the
Machine
Danger!
Disregard of the fol-
lowing warnings can
lead to severe per-
sonal injury or mate-
rial damage.
Read instructions.
Wear safety glass-
es and hearing pro-
tection.
Wear dust mask.
Do not operate tool
in damp or wet envi-
ronment.
1. Place fan housing (7), with the mo-
tor facing down, on a workbench or
similar stable support and set it lev-
el with a block of wood or similar.
2. Loosen the 3 hexagon nuts and
washers (9) shown on both sides of
the ventilator housing. Mount the 2
plates as shown on the bolts. Guide
the two side panels (8) over the
bolts with the adhesive label poin-
ting outwards. Fit all washers and
re-tighten all nuts on the ventilator
housing.
3. Install the cross plate (10) between
the side panels using carriage bolts
and hex flange nuts.
.
4. Screw one castor (11) to each cor-
ner of the bottom panel. Secure
each castor with a hex nut (12).
5. Screw the earthing chain (13) into
the bottom panel. Secure the earth-
ing chain with a hex flange nut.
6. Place the thus prepared bottom
panel on the side panels and secure
4. Assembly
7
8
9
7
8
9
10
11
12
13
ENGLISH
14
with carriage bolts and hex flange
nuts. Then check all screws and
nuts for tightness and place ma-
chine with the castors on the floor.
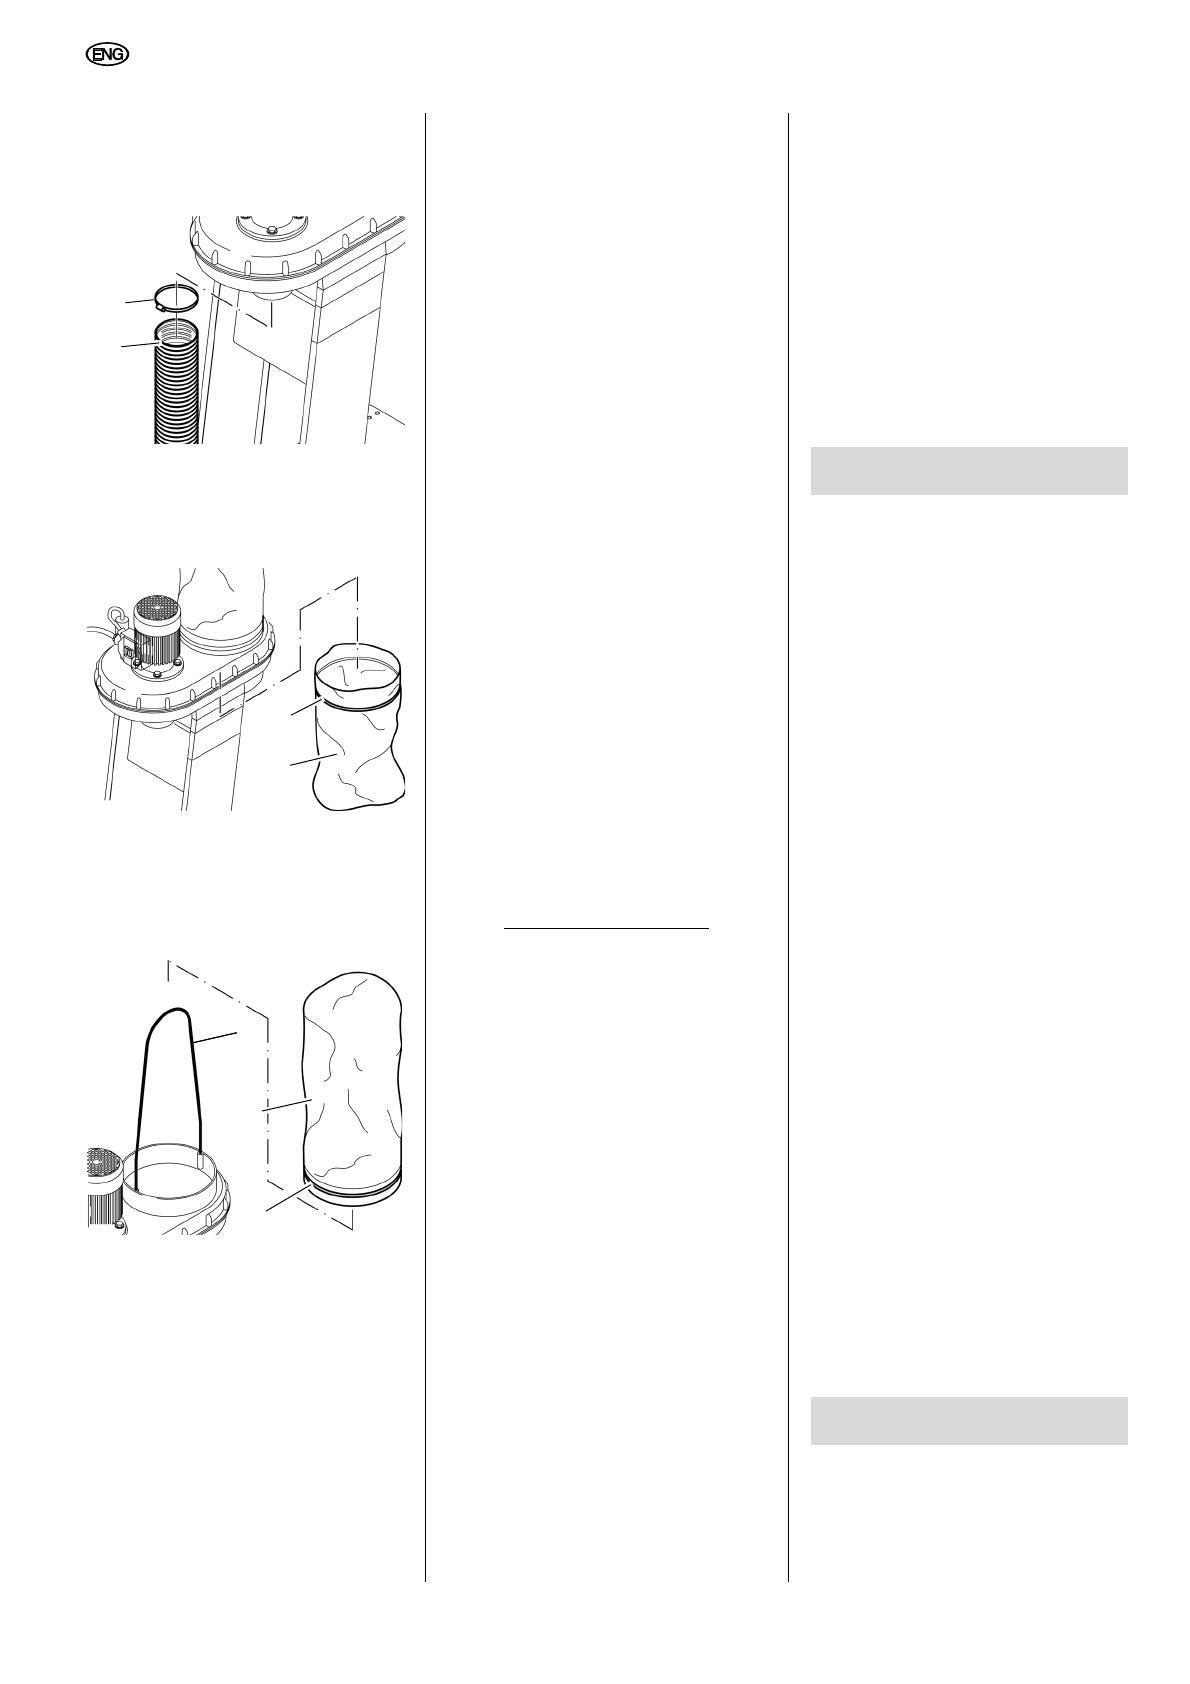
7. Put the hose clamp (14) on one end
of the suction hose (15), then push
the hose on the suction port below
the motor. Tighten the hose clamp.
8. Clamp dust collection bag under the
fan opening. Fit a sufficiently long
and wide dust collection bag (16)
(eg 600 × 900 mm) and tighten it
with the tightening strap (17).
9. Insert the rod (18) into the two holes
on the edge of the upper dust bag
opening. Thread the clamp ring (20)
through the guide sewn into the
dust bag (19). Fit the dust bag over
the dust bag opening. Tighten the
clamp ring.
4.1 Mains Connection
BDanger! High voltage
Operate this machine in dry sur-
roundings only.
Operate machine only on a power
source meeting the following re-
quirements (see also “Technical
Specifications”):
outlets properly installed, earthed
and tested.
outlet protected by a 10A fuse
(time-lag);
mains voltage and system fre-
quency conform to the voltage
and frequency shown on the ma-
chine´s name plate;
fuse protection by a residual cur-
rent device (RCD) of 30 mA sen-
sitivity.
Use only oil-resistant extensions
cords class H07 RN-F. Lead cross-
section should be at least 1.0 mm2.
Protect the power supply cable from
heat, aggressive liquids and sharp
edges.
Run the power supply cables in a
way that they do not interfere with
your work and will not get damaged.
Do not pull on power supply cable
to unplug.
4.2 Electrostatic Charging
The entire extraction system of the ma-
chine is constructed of electrically non-
conductive components. If the suction
hose is connected to electrically con-
ductive parts (eg metal dust chutes or
suctions pipes), they need to be
earthed to dissipate possible electro-
static energy.
On the machine no plastic parts may be
replaced by metal parts. The suction
hose in particular must not be retrofitted
with a metal spiral. In this context small
metal parts like screws and hose
clamps are harmless.
Use only genuine spare parts. These
spare parts are designed for the ma-
chine.
4.3 Overload Protection
To protect the electric motor against
overloads it has a motor protection built
in. If the motor is overheated or over-
loaded the machine will shut off.
In this case the motor can be restarted
after a few minutes of cooling down.
3Note:
If the machine is shut OFF repeatedly
by a tripped motor protection
(23 times) within a short time, the ma-
chine needs to be checked by a quali-
fied electrician, before attempting to
turn it ON again.
1. Place the dust extractor next to the
woodworking machine in a way that
it will not interfere with your work.
2. Connect the suction hose to the
dust extraction port of the wood-
working machine.
3. Place the power supply cable on the
floor and plug it into an outlet.
4. Turn the motor ON and wait a few
seconds, until the fan has reached
fuill speed.
If the upper dust bag does not fill
with air after a few seconds, pull
it up.
5. Only now start the woodworking
machine and commence with your
work.
6. Let the dust extractor postrun for at
least 10 seconds after the wood-
working machine has been turned
OFF.
3Note:
For extended daily use of your wood-
working machine an automatic power
relay for the dust extractor would be of
advantage This relay turns the dust ex-
tractor time-delayed ON and OFF once
the woodworking machine is turned ON
or OFF respectively.
This automatic power relay is available
from the manufacturer in two versions
(see chapter "Available Accessories").
ADanger!
Prior to all servicing:
1. turn the machine OFF,
14
15
16
17
18
19
20
5. Operation
6. Care and Maintenance
ENGLISH
15
2. Pull out the mains plug and store it in
such a way that the person using the
device can see that the plug is re-
moved.
3. wait until the machine has come to
a complete stop.
Repair and maintenance work oth-
er than described in this section
should only be carried out by quali-
fied specialists.
Replace defective parts, especially
of safety devices, with genuine re-
placement parts only. Parts not test-
ed and approved by the manufac-
turer can cause unforeseen
damage.
Check to see that all safety devices
are operational again after each
service.
6.1 Maintenance
Before switching ON
Visual check to see if power supply ca-
ble and power cable plug are damaged;
have faulty parts replaced by a qualified
electrician.
The machine requires no maintenance.
However, before switching ON perform
the following checks.
Check all screw connections!
Retighten loose connections.
Is the switch housing, motor or fan
housing damaged? Have these
parts immediately replaced by a
qualified electrician.
Is the upper dust bag or suction
hose damaged? Replace the dam-
aged part(s).
6.2 Cleaning
In event of reduced suction pow-
er:
Loosen the suction clamp and
pull off the suction hose from the
union beneath the electric motor.
Clean the grille.
Reattach the suction hose and
hose clamp and tighten the hose
clamp.
Wipe work stand and fan housing
with a moist cloth.
Motor and ON/OFF switch may only
be cleaned with a dry cloth.
The upper dust bag should only be
beaten (make sure dust collection
bag is installed on the underside of
the machine).
Change the chip collection bag
when it is about 4/5 full.
6.3 Storage
For storing the dust extractor, place
the suction hose over the motor and
insert the end in the opening in the
base plate.
ADanger!
Store the machine in such way that
it can not be started by unauthor-
ised persons.
Make sure that nobody can get hurt
by the stored machine.
ACaution!
Do not store machine unprotected
outdoors or in damp environment.
6.4 Repairs
ADanger!
Repairs to electric tools may only be
carried out by a qualified electrician!
If the mains connection cable of this de-
vice is damaged, it must be replaced by
the manufacturer or the Customer Ser-
vice department of the manufacturer or
a similarly qualified person to prevent
endangering personnel and property.
Contact your local Metabo representa-
tive if you have Metabo power tools re-
quiring repairs. See www.metabo.com
for addresses.
You can download a list of spare parts
from www.metabo.com.
For special tasks the following accesso-
ries are available from specialist retail-
ers:
AAutomatic power relay
order number: 0913014626
ALV 1, single-phase 230 VAC,
for time-delayed switch-on or
switch-off of the dust extractor after
the woodworking machine has been
switched on or off.
BAutomatic power relay
order number: 0913014634
ALV 10, three-phase 400 VAC, sin-
gle-phase 230 VAC
CFilter cartridge
order number: 0920016529
filters out ultrafine dust particles,
effective filter surface 52 m2
DChip collection bag
order number: 0913017617
Power tools should not be
disposed of with household
waste. According to Europe-
an directive 2002/96/EC on
waste electrical and elec-
tronic equipment used pow-
er tools must be collected separately
and taken to an appropriate recycling
facility.
Contact your local council for the dis-
posal options for your old tool.
The tool packaging is 100% recyclable.
7. Available Accessories
8. Disposal
ENGLISH
16
.
9. Technical Specifications
Voltage V 220 - 240 (150 Hz)
Motor capacity kW 0,55
Rated volume flow m3/h 600
Associated vacuum Pa 740
Max. volume flow m3/h 900
Max. vacuum Pa 1600
Suction hose length mm 2500
Suction hose diameter mm 100
Suction hose connection mm 100
Dust bag volume dm365
Weight (with empty dust collection bag) kg 22
Noise emission according to EN 60335-2-69
Sound power level LWA
Sound pressure level LPA
Measurement uncertainty K
dB (A)
dB (A)
dB (A)
98,25
85,5
3
  • Page 1 1
  • Page 2 2
  • Page 3 3
  • Page 4 4
  • Page 5 5
  • Page 6 6
  • Page 7 7
  • Page 8 8

Metabo SPA 1200 User manual

Type
User manual

Metabo SPA 1200 dust extractor is designed for the extraction of wood and plastic chips as well as wood dust from woodworking machines. It features an electric motor, ON/OFF switch, dust collection bag, suction hose, and transport handle. The device's compact design and castors allow for easy mobility, while its powerful motor ensures efficient dust extraction.

Ask a question and I''ll find the answer in the document

Finding information in a document is now easier with AI