SECURITY BRANDS 14-RTE300 User guide

Type
User guide

SECURITY BRANDS 14-RTE300 is a wireless remote transmitter designed to control gate and door operators. It features a key switch for enabling or disabling the unit and a CR2032 battery for power. The RTE 300 can be paired with compatible receivers using DIP switches, allowing for easy setup and integration with existing systems.

SECURITY BRANDS 14-RTE300 is a wireless remote transmitter designed to control gate and door operators. It features a key switch for enabling or disabling the unit and a CR2032 battery for power. The RTE 300 can be paired with compatible receivers using DIP switches, allowing for easy setup and integration with existing systems.

QUICK START GUIDE RTE 300 1 of 2
Model 14-RTE300
2Make sure you have everything shown here. (Screwdriver not shown)
START HERE
1Carefully unpack box.
What’s what?
Important components labeled
RTE Unit Lock Key Carriage Bolt
( 4x )
Hex Nut
( 4x )
Hole PlugKey Switch Keys
3Unlock and remove faceplate
of RTE unit; then using
carriage bolts and hex nuts,
attach to pedestal as shown.
WARNING!
AUTOMATIC GATES CAN CAUSE
SERIOUS INJURY OR DEATH!
ALWAYS CHECK that the GATE PATH IS
CLEAR BEFORE OPERATING!
REVERSING or other SAFETY DEVICES
SHOULD ALWAYS BE USED!
Key Switch
For enabling and
disabling unit
(Unit is disabled as
shown)
Exit Button
Triggers gate/door
to open
Lock
For securing interior
of RTE unit
RTE Unit Front Panel (Front) RTE Unit Front Panel (Back)
Internal wiring not shown for clarity.
Dip Switches
For pairing RTE unit
to receiver
Status LED
Indicates
transmitting status
CR2032 Battery
On underside of
circuit board
NEED HELP Call (972) 474-6390
We are available Mon–Fri / 8am–5pm Central
© 2022 Security Brands, Inc. All rights reserved. QSG-14RTE300-EN Rev. C (9/2022)
2 of 2
Model 14-RTE300
QUICK START GUIDE RTE 300
6Make sure gate/door path is clear;
then press exit button on RTE unit
and conrm gate/door opens.
(If nothing happens, go back to Step 5)
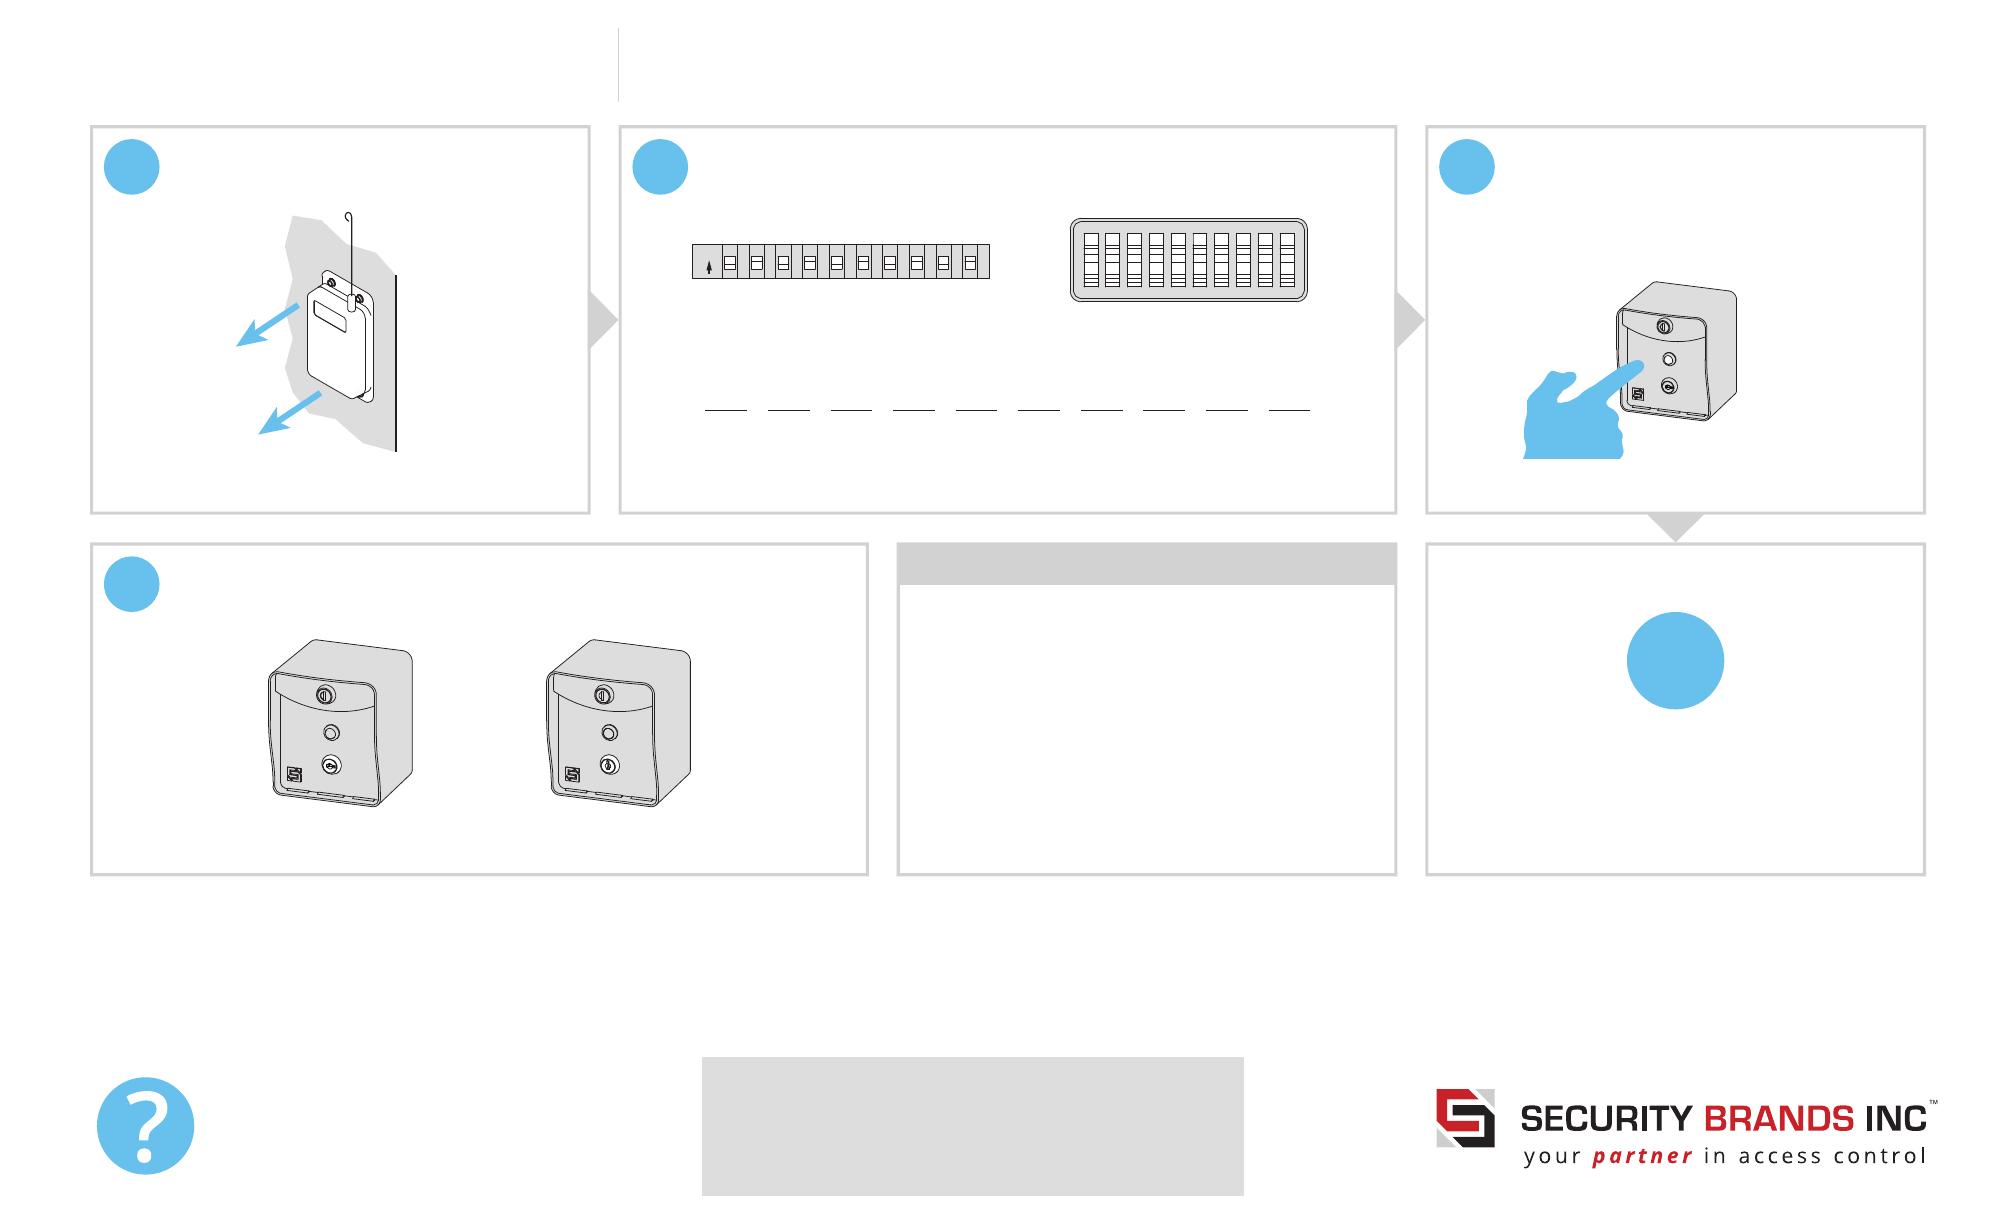
4Locate receiver (not included) and
open for access to DIP switches.
NOTE: For a gate installation, the receiver is typically
installed inside the gate operator housing. NOTE: Key switch must be in the “enabled” position.
10
987654321ON
123456
OPEN
78910
RTE Unit DIP Switches
(DIP SW1) Receiver DIP Switches
(look of components may vary)
5Carry RTE unit to receiver; then set DIP switches on RTE unit to
match DIP switches on receiver. Double check for match.
1 2 3 4 5 6 7 8 9 0/10
Unit Enabled
(exit button active)
Unit Disabled
(exit button inactive)
AThe RTE unit can be disabled or enabled at any time using the
key switch located below the exit button.
NOTE: Use the blanks above to note positions. Use an “X” for ON and leave blank for OFF.
DIP switches may be labeled dierently. The word, OPEN, means the same thing as OFF.
Your system is ready to use.
INSTALLATION COMPLETE!
N
IMPORTANT!
r
The RTE 300 is compatible ONLY with
300-MHz RECEIVERS that use
10 DIP SWITCHES, including those with
the Digi-Code or Multi-Code® brands.
This unit WILL NOT WORK with any
other receivers!
If you are not sure what kind of receiver
you have, check with your distributor.
  • Page 1 1
  • Page 2 2

SECURITY BRANDS 14-RTE300 User guide

Type
User guide

SECURITY BRANDS 14-RTE300 is a wireless remote transmitter designed to control gate and door operators. It features a key switch for enabling or disabling the unit and a CR2032 battery for power. The RTE 300 can be paired with compatible receivers using DIP switches, allowing for easy setup and integration with existing systems.

Ask a question and I''ll find the answer in the document

Finding information in a document is now easier with AI