Page is loading ...

Coral Sea™
Inflatable Sit On Top
OWNER’S MANUAL


Dear customer,
Congratulations on your purchase of a Sevylor inflatable product. We take pride in bringing you a quality product which will
offer you years of pleasure. Your new item is an investment which deserves your care and attention. These instructions
have been compiled to help you to operate your product safely. It contains details of the product, its equipment, and
information on its operation and maintenance. Read it carefully and familiarize yourself with the inflatable before first use,
in order to ensure safe use and prevent tragic accidents.
The warnings below relate to various situations. Please observe them.
CAUTION !
Denotes an imminent hazard which will result in severe injury if you do not comply with the
instructions.
WARNING !
Reminds you of safety measures which must be observed. Also denotes unsafe practices which
could result in personal injury or damage to the product or property, if you do not comply with the
instructions.
CAUTION !
It is the owner’s responsibility to make sure that all users carefully read and follow the instructions for the safe
operation of this product. Observe all local and national laws. Always wear a Personal Flotation Device
approved by proper authorities. Please observe carefully the information on the capacity plate which is printed
on the product.
The Coral Sea™ model U252GRY-00-000 is NMMA certified.
TECHNICAL SPECIFICATIONS
Stearns Model # Sevylor Model # Length
inflated appr.
Width
inflated appr.
Weight Max HP Engine
U252GRY
STK290 113” / 287cm 33” / 84cm 24 lbs / 11 kgs 2.5 HP
N.B. The inflated sizes are measured under the following conditions ; product inflated with the recommended inflator, at the
recommended working pressure and at a temperature ranging between 18°C / 64°F and 22° C / 71°F.
FEATURES:
Carrying
Handles
Mesh Storage Bag
Bungee Paddle Holders
High Support Bucket Seat Tarpaulin Pad for
Tanks and Equipment
Durable
Gear
Straps
Motor Mount
Fittings
Foot Rest
D-Rings
Directional
Strakes
Durable Fabric
Reinforced Bottom
Mooring Ring
1
2
3
Boston
valves

(1)
Valve cap
(
2) Valve
insert
(
3) Valve
base
NMMA (ABYC Standard) Persons Capacity Maximum Payload Capacity
Sevylor Model # Stearns Model #
(Persons Only) (Persons, Motor, Gear)
STK290 U252GRY
1 Pers. Or 300 lbs. 350 lbs.
ASSEMBLY INSTRUCTIONS / INFLATION
CAUTION !
Do not use a sharp tool
!
When inflating for the first time, inflate indoors at room temperature – the PVC will be soft and assembly will be easier. If
the item was stored below 0°C / 32°F, leave it at 20°C / 68°F for 12 hours before unfolding. Inflate it with an inflator from
Sevylor or any inflator designed for inflatable boats, rafts, pool floats, air beds, camping mattresses, and other low
pressure inflatables. These types of inflators have a hose and adaptors to fit the valves on this product.
CAUTION !
Using of an air compressor will damage your product and automatically void all warranties.
Choose a smooth and clean surface on which to unfold your product.
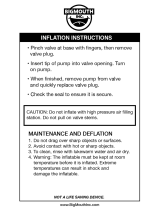
1) Your boat is equipped with two different types of valves:
a) Boston valve(s) – please see opposite figure : Unscrew the valve cap (1).
Screw the valve insert (2) onto its base (3) and check that the valve cap stays
accessible. Insert the pump hose end piece and inflate it until you will reach the
required pressure (see point 3). After inflation fit all the valve(s) cap tight
(clockwise). NOTICE: A slight air-leak before screwing the valve(s) cap is
normal. Only the valve(s) cap can ensure final AIR TIGHTNESS.
b) Push-in valve on the footrest: open the zipper on the footrest, pull the valve out
slightly and remove the plug from the valve ; inflate the chamber by using the adapter of the inflator which fits the
valve. Close the valve and press it into the air chamber. Close the zipper.
2) Inflate the kayak in the following order: inflate floor chamber first, then inflate side tubes second and lastly inflate the
footrest. Note: the bladders inside the hull are tied to the hull with little tie down ropes, which can be accessed through
the zippers in the center and in the tips of the side chambers. Should the bladders have shifted during transportation
causing distortion of the shape of the boat, readjust the bladder position as necessary. Adjustments to bladder
positioning should be done only while the bladders are deflated, or only slightly inflated. Do not open the hull zippers or
attempt to adjust the bladders when they are fully inflated.
3) Max. air pressure : The correct pressure for this item is : 0,1 bar (= 100 mBar / 1.45 PSI). Do not exceed it.
Overpressure : deflate until you reach the recommended pressure. Pressure drop: inflate again slightly.
4) Attach the seat(s): Your kayak is supplied with bucket seat(s), featuring a comfortable high backrest. The seat is held
in place by the Velcro strips on the underside and by webbing straps with Carbine hooks on the sides of the backrest.
Place the seat(s) into the boat, matching the position of the Velcro strips on the floor. Attach the webbing straps from
the sides of the backrest to the D-rings located inside the boat, on the side walls/chambers. Tighten the straps as
needed for the proper back support.
5) Inflatable footrest: Inflate the footrest through the push-in valve located underneath the zipper, as described in point 1.
Your footrest is held in place by 2 webbing straps on the floor, which also act as “rails” the footrest is sliding on.
Tighten these straps if necessary using buckles at the front end of the floor. The actual position/distance of the footrest
is controlled by another pair of webbing straps on the sides of the footrest itself. Pull on these straps to bring the
footrest closer or loosen them to push the footrest further up.
6) Paddle holders: Included feature are also the bungee paddle holders, attached to the D-rings on the side of the boat.
When you need to attach your paddle or a spare paddle to the boat, wrap the bungee cord around the paddle shaft
and attach the hook again to the bungee cord itself or the D-ring. Unhook them accordingly to release your paddle.

WARNING !
If you leave your product exposed to the hot sun check the pressure and deflate it slightly, to avoid
overstretching the material. The ambient temperature affects the tube’s internal pressure : a variation of 1°C (1.8°F)
causes a variation of the pressure in the tube of +/- 4 mBar (0.06 PSI).
OPERATING INSTRUCTIONS
WARNING !
BEWARE OF OFFSHORE WINDS AND CURRENTS !
Get informed on local regulations and hazards related to this sport or water activities.
Learn about your canoeing area. Ask locals about tides and currents.
Before using the product, please check it carefully.
Be careful that you do not over estimate your strength, your endurance or your skill.
Be careful never to under estimate the forces of nature.
Do not exceed the authorized number of persons or weight.
Avoid all contact between the buoyancy tubes and sharp objects or aggressive liquids (such as acid).
This product is delivered with a carry bag. Keep it away from children. Danger of suffocation!
MAINTENANCE : DEFLATING – FOLDING THE BOAT – CLEANING – WINTERING STORAGE
1. Remove paddles and other accessories.
2. To deflate, unscrew the valves’ insert and open the valve cap of the push-in valve.
3. Clean and check the item as well as all the accessories after each use. Rinse it thoroughly making sure that any salt
residues are removed, if it has been used in salt water. Use a mild soapy solution, but do not use detergents or any
type of silicone-based products. Make sure that the product is completely dry before putting it away.
4. Fold the 2 sides into the middle, then roll it up from the opposite end of the valves (so remaining air can escape from
the valves); start again if you feel there is still some air in the tubes.
5. When storing your inflatable, keep it in a clean and dry place, away from extreme temperature variations or other
potentially damaging factors. It can be stored deflated and rolled up in a bag or assembled and lightly inflated. Store it
away from rodents.
WARNING !
Water will enter between the outer hull and inside chambers, this is O.K ; however, whenever you take this
item out of the water and deflate it, allow for it to air out and dry, neither the skin/hull or the inside chambers
will suffer from water damage, but stagnant water could cause mildew and foul odor.
HOW TO REPAIR SMALL PUNCTURES
You can repair small punctures with the included repair kit (Note: Glue not included). Please note that in order for the
repair to be successful, the humidity level should be less than 60%, temperature between 65° F/77° F or 18°C/25° C.
Avoid carrying out repairs in the rain or in direct sunlight.
Remove the inside tube from the hull. Check that the tube is fully deflated and lies flat.
1. Draw the shape of the patch exactly where it will be applied, cut a round patch at least 2” / 5 cm larger than the
cut/damaged area.
2. Clean the damaged area and the corresponding side of the patch with a grease remover of the alcohol type and allow
for it to dry for 5 minutes.
3. Apply 3 thin layers of glue on both the patch and the damaged area, allow for it to dry for 5 minutes between layers
until the glue feels tacky.
4. When the third layer of glue is dry, apply the patch without pressing and adjust the positioning if required, press the air
bubbles which may have formed under the patch by smoothing the patch with a round object such as a spoon, do this
procedure by starting in the center of the patch towards the outside, clean the excess glue with a solvent. Drying : 12
hours.
WARNING
!
Perform all of your repairs in a well-ventilated area.
Avoid inhaling glue vapors or swallowing.
Avoid contact with the skin or the eyes.
Keep all repair materials (glue, solvents, etc.)
away
from children’s reach.

N.B. the repairs on the weldings must not be glued. Only the manufacturer of the boat can perform the repairs on the
weldings.
WARRANTY
Sevylor warrants (legal warranty) to the original purchaser only, and from date of purchase, when any product is used for
normal recreational purposes, that the product is free from defects (weldings). Check with your local Sevylor office for
warranty duration details, which vary for different countries. The warranty does not cover any puncture, cut or abrasion
sustained in normal use or damage from unreasonable uses or improper storage.
If any product is found to be defective, the owner may return it to the store it was purchased from with the
original sales receipt.
After inspection of any product found defective, Sevylor shall either repair or replace the defective part or item as deemed
necessary by Sevylor.
Sevylor shall not be held liable for incidental and consequential damages.
There are no warranties which extend beyond the description of the face hereof.
This warranty is inclusive in lieu of all other warranties.
This warranty gives you specific legal rights and you may also have other rights, which may vary, from country to country.
The main limitations to the application of the warranty are the following :
• The item must not be modified and/or fitted with a motor in excess of that allowable by the manufacturer or
used in any activities outside normal recreational use (such as races, rental, professional usage).
• Use in excess of the manufacturers recommended maximum load capacity.
• Pressure recommendations, assembly / disassembly and handling procedures must be strictly observed.
• The maintenance and the storage procedures must not be neglected.
• This warranty does not cover parts and accessories not supplied or recommended by the manufacturer or
defects resulting from the installation of such equipment on their products.
NOTICE : all repairs covered by warranty must be performed by Sevylor.
WARNING !
Your product is designed in accordance with the standards for a specific use. Any
modifications, transformations or use of a motor horse power higher than indicated by
the manufacturer could result in serious risks for the user and will void the warranty.

Customer Service
STEARNS® INC.
PO Box 1498
St. Cloud, MN USA
Tel. (320) 252-1642 Fax (320) 252-4425
www.stearnsinc.com – www.sevylor.com
SEVYLOR® EUROPE
4 Rue de l’Artisanat
68500 GUEBWILLER - FRANCE
Tél. +33 (0)3 89 76 67 76 - Fax +33 (0)3 89 74 34 88
www.sevylor.com - info@sevylor-europe.com
SEVYLOR® DEUTSCHLAND
Niederlassung Deutschland
Junkersstr. 1
63755 ALZENAU – DEUTSCHLAND
Tel. +49 (0) 6023 91700 – Fax +49 (0) 6023 917099
sevylor.deutschland@sevylor-europe.com
SEVYLOR® ITALIA
Roberto Fratta Selection
Via Pietro Colletta 14
20135 MILANO - ITALY
Tel. +39 02 55189815 - Fax +39 02 55181165
SEVYLOR® ESPAŇA
C & K Watersport SL
Puerto de Mataro, Local 23
08301 MATARO (BCN) - SPAIN
Tel. +34 93 790 5215 - Fax. +34 93 755 2125
jguiraud@sevylor-europe.com
SEVYLOR® BENELUX
PBL SA
50 Avenue du Commerce
1420 BRAINE L’ALLEUD – BELGIUM
Tel. +32 (0)2 386 03 40 . Fax +32 (0)2 386 03 41
STEARNS® Inc.
P.O. Box 1498
St. Cloud, MN 56302 USA
www.stearnsinc.com
SEVYLOR® EUROPE
4 Rue de l’Artisanat
68500 GUEBWILLER - France
www.sevylor.com
info@sevylor-europe.com
SEVYLOR® is a registered trademark of Sevca, LLc, a subsidiary of Stearns® Inc.

PKG-WTS08-0137
/