Entel DX446L User guide

Type
User guide

This manual is also suitable for

Designed in the United Kingdom
Quick Start User Guide
DX Land Series
Quick Start User Guide V1.1
INTRODUCTION
The Entel DX series is designed for those users who demand the ultimate
performance for their business critical communications.
Your radio can be congured for Digital or Analogue channels, or both and to
meet your exact requirements the radio may have been customised by your
Entel dealer. These features will be explained in a separate guide issued by
the dealer.
OPTIONAL ACCESSORIES
Attaching and removing
accessories
1. To attach an accessory, remove the
accessory cover by unscrewing the
locking screw anti-clockwise (store in a
safe place).
2. Plug the accessory into the socket,
then carefully tighten the locking screw
clockwise until nger tight (do not
overtighten or use any implement)
3. To remove an accessory, unscrew the
locking screw of the accessory by hand
in an anti-clockwise direction. Ensure you
re-t the accessory socket cover so as to protect the socket.
4. To prevent corrosion or damage to the accessory connector terminals
ensure either a) the accessory cover is tted or b) an accessory is securely
tted, never leave the terminals exposed.
BATTERY INFORMATION
Battery charging
1. Connect the AC adapter to the charger pod and plug in.
2. Turn the radio off.
3.
Insert the battery pack into the charger pod, either with or without the radio
attached. The charger LED status light changes to red and charging begins.
4. When charging is complete the charger status LED changes from red to
green, a fully discharged battery pack will take approximately 3 hours to
re-charge.
A ashing red LED on the charger indicates there is a problem with the
battery. Remove the battery from the charger and consult your Entel Dealer.
CAUTION
BATTERY PACK PRECAUTIONS
Do not recharge the battery pack if it is already fully charged. Doing so
may reduce the life of the battery pack.
After charging is complete, remove the battery from the charger. If the
power to the charger is turned off and on again, charging will restart and
the battery will become overcharged.
Please ensure the radio is turned off before placing it in the charger and
never switch a radio on whilst in the charger.
Only use Entel branded battery packs and chargers.
Do not short the battery terminals or dispose of the battery in a re.
Do not charge the radio and/or battery pack if they are wet.
DANGER
DO NOT DISASSEMBLE OR MODIFY THE BATTERY IN ANY WAY!
Your Entel battery pack incorporates a safety circuit to avoid danger, if the
safety circuit is damaged or bypassed, or the battery cells are damaged
directly, they may generate extreme heat, smoke, rupture and emit ames.
REPAIR & MAINTENANCE
Repair and maintenance of this product can only be carried out by Entel. Any
damage to the anti-tamper seal will invalidate the product approval. Should
you have any difculties in operating this product please contact your Entel
Dealer for support.
DX Land Series
PACKING LIST
DX Series radio
Li-ion battery pack
Drop in charger
Spring loaded belt clip
High efciency antenna
Quick start user guide
CONTROLS & INDICATORS
NON DISPLAY
NAV KEY DISPLAY
1. On/Off/Volume control.
Rotate clockwise to turn on and increase volume.
Rotate anticlockwise to reduce volume and turn off.
2. Channel control
3. Accessory socket
4. Push-To-Talk (PTT) button.
Press to speak and release to listen.
5. Dealer programmable buttons (ask your Dealer for more information)
6. LED indicator
Red Steady - Transmitting
Red Double Flash - Low Battery
Red Fast Flash - Error
Green Steady - Receiving
Green Steady (AM) - Monitoring Channel
Green slow ash (DM) - Digital call hang time
Amber steady - Receiving invalid signal
Amber Flash every 5-seconds - Radio in standby
Amber Rapid Flash - Scanning
7. Info button
8. Microphone
9. Navigation key
1
5
6
3
8
2
Talk here
1
5
6
3
8
2
Talk here
7
5
4
5
4
9
PREPARING YOUR RADIO FOR USE
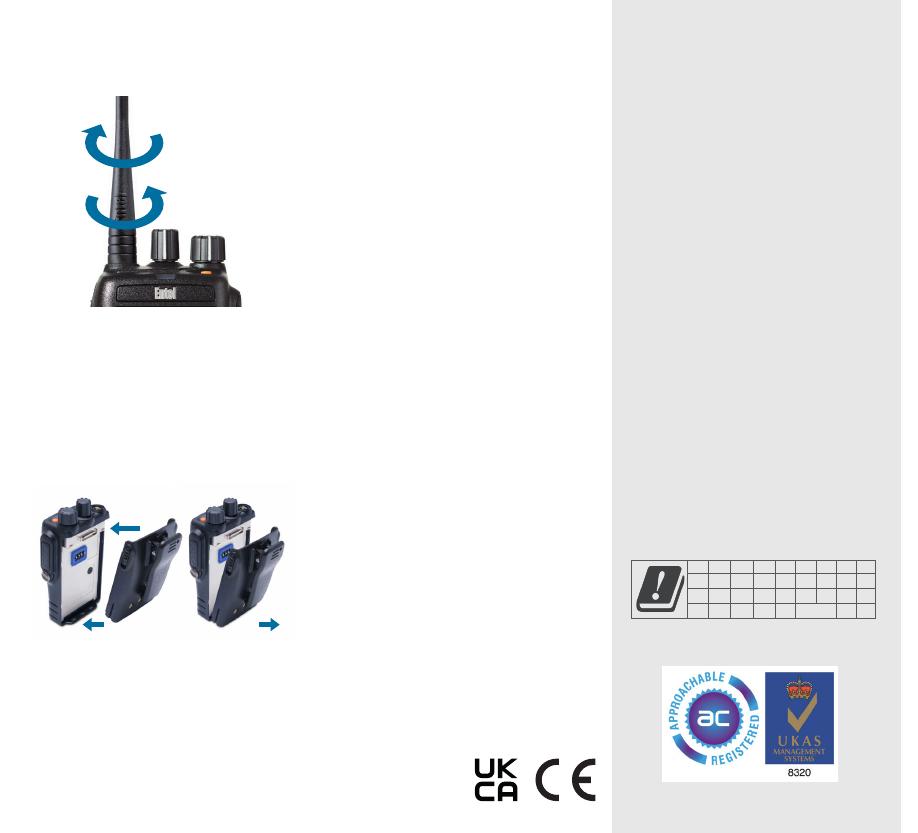
Attaching / removing the antenna
1. To attach, carefully align the antenna with the
socket. Screw in the antenna and clockwise
(taking care not to cross the thread) until it is
seated rmly. (A)
2. To remove, unscrew the antenna
anti-clockwise. (B)
Note: Antenna supplied with DX446E/DX446L
are not removable.
SWITCHING ON, RECEPTION
AND SWITCHING OFF
1. To switch on rotate the on/off/volume control (1)
on the top of the radio clockwise, you will hear
a click from the control.
2. When the radio has passed its diagnostic tests,
it will emit a fanfare tone.
3. The radio will enter standby mode. This is
indicated by the LED ashing Amber once
every 5 seconds, indicating the radio is ready
for use.
4. Adjust the volume control (1) to select the
desired volume level.
5. Using the channel/contact list control (2)
ensure that you have the correct channel/
contact selected.
6. When receiving a valid signal the LED will
illuminate steady green and audio will be
emitted from the radio’s speaker or audio
accessory (if attached)
7. When nished using the radio, switch off by
turning the on/off/volume control (1) counter
clockwise until it clicks and the radio will be
switched off.
TRANSMITTING
1. Perform steps 1 through to 5 of ‘Switching On,
Reception and Switching Off.’
2. Before transmitting, monitor the channel and
make sure it is clear.
3. When receiving a signal, wait until the signal
stops before transmitting. The radio cannot
transmit and receive simultaneously.
4. Press the PTT (Push To Talk) button (4)
to begin your transmission. To conrm
transmission the LED illuminates red.
5. For best transmitted speech quality you must
talk directly into the radio's microphone (8) at
around 4cm between your mouth and the radio.
6. Please note: with your mouth further away, you
will transmit poor quality speech.
7. When the transmission is nished, release the
PTT button.
DECLARATION OF CONFORMITY
Hereby, Entel UK Limited
Declares that the radio equipment type
DX400 series is in compliance with
Directive 2014/53/EU and Radio Equipment
Regulations 2017.
The full text of the relevant declaration of
conformity is available at the following
internet address:
EU www.entel.co.uk/red
UK www.entel.co.uk/UKCA
Frequency Range VHF 136-174MHz
Frequency Range UHF 400-470MHz
Power Output VHF (HI/LOW) 5W/1W
Power Output UHF (HI/LOW) 4W/1W
The product shall only be put into service
after it has been professionally configured by
a specialist radio communications dealer for
the EU member state or geographical area
it is intended to be operated within.
Intended country of use
www.entel.co.uk
1. To attach (C), locate the pegs on the bottom of
the battery into the slots on the radio and pull
the 2 latches downwards, carefully pushing
the battery into the radio. Release the latches
ensuring the battery is full attached.
2. To remove (D), pull down the 2 latches and
carefully pull the battery away from radio.
C
D
Attaching / removing the battery pack
All Rights Reserved. Copyright Entel UK Ltd.
AT BE BG CH CY CZ DE DK EE
ES FI FR EL HR HU IE IS IT
LI LT LU LV MT NL NO PL PT
RO SE SI SK TR UK(NI)
A
B
  • Page 1 1
  • Page 2 2
  • Page 3 3
  • Page 4 4

Entel DX446L User guide

Type
User guide
This manual is also suitable for

Ask a question and I''ll find the answer in the document

Finding information in a document is now easier with AI