Page is loading ...
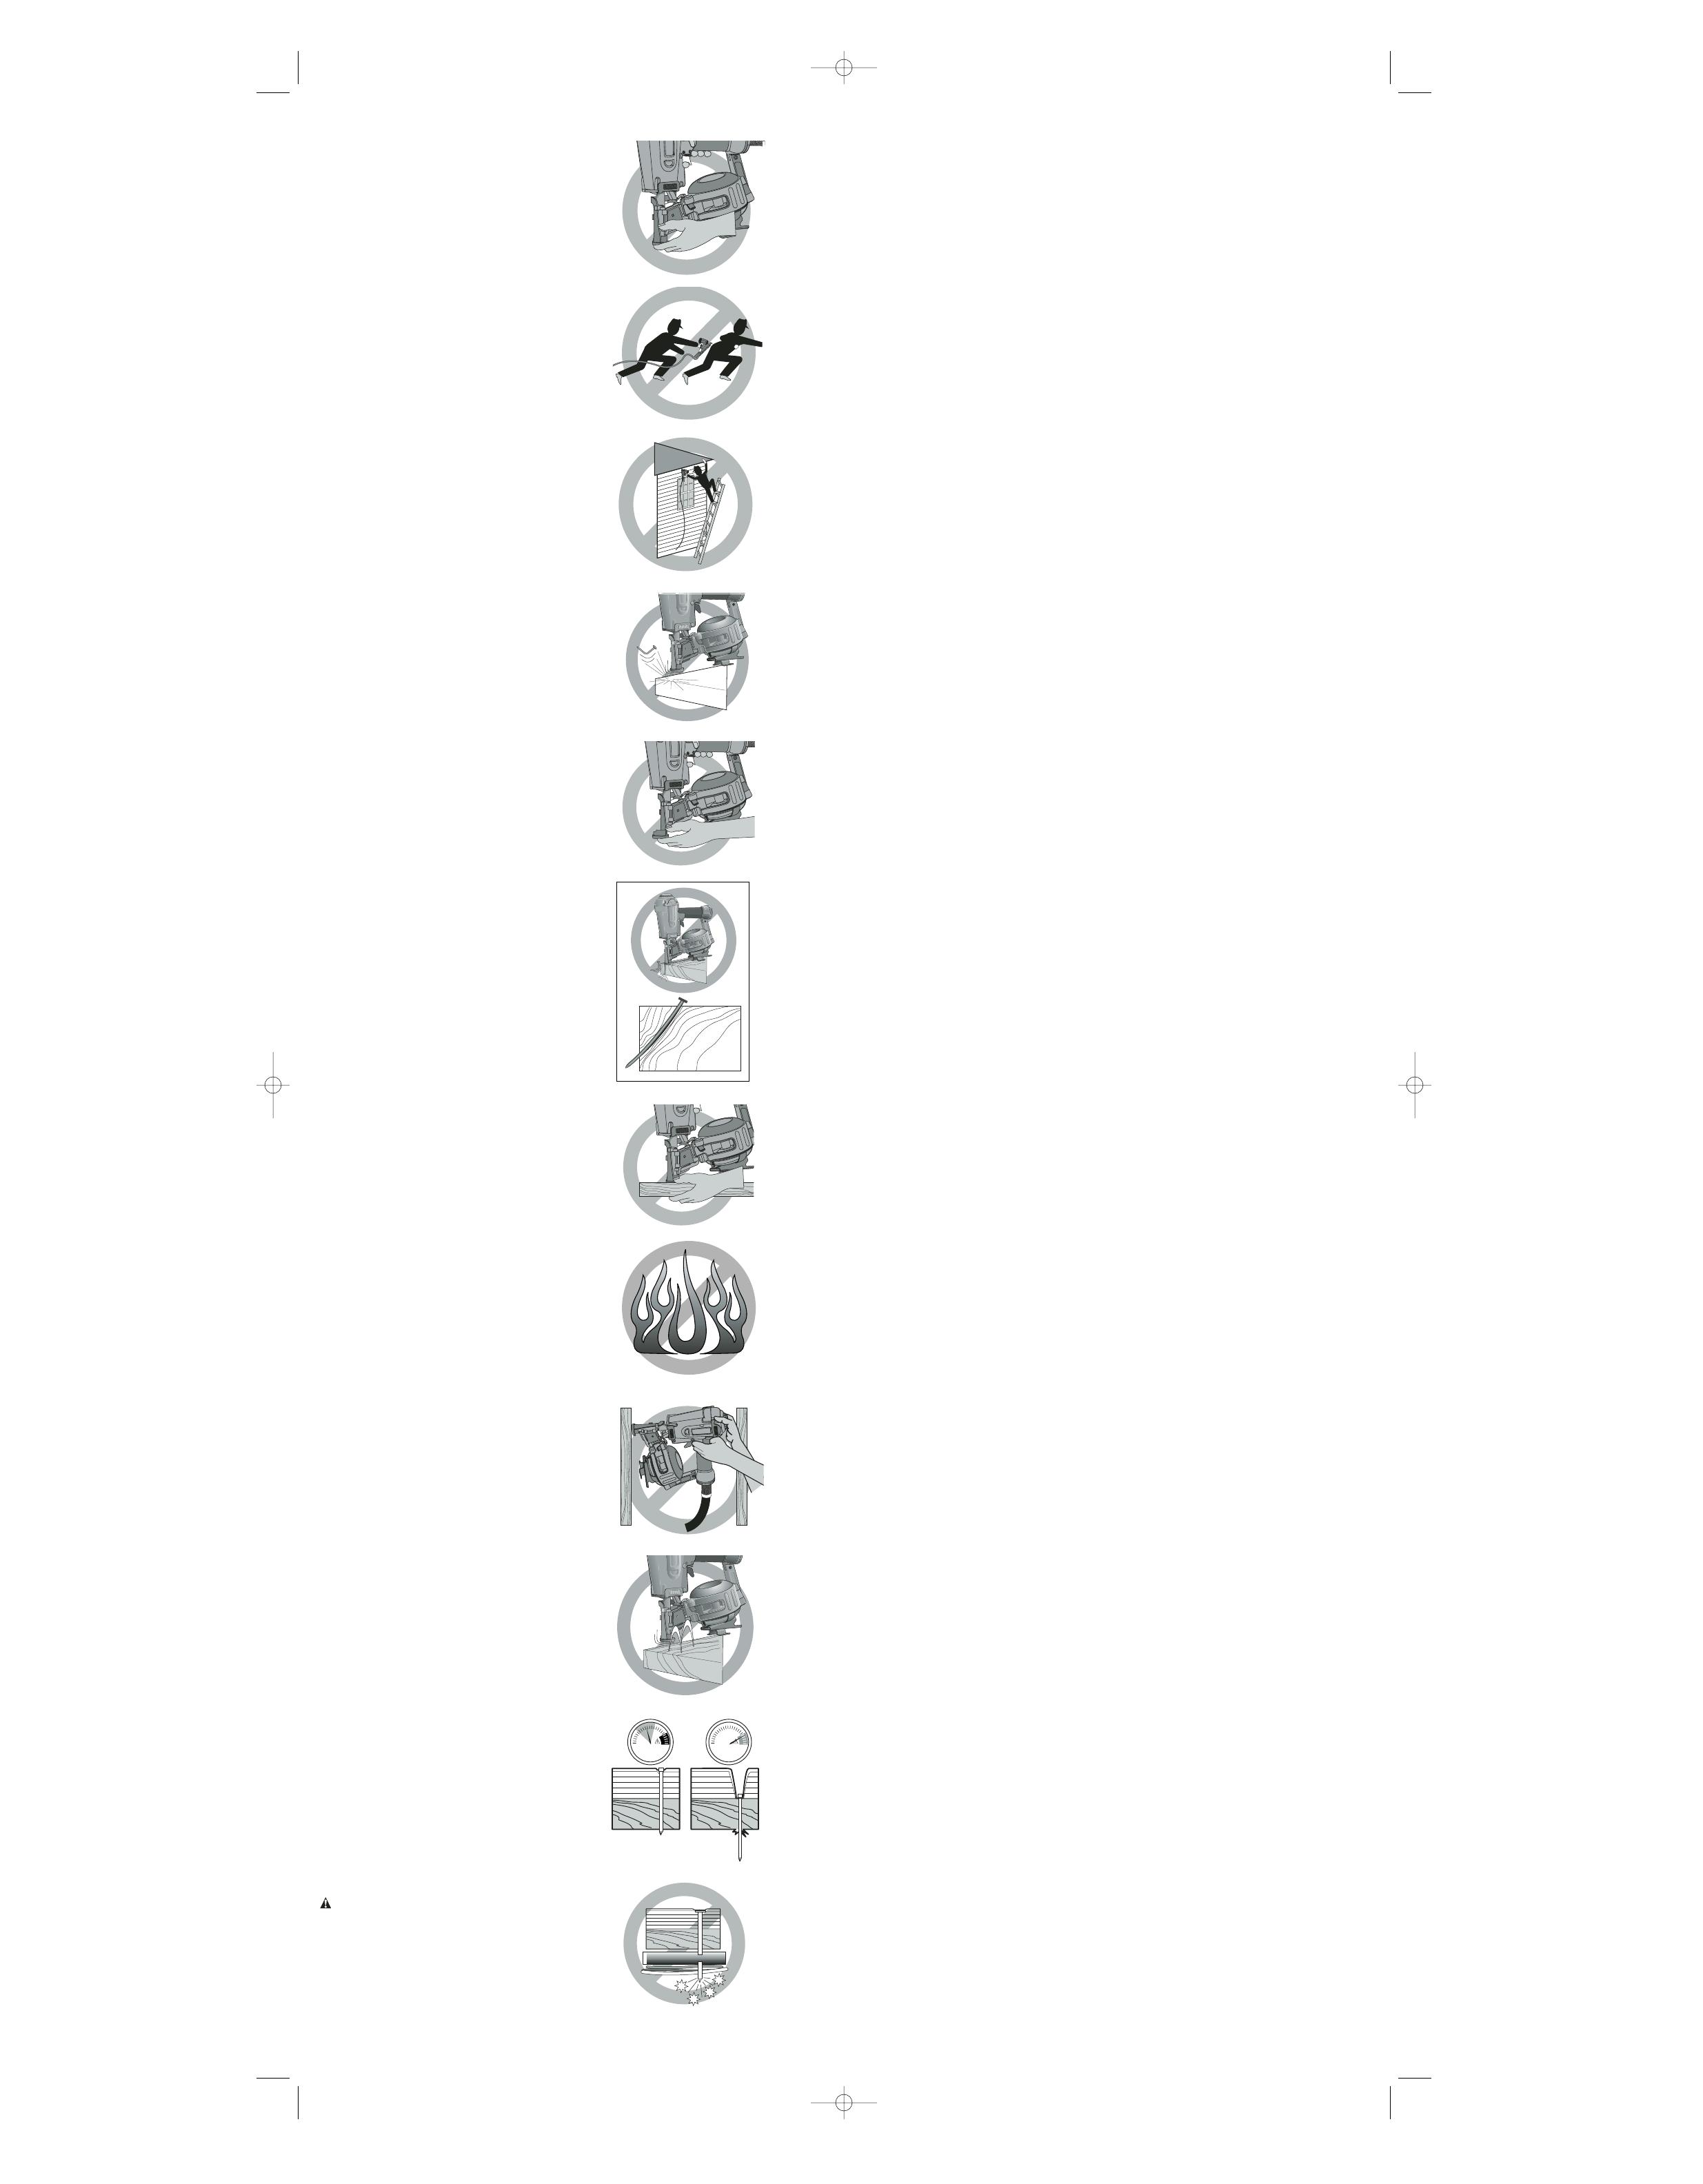
• Do not alter or modify the tool in any way.
(Fig. I)
• Do not use a belt hook accessory with this
tool.
• Always assume that the tool contains
fasteners.
• Do not point the tool at co-workers or yourself
at any time. No horseplay! Work safe! Respect
the tool as a working implement. (Fig. J)
• Keep bystanders, children, and visitors away
while operating a power tool. Distractions can
cause you to lose control. When the tool is not in
use, it should be locked in a safe place out of
reach of children.
• Do not carry the tool from place to place
holding the trigger. Accidental discharge could
result.
• Always use trigger lock-off when tool is not in
immediate use. Using the trigger lock-off will pre-
vent accidental discharge.
• Do not overreach. Maintain proper footing and
balance at all times. (Fig. K)
• Use extreme caution when operating the tool
in elevated areas such as a rooftop. Be sure to
move up the slope of the elevated surface as you
operate the tool. It is easy to slip or lose footing
while moving down on an elevated surface.
• Make sure hose is free of obstructions or
snags. Entangled or snarled hoses can cause
loss of balance or footing.
• Use the tool only for its intended use. Do not
discharge fasteners into open air, concrete,
stone, extremely hard woods, knots or any
material too hard for the fastener to penetrate.
Discharged fasteners may follow unexpected
path and cause injury. (Fig. L)
• Always keep fingers clear of contact trip to
prevent injury from inadvertent release of
nails. (Fig. M)
• Refer to the Maintenance and Repairs sec-
tions for detailed information on the proper
maintenance of the tool.
• Always operate the tool in a clean, lighted
area. Be sure the work surface is clear of any
debris and be careful not to lose footing when
working in elevated environments such as
rooftops.
• Do not drive fasteners near edge of material.
The workpiece may split causing the fastener to
ricochet, injuring you or a co-worker. Be aware
that the nail may follow the grain of the wood
(shiner), causing it to protrude unexpectedly from
the side of the work material. Drive the chisel
point of the fastener perpendicular to the grain to
reduce risk of injury. (Fig. N)
• Keep hands and body parts clear of immedi-
ate work area. Hold workpiece with clamps
when necessary to keep hands and body out of
potential harm. Be sure the workpiece is properly
secured before pressing the nailer against the
material. The contact trip may cause the work
material to shift unexpectedly. (Fig. O)
• Do not use tool in the presence of flammable
dust, gases or fumes. The tool may produce a
spark that could ignite gases causing a fire.
Driving a nail into another nail may also cause a
spark. (Fig. P)
• Keep face and body parts away from back of
the tool cap when working in restricted
areas. Sudden recoil can result in impact to the
body, especially when nailing into hard or dense
material. (Fig. Q)
BUMP ACTION TRIGGER
• When using the bump action trigger, be
careful of unintentional double fires result-
ing from tool recoil.
Unwanted fasteners may
be driven if the contact trip is allowed to acci-
dentally re-contact the work surface. (Fig. R)
TO AVOID DOUBLE FIRES:
• Do not engage the tool against the work
surface with a strong force.
• Allow the tool to recoil fully after each
actuation.
• Use sequential action trigger.
• When “bump” actuating the coil roofing
nailer, always keep tool in control.
Inaccurate placement of tool can result in mis-
directed discharge of a fastener.
SEQUENTIAL ACTION TRIGGER
• When using the sequential action trigger,
do not actuate the tool unless the tool is
placed firmly against the workpiece.
• Do not drive nails onto the heads of other fas-
teners. Strong recoil, jammed fasteners, or rico-
cheted nails may result.
• Be aware of material thickness when using
the coil roofing nailer. A protruding nail may
cause injury.
• Be aware that when the tool is being utilized
at pressures on the high end of its operating
range, nails can be driven completely
through thin or very soft work material. Make
sure the pressure in the compressor is set so
that nails are set into the material and not
pushed completely through. (Fig. S)
• DEPTH ADJUSTMENT: To reduce risk of seri-
ous injury from accidental actuation when
attempting to adjust depth, ALWAYS;
• Lock OFF trigger.
• Disconnect air supply.
• Avoid contact with trigger during adjustments.
• Do not drive nails blindly into walls, floors or
other work areas. Fasteners driven into live
electrical wires, plumbing, or other types of
obstructions can result in injury. (Fig. T)
• Stay alert, watch what you are doing and use
common sense when operating a power tool.
Do not use tool while tired or under the influ-
ence of drugs, alcohol, or medication. A
moment of inattention while operating power tools
may result in serious personal injury.
WARNING: Use of this product will expose you to
chemicals known to the State of California to cause
cancer, birth defects and other reproductive harm.
Avoid inhaling vapors and dust, and wash hands
after using.
BEFORE OPERATING THIS TOOL, CAREFULLY
READ AND UNDERSTAND ALL INSTRUCTIONS
IN THE “IMPORTANT SAFETY INSTRUCTIONS”
SECTION.
• Ne pas retirer, modifier ou rendre non fonc-
tionnel l’outil, la gâchette ou le déclencheur
par contact. Ne pas fixer la gâchette ou le
déclencheur par contact en position de marche
au moyen d’un ruban ou d’une corde, ni retirer le
ressort du déclencheur, afin d’éviter une
décharge accidentelle.
• Ne pas utiliser l’outil lorsque certains élé-
ments de l’outil (comme la gâchette ou le
déclencheur par contact). ne fonctionnent pas
ou fonctionnent incorrectement ou lorsqu’ils
sont débranchés ou qu’ils ont été modifiés de
quelque manière que ce soit. Lorsque certaines
pièces sont endommagées ou manquantes, ou
qu’elles comportent une fuite d’air, les remplacer
ou les faire réparer avant d’utiliser l’outil. (fig. H)
• Ne pas transformer ou modifier l’outil de
quelque façon que ce soit. (fig. I)
• Ne pas utiliser un crochet de courroie (acces-
soire) avec cet outil.
• Toujours prendre pour acquis que l’outil con-
tient des attaches.
• Ne jamais pointer l’outil en direction d’un col-
lègue de travail ou de soi-même. Aucune bous-
culade! Pensons sécurité! Respecter l’outil en
tant qu’élément essentiel de travail. (fig. J)
• Tenir les enfants, les visiteurs ou toute autre
personne à l’écart lorsqu’on utilise un outil
électrique; les distractions peuvent faire perdre
la maîtrise de ce dernier. Lorsqu’on n’utilise pas
l’outil, le ranger sous clé dans un endroit sécuri-
taire, hors de la portée des enfants.
• Ne pas transporter l’outil au moyen de la
gâchette afin d’éviter une décharge accidentelle.
• Toujours verrouiller la gâchette en position
d’arrêt lorsqu’on n’utilise pas l’outil afin
d’éviter une décharge accidentelle.
• Ne pas trop étendre les bras; les pieds doivent
rester ancrés fermement au sol afin de maintenir
son équilibre en tout temps. (fig. K)
• Faire preuve d’une grande prudence
lorsqu’on utilise l’outil dans un endroit
surélevé, tel un toit; s’assurer de toujours mon-
ter la pente d’une surface surélevée lorsqu’on
utilise l’outil, car on peut facilement glisser et per-
dre l’équilibre en la descendant.
• S’assurer que le boyau est libre de toute
obstruction et qu’il n’est pas emmêlé ou placé
de manière à ce que les personnes s’y prennent
les pieds et trébuchent.
• N’utiliser l’outil que pour les travaux pour
lesquels il a été conçu; ne pas décharger les
attaches à l’air libre ni dans des matériaux
durs, comme le béton, la pierre, le bois ou les
nœuds ou tout autre matériel trop difficile à
pénétrer. Les attaches éjectées peuvent suivre
une trajectoire inattendue et causer des
blessures. (fig. L)
• Toujours garder les doigts éloignés du
déclencheur par contact afin d’éviter une
décharge accidentelle et les risques de
blessure. (fig. M)
• Consulter les sections « Entretien » et
« Réparations » afin d’obtenir des renseigne-
ments détaillés sur l’entretien approprié de
l’outil.
• Toujours utiliser l’outil dans un endroit propre
et bien éclairé; s’assurer que la surface de tra-
vail est exempte de débris et prendre soin de ne
pas perdre l’équilibre lorsqu’on travaille dans un
endroit surélevé, tel un toit.
• Ne pas enfoncer les attaches près des bords
de la pièce; celle-ci pourrait se fractionner, ce qui
risque de faire ricocher l’attache et de blesser
quelqu’un, y compris l’utilisateur ou un collègue de
travail. S’assurer de ne pas enfoncer l’attache en
direction du fil du bois afin qu’il ne dépasse pas le
bord de la pièce. Enfoncer la pointe tranchante de
l’attache perpendiculaire au fil du bois afin de
réduire les risques de blessure. (fig. N)
• Garder les mains et le corps éloignés de
l’aire de travail immédiate; on doit les protéger
en retenant la pièce au moyen de brides de ser-
rage. S’assurer que celle-ci est bien fixée avant
d’y appuyer la cloueuse, car le déclencheur par
contact pourrait la déplacer accidentellement.
(fig. O)
• Ne pas utiliser l’outil à proximité de pous-
sières, de gaz ou de vapeurs inflammables;
l’outil, ou le contact entre deux clous, peut créer
des étincelles susceptibles d’enflammer les
vapeurs environnantes et de causer un incendie.
(fig. P)
• Garder le visage et le corps éloignés de la
section arrière du capuchon de l’outil
lorsqu’on travaille dans des zones d’accès
restreint, afin d’éviter que l’outil ne recule
soudainement et blesse l’opérateur, surtout
lorsqu’on enfonce des attaches dans des matéri-
aux durs ou épais. (fig. Q)
GÂCHETTE POUR UN FONCTIONNEMENT EN
MODE SACCADÉ
• Lorsqu’on utilise l’outil en mode saccadé, s’as-
surer de ne pas effectuer un double décharge-
ment lorsque l’outil recule soudainement et
d’enfoncer inutilement des attaches lorsque le
déclencheur par contact touche de nouveau
accidentellement la surface de travail. (fig. R)
POUR ÉVITER LES DOUBLES DÉCHARGE-
MENTS, ON DOIT :
• ne pas appuyer fortement l’outil contre la
surface de travail;
• attendre que l’outil soit revenu à sa position
initiale avant de l’actionner de nouveau;
• utiliser la gâchette pour le fonctionnement
en mode séquential.
• Toujours bien maîtriser l’outil lorsqu’on
l’actionne en mode saccadé; un outil mal
placé pourrait faire en sorte que les attaches
seraient mal orientées.
GÂCHETTE POUR UN FONCTIONNEMENT EN
MODE SÉQUENTIEL
• Lorsqu’on utilise l’outil en mode séquentiel,
on doit l’appuyer fermement contre la pièce
avant de l’actionner.
• Ne pas enfoncer les clous dans la tête d’une
autre attache afin de ne pas causer un recul
brusque, de coincer les clous ou de faire ricocher
les clous.
• Connaître l’épaisseur du matériau dans lequel
on enfonce les clous; un clou qui dépasse peut
causer des blessures.
• Savoir que quand on utilise l’outil à des pres-
sions élevées, les clous peuvent facilement
traverser les surfaces minces ou souples;
s’assurer de régler la pression du compresseur
de manière à ce que les clous ne traversent pas
le matériau. (fig. S)
• RÉGLAGE DE PROFONDEUR : Afin de
réduire les risques de blessure grave causée
par le démarrage accidentel de l’outil
• No quite, toque ni haga de otra forma que la
herramienta, el gatillo o el activador por con-
tacto dejen de funcionar. No pegue con cinta
adhesiva ni ate el gatillo en la posición de
encendido (ON). No quite el resorte del acti-
vador por contacto. Podría descargarse en
forma incontrolable.
• No opere una herramienta si alguna porción
de la herramienta, el gatillo o activador por
contacto no funciona, ha sido desconectado,
alterado o no funciona debidamente. Si exis-
ten filtraciones de aire, piezas dañadas o si faltan
piezas, estas deberían ser reparadas o repues-
tas antes de usarse. (Fig. H)
• No cambie o modifique la herramienta de
ninguna manera. (Fig. I)
• No porte esta herramienta colgada de un gan-
cho en su cinturón portaherramientas.
• Suponga siempre que la herramienta con-
tiene clavos.
• No apunte la herramienta a sus compañeros
de trabajo o a sí mismo en ningún momento.
¡No juegue con la herramienta! ¡Trabaje en forma
segura! Respete la herramienta como un instru-
mento de trabajo. (Fig. J)
• Mantenga alejados a visitas, niños y otras
personas circunstantes cuando opere una
máquina herramienta. Las distracciones
pueden hacer que pierda el control. Cuando la
herramienta no esté en uso, debería estar
guardada bajo llave, fuera del alcance de niños.
• No lleve la herramienta de un lado a otro con
el dedo en el gatillo. Podría resultar en una
descarga accidental.
• Siempre use el bloqueo en off de la herra-
mienta cuando esta no vaya a ser usada de
inmediato. El uso del bloqueo en off del gatillo
evitará causar descargas accidentales de la
herramienta.
• No se sobreextienda. Mantenga siempre el
equilibrio y los pies apoyados. (Fig. K)
• Use mucha cautela cuando opere la herra-
mienta en lugares elevados, como tejados.
Asegúrese de moverse hacia arriba por la pendi-
ente del área de trabajo elevado, cuando opere
la herramienta. Es fácil resbalarse o perder el
equilibrio cuando uno se desplaza hacia abajo
por una superficie en pendiente.
• Asegúrese que la manguera esté libre de
obstrucciones o lugares enganchados. Las
mangueras enredadas o atascadas pueden hac-
erle perder el equilibrio o tropezarse.
• Use la herramienta sólo para lo que fue dis-
eñada. No descargue grapas al aire, en con-
creto, piedra, maderas muy duras, nudos o
cualquier otro material que sea demasiado
duro para que la grapa lo penetre. Las grapas
descargadas podrían seguir trayectorias ines-
peradas y causar lesiones. (Fig. L)
• Mantenga siempre los dedos alejados del
activador por contacto para evitar lesiones
por la descarga inadvertida de clavos. (Fig. M)
• Refiérase a las secciones de mantenimiento y
reparación para información detallada acerca
del mantenimiento debido de la herramienta.
• Opere siempre la herramienta en un área
limpia e iluminada. Asegúrese de que la super-
ficie de trabajo esté limpia de todo desecho y
tenga cuidado de no perder el equilibrio cuando
trabaje en entornos elevados como tejados.
• No intente insertar grapas cerca del borde del
material. La pieza de trabajo podría quebrarse y
hacer que la grapa rebotase, lesionándolo a
usted o a un compañero. Observe también que
la grapa puede insertarse siguiendo la dirección
de la veta de la madera, haciendo que sobresal-
ga inesperadamente de un lado del material de
trabajo. Inserte la punta biselada de la grapa per-
pendicular a la veta para reducir el riesgo de
lesiones. (Fig. N)
• Mantenga las manos y partes del cuerpo ale-
jadas del área inmediata de trabajo. Sujete la
pieza de trabajo con abrazaderas cuando sea
necesario para mantener las manos y el cuerpo
fuera de peligro de daños potenciales.
Asegúrese que la pieza de trabajo esté debida-
mente sujeta antes de presionar la clavadora
contra el material. El activador por contacto
podría hacer que el material de trabajo se
moviera inesperadamente. (Fig. O)
• No use la herramienta en entornos que pre-
senten polvos o gases inflamables. La her-
ramienta podría producir una chispa que podría
inflamarlos y causar un incendio. Si inserta un
clavo encima de otro clavo, esto también podría
causar chispas. (Fig. P)
• Mantenga la cara y el cuerpo alejados de la
parte de atrás de la tapa de la herramienta
cuando trabaje en áreas restringidas. Si retro-
cede repentinamente, podría impactar al cuerpo,
especialmente cuando clave en materiales duros
o densos. (Fig. Q)
GATILLO DE TOPE
• Cuando use el gatillo de tope, tenga cuida-
do de no disparar dos veces en forma acci-
dental si la herramienta retrocede. Puede
que clavos no deseados se inserten si se per-
mite que el activador por contacto vuelva a
hacer contacto con la superficie de trabajo en
forma accidental. (Fig. R)
PARA EVITAR DISPAROS DOBLES:
• No use demasiada fuerza cuando pre-
sione la herramienta contra la superficie
de trabajo.
• Permita que la herramienta retroceda com-
pletamente luego de cada activación.
• Utilice el gatillo de acción secuencial.
• Cuando active por tope la clavadora para
techado en rollo, mantenga siempre el con-
trol sobre la herramienta. La colocación no
debida de la herramienta podría causar la
descarga de un clavo en una dirección no
deseada.
GATILLO DE ACCIÓN SECUENCIAL
• Cuando utilice el gatillo de acción secuen-
cial, no active la herramienta a no ser que
ésta sea colocada firmemente contra la
pieza de trabajo.
• No inserte clavos sobre las cabezas de otros
clavos. Podría resultar en un retroceso fuerte,
clavos trabados o clavos rebotados.
• Tenga conciencia del grosor del material
cuando use la clavadora para techado en
rollo. Un clavo sobresaliente podría causar
lesiones.
• Esté consciente que cuando una herramienta
es utilizada a presiones que se encuentran en
el extremo alto de su rango de operación, los
clavos pueden atravesar completamente un
material de trabajo delgado o muy blando.
Asegúrese que la presión del compresor esté
FIG. I
FIG. J
FIG. K
FIG. L
FIG. M
FIG. N
FIG. O
FIG. P
FIG. Q
FIG. R
FIG. S
FIG. T
614989-00, D51321 3/19/04 5:45 PM Page 2
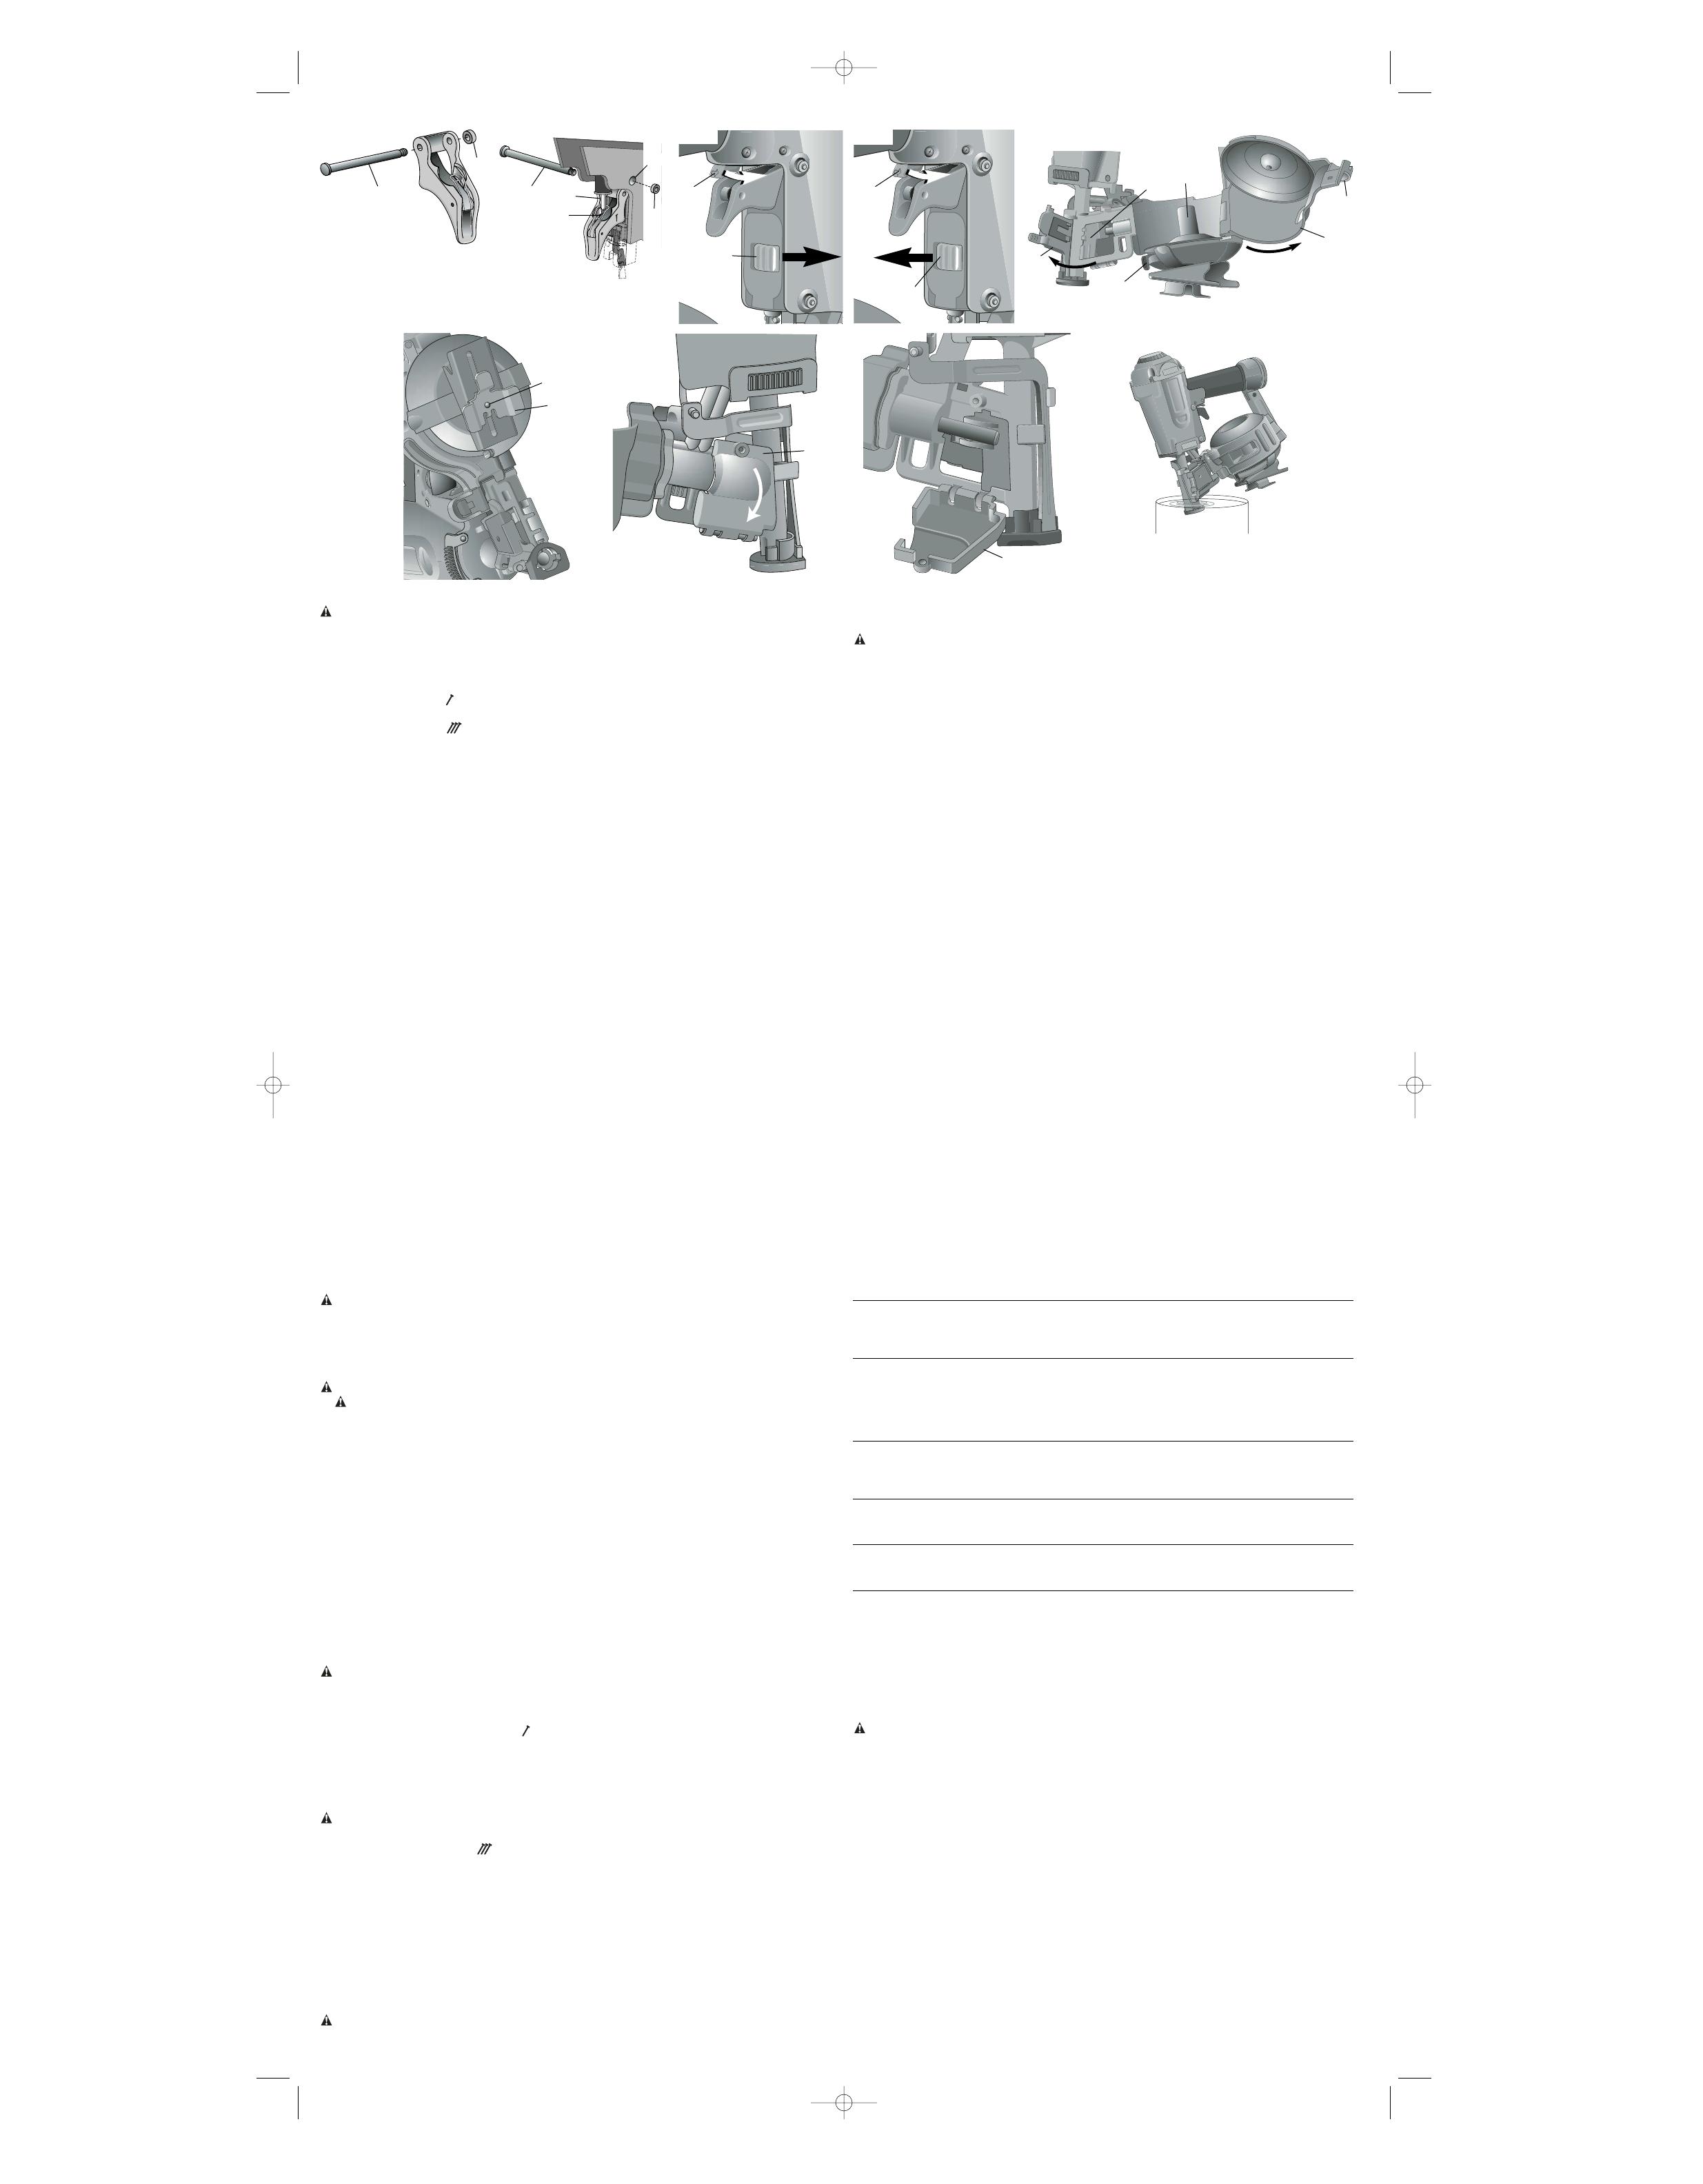
Adjusting Depth (Figures 3, 4)
The depth that the fastener is driven can be adjusted using the depth adjustment next to the
trigger of the tool.
WARNING: To reduce risk of serious injury from accidental actuation when attempt-
ing to adjust depth, ALWAYS:
• Lock OFF trigger.
• Disconnect air supply.
• Avoid contact with trigger during adjustments.
1. To drive the nail shallower, rotate the depth setting wheel (K) to the right (Fig. 3).
2. To drive a nail deeper, rotate the depth setting wheel (K) to the left (Fig. 4).
Shingle Gauge Adjustment (Fig. 6)
1. Lock off trigger.
2. Disconnect air supply.
3. Loosen the screw (L) with the Allen key provided. Move the gauge (M) up or down to attain
desired position.
4. Tighten the screw.
Clearing a Jammed Nail (Fig. 5)
If a nail becomes jammed in the nosepiece, keep the tool pointed away from you and follow
these instructions to clear:
1. Lock OFF trigger.
2. Disconnect the air supply from the tool.
3. Open the canister door (G).
4. Open the nail guide door (H).
5. Remove the jammed nail.
6. Correct any deformation that may have occurred to the nail coil.
NOTE: Should nails continue to jam frequently in nosepiece, have tool serviced by an
authorized D
EWALT service center.
Cold Weather Operation
When operating tools at temperatures below freezing:
1. Make sure compressor tanks have been properly drained prior to use.
2. Keep tool as warm as possible prior to use.
3. Make certain all fasteners have been removed from canister.
4. Put 5 to 10 drops of D
EWALT Pneumatic Tool Oil in the air inlet.
5. Lower air pressure to 80 psi or less.
6. Reconnect air and and load nails into canister.
7. Actuate the tool 5 or 6 times into scrap lumber to lubricate O-rings.
8. Turn pressure up to operating level (not to exceed 120 psi) and use tool as normal.
9. Re-lubricate at least once daily.
10. Always drain the compressor tanks at least once a day.
Hot Weather Operation
Tool should operate normally. However, keep tool out of direct sunlight as excessive heat can
deteriorate bumpers, O-rings and other rubber parts resulting in increased maintenance.
MAINTENANCE (Figures 7, 8, 9)
Daily Maintenance Chart
ACTION Lubricate tool with 5-7 drops of DEWALT Pneumatic Tool Oil.
WHY Prevents failure of O-rings.
HOW Insert drops into air fitting on end cap of tool.
ACTION Drain compressor tanks and hoses daily.
WHY Prevents accumulation of moisture in compressor and nailer.
HOW Open petcocks or other drain valves on compressor tanks. Allow any accumulated water
to drain from hoses.
ACTION Clean contact trip.
WHY Permits smooth operation of contact trip.
HOW Dip the front end of the tool into solvent allowing the dust and dirt to dissolve (Fig. 9). Dry
off nailer before use. NOTE: Only use kerosene, #2 fuel oil, or diesel fuel as a solvent.
NEVER use gasoline, this will damage the O-rings. DO NOT dip the tool beyond the feed
piston.
ACTION Clean canister.
WHY Permits smooth operation of tool and allows nails to consistently move into the feeder sec-
tion of the tool.
HOW Blow clean with compressor air.
ACTION Clean feed piston area.
WHY Permits smooth operation of feed pawl.
HOW Open feed piston cover (N) as shown in Figures 7 and 8. Blow clean with compressor air.
ACTION Before each use, check to insure all screws, nuts and fasteners are tight and undamaged.
WHY Prevents jams, leaks and premature failure of tool parts.
HOW Tighten loose screws or other fasteners using the appropriate allen wrench or screwdriver.
Repairs
To assure product SAFETY and RELIABILITY, repairs, maintenance and adjustment should
be performed by authorized service centers or other qualified service personnel, always using
identical replacement parts. Refer to the Troubleshooting Guide at the end of this section.
Accessories
Recommended accessories for use with your tool are available for purchase from your local
dealer or authorized service center. If you need assistance in locating any accessory for your
tool, contact: D
EWALT Industrial Tool Co., 701 East Joppa Road, Baltimore, MD 21286 (1-800-
4-DEWALT).
WARNING: Only use accessories recommended by D
E
WALT. The use of any other acces-
sory not recommended for use with this tool could be hazardous.
Three Year Limited Warranty
DEWALT will repair, without charge, any defects due to faulty materials or workmanship for
three years from the date of purchase. This warranty does not cover part failure due to normal
wear or tool abuse. For further detail of warranty coverage and warranty repair information,
visit www.dewalt.com or call 1-800-4-D
EWALT (1-800-433-9258). This warranty does not apply
to accessories or damage caused where repairs have been made or attempted by others. This
warranty gives you specific legal rights and you may have other rights which vary in certain
states or provinces.
In addition to the warranty, D
EWALT tools are covered by our:
1 YEAR FREE SERVICE
D
EWALT will maintain the tool and replace worn parts caused by normal use, for free, any time
during the first year after purchase. Nailer wear items, such as O-rings and driver blades, are
not covered.
90 DAY MONEY BACK GUARANTEE
If you are not completely satisfied with the performance of your D
EWALT Power Tool, Laser,
or Nailer for any reason, you can return it within 90 days from the date of purchase with a
receipt for a full refund – no questions asked.
FREE WARNING LABEL REPLACEMENT: If your warning labels (Fig. 10) become illegible
or are missing, call 1-800-4-D
EWALT for a free replacement.
ASSEMBLY
CAUTION: Lock off trigger, disconnect air line from tool and remove fasteners from canis-
ter before making adjustments.
Trigger
In accordance with the ANSI Standard SNT-101-2002, the DEWALT Nailers are assembled with
a bump action trigger. However, a sequential action trigger kit is included and attached to the
tool. For a replacement trigger contact your authorized service center or call 1-800-4-D
EWALT.
The gray trigger with imprinted on the side, (Cat.# D510022 kit) is the single sequential
action trigger and causes the tool to operate in this mode.
The black trigger with imprinted on the side, (Cat.# D510020 kit) is the bump action trig-
ger and permits the tool to be actuated in this manner.
For defining the use of the sequential action trigger and bump action trigger, see the
Actuating Tool section of this manual.
TRIGGER REMOVAL (FIG. 1)
1. Lock off trigger.
2. Remove air from the tool.
3. Remove rubber grommet (A) from end of dowel pin (B).
4. Remove dowel pin.
5. Remove trigger assembly from trigger cavity under the handle of the tool housing.
TRIGGER INSTALLATION (FIG. 2)
1. Select either the sequential or bump trigger to be installed on the tool. Both triggers are
included in the tool packaging.
2. Insert the trigger subassembly into trigger cavity.
3. Ensure that trigger spring (C) is placed around the trigger valve stem (D).
4. Align the holes of the trigger with the housing holes (E), then insert the dowel pin (B)
through the entire assembly as shown.
5. Push the rubber grommet (A) onto the end of the dowel pin as shown.
OPERATION
Preparing the Tool
1.
Read Safety Instruction section of this manual.
2. LUBRICATE TOOL
a. Use D
EWALT Pneumatic Tool Oil or a non-detergent S.A.E. 20 weight oil. DO NOT use
detergent oil or additives as they will damage O-rings and rubber parts.
b. Use a Filter and Regulator when possible.
c. Add 5 to 7 drops of oil in the air fitting a least twice a day.
3. Wear eye and ear protection.
4. Ensure canister is empty of all fasteners.
5. Check for smooth and proper operation of contact trip. Do not use tool if assembly is not
functioning properly. NEVER tamper with the contact trip. NEVER use a tool that has the
contact trip restrained in the actuated position.
6. CHECK AIR SUPPLY: Ensure air pressure does not exceed recommended operating
limits; 70 to 120 psi, (4.9 to 8.3 bar, 5 to 8.5 kg/cm
2
).
7. Keep tool pointed away from yourself and others.
8. Lock off trigger.
9. Connect air hose.
10. Check for audible leaks around valves and gaskets. Never use a tool that leaks or has
damaged parts.
Using the Lock-off (Figures 3, 4)
WARNING: Always wear eye and ear protection when operating tool.
Each DEWALT nailer is equipped with a trigger lock-off switch (P) which when rotated to the
right, prevents the tool from actuating. When the switch is centered, the tool will be fully oper-
ational. The trigger should always be locked off whenever any adjustments are made or when
tool is not in use.
Loading the Tool (Fig. 5)
CAUTION: Keep tool pointed in a safe direction when loading nails.
CAUTION: Never load nails with the contact trip or trigger activated.
1. Lock OFF trigger.
2. Disconnect the air supply from the tool.
3. Pull the canister latch (R) to open the canister door (G).
4. Place your finger under the nail guide door (H) and pull to open the door.
5. Rotate the nail platform adjustment lever (F) to properly accommodate the nail length being
used. There are three different positions. The lowest position is used for 1-1/2" to 1-3/4"
(38 - 45 mm) nails, the center position is used for 1" to 1-1/2" (25 - 38 mm) nails and the
highest position is used for 3/4" to 7/8" (19 - 25 mm) nails.
6. Place the nail coil on spindle (I) in canister.
7. Uncoil enough nails (approximately 3") to reach the nose of the tool.
8. Insert the first nail into the nose and the second nail between the two rails of the feed
pawl (J).
NOTE: Be careful not to deform the coil of nails during the loading process. Otherwise, the
nail guide door will not close and the nails might not feed consistently.
9. Close the nail guide door (H) completely.
10. Close the canister door (G) completely by engaging the canister latch (R) with your fingers
and locking the canister closed.
Actuating Tool
WARNING: Always wear eye and ear protection when operating tool.
The tool can be actuated using one of two modes: single sequential action trigger mode and
bump action trigger mode. The trigger installed on the tool as described in the Trigger section
of this manual determines the mode of operation.
SEQUENTIAL ACTION TRIGGER - (GRAY)
The sequential action trigger’s intended use is for intermittent nailing where very careful and
accurate placement is desired.
To operate the nailer in sequential action mode:
1. Depress the contact trip firmly against the work surface.
2. Depress the trigger.
CAUTION: A nail will fire each time the trigger is depressed as long as the contact trip
remains depressed.
BUMP ACTION TRIGGER - (BLACK)
The bump action trigger’s intended use is for rapid nailing on flat, stationary surfaces.
Using the bump action trigger, two methods are available: place actuation and bump
actuation.
To operate the tool using the PLACE ACTUATION method:
1. Depress the contact trip against the work surface.
2. Depress the trigger.
To operate the tool using the BUMP ACTUATION method:
1. Depress the trigger.
2. Push the contact trip against the work surface. As long as the trigger is depressed, the tool
will fire a nail every time the contact trip is depressed. This allows the user to drive multi-
ple nails in sequence.
CAUTION: Do not keep trigger depressed when tool is not in use. Keep the lock-off switch
rotated to the right (OFF) when the tool is not in use.
P
P
FIG. 9
FIG. 3
FIG. 4
FIG. 6
FIG. 8
FIG. 5
A
B
E
D
B
C
A
FIG. 1
FIG. 2
FIG. 7
N
N
K
K
L
M
G
F
H
I
J
R
614989-00, D51321 3/19/04 5:45 PM Page 3

Compressor will be sufficient for tools at all production rates.
Le compresseur peut actionner tout outil, quel que soit le taux de production.
El compresor será suficiente para las herramientas a todo índice de producción.
Compressor will be sufficient at slow or moderate production rates, but may have difficulty at very rapid rates.
Le compresseur peut actionner des outils à des taux de production faibles ou modérés, mais peut avoir de la difficulté à
des taux très élevés.
El compresor será suficiente a índices de producción lentos o moderados pero tendrá dificultad con índices demasiado rápidos.
Compressor will be adequate only when tools are utilized at slow production rates. (punch-out or occasional use)
Le compresseur ne sera vraiment efficace que lorsque les outils sont utilisés à de faibles taux de production (p. ex., lors de
travaux rapides ou occasionnels).
El compresor será adecuado sólo cuando las herramientas sean utilizadas a índices de producción lentos (perforación o uso
ocasional).
Not Recommended
Taux non recommandés
No se recomienda
Troubleshooting Guide
MANY COMMON PROBLEMS CAN BE SOLVED EASILY BY UTILIZING THE CHART BELOW. FOR MORE SERIOUS OR PERSISTENT PROBLEMS,
CONTACT A D
EWALT SERVICE CENTER OR CALL 1-(800)-4-DEWALT.
DISCONNECT AIR FROM TOOL BEFORE ALL REPAIRS
Trigger valve housing leaks O-ring or valve stem failure Replace valve using: Trigger Valve Kit: Cat. # D510005
Top cap leaks air Loose cap screws Tighten cap screws using appropriate Allen wrench
Damaged or worn gasket or O-ring Replace gasket/O-rings using: O-ring Repair Kit, Cat. # D513211
Exhaust leaks Main seal or O-ring damaged, debris in tool. Replace gasket/O-rings using: O-ring Repair Kit, Cat. # D513211
Air leaks around nose when Damaged or worn O-rings Replace gasket/O-rings using: O-ring Repair Kit, Cat. # D513211
tool is at rest. (Driver blade in up position)
Air leaks around nose when tool is in
actuated position. (Driver blade in Damaged or worn bumper Replace bumper using: Bumper Kit, Cat. # D513213
down position)
Tool does not cycle in cold weather Tool not receiving air Check air supply
Valve may be frozen Warm up tool
Damaged or worn O-rings Replace gasket/O-rings using: O-ring Repair Kit, Cat. # D513211
Broken or damaged driver blade Replace Driver Blade Kit: Cat. # D513212
Lack of power; sluggish Low air pressure Check air supply
Lack of lubrication Lubricate tool using approved pneumatic tool oil.
Damaged or worn O-rings Replace gasket/O-rings using: O-ring Repair Kit, Cat # D513211
Exhaust port blocked or clogged Disconnect air, remove exhaust plate from top of tool, clean port
Skipping nails; intermittent feed Air restricted Check air supply and couplers
Lack of lubrication Lubricate tool using approved pneumatic tool oil
Nose piece screws loose Tighten nosepiece screws using appropriate allen wrench
Wrong size/angle fasteners Use only recommended fasteners
Dirty canister Clean canister track and nosepiece
Worn canister Replace canister
Broken or damaged driver blade Replace Driver Blade Kit; Cat. # D513212
Trigger valve O-ring worn or damaged Replace valve using: Trigger Valve Kit; Cat. # D510005
Worn piston O-ring Replace Piston O-Ring using: O-Ring Repair Kit, Cat.# D513211
Worn or damaged check pawl and/or feed pawl Replace check pawl and/or feed pawl
Canister loose Check that canister latch is holding firmly
Nail platform at incorrect setting Set nail platform to proper nail setting
Feed piston O-ring worn or damaged Replace feed piston O-ring using: O-Ring Repair Kit, Cat. # D513211
Fasteners jam in tool Driver channel in nose piece worn Replace nosepiece
Wrong size/ angle fasteners Use only recommended fasteners
Canister loose Check that canister screws are holding firmly
Worn driver blade Replace Driver Blade Kit; Cat # D513212
Nose piece screws loose Tighten nosepiece screws using appropriate Allen wrench
Nails not feeding properly Ensure nails are feeding properly into nose.
NAIL SPECIFICATIONS
D51321 COIL ROOFING NAILER
CARACTÉRISTIQUES DES CLOUS
D51321 CLOUEUSE À BOBINE POUR TOITURES
ESPECIFICACIONES DE LOS CLAVOS
D51321 CLAVADORA PARA TECHADO EN ROLLO
Nail Lengths .75'' - 1.75''
Longueur 20 – 40 mm (0,75 – 1,75 po.)
Largo de clavos 20 – 40 mm (0,75 – 1,75 pulg.)
Shank Diameters .120
Diamètre de tige 3 mm (0,120 po.)
Diámetro del vástago 3 mm (0,120 pulg.)
Nail Coil Angle 15˚
Angle de la bobine 15°
Ángulo del rollo de clavos 15˚
TOOL SPECIFICATIONS
D51321 COIL ROOFING NAILER
CARACTÉRISTIQUES DE L’OUTIL
D51321 CLOUEUSE À BOBINE POUR TOITURES
ESPECIFICACIONES DE LA HERRAMIENTA
D51321 CLAVADORA PARA TECHADO EN ROLLO
Height / Hauteur / Altura 11.4'' (289,6 mm)
Width / Largeur / Ancho 4.6" (118,1 mm)
Length / Longueur / Largo 10.6'' (269,7 mm)
Weight / Poids / Peso 4.90 lbs. (2,22 kg)
Recommended Operating Pressure 70 - 120 psig (4.9 - 8.3 bar, 5 to 8.5 kg/cm
2
)
Pression d’utilisation recommandée de 5 à 8,5 kg/cm
2
(70 à 120 lb/po
2
ou 4,9 à 8,3 bar)
Presión de operación recomendada 70 - 120 psi (4,9 – 8,3 bar, 5 a 8,5 kg/cm
2
)
Air Consumption per 100 cycles 4.15 scfm @ 100 psi
Consommation d’air par 100 cycles 4,15 scfm à 100 psi (0,12 scmm a 6,9 bar)
Consumo de aire por cada 100 ciclos 4,15 scfm a 100 psi (0,12 scmm a 6,9 bar)
Loading capacity Up to 120 nails
Capacité de charge Jusqu’à 120 clous
Capacidad de carga Hasta 120 clavos
5.5 HP Gas
2 HP Elec.
8 - 9 CFM
Portable
Handcarry
3.2 - 4 CFM
8 HP Gas
14 - 16
CFM
Industrial
23+ CFM
Petit
outil
portatif
5,4 – 6,8 CMM
(3,2 – 4 CFM)
Outil à gaz
(5,5 hp)
Outil élec-
trique
(2 hp)
13,6 – 15,3
CMM
(8 - 9 CFM)
Outil à gaz
(8 hp)
23,8 – 27,2
CMM
(14 – 16
CFM)
Outil indus-
triel
39,1+ CMM
(23+ CFM)
Portátil
5,4 – 6,8 CMM
(3,2 – 4 CFM)
5,5 HP Gas
2 HP Elec.
13,6 – 15,3
CMM
(8 - 9 CFM)
8 HP Gas
23,8 – 27,2
CMM
(14 – 16
CFM)
Industrial
39,1+ CMM
(23+ CFM)
NUMBER OF TOOLS CONNECTED TO COMPRESSOR
NOMBRE D’OUTILS RACCORDÉS AU COMPRESSEUR
NÚMERO DE HERRAMIENTAS CONECTADAS AL COMPRESOR
1
2
3
4
5
6
7
8+
Fig. 10
614989-00, D51321 3/19/04 5:45 PM Page 6
/