Page is loading ...

Installation and Operating Instructions
Coldwatcher
MPH 500 / 1000
IMPORTANT: THESE INSTRUCTIONS SHOULD BE READ CAREFULLY AND RETAINED FOR FUTURE REFERENCE.
Check that the supply voltage details on your heater are in accordance with your electricity supply. The heater is fitted with a rewireable plug
incorporating a 13 amp fuse. In the event of replacing the fuse in the plug supplied, a 13 amp fuse approved by ASTA to BS 1362 must be used.
IMPORTANT
If the plug is not suitable for your socket, the 13 amp plug should be removed. Before wiring the appropriate plug please note the following code.
GREEN AND YELLOW : EARTH
BLUE : NEUTRAL WARNING: THIS APPLIANCE MUST BE EARTHED.
BROWN : LIVE
As the colours of the wires in the mains lead may not correspond with the coloured marking identifying the terminals in your plug, proceed as
follows:
Connect the GREEN AND YELLOW wire to the plug terminal marked E. or the earth symbol or coloured GREEN or GREEN and YELLOW.
Conned the BLUE wire to the plug terminal marked N or coloured BLACK. Conned the BROWN wire to the plug terminal marked L or coloured
RED. If a 3 pin 15 amp plug is used this should be protected by a 15 amp fuse either in the plug or adaptor or at the distribution board. IF IN
DOUBT CONSULT A COMPETENT ELECTRICIAN. Your heater is now ready for use and may be plugged into a wall socket.
If the supply cord is damaged, it must be replaced by a special cord or assembly available from the manufacturer or its service agent.
General
The Dimplex Coldwatcher multi-purpose heater
model MPH500 has an output of 500 watts, and
Model MPH1000 has an output of 1000 watts. Both
are controlled by a variable thermostat with a minimum
setting suitable for frost protection. They
are specially designed for situations where
localized heating is needed, or where a small heater
is only necessary for general heating or frost
protection.
The coldwatchers are versatile and robust units
ideal for greenhouses, lofts, garages, utility rooms,
sheds. chalets. spare rooms, conservatories, airing
cupboards, outside WCs, kiosks, yachts, checkouts,
etc.
THIS APPLIANCE MUST NOT BE USED IN A
BATHROOM.
Suitable for fixed mounting on the wall or floor, they
can also be used free-standing in a vertical or
horizontal position. For maximum heating
effectiveness the heater should be positioned as
low as possible within the area to be heated.
Note: If the heater is to be used unattended for long
periods (e.g. in lofts) it should be permanently mounted
in accordance with the fixing instructions given below.
IMPORTANT - DO NOT COVER THE HEATER
Do not place material or objects on the heater or
obstruct the air circulation around the heater as this
could create a fire risk.
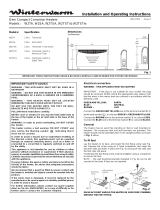
HEATER DIMENSIONS AND
MINIMUM OPERATING
DISTANCES (see diagrams opposite)
1. Horizontal mounting, fixed or portable:
Minimum horizontal distances from sides and end of
heater to obstruction. Minimum vertical distance from
top of heater to shelf or overhanging obstructions.
2. Wall mounting: Minimum vertical distance from top of
heater to shelf or overhanging obstruction. Minimum
horizontal distance from front of heater to obstruction.
3. Vertical mounting; portable operation:
Minimum vertical distance from top of heater
to shelf or obstruction. Minimum horizontal
distance from front of heater to obstruction.
4. Wall mounting or portable: Minimum horizontal
distance to side wall or obstruction.
Note 1 - For maximum heating effectiveness the heater
should be positioned at low level. Note 2 – We
recommend that the heater is not fitted into an
unventilated enclosure which is less than 10 cubic feet.
IMPORTANT
if wall mounted the heater should be mounted only in the
upright position with the control panel at the bottom.
225mm
330mm
Issue. 2 29/1/96 T8839/801/C

Free Standing/Portable Use
The heater may be used free standing in either the
upright or lay-flat position as shown The heater
incorporates a permanently fixed wall mounting bracket
for use when the heater is installed as a fixed appliance,
and which acts as a stand when in either position.
Reference should be made to the section “Heater
Dimensions and Minimum Operating Distances” before
use
WARNING - IF THE HEATER IS FREE
STANDING IT MUST NOT BE USED IN THE
IMMEDIATE SURROUNDINGS OF A BATH. A
SHOWER OR A SWIMMING POOL
FIXING THE HEATER
The heater may be fixed to the wall or floor using
the fixing holes provided in the mounting frame. Please
refer to the Section “Heater Dimensions and Minimum
Operating Distances” before fixing the heater in position
Fixing to the Wall
WARNING - The heater must NOT be located
immediately below a fixed socket outlet
The heater must be fixed only in the upright position
with the control panel at the bottom. The position of the
two upper fixing points should first be marked on the
wall, at a horizontal distance of 100mm apart, Diagram
A. Place the heater in position with the upper wall
bracket notches against these fixing points to check that
the heater complies with the “minimum operating
distances”. These two fixing points should then be
drilled and plugged. Suitable round headed size 8
screws should be fixed in these positions to such a
depth that the heater may be hung in position while the
positions of the lower fixing holes are marked, Diagram
B. The heater should then be removed while the lower
fixing holes are drilled and plugged. Then the heater
should be hung in position on the upper two screws
while the lower two screws are tightened to hold the
heater firmly on the wall. The tightness of the upper
screws should be adjusted if necessary to ensure a firm
fit.
Fixing to the Floor
The heater may be fixed to the floor in the lay-flat
position. Before fixing the heater in position place it in
the desired position and check that it complies with the
requirements described in the section “Heater
Dimensions and Minimum Operating Distances”.
For guidance on fixing the heater see the section on
‘Fixing to the Wall”. The principles involved are the
same.

USING THE CONTROLS
Neon Indicator
When your heater is plugged in and switched on at the
mains, the neon indicator will glow showing that the
heater is available for use, although the heating element
may not be energized, depending on the setting on the
thermostat knob:
Thermostat
The thermostat knob is calibrated with a scale marked *
and 1-5. The lowest setting * represents a temperature
of approximately 5
0
C and is suitable for frost protect on
use. (See section headed “Using the Heater for Frost
Protection”).
The other settings represent a range of temperatures
dependent on a number of factors including the size of
the area to be heated and the outside temperature
Actual settings should be found by experience for each
set of conditions. The heater will
not emit heat if the
temperature of the air surrounding the heater is above
that set on the control knob, although the mains neon
indicator will glow showing that the heater is available
for use. The heating element will energize if the
thermostat knob setting is increased, as indicated by an
audible “click” when the thermostat knob is turned.
Thermal Overload Cut-Out
In case the heater should, for any reason, overheat (for
example, if it is inadvertently covered) a resettable
thermal overload cut-out is incorporated for safety
reasons.
If the heater should overheat the Cut-Out will operate,
isolating the heating elements from the electricity
supply.
Re-setting the Cut-Out
If the cut-out operates for any reason first
disconnect the heater from the electricity supply by
removing the plug from the socket. Examine the
heater to find the cause of the overheating and
rectify if possible. If in doubt as to the cause you
should consult a competent person with experience
of repairing domestic electrical appliances and in
full knowledge of the possible hazards involved.
Once the cause of the overheating has been
rectified the cut-out may be re-set by plugging the
appliance back into the mains supply. The heater
will automatically resume normal operation.
Using the Heater for Frost
Protection
The Heater may be used to protect water-tanks, pipes
and other frost-sensitive areas by setting the thermostat
to the Frost position.
When the thermostat is set at this
position the heater elements will emit heat only when
the temperature in the vicinity of the heater falls to
below approximately 5
0
C.
The heater will continue to emit heat until the
surrounding air again reaches approximately 5
0
C and
will then switch off until the temperature falls again. In
this way, frost protection will be provided in the area
surrounding the heater.
The Heater will also guard against frost in a confined
space such as a small greenhouse (see section
covering greenhouses, etc) or unheated WC, provided
the volume of the space in which it is installed is
appropriate to its heat output.
Using the Heater in a
Greenhouse
Thermostat Knob Mains Neon Indicator

THE ELECTRICITY SUPPLY TO A
GREENHOUSE SHOULD BE INSTALLED BY A
COMPETENT ELECTRICIAN IN ACCORDANCE
WITH THE lEE WIRING REGULATIONS. IT IS
RECOMMENDED THAT RESIDUAL CURRENT
CIRCUIT BREAKER (RCCB) PROTECTION IS
USED.
Using the heater in an
Airing Cupboard
The heater is suitable for use in an airing cupboard
where there is no other heat source, or where the
hot water cylinder is so well insulated that insufficient
heat is available for airing clothes.
The airing cupboard should be ventilated by means of
vents for example in the upper and lower parts of the
door. This will allow circulation and removal of moisture
laden air.
The heater should be positioned in the lower part of the
airing cupboard.
IT IS IMPORTANT THAT PRECAUTIONS ARE
TAKEN TO PREVENT CLOTHES FROM FALLING
ON TO THE HEATER CAUSING IT TO OVERHEAT.
This could take the form of a wire mesh positioned
across the lower part of the airing cupboard not
less than 300mm above the heater. (Also refer to “Heater
Dimensions and Minimum Operating Distances”).
The product complies with the European Safety Standards EN60335-2-30 and the European EN5501 4, N60555-2 and EN60555-3 for
Electromagnetic Compatibility. This standards cover the requirements of EEC Directives 73/23 and 89/336.
Glen Dimplex UK Limited UK customer help line (8.00AM – 6.00PM Mon-Fri; 8.30AM-1.00PM Sat)
Millbrook House
Grange Drive Customer Services: Tel. 0870 7270101
Hedge End Fax. 0870 7270102
Southampton
Hampshire Republic of Ireland 01. 8424833
SO30 2DF
The heat output of the MPH500 is similar to that of a small
single burner greenhouse paraffin stove and the MPH1000
has an output similar to that of a small double burner paraffin
stove. However, both have the advantage that they may be
switched on overnight as a precaution against frost with the
knowledge that they will not consume current on
the frost setting unless the temperature in the vicinity of the
heater falls below approximately 5°C. If only one heater is
being used in a full size greenhouse, it will be necessary to
partition off that which requires frost protection, using for
example heavy duty polythene sheeting, which can also be
used to line the glazing of the greenhouse to reduce
heat losses and therefore power consumption.
As a guide to the effectiveness of a single MPH500
Coldwatcher in a greenhouse, it will raise the temperature of
the shaded section of the greenhouse by approximately 8 – 9
°C. The MPH1000, however, would raise the average
temperature of the whole greenhouse shown by
Approximately the same level. For example, if the outside
temperature is -2ºC the MPH500 should be able to keep the
temperature at 6-7ºC within the partitioned off section. If
higher temperatures are required then the volume partitioned
off should be made smaller. In this respect the only accurate
method is to set the thermostat to the position which keeps
the temperature at the desired level by using a
maximum/minimum thermometer, positioned in the most
critical part of the area to be heated. Although the heater is
designed to be splash-proof it is recommended that it be
removed during periods when spraying is being carried out in
the
g
reenhouse.
Clothing, bed linen or similar items must not be
stored in this space if there is any possibility of their
falling on to or against the heater or coming within
150 mm of the front or sides of the heater. A clear
space of 300 mm must similarly be left above the
heater.
If this space is to be used for storing such items, a
further mesh should be fixed not less than 150mm
from the front of the heater.
After Sales Service
Your product is guaranteed for one year from the date of purchase. We undertake to exchange or repair free of charge within this period, any
part found to be defective due to a manufacturing fault. This guarantee in no way prejudices your rights under common law.
Should you require after sales service, please contact the supplier through whom you purchased the appliance or your nearest Dimplex
Service Agent.
Please do not initially return a faulty appliance or part of an appliance to us as this may result in transit damage and/or delay in providing
service. Let us know your difficulty quoting the details shown on the rating label, and we will then take the appropriate action.
/