
www.metabo.com Made in Germany
de
en
fr
nl
it
es
pt
sv
fi
no
da
pl
el
hu
ru
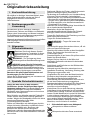
Originalbetriebsanleitung 4
Original instructions 8
Notice originale 12
Originele gebruiksaanwijzing 16
Istruzioni per l'uso originali 20
Manual original 24
Manual original 28
Originalbruksanvisning 32
Alkuperäinen käyttöopas 35
Original bruksanvisning 39
Original brugsanvisning 42
Instrukcja oryginalna 45
Πρωτότυπο οδηγιών χρήσης 49
Eredeti használati utasítás 53
Оригинальное руководство по
эксплуатации 57
RB 18 LTX 60
Page is loading ...

3
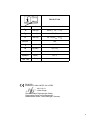
RB 18 LTX 60
U V18
B
B
mm (in)
20-30 (
25
/
32
- 1
3
/
16
)
B
L
mm (in) 533 (21)
D
mm (in)
20 - 60 (
25
/
32
- 2
3
/
8
)
U
a, max
°190
v
0
m/s (in/min) 9,2 (21700)
m kg (lbs) 3,3 (7.3)
a
h
/K
h
m/s
2
< 2,5 / 1,5
L
pA
/K
pA
dB(A) 83 / 3
L
WA
/K
WA
dB(A) 94 / 3
13.
EN 60745
2006/42/EG, 2004/108/EG, 2011/65/EU
Director Product Engineering & Quality
Responsible Person for Documentation
Metabowerke GmbH, 72622 Nürtingen, Germany
2011-12-14
Volker Siegle
Page is loading ...
Page is loading ...
Page is loading ...
Page is loading ...

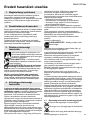
ENGLISHen
8
Original instructions
We, being solely responsible, hereby declare that
these wraparound tube sanders conform to the
standards and directives specified on page 3.
The machine is designed for glazing, tarnishing,
texturing, polishing and smoothing steel pipes
without the use of water.
The user bears sole responsibility for any damage
caused by improper use.
Generally accepted accident prevention regula-
tions and the enclosed safety information must be
observed.
For your own protection and for the
protection of your electrical tool, pay
attention to all parts of the text that are
marked with this symbol!
WARNING – Reading the operating instruc-
tions will reduce the risk of injury.
WARNING Read all safety warnings and
instructions. Failure to follow all safety warn-
ings and instructions may result in electric shock,
fire and/or serious injury.
Keep all safety instructions and information for
future reference.
Pass on your electrical tool only together with these
documents.
Hold the power tool by the insulated gripping
surfaces because the abrasive belt may
contact its own cord. Damage to a "live" wire may
energise metal parts of the power tool and cause an
electric shock.
Flying sparks are created when sanding metal.
Ensure that no persons are in danger. Due to the
risk of fire, all combustible materials must be
removed from the work area (area affected by flying
sparks).
Dust from material such as paint containing lead,
some wood species, minerals and metal may be
harmful. Contact with or inhalation of the dust may
cause allergic reactions and/or respiratory diseases
to the operator or bystanders.
Certain kinds of dust are classified as carcinogenic
such as oak and beech dust especially in
conjunction with additives for wood conditioning
(chromate, wood preservative). Material containing
asbestos must only be treated by specialists.
- Where the use of a dust extraction device is
possible it shall be used.
- The work place must be well ventilated.
- The use of a dust mask of filter class P2 is recom-
mended.
Follow national requirements for the materials you
want to work with.
Materials that generate dusts or vapours that may
be harmful to health must not be processed.
Wear ear protectors. Exposure to noise can cause
hearing loss.
Wear protective gloves.
WARNING – Always wear protective
goggles.
Secure the workpiece against slipping, e.g. with the
help of clamping devices.
Always guide the machine with both hands on the
handles provided. Loss of control can cause
personal injury.
Check that the additional handles (8) are secure,
and tighten them with screws if necessary.
Never place your hand near rotating parts of the
device or near the rotating sanding belt.
Remove sanding dust and similar material only
when the machine is not in operation.
Remove the battery pack from the machine before
any adjustments, conversions or servicing are
performed.
Before fitting the battery pack, make sure that the
machine is switched off.
The rated speed of the sanding belt must be at least
equal to the belt speed in idling marked on the
power tool. A sanding belt running faster than its
rated speed can break and fly apart.
Check prior to each use that the sanding belt is
correctly attached and is completely on the rollers.
Carry out a trial run: Allow the machine to run at
idling speed for 30 seconds in a safe location. Stop
immediately if significant vibrations occur or if other
defects are noted. If such a situation occurs, check
the machine to determine the cause.
4.1 Safety instructions for battery packs:
Protect battery packs from water and mois-
ture!
Do not expose battery packs to naked flame!
Do not use faulty or deformed battery packs!
Do not open battery packs!
Do not touch or short-circuit battery packs!
Slightly acidic, flammable fluid may leak from
defective li-ion battery packs!
If battery fluid leaks out and comes into
contact with your skin, rinse immediately
with plenty of water. If battery fluid leaks out
and comes into contact with your eyes, wash them
with clean water and seek medical attention imme-
diately.
1. Declaration of Conformity
2. Specified Use
3. General Safety Instructions
4. Special Safety Instructions

ENGLISH en
9
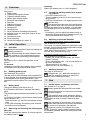
See page 2.
1 Battery pack
2 Capacity and signal indicator
3 Capacity indicator button
4B
attery pack release button
5 Electronic signal indicator
6 Dust filter
7 Sliding
on/off switch
8 Additional handles
9Sanding belt
10 Sanding head
11 Arrow (direction of sanding belt motion)*
12 Adjuster screw (for setting the tension force)
13 Release lever
14 Sanding belt roller
15 Pressure spring
16 Screw (see chapter 6.6 and 6.7)
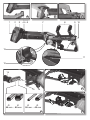
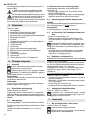
6.1 Dust filter
Always fit the dust filter if the surroundings are
heavily polluted (6).
The machine heats up faster when the dust
filter is fitted (6). It is protected by the elec-
tronics system from overheating (see chapter9.).
To fit:
See page 2, fig. A. Attach the dust filter (6) as
shown.
To remove:
Holding the dust filter at the edges, raise it slightly
(6) and then pull it downwards and remove.
6.2 Rotating battery pack
See illustration B on page 2.
The rear section of the machine can be rotated 270°
in three stages, thus allowing the machine's shape
to be adapted to the working conditions. Only
operate the machine when it is in an engaged posi-
tion.
6.3 Battery pack
Charge the battery pack before use (1).
If performance diminishes, recharge the battery
pack.
The ideal storage temperature is between 10°C and
30°C.
"Li-Power" li-ion battery packs have a capacity and
signal indicator: (2)
- Press the button (3), the LEDs indicate the charge
level.
- If one LED is flashing, the battery pack is almost
flat and must be recharged.
6.4 Removing and inserting the battery pack
Removal:
Press the battery pack release (4) button and pull
the battery pack (1) down
.
Inserting:
Slide in the battery pack (1) until it engages.
6.5 Turning the sanding head (10) to operat-
ing position
- Open the release lever (13).
- Turn the sanding head (10) to the required oper-
ating position.
- Close the release lever (13), applying force until it
hits the limit stop.
The tension force has been set correctly when
the release lever can only be moved as far as
the limit stop when force is applied (13) and when
the sanding head (10) is securely attached to the
device.
- If necessary, you can adjust the tension force of
the tension lock by twisting the adjuster screw (12)
(when the release lever is open (13)).
6.6 Adjusting to the tube diameter
a) Choose the adjustable range (coarse setting)
See illustration D on page 2.
The screw (16) can be inserted in 2 different screw
threads. This provides 2 different adjustable ranges
for the sanding belt roller (14).
Note: When extracting screw (16), be careful not to
lose the inner pressure spring (15).
b) Adjust the sanding belt roller (fine setting)
See illustration E on page 2.
- Slacken the screw (16) sufficiently, but do not
remove it entirely.
- Tilt the sanding belt roller (14) in the direction of
the arrow and adjust.
- Tighten the screw (16) again.
- Adjust the belt run (see chapter 6.7).
6.7 Adjusting the belt run
See page 2, illustration F.
Using screw (16), adjust the sanding belt
(with the machine running) so that it runs
centrally on the sanding belt roller.
7.1 On/Off switch, continuous activation
See illustration C on page 2.
Always guide the machine with both hands.
Switch the machine on first before mounting it
on the workpiece.
The machine must not be allowed to draw in
additional dust and shavings. When switching
the machine on and off, keep it away from dust
deposits.
After switching off the machine, only place it
down when the motor has come to a standstill.
In continuous operation, the machine
continues running if it is forced out of your
hands. Therefore, always hold the machine using
the handles provided, stand in a safe position and
concentrate.
5. Overview
6. Initial Operation
7. Use

ENGLISHen
10
Switching on/
Continuous activation
: Push sliding
switch (7) forward. For continuous activa-
tion, now tilt downwards until it engages.
Switching off: Press the rear end of the slide
switch (7) and release.
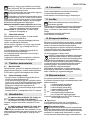
7.2 Sanding procedure
Switch the machine on first before mounting it on
the workpiece.
Place the machine on the material such that the
sanding belt is parallel to the surface of the work-
piece.
When working, please ensure that the machine is
operated at right angles to the pipe so that the belt
does not fall off the rollers.
To adjust the angle of contact, hold together the
additional handles (8).
You can adjust the cutting output by changing the
degree of pressure.
Keep the machine in constant motion because
otherwise recesses could be produced in the mate-
rial.
8.1 Motor cleaning
To clean the motor, apply jets of compressed air
through the rear ventilation slots of the machine
regularly, frequently and thoroughly. Here, the
machine must be held firmly.
8.2 Sanding belt replacement
- Hold the additional handles (8) together and
remove the sanding belt (9).
- Place the new sanding belt on the rollers so that
the arrow on the inside of the sanding belt is
aligned with the arrow on the (11) on the gearbox.
- Release the additional handles (8).
- Ensure that the sanding belt is completely on the
rollers.
- Adjust the belt run (see chapter 6.7).
The electronic signal display (5) lights up
and the load speed decreases. The
temperature is too high! Run the machine in
idling until the electronics signal indicator switches
off.
The electronic signal display (5) flashes
and the machine does not start. The restart
protection is active. The machine will not start
if the battery pack is inserted while the machine is
on. Switch the machine off and on again.
Use only genuine Metabo accessories.
For a complete range of accessories, see
www.metabo.com or the main catalogue.
Repairs to electrical tools must be carried out
by qualified electricians ONLY!
If you have Metabo electrical tools that require
repairs, please contact your Metabo service centre.
For addresses see www.metabo.com.
You can download spare parts lists from
www.metabo.com.
Observe national regulations on environmentally
compatible disposal and on the recycling of disused
machines, packaging and accessories.
Battery packs must not be disposed of with regular
waste. Return faulty or used battery packs to your
Metabo dealer!
Do not allow battery packs to come into contact with
water!
Only for EU countries: Never dispose of
power tools in your household waste! In
accordance with European Guideline 2002/
96/EC on used electronic and electric equipment
and its implementation in national legal systems,
used power tools must be collected separately and
handed in for environmentally compatible recycling.
Before disposal, discharge the battery pack in the
power tool. Prevent the contacts from short-
circuiting (e. g. by protecting them with adhesive
tape).
Explanatory notes on the specifications on page 3.
Changes due to technological progress reserved.
U =Voltage of battery pack
B
B
=Sanding belt width
B
L
=Sanding belt length
D =Machinable tube diameter
U
a, max.
=max. angle of contact
v
0
=Belt speed in idling
m =Weight with smallest battery pack
Measured values determined in conformity with
EN 60745.
Direct current
The technical specifications quoted are subject to
tolerances (in compliance with the relevant valid
standards).
Emission values
Using these values, you can estimate the
emissions from this power tool and compare these
with the values emitted by other power tools. The
actual values may be higher or lower, depending on
the particular application and the condition of the
tool or power tool. In estimating the values, you
should also include work breaks and periods of low
use. Based on the estimated emission values,
specify protective measures for the user - for
example, any organisational steps that must be put
in place.
8. Cleaning, Maintenance
9. Troubleshooting
10. Accessories
11. Repairs
12. Environmental Protection
13. Technical Specifications

ENGLISH en
11
Vibration total value (vector sum of three directions)
determined in accordance with EN 60745:
a
h
=Vibration emission value (surface
grinding)
K
h
= Uncertainty (vibration)
Typical A-effective perceived sound levels:
L
pA
=Sound pressure level
L
WA
=Acoustic power level
K
pA
, K
WA
= Uncertainty
Wear ear protectors!
Page is loading ...
Page is loading ...
Page is loading ...
Page is loading ...
Page is loading ...
Page is loading ...
Page is loading ...
Page is loading ...
Page is loading ...
Page is loading ...
Page is loading ...
Page is loading ...
Page is loading ...
Page is loading ...
Page is loading ...
Page is loading ...
Page is loading ...
Page is loading ...
Page is loading ...
Page is loading ...
Page is loading ...
Page is loading ...
Page is loading ...
Page is loading ...
Page is loading ...
Page is loading ...
Page is loading ...
Page is loading ...
Page is loading ...
Page is loading ...
Page is loading ...
Page is loading ...
Page is loading ...
Page is loading ...
Page is loading ...
Page is loading ...
Page is loading ...
Page is loading ...
Page is loading ...
Page is loading ...
Page is loading ...
Page is loading ...
Page is loading ...
Page is loading ...
Page is loading ...
Page is loading ...
Page is loading ...
Page is loading ...
Page is loading ...
Page is loading ...
Page is loading ...
Page is loading ...

Metabowerke GmbH,
72622 Nürtingen, Germany
www.metabo.com
170 27 1050 - 0212
-
 1
1
-
 2
2
-
 3
3
-
 4
4
-
 5
5
-
 6
6
-
 7
7
-
 8
8
-
 9
9
-
 10
10
-
 11
11
-
 12
12
-
 13
13
-
 14
14
-
 15
15
-
 16
16
-
 17
17
-
 18
18
-
 19
19
-
 20
20
-
 21
21
-
 22
22
-
 23
23
-
 24
24
-
 25
25
-
 26
26
-
 27
27
-
 28
28
-
 29
29
-
 30
30
-
 31
31
-
 32
32
-
 33
33
-
 34
34
-
 35
35
-
 36
36
-
 37
37
-
 38
38
-
 39
39
-
 40
40
-
 41
41
-
 42
42
-
 43
43
-
 44
44
-
 45
45
-
 46
46
-
 47
47
-
 48
48
-
 49
49
-
 50
50
-
 51
51
-
 52
52
-
 53
53
-
 54
54
-
 55
55
-
 56
56
-
 57
57
-
 58
58
-
 59
59
-
 60
60
-
 61
61
-
 62
62
-
 63
63
-
 64
64


Metabo RB 18 LTX 60 BARE User manual
- Type
- User manual
- This manual is also suitable for
Ask a question and I''ll find the answer in the document
Finding information in a document is now easier with AI
in other languages
- italiano: Metabo RB 18 LTX 60 BARE Manuale utente
- français: Metabo RB 18 LTX 60 BARE Manuel utilisateur
- español: Metabo RB 18 LTX 60 BARE Manual de usuario
- Deutsch: Metabo RB 18 LTX 60 BARE Benutzerhandbuch
- русский: Metabo RB 18 LTX 60 BARE Руководство пользователя
- Nederlands: Metabo RB 18 LTX 60 BARE Handleiding
- português: Metabo RB 18 LTX 60 BARE Manual do usuário
- dansk: Metabo RB 18 LTX 60 BARE Brugermanual
- polski: Metabo RB 18 LTX 60 BARE Instrukcja obsługi
- svenska: Metabo RB 18 LTX 60 BARE Användarmanual
- suomi: Metabo RB 18 LTX 60 BARE Ohjekirja
Related papers
-
Metabo RBE 9-60 Set Operating instructions
-
Metabo BF 18 LTX 90 Operating instructions
-
Metabo BFE 9-20 Operating instructions
-
Metabo MT 18 LTX Operating instructions
-
Metabo LB 18 LTX BL Cordless Leaf Blower User manual
-
Metabo RB 18 LTX 60 Operating instructions
-
Metabo BAE 75 Operating instructions
-
-
-
Metabo DBF 457 Operating instructions
