Page is loading ...

Waterproof pH Testing Pen
Specifications - Installation and Operating Instructions
Bulletin TE-WPH2
T
M
DWYER INSTRUMENTS, INC.
Phone: 219/879-8000 www.dwyer-inst.com
SPECIFICATIONS
Range: pH: 0 to 14; Temperature: 32 to 122 F (0 to 50 C).
A
ccuracy: WPH2-10: ±0.2 pH, ±1°C, WHP2-20: ±0.05 pH, ±0.5°C.
D
isplay: 30 mm H x 18 mm LCD dual display.
R
esolution: WPH2-10: 0.1 pH, 0.1°C/°F, WPH2-20: 0.01 pH, 0.1°C/°F.
Operating Temperature Limits: 32 to 122°F (0 to 50°C).
Storage Temperature Limits: 32 to 140°F (0 to 60°C).
Humidity Limits: <90%.
Power Requirements: (4) 1.5 V LR44 alkaline batteries, included, user
replaceable.
Calibration: One touch auto-calibration up to 3 points.
Enclosure Rating: IP65.
Electrode: Detachable single junction, KCl filled glass.
Weight: 3.9 oz (110 g).
Agency Approval: CE.
T
he Series WPH2 pH Testing Pen accurately monitors pH and temperature levels
i
n a variety of applications. This pocket-sized tester is ideal for pH level
measurements in lab environments, industrial plants, or field environmental
testing. It features an easy to replace electrode and automatically recognizes up
to 3 calibration buffer solution ranges. Both pH and temperature, in both English
and Metric units, appear on the large dual display. Both the electrode and battery
c
ompartment caps are sealed to provide an IP65 weatherproof rating.
OPERATING INSTRUCTIONS
Please read the manual completely before using this meter. Filing and keeping the
manual for future reference is recommended. It is also recommended to soak the
electrode for at least 30 min before using the meter to clear anything affecting the
probe.
Power Supply
The meter is powered by 4 LR44 button cell batteries. Check the batteries if it is
your first time use, if the battery symbol appears on the LCD, or if the meter cannot
power on.
To install the batteries:
1. Turn off the meter.
2. Loosen the battery cover in the counterclockwise direction (DO NOT discard the
black washer!).
3. Replace the old batteries with four new button cell LR44 batteries.
4. Make sure the batteries are in place and the polarity is correct.
5. Put the battery cover back and turn it tightly in the clockwise direction.
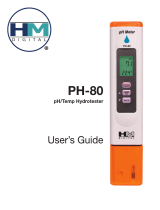
LCD Display
LCD SCREEN
PROBE
6
-59/64
[176.00]
1
-17/32
[39.00]
It is suggested to re-calibrate the meters after changing the
batteries.
NOTICE
Remove the batteries from instruments that you don’t plan to
use for a month or more. Do not leave the batteries in the
instrument.
NOTICE

- The first display shows the measured pH reading.
-
The second display shows the temperature reading (Degree C or F).
-
CAL = Calibration mode
-
HLD = Data hold
- Battery icon indicates low power
- uS/ppt/ppm/mS/mV are units not used for this pen. Only pH will be used
Keypad
-
Press to power on/off the meter.
-
Press >2 seconds to enter setting mode before power on.
- Press with “HOLD” key to disable auto sleep function before power
on.
- Press to enter calibration mode.
-
Press to save and enter next step while in setting mode.
-
Press to adjust while in calibration mode.
- Press to freeze the current reading.
- Press again to release hold.
- Press to adjust while in setting or calibration mode.
Operation
1. Remove the probe cover from the meter.
2. Rotate the transparent cap to expose the electrode (see diagram below).
3. Dip the electrode into the test solution. Press to power on the meter and stir it
to get a stable reading.
4. “pH” flashes while the meter is in measurement mode. The LCD shows the
measured pH and temperature. “pH” stops flashing when the reading is stable.
5. Press key to freeze current reading. “HLD” appears on the LCD. Press key
again to release.
6
. Turn off the meter by pressing the button.
7
. Once finished with the measurement, clean the electrode. Put the transparent
electrode cap and meter cover back on.
A
uto Power Off (Sleep Function)
T
his meter will shut off automatically after 20 minutes of inactivity. For a longer
operating time, you can disable sleep mode.
To disable the auto power off:
Before powering on, press and simultaneously until an “n” appears on the
s
creen. Then release the keys to return to normal mode.
Program Settings
Parameters setting function could help you to check or program your meter.
When the meter is off, press key >1 second to enter setting mode.
Probe slope and offset value
After re-calibration, checking probe slope and offset value could help to confirm the
necessity to replace the probe.
While doing 3 points calibration, there are two available slope values and one offset
point:
Range 1 (SL1): 0.00 to 2nd point
Range 2 (SL2): 2nd point to 14.00 pH. Offset point is at pH7.
While doing 1 or 2 points calibration, the slope value SL1 equals that of SL2. The
offset point is still at pH7.
When the meter is off, press for >1 second to enter setting mode. The SL1 value
will appear on the LCD. Press to view the SL2 value. Press to view the offset
value. See diagram below.
The disable sleep mode will be invalid after every power off.
NOTICE
F
or pH meters, please always make the electrode wet to keep
t
he electrode in a good storage condition.
WARNING
Change the probe while the slope value is <75 or >115 %. Also,
change the probe if the offset value is not between -60 to 60 mV.
NOTICE

T
emperature Unit Setting
T
o select the temperature unit (°F or °C) enter the setting mode first. Press to
s
elect the unit setting. The default unit will flash on the LCD. Press to change
a
nd press to confirm.
R
eset to Default Setting
T
o reset the meter to default setting, enter the setting mode first. Press to select
reset. The default “no” will flash on the LCD. Press to change and press to
confirm. See diagram below.
Calibration Mode (CAL)
Calibration is necessary and should be done regularly. It is recommended that
calibration is done every day if the meter is used often. The unique calibration
design of the meter features automatic buffer recognition to avoid errors.
1. Rinse the probe thoroughly with de-ionized water or rinse solution. Do not wipe
the probe as this will cause a build-up of electrostatic charge on the glass surface.
2. Power on the meter.
3. Dip the probe into the standard calibration buffer. The end of the probe must be
completely immersed into the sample. Stir the probe gently to create a
homogenous sample. It is recommended to calibrate pH7 first and then 4 or 10 pH
for a better accuracy.
4. Press for >1 second to enter calibration mode. The “CAL” icon, auto
recognized buffer value (see table below) and “pH” will all flash on the primary LCD.
5. If the probe is damaged or the buffer is not specified as following, the primary
LCD will keep flashing unless you escape by turning off the meter.
The acceptable pH buffer range:
- pH3.00 to 5.00
- pH6.00 to 8.00
- pH8.50 to 10.50
6
. If the probe successfully recognizes the buffer, the buffer pH value and “CAL” will
s
top flashing.
7. If your calibration buffer is not NIST, press or to adjust the calibrating point
t
o the corresponding buffer value of specific temperature. The adjustable range is:
3
.00 to 5.00, 6.00 to 8.00, and 8.50 to 10.50.
8
. Wait for 30 seconds. If the reading is stable enough, the meter will complete the
calibration automatically.
9. Rinse the probe with de-ionized water or a rinse solution after calibration, Repeat
steps 3 to 8 to do multiple point calibration or exit by turning the meter off.
P
robe Change
I
t is suggested that the probe be changed when:
1
. Slow response
2. Unstable reading
3. Slope value is <75%, >115%, or the offset value is not between –60 to 60 mV.
Part number for the replacement electrode probe is WPH2-RS.
There are three steps to changing the probe:
1. Loosen the washer
2. Unplug the probe
3. Reverse the steps to install the new probe
Before calibration, it is recommended that you RESET the
meter to delete all the old calibration information.
NOTICE
Temp (°C)
0
5
10
15
20
25
30
35
40
45
50
pH4.01
4.01
4.01
4.00
4.00
4.00
4.01
4.01
4.02
4.03
4.04
4.06
pH6.86
6.98
6.95
6.92
6.90
6.88
6.86
6.85
6.84
6.84
6.83
6.83
pH9.18
9.47
9.38
9.32
9.27
9.22
9.18
9.14
9.10
9.07
9.04
9.01
NIST
Be sure to calibrate the meter after changing the probe.
NOTICE

T
roubleshooting
MAINTENANCE/REPAIR
Upon final installation of the Series WPH2, no routine maintenance is required. The
Series WPH2 is not field serviceable and should be returned if repair is needed.
Field repair should not be attempted and may void warranty.
WARRANTY/RETURN
Refer to “Terms and Conditions of Sales” in our catalog and on our website. Contact
customer service to receive a Return Goods Authorization number before shipping
the product back for repair. Be sure to include a brief description of the problem
plus any additional application notes.
DWYER INSTRUMENTS, INC.
Phone: 219/879-8000 www.dwyer-inst.com
©Copyright 2013 Dwyer Instruments, Inc. Printed in U.S.A. 6/13 FR# R6-444022-00 Rev.2
Symptom
P
ower on but no display
S
low response
Action
1
. Make sure the time of pressing the power key is
m
ore than .3 seconds.
2
. Check that the batteries are in place and make good
c
ontact, minding polarities.
3. Replace new batteries.
4. Move the battery away for one minute and then put
back in.
1
. Clean probe by immersing the electrode in tap water
f
or 10 to 15 min. Rinse thoroughly with distilled water
o
r use a general purpose electrode cleaner.
2
. Replace with a new probe.
E
rror Code
E
02
E03
E
04
E13
E31
E
32
E33
M
eaning
T
he value is below the lower
l
imit.
The value is over the upper limit.
T
emperature measuring error.
Slope or offset value of pH probe
is out of range.
Measuring circuit failure.
M
emory saving/reading failure.
Reference voltage failure.
S
olution
R
e-calibrate or replace a new
p
robe or replace calibration
buffer.
Re-calibrate or replace a new
probe or replace calibration
b
uffer.
R
emove batteries for one minute
t
hen replace and power on or
replace probe.
Re-calibrate or replace a new
probe or replace calibration
buffer.
Power meter on and off. If error
still appears, send back for
repair.
P
ower meter on and off. If error
s
till appears, send back for
r
epair.
Power meter on and off. If error
still appears, send back for
repair.
/