
The Home Owner’s Manual
1
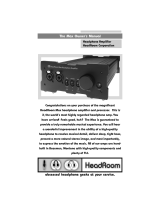
Congratulations on your purchase of the wonderful Maxed Out
Home HeadRoom headphone amplifier and processor. The
Maxed Out Home represents a solid balance between price and
performance and is guaranteed to provide a truly satisfying
musical experience. You will hear a welcomed improvement in a
high-quality headphone’s ability to resolve musical detail,
deliver deep, tight bass, present a more natural stereo image,
and most importantly, express the emotion of the music. All of
our amps are hand-built in Bozeman, Montana with high-
quality components and plenty of TLC.
obsessed headphone geeks at your service.
www.headphone.com
The Maxed Out Home Owner’s Manual
Headphone Amplifier
HeadRoom Corporation

2
800.828.8184
www.headphone.com
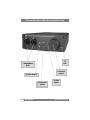
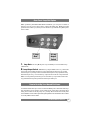
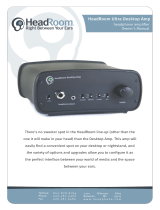
A Tour of Your Maxed Out Home HeadRoom Amp
4. Gain
Switch
3. Processor
Switch
2. Filter Switch
1. Headphone
Jacks
5. Volume
Control
6.
LED

The Home Owner’s Manual
3
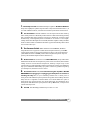
1. The Headphone Jacks. The Neutrik headphone jacks on The Maxed Out Home
clamp down tightly for optimum signal transfer. They will accomodate both a 1/4
and well as XLR connectors, and both are controlled by the same volume control.
2. The Filter Switch. The filter switch is used to compensate for the warming
action of the processor. In the center position there is no filter in the circuit; generally
this is preferred. But if the processor is causing too much bass or blurring of the
central image, a mild high frequence boost filter can be turned on. The “bright”
setting accentuates the highs at about 3 kHz; with the “brighter” setting the filter
starts an octave earlier and catches some of the upper mids. Basically, set it to what
ever sounds best to you.
3. The Processor Switch. When switched toward PROCESS, the Audio
Image Processor is engaged for normal stereo headphone listening. In the OFF
position, the Processor is bypassed for listening to mono or binaural recordings.
(This switch should be in the OFF position when using the headphone amp as a
preamp. This is further explained later in the manual.)
4. The Gain Switch. A new feature on our Maxed Out Home, the 3-position Gain
Switch accomodates various headphones’ power needs. For instance, the Low Gain
setting would be used for Grado headphones, allowing a larger range on the
volume control pot. Experiementing with your headphones and the gain switch may
help you to determine which setting you prefer. If have any questions regarding
your headphones, feel free to call and ask us.
5. The Volume Control First, we recommend turning the amp OFF or ALL THE
WAY DOWN before plugging in or unplugging your headphones to avoid short-
circuiting the amp. Also, if you’re switching between two or three pairs of
headphones with different input impedance ratings, the volume setting will most
likely need to be adjusted to achieve similar sound levels. When two pairs of
headphones are plugged into the amp at the same time, we recommend using
headphones with the same input impedance ratings. Otherwise, a dispute over
volume level may ensue.
6. The LED. The LED simply indicates if your unit is on or off.

4
800.828.8184
www.headphone.com
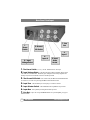
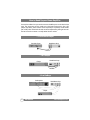
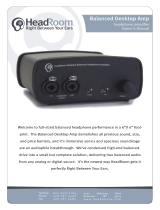
1. The Power Switch. 1 is on, 0 is off... what more can we say?
2. Input Voltage Select. In most cases, the voltage indicator should read
‘115 volts’ for use in the U.S. However, your voltage can be easily adjusted for
foreign use; call us for details on how to do this yourself.
3. The Ground Lift Switch. For normal use, the Ground Lift Switch should
be on‘float’. For use as a pre-amp, the Ground Lift should be off.
4. Input Two. This is where you would plug in a second source.
5. Input Selector Switch. This switch chooses Input One or Input Two.
6. Input One. Your primary source gets hooked up here.
7. Line Out. If you are using The Maxed Home as a pre-amplifier, plug your
cables in here.
Rear Panel- Dual Input
2. Input
Voltage Select
3. Ground
Lift Switch
4.
Input 2
5. Input
Select
Switch
6.
Input 1
7. Line
Out
1.
Power
Switch

The Home Owner’s Manual
5
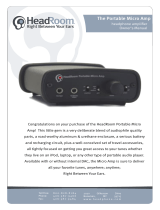
1. Loop Outs. The Loop Outs pass a signal directly in and out without any
interference.
2. Loop Output Switch. With the loop output switch in the “on” position the
line inputs are connected to the loop output. This feature allows you to use the
record output of a preamp as the source for the headphone amp (which is really
the best way to do it), and use the loop output as the source for a tape recorder.
When not using the tape recorder, you can turn the loop output off to disconnect
any performance degrading reactance of the tape deck input.
Rear Panel- Loop Out Option
2. Loop
Output
Switch
1. Loop
Outs
When purchasing the Maxed Out Home HeadRoom, you are given a choice of
having a loop out put or a second line in on the back of the amp. Most people will
prefer to have a 2nd input, but if you have chosen to go with the ‘Loop Out’ option
read on here.
Connect the cables from your audio source to the RCA inputs on the back of the amp.
This connection can be made to any line-level audio source, like a CD player, tape
deck, phono section or the tape loop of a preamp. Audio cables are usually color
coded with the red connector representing the right channel. The left channel connector
is usually either black or white.
How to Hook Up Your Maxed Out Home

6
800.828.8184
www.headphone.com
Connect the cables from your audio source to the RCA inputs on the back of the
amp. This connection can be made to any line-level audio source, like a CD
player, tape deck, phono section or the tape loop of a preamp. Audio cables
are usually color coded with the red connector representing the right channel.
The left channel connector is usually either black or white.
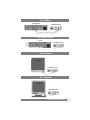
How to Hook Up your Home Amplifier
...To a Player
...To a Portable Player
...As a PreAmp
HeadRoom Amp
Portable Player
HeadRoom Amp
Player
HeadRoom Amp
PreAmplifier
Player

The Home Owner’s Manual
7
...To a PreAmp
...To a Home Theater
...To a Television
...To a Computer
HeadRoom Amp
HeadRoom Amp
HeadRoom Amp
PreAmplifier
Television
Computer
HeadRoom Amp
Audio
Video
Source

8
800.828.8184
www.headphone.com
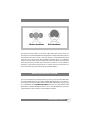
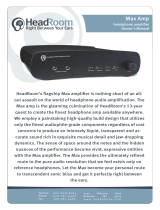
Why does your HeadRoom Amp have a Processor?
The Processor switch engages and disengages the headphone audio image
processing circuit. Headphone audio imaging is not very good; typically the image is
a blob on the left, a blob on the right, and a blob in the middle. The HeadRoom audio
image processor provides the natural acoustic cross-feed normally heard from the
left speaker to the right ear, and from the right speaker to the left ear. Adding the
cross-feed signal gives your brain enough information to build up the stable and
natural audio image needed to have a quality listening experience.
The end result is a subtle but important change in the sound. If you want you hear it
more dramatically, remove either the left or right input, then as you switch the
processor in and out you can hear the sound move from one ear only to a slightly
forward and up position that synthesizes the sound of a speaker. Most people
should just switch it on and not worry about it.

The Home Owner’s Manual
9
The image processor itself is a two-stage active filter with all-pass delay and
frequency response characteristics that model those normally heard when listening
to speakers. It amounts to about a 300 uSec delay and a relatively flat frequency
response out to about 2 kHz. The interactions between mono and difference
components of the stereo signal and the chaotic nature of the music signal cause the
actual frequency response changes added by the processor to be unpredictable.
However, in general turning the processor on “warms” the sound. The more mono
component in the signal the warmer it gets. (See filter switch.)
How can the processor be tested?
If you have already tried out the Processor, you have probably noticed that there
isn’t a huge difference in the sound when switching the Processor on and off. If you
would like a more obvious demonstration of the effect of the Processor, just unplug
one of the RCA inputs to The Maxed Out Home and listen for a few moments with
the Processor off. Now switch the Processor on and hear the difference. [
pause for
experimentation
] See, it really
is
doing something dramatic.
With HeadRoomWithout HeadRoom

10
800.828.8184
www.headphone.com
The Maxed Home amplifier carries a five-year parts and labor product warranty. If you have
any problems with your headphone listening system, please first call us at 1-800-828-8184.
We will try to diagnose the problem over the phone, which can save both of us considerable
time, effort and money. If the equipment must be returned for repair, we will authorize a
return for you. HeadRoom is the only authorized service center for HeadRoom products,
either in or out of warranty. If a unit is under warranty, there is no cost for the repair labor,
parts, or shipping from HeadRoom back to you (i.e., You’re responsible for paying the
shipping charges to get the product to us). For units out of warranty, repairs are billed on
a time and parts basis, plus shipping costs. When we receive the equipment, we will initiate
repairs quickly (usually within three working days) and return the unit to you, or call you
with an assessment of the problem.
Five-Year Product Warranty
People have a natural tendency to listen to music on headphones at much louder levels than
they would on speakers. If you hope to avoid permanent hearing damage, it’s important to
be careful not to listen at extremely loud levels or to listen for too long at moderately loud
levels. Because HeadRoom amps must be capable of driving even the most inefficient dy-
namic headphones to satisfactory listening levels, the amps are able to drive headphones of
average and high efficiencies to
very
high levels. As a result, you may not be listening at a
safe level even though the volume control on the amp is less than half way up. Generally
speaking, when listening to headphones, you should only turn up the volume to the point at
which the sound isn’t too quiet.
The most common hearing damage caused by prolonged or excessively loud sound is called
tinnitus. It manifests itself as a sustained ringing in the ears and can become a permanent
condition. If you find that your ears are ringing or that there is a sensation of pressure or
fatigue, give them a rest for a couple of days (or until they feel fresh). These symptoms are
your body telling you that your ears need a break. Should you choose to ignore these
symptoms, you are risking permanent hearing damage. As a general rule, sound pressure
levels under 80 decibels will not damage hearing, even if listened to continually. On the other
hand, anything over 100 decibels may cause permanent damage fast. Sound pressure levels
anywhere in between can also be damaging. The louder the sound, the shorter the exposure
time required to cause permanent damage.
Now, don’t fool yourself into thinking that you either have full-blown tinnitus or you don’t
have it at all—you can get a slight case. For example, you might only notice your ears ringing
in bed at night. Once you have a slight case of tinnitus, your ears are much more susceptible
to further damage. So, if you get tinnitus, it’s important to be much more careful about
exposure to loud sounds. Now that we’ve told you to be careful, don’t blame us if you blow
it. If you have any more questions about hearing damage, call a doctor. Sorry to sound so
sobering, but a lifetime of musical enjoyment requires ears in tiptop shape.
And Now A Word About Your Hearing

The Home Owner’s Manual
11
30-day Satisfaction Guaranty
Unless specifically stated, all HeadRoom purchases come with a 30-day satisfaction
guaranty. We do this because we want to give you the opportunity to change your
mind after you get to hear the products you bought. We’re very glad to give you this
option, and we want you to use it if you aren’t happy with your purchase, but we also
want you to be aware of the conditions under which we can provide you this guaranty:
· Please return all packages to 2020 Gilkerson Drive, Bozeman, MT 59715
· Assuming all conditions are met, we are willing to refund the entire purchased
amount for products returned. We do not refund shipping charges.
· If you are experiencing trouble with a headphone amp or a headphone
system, please email Sales at
[email protected] to troubleshoot the problem.
This can save all of us considerable time, effort, and money.
· If you are doing a partial return, you will be refunded the cost to you of the
products returned. If you purchased a package system at a discount and are keeping
some of the items in the package, your refund will be adjusted based on the retail
price of the equipment you are keeping. In other words, we don’t give full-price
refunds on products purchased at a discount.
· If you are doing a partial return and exchange for other product, you will be
eligible for all discounts that would apply to the set of products that you end up
keeping.
· Products must be returned to us within 30 days of the date you receive the
product. SO if you think you might want to return something to us, listen right away; it’s
amazing how many people say the went out of the country and didn’t have a chance
to listen before they left.
· Products must be in as new condition. This means that they are not only in
pristine cosmetic condition and functioning perfectly, but that they are repacked with
ALL materials (plastic bags, warranty cards, tie wraps, and ANY other little bit or piece
that came with the product) just as you received it. Please use the original box it was
received in (or another that is comparable); and please don’t send your headphones
back in JUST the headphone box!
· If a product is returned within 30-days, but is not in as new condition, we will
charge you a 15% restocking fee PLUS any labor and materials required to return the
product to as new condition.
· Return packages shipped to us must be sent “signature required” and insured,
otherwise they are sent back at your own risk!
· Products returned to us after the 30-day period, or which require more cost
to repair than the wholesale value of the product will simply be returned to the
customer.
We want you to know that we’re not hard cases about this; the vast majority of
returns are refunded.

12
800.828.8184
www.headphone.com
HeadRoom Corporation
2020 Gilkerson Drive Bozeman, MT 59715
toll free 800-828-8184 or 1+ 406-587-9466
fax: 406-587-9484
drop us an email at
www.headphone.com
Upgrading your Maxed Out Home
obsessed headphone geeks at your service.
The stepped attenuator is an available upgrade for the Maxed Out Home. We use
the Nobel potientiometer on our high-end amps, and while its performance is very
good, we consider the stepped attenuator to be the finest available today. You
can also upgrade the premium electronics module to a reference module, offering
significant sound quality improvement. Please call us for details about these upgrade
paths.
the reference electronics module
the stepped attenuator
Contacting HeadRoom
-
 1
1
-
 2
2
-
 3
3
-
 4
4
-
 5
5
-
 6
6
-
 7
7
-
 8
8
-
 9
9
-
 10
10
-
 11
11
-
 12
12


HeadRoom Maxed Out Home Owner's manual
- Type
- Owner's manual
- This manual is also suitable for
Ask a question and I''ll find the answer in the document
Finding information in a document is now easier with AI
Related papers
-
 HeadRoom MAX Owner's manual
-
 HeadRoom headphone amplifier User manual
-
 HeadRoom BlockHead Owner's manual
-
 HeadRoom Desktop & Ultra Desktop Amp Owner's manual
-
 HeadRoom Max Balanced Amp Owner's manual
-
AMX Max Balanced Amp Owner's manual
-
 HeadRoom Ultra Micro DAC Owner's manual
-
Audio Note Balanced Home Amp Owner's manual
-
 HeadRoom The Portable Micro Amp Owner's manual
-
 HeadRoom Max Amp Owner's manual


Other documents
-
Argon HA1 Owner's manual
-
Lutron MS-OPS2H-WH User guide
-
 Mesa Boogie Mark Five:35 Head Owner's manual
-
Manley TNT 2-Channel Mic Preamp Owner's manual
-
ALLEN & HEATH XONE:62 User guide
-
Allen-Heath GL2400-32 User manual
-
Electro-Voice C-12 & C-8E Owner's manual
-
Fender PX-2200 Series Owner's manual
-
Mackie DL16S User manual
-
Mackie 802 VLZ4 User manual
