Page is loading ...

No.1
Gas Stove
FUEL EFFECT HEATING STOVE
Installation, Maintenance & User Instructions
Hand these instructions to the user
Model No. FGSL**RN2 is for use on Natural Gas (G20) at a supply pressure
of 20 mbar in G.B. / I.E.
** denotes cosmetic variance

Information Requirements for Commission Regulation (EU) 2015/1188
Model Identifier FGSL01RN2
Indirect Heating Functionality No
Direct Heat Output 4.2kW
Indirect Heat Output Not Applicable
Fuel Natural Gas (G20)
NOx Emissions 130mg/kWh
Nominal Heat Output 4.2kW
Minimum Heat Output (Indicative, all models) 1.5kW
Useful Efficiency at Nominal Heat Output 81.4%
Useful Efficiency at Minimum Heat Output (Indicative) 50.0%
Auxilliary Power Consumption at Nominal Heat Output 0.0000010kW
Auxilliary Power Consumption at Minimum Output 0.0000010kW
Auxilliary Power Consumption at Standby Mode 0.0000005kW
Permanent Pilot Flame Requirement Not Applicable
Type of Heat Output / Room Temperature Control With electronic
room temperature
control.
Contact Details BFM Europe Ltd.
Gordon Banks Drive
Trentham Lakes North
Stoke-on-Trent
ST4 4TJ
Tel : 01782 339000

CONTENTS
P
AGE
S
ection 1 Information and Requirements
1
.0 Appliance Information 3
1
.1 Conditions of Installation 4
1.2 Flue and chimney suitability 4
1.3 Ventilation 5
1
.4 Clearances to combustible and non-combustible surfaces 6
1.5 Flue and chimney inspection 6
1.6 Hearths 7
1.7 Spillage monitoring system 7
Section 2 Installation of Fire
2.1 Unpacking the stove 6
2.2 Installing the stove 7
2.3 Installing the stove with top flue outlet to chimney with clay liner 8
2.4 Installing the stove with rear flue outlet to chimney without clay liner 9
2.5 Installing the stove with top flue outlet to chimney without clay liner 10
2.6 Installing the stove with top or rear flue outlet to pre-fabricated flue system 11
2.7 Changing the flue outlet from top to rear 12
2.8 Removing and re-fitting the flue restrictor baffle 13
2.9 Making the gas connection / pressure testing 14
2.10 Fitting the batteries 15
Section 3 Assembling Fuel Bed and Commissioning
3.1 Fitting the log fuel bed 16-19
3.2 Changing the internal fireboards 20
3.3 Fitting the coal fuel bed 21-24
3.4 Lighting the stove manually 25
3.5 Setting the time, date and temperature on the remote handset 26-28
3.6 Lighthing the stove via the remote handset 29-32
3.7 Advanced settings of the remote control 32-36
3.8 Checking for clearance of combustion products 37
Section 4 Maintenance
4.1 Removal of the burner assembly 38-39
4.2 Removal of the gas control valve 39-40
4.3 Removal of the pilot 40
4.4 Removal / replacement of the thermal cut-out 40-41
4.5 Parts shortlist 41
Section 5 User Instructions
5.1 Installation Information 42
5.2 About the Flavel gas stove 43-44
5.3 Operating your stove 45-48
5.4 Manual operation of the stove 49-50
5.5 Replacing the batteries 50
5.6 Setting the time, date and temperature on the remote handset 51-54
5.7 Advanced settings of the remote control 55-58
5.8 Turning the product off in the event remote handset malfunction 59
5.9 Removal / replacing the log fuel-bed 60-63
5.10 Removal / replacing the coal fuel-bed 64-67
5.11 User replaceable parts / trouble shooting chart 68
BFM Europe Ltd, Trentham Lakes, Stoke-on-Trent, Staffordshire, ST4 4TJ
2

SECTION 1
INFORMATION AND REQUIREMENTS
1.0 APPLIANCE INFORMATION
Main injectors : (2 off) Size 190
Pilot Type ERTA OXYP PG-83-10
Max. Gross Heat Input : 5.7kW
Min. Gross Heat Input : 3.0kW
Gas Rate : 0.521 m
3
/hr
Cold Pressure : 20.0+/-1.0 mbar
Ignition : 4.5v battery / electronic ignition
Electrode Spark Gap : 4.0mm
Packed weight (without fender) : 71.5kg
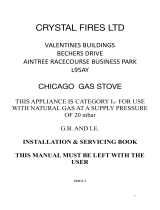
Fig 1
3
Please Note : An optional flue collar
is available to reduce the 159mm
dimension from the centre of the flue
to the rear of the stove to 138mm.
Please quote part number B-178420
when ordering.

INSTALLATION REQUIREMENTS
Efficiency Declaration
The efficiency of this appliance has been measured as specified in
BS EN 613 : 2001 and the result is 67.6% (coal) & 68.7% (log). The gross
calorific value of the fuel has been used for this efficiency calculation.
The test data from which it has been calculated has been certified by BSI Testing
Services.
The efficiency value may be used in the UK Government’s Standard Assessment
Procedure (SAP) for energy rating of dwellings.
1.1 CONDITIONS OF INSTALLATION
It is the law that all gas appliances are installed only by a GAS SAFE Registered
Installer, in accordance with these installation instructions and the Gas Safety
(Installation and Use) Regulations 1998 as amended. Failure to install appliances
correctly could lead to prosecution. It is in your own interest and that of safety to
comply with the law.
The installation must also be in accordance with all relevant parts of the Local and
National Building Regulations where appropriate, the Building Regulations
(Scotland Consolidation) issued by the Scottish Development Department, and all
applicable requirements of the following British Standard Code of Practice.
1. B.S. 5871 Part 1 Installation of Gas Fires
2. B.S. 6891 Installation of Gas Pipework
3. B.S. 5440 Parts 1 & 2 Installation of Flues and Ventilation
4. I.S 813 : 1996 Domestic Gas Installation, issued by the National Standards
Authority of Ireland.
1.2 FLUE & CHIMNEY SUITABILITY
This appliance is designed for use with conventional brick built or lined chimneys
and fabricated flues and metal flue boxes conforming to BS 715 / BS EN 1856-2
All flues must conform to the following minimum dimensions.
Minimum diameter of circular flues 125 mm (Without Flue
Restrictor Fitted)
Minimum effective height of all flue types 3 metres
When fitting to conventional chimneys or 175mm flues it may be desirable to
fit the flue restrictor baffle (supplied) to reduce the flue flow and increase the
efficiency of the fire. Safe clearance of products must always be checked by
carrying out a smoke match test as described.
4

1.3 VENTILATION
This Flavel stove has a nominal input not exceeding 7kw and therefore does not
normally require additional purpose made ventilation when installed in G.B. If,
however spillage is detected when commisioning the stove there may be
insufficient natural ventilation in the property and additional ventilation may
therefore be required. Any purpose made ventilation must be checked periodically
to ensure that it is free from obstruction.
When Installing in I.E. please consult document I.S. 813 : 1996 Domestic Gas
Installation, which is issued by the National Standards Authority of Ireland. If
installing in Northern Ireland, please consult local building regulations. Any
purpose made ventilation must be checked periodically to ensure that it is free
from obstruction.
1.4 CLEARANCES TO COMBUSTIBLE AND NON-COMBUSTIBLE
SURFACES
The Stove may be fitted below a combustible shelf providing there is a minimum
distance of 225mm above the top of the stove and that it does not extend in front
of the stove. There must be a minimum distance of 300mm to any combustible
side or rear surface. The minimum clearance to non combustible materials at the
sides are 100mm and the rear 25mm, but please ensure sufficient access to the
draft diverter on the rear right hand side of the stove can be achieved to complete
the spillage test when commisioning the stove.
1.5 FLUE / CHIMNEY INSPECTION
Before commencing installation, a flue or chimney should be inspected to ensure
that all the following conditions are satisfied.
1. Check that the chimney / flue only serves one fire place and is clear of any
obstruction. Any dampers or register plates must be removed or locked in
the open position.
2. Brick/stone built chimneys or any chimney or flue which has been used for
an appliance burning fuel other than gas must be thoroughly swept. The
base of the chimney / flue must also be thoroughly cleared of debris etc.
3. Any under-floor air supply to the fire place must be completely sealed off.
4. Ensure that the inside of the chimney / flue is in good condition along it’s
length and check that there is no leakage of smoke through the structure
of the chimney during and after the smoke pellet test.
5

5. Using a smoke pellet, check that there is an up-draught in the
chimney / flue and that the smoke can be seen issuing from the
terminal / chimney pot outside.
There must be no leakage of smoke through the structure of
the chimney during or after the smoke pellet test and it is
important to check inside upstairs rooms / loft spaces adjacent to the
chimney / flue. Check the chimney pot / terminal and general condition of
the brickwork or masonry. If the chimney or flue is in poor condition or if
there is no up-draught do not proceed with the installation. If there is a
history of down-draught conditions with the chimney / flue, a tested and
certificated flue terminal or cowl suitable for the relevant flue type should
be considered.
6. A spillage test must always be carried out during commissioning of
the appliance.
1.6 HEARTHS
This stove must only be installed on to a concrete or non-combustible hearth. The
hearth material must be a minimum thickness of 12mm with the top surface at
least 50mm above the floor. The hearth must be fitted symmetrically about the fire
opening and project at least 50mm from the base of the stove in all directions.
1.7 SPILLAGE MONITORING SYSTEM
This appliance is fitted with an spillage sensing thermal switch. This is designed
to shut the fire off in the event of a partial or complete blockage of the flue causing
a build up of combustion products in the room in which the fire is operated. The
following are important warnings relating to this spillage
monitoring system :-
1.7.1 The spillage monitoring system must not be adjusted by the installer.
1.7.2 The spillage monitoring system must not be put out of operation.
1.7.3 When the atmosphere sensing thermal switch is exchanged only a
complete original manufacturers part may be fitted. It is not possible to
replace individual parts on the pilot system on this appliance, only a
complete switch assembly (including the connecting wires) may be
fitted.
6

SECTION 2
INSTALLATION OF FIRE
2.1 UNPACKING THE STOVE
Carefully remove the stove from it’s packaging taking care not to damage the gas
controls located beneath the stove. Remove the loose items pack. Remove the
loose item packaging carefully from the the pack. Check the contents as listed :-
DO NOT UNDER ANY CIRCUMSTANCES USE THIS APPLIANCE IF THE GLASS PANEL
IS BROKEN OR NOT SECURELY FIXED TO THE DOOR ASSEMBLY.
Packing Check List
1 off Stove body, burner assembly and controls.
1 off Boxed ceramic 4 piece log fuel-bed set, bark & front rail
1 off Closure plate
1 off Installation / user manual (combined)
1 off Guarantee card
1 off Horizontal flue spigot (150mm)
2 off AA batteries (3 off fitted during manufacture to battery holder, 2 off for
handset supplied loose)
1 off RC handset
2.2 INSTALLING THE STOVE
Due to the weight of the appliance it does not require additional fixing, however if
you wish to mechanically secure the stove, holes are provided in the stoves feet.
There are several methods of installing the Flavel gas stove to the flue system.
Please follow the installation criteria stated below dependent upon which type of
flue you are intending to install this gas stove into :-
2.2.1 If you have a stone or brick built chimney with an integral clay flue
liner, and you wish to fit the stove with a top flue outlet, please refer
to section 2.3 for further instuctions.
2.2.2 If you have a stone or brick built chimney without an integral clay flue
liner, and wish to fit the stove with a rear flue outlet and closure
plate, please refer to section 2.4 for further instructions.
2.2.3 If you have a stone or brick built chimney without an integral clay flue
liner, and wish to fit the stove with a top flue outlet please refer to
section 2.5 for further instructions.
2.2.4 If you have no chimney and are planning to fit the stove with a
pre-fabricated flue system, please refer to section 2.6 for further
instructions.
7

2.3 INSTALLING THE STOVE USING TOP FLUE OUTLET WHEN
CHIMNEY HAS INTEGRAL CLAY FLUE LINER.
Fig. 2
8
Minimum effective
flue height
3.0 metres
F
lue termination
t
o comply with
BS 5440-1
Flue pipe to project not
less than 150mm
above register plate
Register plate
Integral clay chimney
liner
IMPORTANT NOTE : If the stove is fitted with a top flue outlet and the chimney
does not have an integral chimney liner then the flue must be lined with a flexible
flue liner. Alternatively, the stove can be fitted with the closure plate and a rear flue
outlet as shown in section 2.4 overpage
Minimum 100mm side and
25mm rear clearance to non
combustible or 300mm to
combustible
surfaces to be strictly adhered
to.

2.4 INSTALLING THE STOVE USING REAR FLUE OUTLET WHEN
CHIMNEY HAS NO INTEGRAL CLAY FLUE LINER.
Fig. 3
9
Minimum effective
flue height
3.0 metres
Flue termination
to comply with
B
S 5440-1
Use flue spigot
supplied to obtain
150mm projection
into chimney.
Register plate
Closure plate
to be sealed
with adhesive
tape that
complies to
British Gas
PRS10
specification
Void volume to be a
minimum of 12dm
3
Minimum 250mm from
bottom of flue duct to
base of fireplace opening
Minimum 100mm side and 25mm
rear clearance to non combustible
or 300mm to combustible
surfaces to be strictly adhered to.

2.5 INSTALLING THE STOVE USING TOP FLUE OUTLET WHEN
CHIMNEY HAS NO INTEGRAL CLAY FLUE LINER.
Fig. 4
10
Minimum effective
flue height
3.0 metres
Flue termination
t
o comply with
BS 5440-1
Register plate
5” / 125mm
Flexible flue
liner
5” / 125mm
flue liner
IMPORTANT NOTE : If the stove is fitted with a top flue outlet and the chimney
does not have an integral chimney liner then the flue must be lined with a flexible
flue liner as shown above. Alternatively, the stove can be fitted with the closure
plate and a rear flue outlet as shown in section 2.4 on the previous page.
Minimum 100mm side and 25mm
rear clearance to non combustible
or 300mm to combustible
surfaces to be strictly adhered to.

2.6 INSTALLING THE STOVE USING A PRE-FABRICATED FLUE
SYSTEM
Fig. 5
11
Minimum effective
flue height
3.0 metres
Flue termination
t
o comply with
B
S 5440-1
5” / 125mm
Flue liner to
BS 715
Ensure that clearances
to combustible materials
comply with building
regulations
Product shown fitted in top flue
outlet position, product can also be
fitted to pre-fabricated flue system
via rear outlet on the stove.

2.7 CHANGING THE FLUE OUTLET FROM TOP TO REAR
2.7.1 There is a choice of either top of rear flue outlet options for the Flavel
gas stove. The stove is supplied from the factory with the flue outlet in
the top position, if you wish to use the rear flue outlet then follow the
instructions below to change the outlet from top to rear.
Fig. 6
Fig. 7
12
Blanking plate
Flue spigot
Closure plate
Flue spigot extension
Flue restrictor baffle
Flue outlet plate
Flue spigot
Blanking plate

2.8 REMOVAL & RE-FITTING THE FLUE RESTRICTOR BAFFLE
2.8.1 The flue restrictor baffle can be removed and re-fitted as shown below
in figure 8.
Fig. 8
2.8.2 The optional extra flue casting collar as shown above in figure 8 can be
used to reduce the distance from the rear of the stove to the centre of
the flue when installing into shallow chimney applications. Please quote
part number B-178420 if ordering the flue casting collar.
2.8.3 It is recommended that the removal or re-fitting of the flue
restrictor baffle is completed with the flue pipe disconnected from
the spigot.
13
Flue restrictor baffle
Flue outlet plate
Flue spigot
F
lue restrictor baffle
securing screws
Optional flue
casting collar

2.9 MAKING THE GAS CONNECTION / PRESSURE TESTING
2.9.1 The gas connection should be made to the appliance inlet elbow to
using 8mm rigid tubing.
2.9.2 Remove the pressure test point screw from the inlet elbow and fit a
manometer.
2.9.3 Turn on the main gas supply and carry out a gas tightness test.
2.9.4 Please consult section 3.4 to 3.7 for full lighting instructions.
2.9.5 Check that the gas pressure is 20.0 mbar (+/- 1.0mbar) 8.0 in w.g.(+/-
0.4 in w.g.).
2.9.6 Turn off the stove, remove the manometer and refit the pressure test
point screw. Check the pressure test point screw for gas tightness with
the appliance turned on using a suitable leak detection fluid or detector.
14

2.10 FITTING THE BATTERIES
2.10.1 To prevent un-necessary battery drain, the battery pack that is
used to provide the remote and electronic control function for this
product is disconnected at the factory. Prior to attempting to light the
product, can the installer please ensure that the battery pack is
re-connected as shown in section 2.10.2 & 2.10.3 below.
2.10.2 Locate the battery pack in the support cradle at the bottom L/H side of
the stove (batteries are fitted to this from the factory).
2.10.3 The wire and connecting plug from the battery pack should then be
re-connected into the supply wire running from the control unit / valve.
See figure 9 below.
Fig. 9
2.10.4 Fit 2 off AA batteries to the handset by unclipping the rear cover, fitting
the batteries then replacing the rear cover. Switch the white power
isolation switch to the “on” position on the valve after connecting the
battery pack.
15
Battery pack
Power isolation switch
location - slide to “on”
position after
connecting battery pack
Connecting wire - battery
pack to control valve

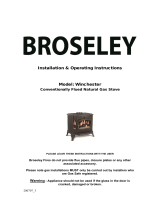
3.1 ASSEMBLING THE LOG FUEL BED
3.1.1 Place the ceramic base log on top of the fuelbed support and pull
fully forwards to the burner. Make sure that the ceramic log base
is positioned centrally in the stove. Ensure that the fuelbed base
fits fully down onto the fuel bed support and is not lodged on the
burner. See figure 10 below.
Fig. 10
3.1.2 Place the vermiculite front log support onto the burner front rail as
shown below in figure 11.
Fig. 11
16

3.1.3 Place a single layer of bark onto the front log support as shown below
in figure 12.
Fig. 12
3.1.4 Place log “B” onto the right hand end of the base ceramic log as shown
below in figure 13.
Fig. 13
17
Log “B”

3.1.5 Place log “C” onto the groove in the centre of the base ceramic log as
shown below in figure 14.
Fig. 14
3.1.6 Place log “A” onto the groove in the left hand centre of the base
ceramic log as shown below in figure 15.
Fig. 15
18
Log “C”
Log “A”

The exact position and fit of the logs may be finely adjusted to give the most
pleasing and random appearance.
Warning : Use only the logs supplied with the fire. When replacing the
logs remove the old logs and discard them. Fit a complete set
of logs of the correct type. Do not fit additional logs or any
logs other than a genuine replacement set.
This appliance uses fuel effect pieces containing Refractory Ceramic Fibres
(R.C.F.), which are man-made vitreous silicate fibres. Excessive exposure to
these materials may cause temporary irritation to eyes, skin and respiratory
tract. Consequently, it makes sense to take care when handling these
articles to ensure that the release of dust is kept to a minimum. To ensure
that the release of fibres from these R.C.F. articles is kept to a minimum,
during installation & servicing we recommend that you use a HEPA filtered
vacuum to remove any dust and soot accumulated in and around the fire,
before and after working on the fire. When replacing these articles we
recommend that the replaced items are not broken up, but are sealed within
a heavy duty polythene bag, clearly labelled as “RCF waste”. This is not
classified as “hazardous waste” and may be disposed of at a tipping site
licensed for the disposal of industrial waste. Protective clothing is not
required when handling these arrticles, but we do recommend you follow the
normal hygiene rules of not smoking, eating or drinking in the work area,
and always wash your hands before eating or drinking. This appliance does
not contain any component manufactured from asbestos or asbestos related
products.
19
/