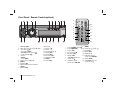
LG LAC3800 is a car MP3/WMA receiver with a detachable control panel and a variety of features to enhance your in-car audio experience. With its CD player, you can enjoy your favorite music on the go. It also has an auxiliary input, so you can connect your smartphone or other audio device to play music, podcasts, or audiobooks. The built-in FM/AM tuner lets you listen to your favorite radio stations, and the 3-band equalizer allows you to customize the sound to your liking.
LG LAC3800 is a car MP3/WMA receiver with a detachable control panel and a variety of features to enhance your in-car audio experience. With its CD player, you can enjoy your favorite music on the go. It also has an auxiliary input, so you can connect your smartphone or other audio device to play music, podcasts, or audiobooks. The built-in FM/AM tuner lets you listen to your favorite radio stations, and the 3-band equalizer allows you to customize the sound to your liking.


-
 1
1
-
 2
2
-
 3
3
-
 4
4
-
 5
5
-
 6
6
-
 7
7
-
 8
8
-
 9
9
-
 10
10
-
 11
11
-
 12
12


LG LAC3800 is a car MP3/WMA receiver with a detachable control panel and a variety of features to enhance your in-car audio experience. With its CD player, you can enjoy your favorite music on the go. It also has an auxiliary input, so you can connect your smartphone or other audio device to play music, podcasts, or audiobooks. The built-in FM/AM tuner lets you listen to your favorite radio stations, and the 3-band equalizer allows you to customize the sound to your liking.
Ask a question and I''ll find the answer in the document
Finding information in a document is now easier with AI