Page is loading ...

Owner’s Manual
82S6AWS030B

Begbroke, Oxford, England OX5 1RU • +44 (0)1865 842300
320 West 46th Street, 2nd Floor, New York, NY 10036, USA • +1 (1) 212 315 1111
Suite 401, 5757 Wilshire Blvd, Los Angeles, CA 90036, USA • +1 (1) 323 549 9090
3-55-14 Sendagaya, Shibuya-Ku, Tokyo 151-0051, Japan • +81 (0)3 5474 1144
7 bis, rue de la Victoire, le Blanc Mesnil, Paris 93150, France • +33 (0)1 48 67 84 85
Via Timavo 34, 20124 Milano, Italy • +39 (0)39 2328 094
Visit SSL at http://www.solidstatelogic.com
© Solid State Logic
All Rights reserved under International and Pan-American Copyright Conventions
Solid State Logic, SSL, AWS 900, AWS900+, AWS900+ SE,
AWSomation and Total Recall are trademarks of Solid State Logic
All other trademarks are the property of their respective owners
No part of this publication may be reproduced in any form or
by any means, whether mechanical or electronic, without the
written permission of Solid State Logic, Oxford, England
Initial release (0A) March 2006
Section 5A added June 2006
Updated to AWS900+ SE January 2009
As research and development is a continual process, Solid State Logic reserves the right
to change the features and specifications described herein without notice or obligation.
E&OE

1
Safety and Installation Considerations
G
raphical Symbols 1-1
General Safety 1-1
Caution 1-1
Power Safety 1-2
Caution 1-3
FFC Notice 1-3
WEEE Directive Information 1-3
Standards Conformance 1-3
About This Manual 1-4
Conventions Used 1-4
Contacting Solid State Logic 1-4
2 Introduction to the AWS 900+ SE
Analogue Workstation System 2-1
Design Concepts 2-1
Key Features Summary 2-1
SuperAnalogue
T
M
Audio Quality 2-1
Console Feature Summary 2-1
Exceptional Signal Processing 2-2
Creative Versatility 2-2
DAW Controller 2-2
Controller Features Summary 2-2
3 Installation and Setup
Pre-Installation Requirements 3-1
Console Control Surface 3-1
Air Conditioning Requirements 3-1
Cable Ducting 3-1
Service Access 3-1
Power Connections 3-1
Grounding 3-1
Thermal Considerations 3-1
Console Drawing 3-2
Unpacking The Console 3-3
Attaching the legs 3-3
Removing the trim 3-5
Studio Integration 3-7
Audio Connections 3-7
Line Level Input/Outputs 3-7
Connecting a Patchbay 3-8
Mic Inputs 3-8
Instrument Inputs 3-8
DAW Connection 3-9
Overview 3-9
Installing the ipMIDI Driver and Logictivity Browser 3-9
Software Installation (Macintosh) 3-9
AWS 900+ SE Owner’s Manual
TOC-1
Table of Contents
Table Of Contents

Software Installation (PC) 3-10
Make and Configure the Network Connection 3-10
Direct Network Connection (Macintosh) 3-10
D
irect Network Connection (PC) 3-13
Enabling ipMIDI on your AWS 3-14
Setting your workstation(s) to Communicate via ipMIDI 3-15
Pro Tools 7 3-16
Logic Pro 8 3-17
P
references/Control Surfaces Setup Menu 3-18
Network Trouble Shooting 3-19
Larger Networks 3-20
Assigning the AWS900+ SE IP Address 3-21
Enabling the AWS Logictivity Features on your Console 3-22
Using Physical MIDI Ports to connect your DAW 3-22
4 Console Operator’s Guide
Overview 4-1
About this Section 4-1
Routing and Signal Flow 4-3
DAW System Configurations 4-3
DAW I/O Labelling 4-4
Example Methods of Operation 4-5
Recording 4-5
Mixing 4-7
Channel Strip 4-8
Introduction 4-8
Channel Input Section 4-9
Filter 4-9
Equaliser 4-9
Insert Point 4-9
Direct Output 4-9
Cue Stereo Send 4-9
FX Sends 4-9
Channel Output 4-10
Upper Scribble Strip 4-10
D-Pot Rotary Encoder 4-10
D-Pot Cut and Solo 4-10
Select Button 4-10
Lower Scribble Strip 4-10
Channel Cut and Solo 4-10
Automation control 4-10
Moving Fader 4-10
DAW Status Indicators 4-11
Channel Meters 4-11
Overload Indicators 4-11
Track Bus Routing 4-11
Dynamics Assignment 4-11
Signal Processor Routing 4-12
Centre Section 4-15
Introduction 4-15
Power Supply Indicators 4-15
Main Output Functions 4-15
Console Operator’s Guide
TOC-2
AWS 900+ SE Owner’s Manual

4 Console Operator’s Guide (continued)
Dynamics 4-16
S
tereo Compressor 4-16
Master Fader 4-16
Centre Section Dynamics 4-17
Compressor Limiter 4-17
Gate/Expander 4-17
M
etering 4-18
Track Bus Master Controls 4-18
Monitoring 4-19
External Source Selectors 4-20
Monitor Insert 4-21
Monitor Options 4-21
Bass Management 4-22
Monitor Level Calibration 4-23
Monitor Level Display and Calibrated Listening Level 4.24
Solo/AFL/PFL 4-25
Cue/FX Send Master Controls 4-25
Foldback and Headphone Outputs 4-26
Stereo FX Returns 4-27
Misc Options 4-27
Communications 4-28
Oscillator 4-29
Centre Section Metering 4-30
Daw Control 4-31
The AWS Console Setup Menu 4-31
5 DAW Control Guide
Introduction 5-1
DAW Controller Features Summary 5-1
Communication with your DAW 5-1
Overview 5-2
Console Focus Button 5-2
D-Pots 5-2
Console Focus 5-2
Analogue Focus Mode 5-2
DAW Focus Mode 5-2
Digital In-Line Mode 5-2
The Master Control Panel 5-3
Channel Banking Controls 5-3
DAW Window Buttons 5-3
DAW Utility Buttons 5-4
The Default Button 5-5
Channel Functions 5-6
DAW Meters 5-6
Status Indicator 5-6
Channel Fader 5-6
Channel Solo and Cut Tile 5-7
Channel D-Pot 5-7
Solo and Cut Buttons 5-7
Channel Select Button 5-7
AWS 900+ SE Owner’s Manual
TOC-3
Table of Contents

5 DAW Control Guide (continued)
Scribble Strip Displays 5-7
C
hannel SEL Button –Track Arming/Edit/Select 5-8
Record Ready Mode 5-8
Edit Mode 5-8
Select Mode 5-8
Working With Channel D-Pots 5.9
P
an Mode 5-9
Channel Mode 5-9
Send Mode 5-9
Setting Sends Pre/Post Fader 5-10
Muting Sends 5-10
Flipping Send Levels to the Faders 5-10
Input Output and Send Routing 5-11
Viewing Input, Output and Send Routing 5-11
Setting Input, Output and Send Routing 5-11
Assigning Signals To Multiple Channels 5-11
Assigning a Channel to Multiple Outputs 5-11
Motion Control Panel 5-10
Transport Controls 5-10
Other Useful Transport Modes 5-12
IN/OUT and PRE/POST 5-11
Setting Pre and Post Roll 5-13
Setting Start and End Times 5-13
Audition 5-13
Footswitch Control 5-13
ZOOM, Navigation and Selection Modes 5-14
Navigation Edit Mode 5-14
Zoom Mode 5-14
Selection Mode 5-14
Scrolling Within a Window 5-14
Shuttle/Scrub Wheel 5-15
Using the Shuttle Wheel 5-15
Using Scrub Mode 5-15
Using the Numeric Keypad to Shuttle 5-15
Exit from Scrub/Shuttle Mode 5-15
Notes on Scrub/Shuttle Mode 5-15
Numeric Keypad 5-15
Working with Markers/Memory Locations 5-15
Plug-In Editor 5-16
Plug-In Editor Display 5-16
Plug-In Editor Controls 5-16
Paging Buttons 5-16
Selecting a DAW Channel for Plug-in Control 5-16
Timecode/Bars & Beats/Samples Display 5-17
DAW Status Display 5-17
Plug-in Display Modes 5-17
Viewing Current Inserts (Insert Mode) 5-17
Assigning a Plug-in or I/O Insert (Assign Mode) 5-17
Assigning the Same Plug-in to all Channels 5-17
Assigning the Same Plug-in to Selected Channels 5-17
Console Operator’s Guide
TOC-4
AWS 900+ SE Owner’s Manual

5 DAW Control Guide (continued)
Editing Plug-in Parameters (Parameter Mode) 5-18
S
electing a Plug-In to Edit 5-18
Changing Plug-in Parameters 5-18
Hi-Resolution Parameter Display Mode 5-18
Comparing Your Changes 5-18
Bypassing Plug-ins 5-18
D
-Pot Sensitivity 5-18
Soft Key Display 5-19
Automation Enables Menu 5-19
Automation Modes Menu 5-19
Edit Tools Menu 5-20
Edit Modes Menu 5-20
Status/Group Menu 5-20
Function Keys Menu 5-21
Edit Menu 5-21
SSL Menu 5-21
Working with Automation 5-22
Automation Enables 5-22
Automation Modes 5-22
Trim Mode 5-22
Automation Status 5-22
Automation Override Mode 5-23
Suspending Automation 5-23
Writing Automation to Start, End etc. 5-23
Automating Switches 5-23
Automating Pans and Sends 5-23
Automating Plug-Ins 5-23
Automation Indicators for Plug-in Parameters 5-23
HUI with Non Pro Tools DAW’s 5-24
Working with two DAW’s 5-24
MCU Emulation Advantages 5-25
Implementation 5-25
DAW Control Function Key Overview 5-27
The Logic Template 5-28
Logic Control Key Layout 5-28
Transport Function Key Layout 5-29
AWS Logic Control Screen 5-29
The Nuendo/Cubase Template 5-31
Nuendo Control Key Layout 5-32
AWS Nuendo Control Screen 5-33
Mackie Control Surface Steinberg Overlay 5-34
The Sonar Template 5-35
Sonar Control Key Layout 5-36
AWS Sonar Control Screen 5-37
Mackie Control Surface Steinberg Overlay 5-38
The Digital Performer Template 5-39
Digital Performer Control Key Layout 5-39
AWS Digital Performer Control Screen 5-41
Mackie Control Surface Digital Performer Overlay 5-42
AWS 900+ SE Owner’s Manual
TOC-5
Table of Contents

6 Total Recall
Overview 6-1
I
nstallation 6-1
Operation 6-1
Accessing Total Recall 6-1
The SEL Menu 6-2
Storing Setups 6-2
C
hanging the Selected Setup 6-2
Deleting Setups 6-2
Total Recall via Logictivity 6-3
Saving Legacy MIDI Setups to a Mac or PC 6-4
Restoring Legacy MIDI Setups to a Mac or PC 6-4
Total Recall Display Pages 6-5
The Channel Display 6-5
The Section Displays 6-6
Installation of Total Recall Option 6-7
7 AWSomation
Overview 7-1
Key Features 7-1
Quick Guide 7-1
Operation 7-2
Accessing AWSomation 7-2
List Mix Menu 7-2
Changing the Selected Mix Passes 7-2
AWSomation Data Management via Logictivity 7-3
Creating a Mix Pass 7-4
New Mix Setup 7-4
Mix Running 7-5
Join and Revise 7-6
Discard 7-6
Updating A Mix Pass 7-7
Selecting Protection 7-7
Automation Options 7-7
Trim 7-7
TLock 7-8
Motors Off 7-8
Snap Mode 7-9
AutoTakeover 7-9
Cut Automation 7-9
Copy and Swap 7-10
Automation Setup Options 7-11
Fader Links 7-12
Pro Tools Setup Notes 7-13
Saving Mix Passes to a Mac or PC via Legacy MIDI SysEx 7-16
Installation 7-17
Console Operator’s Guide
TOC-6
AWS 900+ SE Owner’s Manual

8 Logictivity and Projects
Key Features 8-1
T
he AWS 900 Remote 8-2
Projects Tab 8-3
Mixes Tab 8-5
Total Recall Tab 8-6
Channels Tab 8-7
E
xternals Tab 8-8
About Tab 8-9
Appendices
Console Specification A-1
Service & Warranty Information A-2
Audio Connectors and Pinouts A-3
MIDI Implementation Chart A-6
Troubleshooting A-8
Introduction A-8
Locating Problems A-8
Control Faults A-9
Replacing Modules A-11
The Channel Strip A-12
The Channel Fader A-13
The Channel Meter Panel A-14
Centre Section Cards A-14
Trouble Shooting Chart - Channel Bay A-16
Trouble Shooting Chart - Centre Section A-17
Glossary Of Terms A-18
Link Options A-19
Environmental Specification A-20
Block Diagrams A-21
AWS 900+ SE Owner’s Manual
TOC-7
Table of Contents

Console Operator’s Guide
TOC-8
AWS 900+ SE Owner’s Manual

This section contains definitions, warnings, and practical information necessary to ensure a safe working environment.
Please take time to read this section before installing or using your AWS 900+ SE. Please do not dispose of these
instructions.
Graphic Symbols
The following symbols may be used in this section and elsewhere in this manual:
General Hazard
(refer to User or Service Instructions for details)
Electrical Hazard
General Safety
• Read these instructions.
• Keep these instructions.
• Heed all warnings.
• Follow all instructions.
• Do not use this apparatus near water.
• Do not expose this apparatus to rain or moisture.
• Clean only with dry cloth.
• Do not block any ventilation openings. Install in accordance with the manufacturer’s instructions.
• Do not install near any heat sources such as radiators, heat registers, stoves or other apparatus (including amplifiers)
that produce heat.
• Ensure that this apparatus is positioned on a secure level surface.
• Ensure that no strain is placed on the cables connecting to this apparatus. Ensure also that such cables are not placed
where they can be stepped on, pinched, pulled or tripped over in any way.
• Refer all servicing to qualified personnel. Servicing is required when the apparatus has been damaged in any way,
such as power-supply cord or plug is damaged, liquid has been spilled or objects have fallen into the apparatus, the
apparatus has been exposed to rain or moisture, does not operate normally or has been dropped.
• Adjustments or alterations to this apparatus may affect the performance such that safety and/or international
compliance standards may no longer be met.
• This apparatus is designed for use solely by engineers and competent operators skilled in the use of professional
audio equipment.
Caution
The AWS 900+ SE console is too heavy for one person to lift. If covers or panels are removed for any
reason, sharp edges may be present on exposed metalwork.
To reduce the risk of fire or electric shock, do not expose this apparatus to rain or moisture.
To reduce the risk of electric shock, do not perform any servicing unless you are qualified to do so.
AWS 900+ SE Owner’s Manual
1-1
Important Information
Section 1 – Safety and Installation Considerations

Power Safety
• This apparatus includes a universal power supply, approved and certified for operation in this apparatus.
• This apparatus is supplied with a 3-core power cord and must be connected to a 3-pin grounded ac. power supply.
• To ensure safe operation of this apparatus, connect only to an ac. power source that contains a protective earthing
(PE) conductor. This apparatus is designed for connection to single phase supplies with the neutral conductor at earth
potential – category TN or TT – and is fitted with a protective fuse in the live conductor only. This apparatus is not
designed for use with live and neutral connections reversed or where the neutral conductor is not at earth potential (IT
s
upplies). This apparatus should not be connected to a power system that switches open the return (neutral) lead
when the return lead also functions as the protective earth (PE).
•
Use only the Solid State Logic provided power cord. Use of any other power cord is not covered by your warranty and
may cause fire or explosion.
•
The supplied power cord will be coded with either of the following colour schemes:
1 or 2
LIVE: Brown Black
NEUTRAL: Blue White
EARTH: Yellow/Green Green
• Do not defeat the safety purpose of the polarised or grounding-type plugs fitted to the power cord. A polarised plug has
two blades with one wider than the other. A grounding type plug has two blades and a third grounding prong. The wide
blade or the third prong are provided for your safety. If the provided plug does not fit into your outlet, consult an
electrician for replacement of the obsolete outlet.
• An external disconnect device is required for this apparatus; a detachable power cord – as fitted to this apparatus – is
a suitable disconnect device.
• An external over-current protection device is required to protect the wiring to this apparatus which must be installed
according to current wiring regulations: 5A for 230V supplies; 10A for 100 – 110V supplies. In certain countries this
function is supplied by use of a fused plug. In other cases a fused spur or circuit breaker should be used according to
local practice.
• If an extension power cable or adaptor is used, ensure that the total power rating of the power cable and/or adaptor is
not exceeded.
• The power socket used for this apparatus should be located nearby and be easily accessible.
• Unplug this apparatus during an electrical storm or when unused for long periods of time.
• Do not operate this apparatus whilst it is covered or boxed in any way.
• To reduce the risk of electric shock, do not perform any servicing unless you are qualified to do so.
• Disconnect the power cord before removing any panels. The power switch alone does not provide adequate isolation
for service access.
• Do not permit anyone to remove panels or covers from this apparatus, other than qualified service personnel.
• Do not permit anyone other than qualified service personnel to operate this apparatus unless all panels and covers are
in place.
Important Information
1-2
AWS 900+ SE Owner’s Manual

Caution
When installing or servicing any item of SSL equipment with power applied, when cover panels are
r
emoved:
H
AZARDOUS CONDITIONS CAN EXIST!
T
hese hazards include: • High energy stored in capacitors
• High currents available from DC power busses
• Hot component surfaces
• High voltages
To reduce the risk of fire, replace internal fuses only with identical type and rating.
AWS 900+ SE may contain a lithium battery (CPU assembly 629645). There is a danger of explosion
if the battery is incorrectly fitted. Replace only with the same or equivalent type.
FCC Notice
This equipment has been tested and found to comply with the limits for a Class A digital device, pursuant to
part 15 of the FCC Rules. These limits are designed to provide reasonable protection against harmful
interference when the equipment is used in a commercial environment. This equipment generates, uses, and
can radiate radio frequency energy and, if not installed and used in accordance with the instruction manual,
may cause harmful interference to radio communications. Operation of this equipment in a residential area is
likely to cause harmful interference in which case the user will be required to correct the interference at his own
expense.
Instructions for Disposal of WEEE by Users in the
European Union
The symbol shown here is on the product or on its packaging, which indicates that this product must
not be disposed of with other waste. Instead, it is the user’s responsibility to dispose of their waste
equipment by handing it over to a designated collection point for recycling of waste electrical and
electronic equipment. The separate collection and recycling of your waste equipment at the time of
disposal will help to conserve natural resources and ensure that it is recycled in a manner that protects
human health and the environment. For more information about where you can drop off your waste equipment
for recycling, please contact your local city office, your household waste disposal service or where you
purchased the product.
Standards Conformance
This apparatus fully conforms with the current protection requirements of the European community
council directives on EMC and LVD.
AWS 900+ SE Owner’s Manual
1-3
Important Information

About this manual
T
his manual is divided into eight main sections, and is designed to provide a comprehensive source of
information for both installers and users of the AWS 900+ SE console. The table of contents will help you to
familiarise yourself with the basic content of each section. If you are reading this from an electronic version of
the manual, use the ‘bookmark’ feature to locate to any topic almost immediately.
P
lease read the opening pages of Section 3 before attempting to install the console, particularly the warnings
about lifting and positioning the console.
If you have not previously used an SSL console, you are advised to read an introduction to the AWS 900+ SE
in Section 2. Those of you who have experience of SSL’s legendary range of analogue consoles will have little
difficulty getting to grips with the operation of this console. Features that are specific to the AWS 900+ SE are
fully described in Section 4.
To set-up and configure the software interface between the AWS 900+ SE and your chosen DAW, please study
Section 5. This section also covers those DAW functions that you can now usefully control from the AWS 900+ SE
centre section.
Finally, the last section in this manual holds a number of useful appendices that you may need to refer to from
time to time.
Conventions Used
Some typographical conventions have been used in this manual to help distinguish explanatory text from the
text referring to items on the console. They are as follows:
• Switch cap engravings on the console are usually in UPPERCASE (eg. SOLO).
• Silk screened text on the console’s control surface can be either UPPERCASE (eg. DYNAMICS), or
lowercase bold (eg. auto), or Titlecase (eg. Talkback Mix).
• Any text on the console’s TFT screen is referred to in a Bold typeface.
• Items of note or cautions are shown in a red typeface.
• Whenever this manual mentions the selection or pressing of a button, it is assumed that the button was not
active (ie. not lit), and that this action has made it active (ie. it has become lit).
• Similarly, whenever the manual mentions the deselection of a button (or pressing it again), it is assumed that
it was active before the action, and has become inactive due to this action.
Contacting Solid State Logic
If you cannot find the information you need on the pages of this manual, please see the AWS 900+ SE support
pages at http://www.solidstatelogic.com
Important Information
1-4
AWS 900+ SE Owner’s Manual

The AWS 900+ SE – Analogue Workstation System
The AWS 900+ SE is a revolutionary combination of a compact world-class analogue mixing console and a
comprehensive DAW controller. Based on the DNA of SSL’s flagship XL 9000 K Series console, the
AWS900+ SE provides everything you need to record, edit and mix professional projects – just add the
workstation of your choice.
Solid State Logic mixing systems are the de facto standard in audio production, valued for their unrivalled audio
quality and control ergonomics. SSL was the first company to integrate automation and machine control into
the mixing console, and it pioneered surround mixing. The AWS 900+ SE delivers the same powerful
integration benefits to DAW users, who face similar challenges with an array of equipment (Mic Amps, Effects,
Controllers etc.) to produce professional results from a modern DAW.
Design Concepts
The AWS 900+ SE is the only console that provides the dual benefits of a fully featured SuperAnalogue signal
path, coupled with a comprehensive DAW controller. The product is a result of extensive customer and market
feedback.
Key Features Summary
• Combined SSL console and DAW controller
• Legendary SSL SuperAnalogue™ mic preamps and signal processing
• Comprehensive monitoring system up to 5.1 surround
• Direct control of DAW recording, editing and mixing functions
• Flexible signal routing
• Logictivity Browser
• MIDI over Ethernet
SuperAnalogue™ Audio Quality
The AWS 900+ SE is a complete, compact SSL console, with all of the audio quality, robustness and advanced
ergonomics that this implies. AWS 900+ SE offers no-compromise audio performance, equivalent to SSL’s
celebrated XL 9000 K Series mixing console, which is a feature of major studios the world over.
Signal routing, inputs/outputs, monitoring and signal processing are all permanently available on the console.
Quality motorized faders provide conventional audio level control as well as controlling the recording and replay
levels in your DAW.
Console Feature Summary
• Integrated console, signal acquisition, signal processing, studio monitoring, Bass management and DAW control
• Advanced DAW control through a high resolution integrated TFT screen
• Small elegant design with desk installation or freestanding options
• Innovative large fader dual-control of both DAW and console input path with follow fader metering
• Logictivity Browser for console session management
AWS 900+ SE Owner’s Manual
2-1
Introduction
Section 2 – Introduction

Exceptional Signal Processing
• Legendary SSL sound quality
• SuperAnalogue™ technology derived from SSL’s flagship XL 9000 K Series console
• DC Coupled for excellent low frequency response
•
Balanced signal paths throughout for optimal dynamic range
• Greater bandwidth than 192kHz recorders
• 24 Ultra low-noise dual impedance mic amps
• 24 channels with twin-curve SSL E and G Series 4-band parametric equalization
• Assignable dynamics sections with gate, expander and compressor/limiter
• G Series stereo mix buss compressor
• Flexible processing order
Creative Versatility
• Dual mix bus design for comprehensive control of Inputs and DAW mixing and monitoring
• 5.1, stereo or stereo down-mix monitor outputs
• 8 Track busses
• Two main busses – Record and Mix
• 8 aux busses plus EFX re-assign system on all 24 channel modules
• Wide range of solo modes including Solo-In-Front
• 4 stereo echo returns
• Unrivalled comprehensive studio monitoring section
• Hi-visibility channel meters, 4 main VU meters and complete bus metering in the centre section
DAW Controller
DAWs provide the power and convenience of recording and editing audio, but a keyboard and mouse is not the
most intuitive way to access these controls. For most users, finding an integrated solution that answers all of
their working needs is strongly desired. The AWS 900+ SE achieves this to an extent and quality that has
previously been unavailable.
Controller Features Summary
• Direct access to all major DAW mixing, editing and automation parameters
• Direct control of plug-in settings
• Dedicated control processor to maximize console performance
• Integral colour TFT display with dedicated control keys
• User-definable controls on every channel
• High quality motorized faders to write/replay level moves in your DAW
• Simple switching between console layer and DAW control layer
• Full remote control implementation
• Operation independent of platform – works with ProTools™, Nuendo™, Logic Audio™, and many more
• MIDI connection via Ethernet
Enjoy.......
Introduction
2-2
AWS 900+ SE Owner’s Manual

Pre-Installation Requirements
Console Control Surface
The AWS 900+ SE console is a self contained system; there are no remote power supplies or I/O racks. The
frame is not fitted with cooling fans. See the following page for a drawing of the console footprint.
Air Conditioning Requirements
It is unlikely that additional air conditioning will be required after installing the AWS 900+ SE (with its typical
450W dissipation). It is possible however, that when all the studio equipment is taken into consideration,
particularly if additional lighting is being installed, the combined heat output could be sufficient to cause the
temperature to rise to uncomfortable levels. The appendix section contains environmental specifications for SSL
equipment.
Cable Ducting
Cable ducting may be required between the console and any outboard racks and the recording areas. If a full
remote patchbay is being provided then the ducting will need to be of sufficient size to allow at least twelve 24-
circuit multicore cables to be accommodated.
Service Access
Access to all electronic assemblies within the frame is from the front of the console. Note however, that each of
the console’s modules is retained by a screw through its rear panel. Is necessary therefore, to have access to
the rear of the console.
Power Connections
The console is fitted with auto-sensing power supplies which will function at any voltage from 90 to 250 volts
without adjustment. It is supplied with two IEC mains power-leads. One will have a US-style 3-pin mains plug
fitted, the other will be unterminated to allow the user to install a mains plug of their preferred type; the wires are
colour-coded according to the EC standard.
Grounding
A standard system should not require any additional grounding over and above that provided by a correctly
installed mains supply. The console’s chassis is permanently bonded to mains earth.
Safety Warning: The mains input ground wire MUST be connected to the supply earth.
Thermal Considerations
The maximum dissipation of an AWS 900+ SE is less than 600W (typically 450W). The console is cooled by
convection from the front inlet (in the knee panels) to the exit at the top of the rear panels. It is very important
that these ventilation grills are not obstructed in any way.
Particular care must be taken when considering the installation of studio furniture – such as shelving – across
the rear of the console. Sufficient space must be left for the free flow of air from the rear grills, and also above
the heatsink fins. Clearance behind the console must not be less than 50mm and clearance above the console
not less than 200mm.
Note: The heatsink fins on the console rear panels can reach temperatures of approximately 30 degrees
Celsius above ambient room temperature.
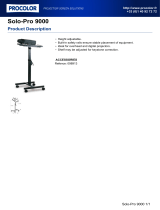
AWS 900+ SE Owner’s Manual
3-1
Installation
Section 3 – Installation

Installation
3-2
AWS 900+ SE Owner’s Manual
863
8
6
2
8
7
7
637
726
4
5
4
260 115
9
1
0
102
1154
1458
1358

Unpacking The Console
The AWS 900+ SE is supplied in a wooden crate with the legs in a smaller separate crate.
Using a large screwdriver or pry-bar carefully open the crate containing the console. The crate is not designed to
be reusable so does not have to be removed intact. With the crate sides removed there will be sufficient space for
f
our people to lift the console clear from the base of the crate.
Note: The console is shipped with its trim fitted, avoid using the trim as a lifting point.
Do not lift the front of the console by using the buffer alone.
Attaching the legs
Again, it is recommended that four people are available to perform this operation
The bolts required to attach the legs are shipped in the same crate as the legs. A 6mm hex-key is provided as one
of the tools included in the AWS 900+ SE console crate.
The console should first be rolled onto its back. Ensure that ample padding is provided – such as blankets or
bubble-wrap – to support the rear panels (the PSU heatsink fins protrude from the rear of the console, and care
must be taken not to damage them).
Position the legs on the console beam and attach the M10 bolts using the 6mm hex-key supplied. There are four
bolts per leg.
Using four people, the console may now be tipped forward onto its feet. When the console is in position, the feet
can be slightly adjusted to compensate for an uneven floor. Do not unscrew the feet by more than 15mm.
AWS 900+ SE Owner’s Manual
3-3
Installation

Installation
3-4
AWS 900+ SE Owner’s Manual
/