Page is loading ...

Page 1
1
YEAR
limited
WARRANTY
Electric Fireplace
Owner’s Manual
Member of
HPBA
READ & SAVE THESE INSTRUCTIONS
Carefully read and review before assembling, installing, operating, or maintaining
this product. Observe all safety instructions and information.
FAILURE TO FOLLOW WARNINGS & OPERATIONAL INSTRUCTIONS CONTAINED IN THIS
MANUAL CAN RESULT IN PROPERTY DAMAGE OR PERSONAL INJURY
**IMPORTANT NOTICE**
For customer service & warranty issues, please contact: [email protected]
01.17.19
Model Number
Item Number
DD5 WFCWF40
SERIAL NUMBER:

Page 2
Introduction
WARNING
• THIS APPLIANCE IS HOT WHEN OPERATED AND CAN CAUSE SEVERE BURNS IF CONTACTED.
• Do not operate appliance before reading and understanding operating instructions. Failure to operate appliance
accordingtooperatinginstructionscouldcausereorinjury.
• Risk of burns. Power to the appliance should be turned off and the appliance allowed to cool before servicing. To
disconnect power to the appliance, turn controls to off, then remove plug from outlet.
• Do not install damaged, incomplete or substitute components.
• Do not burn wood or other materials in this appliance.
• Young children should be carefully supervised when they are in the same room as the appliance. Toddlers, young
children and others may be susceptible to accidental contact burns. A physical barrier is recommended if there are
at risk individuals in the house. To restrict access to an appliance or stove, install an adjustable safety gate to keep
toddlers, young children and other at risk individuals out of the room and away from hot surfaces.
• Clothingorotherammablematerialshouldnotbeplacedonorneartheappliance.
• Duetohightemperatures,theapplianceshouldbelocatedoutoftrafcandawayfromfurnitureanddraperies.
• Ensure you have incorporated adequate safety measure to protect infants/toddlers from touching hot surfaces.
• Even after the appliance is out, the glass and/or screen will remain hot for an extended period of time.
• Check with your local hearth specialty dealer for safety screens and hearth guards to protect children from hot
surfaces.Thesescreensandguardsmustbefastenedtotheoor.
• Any safety screen or guard removed for servicing must be replaced prior to operating the appliance.
• It is imperative that the control compartments, circulating blower and its passageway in the appliance and are kept
clean.Theapplianceshouldbeinspectedbeforeuseandatleastannuallybyaqualiedserviceperson.More
frequent cleaning may be required due to excessive lint from carpeting, bedding material, etc. The appliance area
mustbekeptclearandfreefromcombustiblematerials,gasolineandotherammablevaporsandliquids.
• Undernocircumstancesshouldthisappliancebemodied.
• Donotusethisapplianceifanyparthasbeenunderwater.Immediatelycallaqualiedservicetechniciantoinspect
the appliance and to replace any part of the control system which has been under water.
• Do not operate the appliance with the glass door removed, cracked or broken. Replacement of the glass should be
donebyalicensedorqualiedserviceperson.
• Do not strike or slam shut the appliance glass door.
• Keep the packaging material out of reach of children and dispose of the material in a safe manner. As with all plastic
bags, these are not toys and should be kept away from children and infants.
• Servicing should be done only while the appliance is disconnected from the power supply circuit.
• Always unplug appliance when not in use.
• Do not operate this appliance with a damaged cord or plug after the appliance malfunctions, has been dropped or
damaged in any manner. Return appliance to authorized service facility for examination, electrical or mechanical
adjustment, or repair.
• Do not use outdoors.
• Never locate appliance where it may fall into a bathtub or other water container.
• Do not run cord under carpeting. Do not cover cord with throw rugs, runners, or the like. Arrange cord away from
trafcareaandwhereitwillnotbetrippedover.
• Connect to properly grounded outlets only.
• Do not insert or allow foreign objects to enter any ventilation or exhaust opening as this may cause an electric
shockorre,ordamagetheappliance.
• Topreventapossiblere,donotblockairintakesorexhaustinanymanner.Donotuseonsoftsurfaces,likea
carpet, where openings may become blocked.
•
• Ensure clearances to combustibles are maintained when building a mantel or shelves above the appliance.
Elevated temperatures on the wall or in the air above the appliance can cause melting, discolouration or damage to
decorations, a T.V. or other electronic components.
01.17.19
Always plug appliances directly into a wall outlet/receptacle. Never use an extension cord, relocatable power tap
(outlet/power strip) or adapter.

Page 3
Dimensions
Listing Approvals
ThisappliancehasbeentestedinaccordancewiththeCSAStandardsforxedandlocation-dedicated
electric room appliances in the United States and Canada. If you need assistance during installation, please
contact your local dealer.
NOTE: This appliance must be electrically wired and grounded in accordance with local codes or,
in the absence of local codes, with National Electric Code ANSI/NFPA 70-latest edition in the United
States or the Canadian Electric Code, CSA C22.1 in Canada.
01.17.19
Technical Specification
Description of product
ELECTRIC FIREPLACE
Model WFCWF40
Rated Voltage 120V~
Rated Frequency 60 Hz
Rated Power 1500W
Lamp LED

Page 4
General Instructions
READ THESE INSTRUCTIONS COMPLETELY BEFORE BEGINNING INSTALLATION. FAILURE TO
FOLLOW THEM COULD CAUSE AN APPLIANCE MALFUNCTION RESULTING IN SERIOUS INJURY
AND/OR PROPERTY DAMAGE.
ALL ELECTRIC APPLIANCES HAVE HOT AND ARCING OR SPARKING PARTS INSIDE. DO NOT USE IT
IN AREAS WHERE GASOLINE, PAINT OR FLAMMABLE LIQUIDS ARE PRESENT.
THIS ELECTRIC APPLIANCE IS TESTED AND LISTED FOR USE ONLY WITH THE OPTIONAL
ACCESSORIES LISTED IN THESE INSTRUCTIONS. USE OF OPTIONAL ACCESSORIES NOT
SPECIFICALLY TESTED FOR THIS ELECTRIC APPLIANCE COULD VOID THE WARRANTY AND/OR
RESULT IN A SAFETY HAZARD.
DONOTOPEN.RISKOFELECTRICSHOCK.NOUSER-SERVICEABLEPARTSINSIDE.
DO NOT USE DAMAGED ELECTRICAL CORDS.
SERVICING SHOULD BE DONE ONLY WHILE THE APPLIANCE IS DISCONNECTED FROM THE
POWER SUPPLY CIRCUIT.
TO PREVENT ELECTRIC SHOCK MATCH THE WIDE BLADE OF PLUG TO WIDE SLOT OF
RECEPTACLE AND FULLY INSERT.
1. Prior to plugging your appliance into an electrical outlet, verify that the house circuit breakers for the
outlet are on.
2. Theappliancemayemitaslight,harmlessodourwhenrstused.Thisodourisnormalanditiscaused
by the initial heating of internal appliance elements and will not occur again.
3. If your appliance does not emit heat, consult the operation section of this manual for further information.
4. UsewithaCSAorULcertiedsurgeprotector.
5. Do not route the power cord directly underneath the appliance.
This electric appliance meets the construction and safety standards of H.U.D. for application in
manufactured homes when installed according to these instructions.
Aswithmostelectronicdevices,yournewelectricreplacehasbeendesignedtooperateat
temperatures between 5°C (41°F) and 35° C (95°F). During the colder winter months, allow the
replacetoreachroomtemperaturebeforeturningiton.
WARNING
Unpacking and Testing Appliance
Carefully remove the appliance from the box. Prior to installing the appliance, test to make sure the appliance
operates properly by plugging the power supply cord into a conveniently located 120 Volt grounded outlet.
01.17.19

Page 5
D- Drywall Anchors
B- Mounting Bracket
C- Wood Screws
A- Fireplace
G- Crystals
F- Remote Control
Hardware Parts List
x1
01.17.19
WFCWF40
x1
x9
E- ST4x8 Metal Screws
WFCWF40
x9
WFCWF40
WFCWF40
x1
WFCWF40
x1
WFCWF40
x1
WFCWF40

Page 6
Locating Appliance
DUE TO HIGH TEMPERATURES, THIS ELECTRIC APPLIANCE SHOULD BE LOCATED OUT OF
TRAFFIC. KEEP COMBUSTIBLE MATERIALS SUCH AS FURNITURE, PILLOWS, BEDDING, PAPERS,
CLOTHES AND CURTAINS AT LEAST 36” (914mm) FROM THE FRONT OF THE APPLIANCE.
NEVER LOCATE THIS ELECTRIC APPLIANCE WHERE IT MAY FALL INTO A BATHTUB OR OTHER
WATER CONTAINER.
WEAR SAFETY GLOVES AND SAFETY GLASSES FOR PROTECTION DURING INSTALLATION AND
MAINTENANCE.
TO PREVENT CONTACT WITH SAGGING OR LOOSE INSULATION, THE ELECTRIC APPLIANCE
MUST NOT BE INSTALLED AGAINST VAPOR BARRIER OR EXPOSED INSULATION. LOCALIZED
OVERHEATING COULD OCCUR AND A FIRE COULD RESULT.
DO NOT EXPOSE THE ELECTRIC APPLIANCE TO THE ELEMENTS (SUCH AS RAIN, ETC.)
WARNING
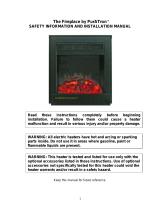
Grounding Appliance
01.17.19
This appliance is for use on 120 Volts. The cord
has a plug as shown in (A).
To disconnect appliance, turn controls to off, then
remove plug from outlet.
(A)
GROUNDING PIN
COVER OF
GROUNDED
OUTLET BOX
GROUNDING METHODS

Page 7
Installation
Minimum Clearance to Combustibles
Minimum Mantel Clearances
RISK OF FIRE! THE POWER CORD MUST NOT BE PINCHED AGAINST A SHARP EDGE. SECURE
CORD TO AVOID TRIPPING OR SNAGGING TO REDUCE THE RISK OF FIRE, ELECTRIC SHOCK OR
PERSONAL INJURY. DO NOT RUN CORD UNDER CARPETING. DO NOT COVER CORD WITH THROW
RUGS, RUNNERS OR THE LIKE. ARRANGE CORD AWAY FROM TRAFFIC AREAS AND WHERE IT
WILL NOT BE TRIPPED OVER.
RISK OF FIRE! TO PREVENT A POSSIBLE FIRE, DO NOT BLOCK AIR INTAKE OR EXHAUST IN ANY
MANNER. DO NOT USE ON SOFT SURFACES WHERE OPENINGS MAY BECOME BLOCKED.
RISK OF FIRE! DO NOT BLOW OR PLACE INSULATION AGAINST THE APPLIANCE.
THIS ELECTRIC APPLIANCE IS TESTED AND LISTED FOR USE ONLY WITH THE APPROVED
OPTIONAL ACCESSORIES. USE OF OPTIONAL ACCESSORIES NOT SPECIFICALLY TESTED FOR
THIS ELECTRIC APPLIANCE COULD VOID THE WARRANTY AND/OR RESULT IN A SAFETY HAZARD.
IF THE INFORMATION IN THESE INSTRUCTIONS IS NOT FOLLOWED EXACTLY, A FIRE OR EXPLOSION
MAY RESULT CAUSING PROPERTY DAMAGE, PERSONAL INJURY OR DEATH. DO NOT STORE OR USE
GASOLINE OR OTHER FLAMMABLE VAPORS IN THE VICINITY OF THIS OR ANY OTHER APPLIANCE.
THIS APPLIANCE IS HEAVY. IT IS HIGHLY RECOMMENDED THAT TWO PEOPLE INSTALL THIS APPLIANCE.
HEATER VENTS ON THE ELECTRIC APPLIANCE CANNOT, IN ANY WAY, BE COVERED AS IT MAY
CREATE A FIRE HAZARD.
DO NOT RUN THE POWER CORD HORIZONTALLY, DIRECTLY BELOW THE APPLIANCE.
WHEN USING PAINT OR LACQUER TO FINISH THE MANTEL, THE PAINT OR LACQUER MUST BE
HEAT RESISTANT TO PREVENT DISCOLOURATION.
WARNING
WARNING
YourWFCWF40unitisawall-mountedappliance.Selectasuitablelocationthatisnotsusceptibleto
moistureandisawayfromdrapes,furnitureandhightrafcareas.
NOTE: Follow all National and local electrical codes.
Bottom
Sides
Back
0”
0”
0”
Top
Top
Measurements are taken from the glass front
8” (203mm) to mantel
8” (203mm) to ceiling
01.17.19

Page 8
01.17.19
Before Assembly
Before you assemble your fireplace, you should put the crystals
on the ember.
Please following below :
1) Put the fireplace on flat floor with the front glass panel on top position.
2) Use screwdriver(not supplied) to loosen the 6 screws
as Fig A, and remove the glass panel.
3) Put the craystals gently on the ember,as Fig B.
4) Tighten the glass panel with the 6 screws tightly.
5) Use screwdriver(not supplied) to loosen the 2 screws as Fig C, and
remove the hanger.
Fig A Fig B Fig C
INSTALLATION
1.This heater is for wall mounting only. Do not attempt to use it free standing.
2.Referring to Fig. 3 below select a suitable position in which to mount the
heater horizontally – use a spirit level to achieve this.
3.Check the wall to ensure there is no wiring, pipe wires etc in the area to be
drilled. Drill 4 holes (8mm diameter & 40mm depth) using a suitable size
drill and put the Plastic expansion into the holes.
4.First fix hanger to wall
5. Referring t
o Fig. 4
hang fireplace to hanger .
6. Referring to Fig. 5
avoid fireplace to move,use screw fix fireplace to
wall ;

Page 9
01.17.19
Warning!
Always ensure the fireplace is at least 200mm above
the floor!Be sure that
the bolts have been fixed firmly enough
to withstand the weight
Fig 3
Fig 4
Fig 5
≥200mm
≥600mm
≥
200mm
≥
200
mm
5
3
4
6

Operating by manual
Page 10
01.17.19
Remove all packaging before use.
Control Panel (See also ‘Operating Instructions’ below)
As shown in the photo below you will see the control panel in the left side of
the heater.
OPERA
TION
1.Press the “FLAME” ( ) button multiple times to adjust between high, mid, low brightness or ON/OFF.
Press the “ ” button to turn on and off the Bluetooth speaker. To begin, press and hold for 3 seconds
until the speaker sounds when the Bluetooth is activated. Pair your mobile or mp3 device with the
Bluetooth speaker to play music. To turn off, press again and hold for 3 seconds until the speaker sounds
and Bluetooth is deactivated. Between turning on and off the Bluetooth, 10 seconds is required.
2.
3. Press the “” ( ) button once, the heater turns on at LOW (750W), instruction light displays in Blue;
4. Press the “” ( ) button twice, the heater turns on at HIGH (1500W), instruction light displays in Red;
5. Press the “” ( ) button again, the heater is auto set to a room temperature of 25°C, the instruction
light displays in Purple. When the room temperature reaches 25°C, the heater will turn off; when room
temperature drops below 22°C, two sets of heaters turn on to 1500W; when room temperature is in the
range of 22-25°C, only one set of heater turns on at 750W.

12.19.18
Page 11
13
Multi-functional Operating with Remote Control
T
urning ON/OFF the appliance:
1. Ensure steps 1-3 in the “Main Power Switch” procedure are rst followed.
2. Press the “ ” remote button to turn on the ame, ember bed, and ceiling light
LEDs at the brightest level. The heater is in OFF status.
Changing LED options:
1. Ensure steps 1-2 or 1-3 in “Turning ON/OFF the appliance” are previously
followed.
3. Press the yellow “ ” button multiple times to cycle through 4 different brightness
levels and OFF for the yellow ame LEDs.
4. Press the blue “ ” button multiple times to cycle through 4 different brightness
levels and OFF for the blue ame LEDs.
6. Press the “ ” button to turn on all ame colors, ember bed, and ceiling light
LEDs (at brightest level). If Pressed off and on again, LED setting will resume to
previous setting.
9. The “ ” button is not functional on this model.
10. Press the “ ” button, the heater is auto set to a room temperature of 25
°C.
When the room temperature reaches 25°C, the heater will turn off; when room
temperature drops below 22°C, two sets of heaters turn on to 1500W; when room
temperature is in the range of 22-25°C, only one set of heater turns on at 750W.
11. Press the “ ” button, the heater turns on in LOW condition (750W).
12. Press the “ ” button, the heater turns on in HIGH condition (1500W).
Note: Steps 2-12 can be done independently.
2. Press the “ “ button to turn on and off the Bluetooth speaker; press and hold for 3
seconds, the speaker sound when Bluetooth activated.
a. To play music, pair your mobile or MP3 device with the bluetooth speaker according to
the bluetooth procedure on your device.
b. Adjust volume and control the audio on your device.
c. Press and hold the “ “ button for 3 seconds; the speaker will sound and bluetooth will
deactivate. In between turning on and off the Bluetooth needs to take 10 seconds to reset.
7. The “ ” button is not functional on this model.
8. The “ ” button is not functional on this model.
5. Press the blue “ ” button multiple times to cycle through 4 different brightness
levels and OFF for the blue ame LEDs.

Page 12
RemoteControlSpecications
Storage Instructions
Maintenence
PREPARATION FOR MAINTENANCE
ALWAYS DISCONNECT THE POWER AND ALLOW THE ELECTRIC APPLIANCE TO COOL BEFORE
PERFORMING ANY CLEANING, MAINTENANCE OR RELOCATION OF THIS ELECTRIC APPLIANCE.
TURN CONTROLS TO OFF AND REMOVE PLUG FROM OUTLET OR TURN OFF THE HOUSE
CIRCUIT BREAKER TO ELECTRIC APPLIANCE RECEPTACLE.
DO NOT INSTALL REPLACEMENT BULBS THAT EXCEED SPECIFIED MAXIMUM WATTS.
THE BULBS IN YOUR APPLIANCE CAN BECOME EXTREMELY HOT. ALLOW AT LEAST
10 MINUTES BETWEEN TURNING OFF THE APPLIANCE AND REMOVING THE LAMPS TO AVOID
ACCIDENTAL BURNS.
DO NOT HANDLE THE BULBS WITH BARE FINGERS, OILS FROM YOUR SKIN WILL DAMAGE THE
BULS WHEN THEY HEAT UP. USE GLOVES OR A CLEAN DRY CLOTH WHEN HANDLING BULBS.
WARNING
Ensure the power cord is not installed so that it is pinched or against a sharp edge and ensure that the
powercordisstoredorsecuredtoavoidtrippingorsnaggingtoreducetheriskofre,electricshock,or
injury to persons.
Construction and electrical outlet wiring must comply with local building codes and other applicable
regulationstoreducetheriskofre,electricalshock,andinjurytopersons.
Donotattempttowireyourownnewoutletsorcircuits.Toreducetheriskofre,electricshock,orinjuryto
persons, always use a licensed electrician.
01.17.19
1. Model: RC1302
2. Remote Key: 12
3. Communication: Infrared
4. Infrared Distance: 8 Meters
5. Battery:
AA x 2pcs
NOTE: Make sure your “AA” batteries (x2) are
fully charged and installed correctly in your
remote control before operating.
The remote control must remain within 8
meters of the appliance to be effective, this
range may be reduced when battery power is
depleted.

Page 13
Wiring Diagram
TURN OFF THE APPLIANCE COMPLETELY AND LET COOL BEFORE SERVICING. ONLY A QUALIFIED
SERVICE PERSON SHOULD SERVICE AND REPAIR THIS ELECTRIC APPLIANCE.
WARNING
01.17.19

Page 14
Replacement Parts
FAILURE TO POSITION THE PARTS IN ACCORDANCE WITH THIS MANUAL OR FAILURE TO USE ONLY
PARTS SPECIFICALLY APPROVED WITH THIS APPLIANCE MAY RESULT IN PROPERTY DAMAGE OR
PERSONAL INJURY.
WARNING
To order parts, contact [email protected]
FOR WARRANTY REPLACEMENT PARTS, A PHOTOCOPY OF THE ORIGINAL INVOICE WILL BE
REQUIRED TO HONOUR THE CLAIM.
When ordering replacement parts always give the following information:
•Modelandserialnumberofappliance
•Installationdateofappliance
•Partnumber
•Descriptionofpart
•Finish
FOR FURTHER INFORMATION, CONTACT YOUR AUTHORIZED DEALER.
REF.
1
2
3
4
5
6
7
8
9
10
11
DESCRIPTION
Front Glass
Ember Bed Led Light
Wall Mounting Bracket
Flame System Assembly
Blower and Heater Assembly
Circuit Board
Hardware Kit
Botton Panel
Remote Control Receiver
COMPONENTS
WFCWF40
01.17.19
Remote Control
Crystal Embers
RCR
40BP
HKIT
CYE
R80
42WMB
40CB
40BHA
40FSA
40EBLL
40FG

Page 15
NOTE: Care must be taken when removing and disposing of any broken glass or damaged components. Be
sure to vacuum up any broken glass from inside the appliance before operation.
Replacement Parts Diagram
FAILURE TO POSITION THE PARTS IN ACCORDANCE WITH THIS MANUAL OR FAILURE TO USE ONLY
PARTS SPECIFICALLY APPROVED WITH THIS APPLIANCE MAY RESULT IN PROPERTY DAMAGE OR
PERSONAL INJURY.
WARNING
1
2
3
4
5
6
7
8
10
11
9
01.17.19

Page 16
Troubleshooting
TURN OFF THE APPLIANCE COMPLETELY AND LET COOL BEFORE SERVICING. ONLY A QUALIFIED
SERVICE PERSON SHOULD SERVICE AND REPAIR THIS ELECTRIC APPLIANCE.
WARNING
Symptom Problem Test Solution
Dimornoame/
Ember bed is not glowing or
dimming
LED’s are burnt out or
malfunctioning
Inspect the LED’s and replace them if necessary
No warm air coming out of
appliance
Room temperature is higher
than the appliance setting (if it
is set to room temperature)
Reset temperature setting
Heater is burnt out Inspect the burner and heater assembly and
replace it if necessary
Appliance turns off and will
not turn on
Remote control does not work Low battery Replace battteries in remote control
Heater shuts off automatically Room is too warm Theheaterhasabuilt-inthermostatsoit
willshutoffautomaticallyoncethepre-set
temperature is reached. It will also turn on
automatically if the room temperature drops
below the pre-set temperature.
01.17.19
Electric firepalce has overheated
and safey device has caused
thermal switch to disconnect
or home circuit breaker has
opened.
Reset switch by turing main power switch off
ans waiting 5 minutes then turning is back on.
This product can expose you
to chemicals including Carbon
Black, which is known to the
State of California to cause
cancer, and Bisphenol A (BPA),
which is known to the State of
California to cause birth defects
or other reproductive harm. For
more information go to www.
P65Warnings.ca.gov
WARNING

Page 17
Limited Parts Warranty
This product is inspected, tested and carefully packaged to minimize the chance of damage during
shipment. If a part (excluding light bulbs and fuses*) within one year from the date of purchase proves to be
defective in material or fabrication under normal use, the part will be repaired or replaced. The Company’s
obligation under the warranty is to replace or repair defective parts at our discretion. Any expenses or
damage resulting from the installation, removal, or transportation of the product will be the responsibility of
the owner and are not covered by this warranty. The owner assumes all other risks arising from the use or
misuse of the product. The warranty will be void if the product damage or failure is deemed by the Company
to be caused by accident, alteration, misuse, abuse, incorrect installation or removal, or connection to an
incorrect power source by the owner. The Company neither assumes, nor authorizes and person or entity
to assume for it any obligation or liability associated with its products. Light bulbs and fuses are not covered
under this warranty. If you have any questions regarding the warranty or service, please call our toll free
number:1-888-268-7106.
Customer Service
TollFree:1-888-268-7106
E-mail:[email protected]
01.17.19
/