Dovado USB Mobile Broadband Router Reference guide
- Category
- Modems
- Type
- Reference guide

USB Mobile Broadband Router
The Mobile Choice for your Broadband Internet
Reference Manual

Table of Contents 2
Reference Manual
Table of Contents
Introduction 3
Package contents 3
Additional required items 3
Reference Manual 4
Hardware installation 4
Reset button 4
Modem switch 4
Modem 5
Connecting Status Overview Bar 7
Data Trac Usage Report 8
SMS Notication of Data Trac Usage 9
SMS Remote Control 10
Remote Commands 11
Notication SMS 12
Home Automation 13
Advanced Settings 13
WLAN Settings 14
LAN Settings 18
System Settings 20
Internet 22
Upgrading the rmware 26
Congurations 27
Positioning 27
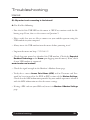
Troubleshooting 28
Internet 28
Support 30
Technical specifications 30
Guidelines for safe and efficient use 31
Product care and maintenance 31
Limited warranty 32

Introduction 3
Introduction
Thank you for choosing the Dovado USB Mobile Broadband Router. This quick
user guide will help you set up your router to access the Internet.
Package contents
Before continuing to the next section, make sure all of the listed items below are
included in your package. If something is missing, kindly contact your reseller.
• USBMobileBroadbandrouter
• Powersupply
• USBextensioncable
• QuickWizardGuide
• Referencemanual
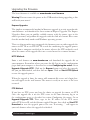
Additional required items
In addition to the items above you will need a mobile broadband USB modem
in order for the product to work. This modem provides the wireless link to your
operator’s network and is sold separately.To use the Internet you need a computer.
!
ATTENTION: As the DOVADO portfolio of routers are con-
stantly being updated to support new modems, features as well as fixes,
it is advised that you remain updated with the latest firmware. To
download the latest firmware, please visit www.dovado.com/firmware

Introduction 4
The Reset button
The location of the reset button is at the back of the router. If you need to erase
all the inserted parameters and password, along with restoring the factory defaults
settings, then hold down the reset button for approximately 8 seconds. For restart
of the router just press the reset button quickly.
Modem switch
You can enable the USB Modem On/Off function in the Modem Settings menu.
When enabled you can switch on/off the USB modem Internet connection.
PleasenotethatSMSfunctionisstilloperational.
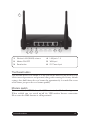
1. Wireless LAN (WLAN) antenna
2. Modem ON/OFF
3. Reset button
4. LAN ports 1-4
5. WAN port
6. DC Power Input
1
6
4
3
2
5

Reference Manual 5
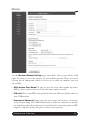
Modem
On the Modem->Modem Settings page, you will be able to insert all the valid
inputs in order to access the internet via your mobile operator. There are several
relevant bits of information which are necessary in order to complete this task
successfully:
• APN(AccessPointName).If you are not sure what your mobile operator’s
APNis,pleasecontactthemorcheckwithyourmodemmanual.
• PINcode.ThisisyourPINcodeprovidedwithyourSIMcardwhichresidesin
your USB modem.
• Username&Password:Some operators may require you to insert a username
and password along withAPN information in order to authenticate towards
themobilenetwork.Ifyouhaven’tbeenprovidedthis,thenusingonlyanAPN
might be sufficient. If not, then please contact your operator.

Reference Manual 6
• Modem On/Switch: Once activated, you can manually connect/ disconnect
the Internet connection by toggling the On/Off switch, located at the back of
yourrouter.Note:ThisswitchonlyworksfortheinsertedUSBmodem,andnot
theEthernetWANport.“
The following scenarios should assist you in enabling your router for Internet ac-
cess, depending on which type of USB modem you have inserted into the router.
If your scenario is not available in this guide, then please visit
www.dovado.com/supportfor latest update.
Once the information has been inserted, the unit will automatically try to
establish a connection to the operator’s network. A solid yellow light on the USB
LED indicates a successful connection.
Note:Mobile operators typically have an AccessPointName(APN)asthekey
relevant point of entry towards the mobile broadband network. Make sure to have
thenameofyourAPNinadvanceofconguringyourUSBmodem.Ifyouare
usinganyothertechnologybesidesGPRS,EDGE,UMTSorHSPA,youmight
notrequireanAPN.
Scenario1:3G/4GUSBmodemusingaSIMcard
• IntheModem->Modem Settings page, select to use SIM.
• EnteryouroperatorAccessPointNameand a PINcodeif using one.
• PushSaveModemSettings.
• Restartthe router.
Scenario2:3G/4GUSBmodemusingaSIMcardalongwithausername
andpassword
• IntheModem->Modem Settings page, select to use SIM.
• EnteryouroperatorAccessPointNameand a PINcodeif using one.
• PushSaveModemSettings.
• GotoModem->PPPandmakesurethatPPPisenabled.
• EnteryourUsernameand Password
• SavePPPSettings.
• Restartthe router.

Reference Manual 7
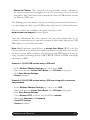
Connection Status Overview Bar
Atop of the user interface, a bar displays an overview of your Internet connection.
Thisinformationsitsoutsidethesecurityzoneofyourrouter,anddoesnotneed
tobeaccessedviaanauthorizedlogin,thussavingtimeoncheckingtheconnec-
tion status.
The Connection Status Overview Bar shows the following information:
Date: Synchronized with a DOVADO NTP (NetworkTime Protocol) server
upon each new successful Internet connection.
Time: Displayed in a 24-hour format (HH:MM). In case the displayed time is
incorrect,youcansetthetime-zoneintheSYSTEM->NTPpage.
Signal:The latest measurement gathered by the USB modem upon connection is
displayedinapercentagevalue,alongwiththetechnology(2G:GPRSorEDGE;
3G:UMTSorHSPA;4G).Thevalueisonlyupdatedafterinitiatinganew
connection.
Connection:Indicates whether your current Internet connection is via the inser-
ted USBmodem or via an Ethernet WANport. This is useful if your router has
been configured to perform automated failovers between one dropped Internet
connectiontoasecondary(backup)connection.
ConnectionIndicator:Greencolorindicatesthattherouterisconnectedtothe
Internet via a USB modem. Red color indicates that it is disconnected from the
Internet.
Traffic:Quicklydisplayingthismonth’sInternetconsumptioningigabytes(GB)
on the downlink and uplink of both Internet interfaces (USB modem and Ether-
netWAN).

Reference Manual 8
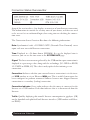
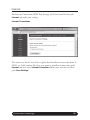
Data Traffc Usage Report
It is possible to keep track of how much Internet traffic is consumed each new
calendar month.A log is also held for the previous month. The chart displays how
much data has been downloaded as well as uploaded per Internet interface, be it a
USBmodemorEthernetWANport.Atotalisalsocalculatedforthemonthper
interface. As these figures are automatically updated every few minutes, a forced
update can be manually requested by pushing the Update button.

Reference Manual 9
Notification of Data Traffic Usage
Upon enabling this feature, the router can send you an SMS and/or E-Mail no-
tification after a certain amount of data has been consumed by your Internet
connection. It will then continuously update each time it passes that interval, thus
providing you with an overview of your monthly data consumption.
The router can alert you after every 100MB, 250MB, 500MB and 1000MB of
downloaded or totally accumulated bi-directional traffic passed during the calen-
dar month.
Note:ByusingyourUSBmodemdirectlyinthecomputer,therouterwillonlybe
able to display the amount of data the router itself has consumed when the USB
modemisinsertedintoit.ItwillnotdisplaywhattheUSBmodemhasconsumed;
therefore, to acquire the most accurate accumulated figures, please contact your
Internet service operator.
To enable notification by SMS, go to SMS->REMOTECONTROL, and select the
TrafficLimitReached, located under NotificationSMS.
To enable notification by E-Mail, go to SYSTEM->E-Mail, and enter your E-
Mail account configuration.
Then proceed to INTERNET->TRAFFIC, and select how often you would like to
be notified by SMS and/or E-Mail for an updated total of your calendar month’s
data consumption. You can also specify which kind of data to keep track of (down-
loadedonly,ordownloadedanduploaded;dependingonyourmobilebroadband
subscriptionterms).

Reference Manual 10
SMS Remote Control
IfyourSIMcardand3G/4GUSBmodemsupportSMS(seewww.dovado.com)
in the router, then you’ll be able to employ this feature to remotely control the
router from your mobile phone. A short text command can be sent from your
phone to administer any of these tasks instantly.The configuration allows an
unlimitedrangeofauthorizedmobilephonenumberstobeinsertedintothelist.

Reference Manual 11
You can specify which number will be viable for sending commands, receiving
notifications, or both.To insert the number, use international dialing format (e.g.
+46forSweden,followedbytherest).Foreachnumberthatisinsertedwithits
rights,clickonAddtolist.Note:Foreachnumberthatisentered,andtaggedwith
a“Notication”tickmark,anindividualSMSwillbesentbytherouterincaseof
any notification. By doing so, this will generate a larger load of SMS traffic to your
mobile broadband subscription.
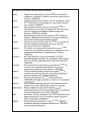
Remote Commands
The short text commands are: Status,Restart,Disconnect,Connect(or
Reconnect).
Status:The router will reply to you stating that it’s either connected or discon-
nectedfromtheInternet.ItwillalsocontaintheIPaddress(ifconnected)ofit’s
WAN/3Gor4Ginterfacealongwithsignalinformation.
Restart:The router will restart itself.
Disconnect: The router will disconnect itself from the mobile broadband net-
work. Internet connection will be dropped, though SMS will still be active.
Connect(or Reconnect):Therouterwillconnectitselftothemobilebroadband
network. Internet connection will be enabled.

Reference Manual 12
Notification SMS
Unexpected events which occur in regards to the Internet connection along with
the overall status of the router can be reported by SMS to all numbers listed for
“Notication”.Noticationmessagescanbesenttorecipientsforthefollowing
events:
Restart: In case the router was forced to restart itself after 3 unsuccessful connec-
tionattempts(basedonthesettingslocatedintheConnectionTracker).Arestart
can also be affected by an unexpected power failure.
Connection down: The Internet connection has been dropped. The router at
this point has acknowledged a drop, and is working on resolving this situation
by either redialing the connection, restarting itself or switching connection to
the secondary Internet interface (depending on what has been defined in the
INTERNET¬>CONNECTIONTRACKERsite)
Connectionup: An Internet connection has been established. It is very likely that
your router will be handed a new IP address from the operator.The SMS will
displaythenewIPaddressincaseyouwouldliketoremotelyconnecttoitfor
administration purposes.
Trafficlimitreached: More information for this is available on page 19.
Switchedconnection:In case your Connection Tracker has been configured to
automatically perform a connection failover between two interfaces, you will be
notified of this change, along with further information pertaining to that new
connection.

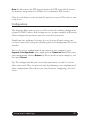
Advanced settings 13
Advanced Settings
The router has a built-in firewall. In this section you will learn more about this
and other security features.
Besides password protecting the router configuration pages it is possible to restrict
theWirelessLANdevicesthatmayaccessyourprivate networkandthe public
Internet through the router. You can use encryption and/ or MAC address filtering
in order to achieve this.
Withencryptionyoucanchooseakey,whichthenallWirelessLANclientsneed
to know in order to access your private network through the router.These settings
are found in WLAN->Authentication.
WithMACaddressfilteringyou can enter the MAC address of each client that
you want to grant access to your private network. This address is physically linked
to the network card in each client. These settings are found in WLAN->MAC
AddressControl.

Advanced settings 14
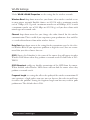
WLAN Settings
Under WLAN->WLANPropertiesare the settings for the wireless network.
WirelessBanddrop-down menu lets you choose what wireless standard to use
inyourprivatenetwork.Possiblechoicesare802.11bwithamaximumtransfer
rate of 11Mbps, 802.11g with a maximum transfer rate of 54Mbps, 802.11n with
a maximum transfer rate of 300 Mbps or 802.11b+g+n if you have clients with
mixed types of network cards.
Channel drop-down menu lets you change the radio channel for the wireless
communication. This is useful if you experience poor performance that could be
as a result of interference from other wireless devices.
DataRatedrop-down menu is the setting for the transmission speed at the selec-
tedWirelessBand.Ifyouexperienceproblemsathighdatarates,thenwerecom-
mend that you select a lower data rate..
SSID(ServiceSetIdentier)isthenameoftherouterthatwillappearinother
WirelessLANclientswhentheyperformanetworksearch.DefaultvalueisDO-
VAD O.
SSID Broadcast enables or disables transmission of the SSID from the router.
Whendisabled, otherWirelessLAN clients will not nd the routerwhenthey
perform a network search.
Fragmentlengthis a setting that affects the quality of the wireless transmissions. If
you experience a high packet error rate you can decrease this value in small steps
to reduce this problem. Setting the fragment length too low may result in poor
performance.The default value is 2346.

Advanced settings 15
RTSlengthis a setting that affects the quality of the wireless transmissions. If you
experience inconsistent data flow you can decrease this value in small steps to
reduce this problem.The default value is 2311.
WirelessRadioenablesordisablestheWLAN.Ifyou do notuseanyWireless
LANdevicesitisrecommendedthatyouselectdisable.
Click on SaveWLANSettingsand then Restartfor the changes to take effect.
WLAN->Authentication:TheencryptionsettingsforyourprivateWirelessLAN.
Encryptionis disabled by default. Choose Enableto show the available settings.
There are three types of encryption methods in the AuthenticationTypedrop-
down menu, WEPOpenSystem,WEPSharedKeyand WPA-PSK.
WEPOpenSystemencrypts all data that is sent over the wireless network but
does not use any authentication.This means it is still possible for all clients in range
to log onto the router, but without the correct key they will not be able to com-
municate with it.To activate this setting, choose WEP Open System from the
AuthenticationType drop-down menu. Then choose a KeyType, either HEX
(range0-9andA-F)orASCII(anycharacteronthekeyboard).ChooseKeySize;
64bits(forHEXthisis10charactersandforASCII5characters)or128bits(for
HEXthisis26charactersandforASCII13characters):thelongerthekey,the
stronger the encryption.The key is case sensitive.You have the possibility to define
4 keys at once so that you can easily change key to maintain security.

Advanced settings 16
WEPSharedKeyisidenticaltoWEPOpenSystemexceptthatthismodealso
uses authentication.This is less suitable from a security perspective since it is pos-
sible to retrieve the key from the authentication process.
WPA-PSKis the third and strongest security option. Choose it from the Authen-
ticationTypedrop-down menu and then enter a pass phrase between 8 and 63
characters.AllWirelessLANclientsmustusetheexactsamepassphraseinorderto
access your network. Due to the complexity and larger data overhead this option
may decrease the performance of the network.
Click on SaveAuthenticationSettingsand then Restart for the changes to take
effect.

Advanced settings 17
WLAN->MACAddressControl:
The settings for restricting access to your private network via white-listing of
authorizedclients.
MACAddressControlenables or disables the MAC address filtering on the MAC
addresses under WLAN->MACAddressControl.
MAC Address control is a security function that limits which clients can access
your private network and the public Internet through your router. Enter the MAC
address of the client that you want to grant access to your network (the MAC
addressofaclientrunningMicrosoftWindowscanbeobtainedbyclickingonthe
Startbutton and then Run. Type cmdand press enter.Then type ipconfig/allin
the command prompt and press enter. The MAC address is found on the physical
addressline).ClickonAddtolist.Notethatthefunctionisenabledordisabled
under WLAN->WLANProperties. Disabling the function does not clear the MAC
AddressControlList.

Advanced settings 18
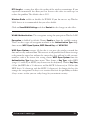
LAN Settings
LAN->LANSettings:The network settings for the router.
NetworkSettingsallows you tochangethedefault IP addressforyourrouter.
However,inmostcasesyoudonotneedtochangethissetting.NotethattheIP
address for the router is used on your private network only. It is not possible to
change the subnet mask. Click on SaveLANSettingsand then Restartfor the
changes to take effect.
LAN->DHCP:The settings for your private network.
DHCPServerallowsyoutoenableordisablethebuilt-inDHCPserver.When
enabled,allclientsonyourprivatenetworkwillautomaticallyobtainanIPaddress
from the range specified under ClientIPAddressRange(valid range is from 1
to254).WhendisabledyouhavetomanuallyenteranIPaddressfromthisrange
into each client.
ClientNetworkInformationallows you to set a domain name for the router and
specifyanadditionalDNSserver.
StaticAddressAssignmentcan be used when you want a client to obtain the
sameIPaddresseachtimeitlogsontoyourprivatenetwork.Thissettingworks
nomatterifthe DHCP Server is enabledordisabled. Select how you wantto
identify the client, by hostname or MAC address (it is possible to define 253 static
IPaddressesbasedonMACaddressesand256basedonhostnames).Typeinthe
hostname or the MAC address under HostIdentifierand finally, set the desired
IPaddressunderInternalAddress.PleasemakesurenottoassigntheIPaddress
of the router to any of the clients. Click on Add and then SaveDHCPSettings
when you are finished.
ViewDHCPTableisafunctionthatshowstheIPandMACaddressesofallclients
that are connected to the router.

Advanced settings 19
Click on SaveDHCPSettingsand then Restart for the changes to take effect.
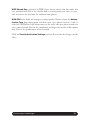
LAN->PortForwarding: The settings for manually unblocking certain commu-
nication ports in your private network.
ReservedPortsis a list of logical ports that cannot be used to access your pri-
vate network from the public Internet.
PortForwardingtoLANlets you specify which ports clients on the public In-
ternet shall be able to communicate through, to clients on your private network.
Under PortRange, select a range (any range that does not contain the ports
listed under Reserved Ports)from0-65535.Selectthetypeoftrafcthat
should be let through on these ports, TCP or UDP, or Both. Finally, type in
the DestinationAddress,whichistheIPaddressoftheclientonyourprivate
network that you want to be accessible from the public Internet. Click on Add
whenyouarenished.Notethatbydefault,notrafcispermittedinwardsifthe
requestisinitiatedbyanexternaluser.However,clientsonyourprivatenetwork
can always access the public Internet.
Click on Restartfor the changes to take effect.
LAN->UPnP:ThesettingsforUniversalPlugandPlay.
TheroutersupportsUniversalPlugandPlay.UPnPisafeaturethatenablesclient
application on devices behind the router to automatically trigger the opening of
TCP/UDPportsthroughtherewallintherouter.
As a security precaution, this feature is disabled by default and can be enabled
manually.

Advanced settings 20
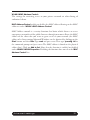
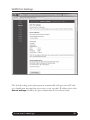
System Settings
System->Security:Option for changing the default password of the router.
PleaseenterthesamepasswordtwiceandpressSavePassword. The new pass-
word will take effect upon restart.
Note:Ifyouhavemisplacedorforgottenyourpassword,youcanresetitto“pass-
word”bypushingtheResetbuttononthebackoftherouter.
Warning:By pushing the Reset button, you will also be clearing out all the para-
metersandrestoringeverythingbacktotheoriginalfactorydefaultsettings.Please
notethatallyourstoredtextmessages(SMS)willbedeletedaswell.
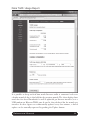
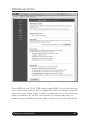
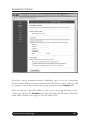
System->RemoteManagement: The settings for enabling remote management
of the router from another location.
WebAccessPort: Select which port you would like to access the router interface
page from the Internet. The Standardportis port 80, which is the regular port
forHTTP.
Example: Should you wish to access the settings on your router from elsewhere on
the internet, simply open a browser, type in
http://<theroutersipaddress>:<port>.
For instance, http://183.168.0.35:4430.
Hostnamelookupinterval: Select how often a hostname entered in the Client
AccessListshouldbeupdated.FrequentupdatesareneedediftheIP-addressbe-
hind the hostname changes often.
AllowedClients: The router will only allow access for clients visible in the Client
AccessList.Toputaclientinthelist,enterthecorrespondingIP-addressorHost-
name(Forinstance217.65.34.12ormyhost.dyndns.org)intheHost/IP-eldand
click Add to list. Repeat the procedure in order to grant more clients access.
AccesscanbegrantedfromanywhereontheInternetbymarking”AnyHost”and
pressing”AddtoList”.
ShowMapping:DisplaystheroutersviewofIP-addressesassociatedwithhostna-
mesinthe”ClientAccessList”.
All changes will take effect upon restart of the router.
Page is loading ...
Page is loading ...
Page is loading ...
Page is loading ...
Page is loading ...
Page is loading ...
Page is loading ...
Page is loading ...
Page is loading ...
Page is loading ...
Page is loading ...
Page is loading ...
Page is loading ...
Page is loading ...
Page is loading ...
Page is loading ...
-
 1
1
-
 2
2
-
 3
3
-
 4
4
-
 5
5
-
 6
6
-
 7
7
-
 8
8
-
 9
9
-
 10
10
-
 11
11
-
 12
12
-
 13
13
-
 14
14
-
 15
15
-
 16
16
-
 17
17
-
 18
18
-
 19
19
-
 20
20
-
 21
21
-
 22
22
-
 23
23
-
 24
24
-
 25
25
-
 26
26
-
 27
27
-
 28
28
-
 29
29
-
 30
30
-
 31
31
-
 32
32
-
 33
33
-
 34
34
-
 35
35
-
 36
36


Dovado USB Mobile Broadband Router Reference guide
- Category
- Modems
- Type
- Reference guide
Ask a question and I''ll find the answer in the document
Finding information in a document is now easier with AI
Related papers
Other documents
-
Cradlepoint CBA750B-LP2-EU User manual
-
Cradlepoint CBA850 User manual
-
Asus 4G-AC86U User manual
-
-
-
CalAmp Vanguard 5530 User manual
-
Eaton ELPRO 645M-1 User manual
-
Cradlepoint COR IBR600 User manual
-
 CalAmp Vanguard 3000 VG3000-PXS-F User manual
-
