
IBM ThinkPad 770 User's Guide
IBM
Title: C79DMMST CreationDate: 07/16/97 13:09:22

Note
Before using this information and the product it supports, be sure to read the general information in “Safety
Information” on page vii, Appendix C, and Appendix E.
First Edition (September 1997)
The following paragraph does not apply to the United Kingdom or any country where such provisions are
inconsistent with local law:
INTERNATIONAL BUSINESS MACHINES CORPORATION PROVIDES THIS PUBLICATION “AS IS” WITHOUT ANY
WARRANTY OF ANY KIND, EITHER EXPRESS OR IMPLIED, INCLUDING, BUT NOT LIMITED TO, THE LIMITED
WARRANTIES OF MERCHANTABILITY OR FITNESS FOR A PARTICULAR PURPOSE. Some states do not allow
disclaimers or express or implied warranties in certain transactions; therefore, this statement may not apply to you.
This publication could include technical inaccuracies or typographical errors. Changes are periodically made to the
information herein; these changes will be incorporated in new editions of the publication. IBM may make
improvements or changes in the products or the programs described in this publication at any time.
Requests for technical information about IBM products should be made to your IBM authorized dealer or your IBM
marketing representative.
Copyright International Business Machines Corporation 1997. All rights reserved. Note to U.S. Government
Users – Documentation related to restricted rights – Use, duplication, or disclosure is subject to restrictions set forth in
GSA ADP Schedule Contract with IBM Corp.
Title: C79DMMST CreationDate: 07/16/97 13:09:22

Contents
Safety Information . . . . . . . . . . . . . . . . . . . . . . . . . . vii
Laser Compliance Statement ..................... ix
Chapter 1. Getting to Know Your Computer ......... 1-1
Knowing the Indicators on the LCD Indicator Panel ....... 1-7
Using the Fn Key Function ..................... 1-9
Using the Numeric Keypad .................... 1-11
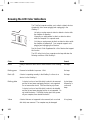
Knowing the LED Color Indications ............... 1-12
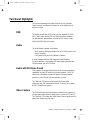
Functional Highlights . . . . . . . . . . . . . . . . . . . . . . . . 1-13
DVD . . . . . . . . . . . . . . . . . . . . . . . . . . . . . . . . 1-13
Audio . . . . . . . . . . . . . . . . . . . . . . . . . . . . . . . 1-13
Audio with 3D Stereo Sound .................. 1-13
Video Capture . . . . . . . . . . . . . . . . . . . . . . . . . . 1-13
Infrared . . . . . . . . . . . . . . . . . . . . . . . . . . . . . . 1-14
Video Phone Features ..................... 1-14
System Management Features ................ 1-14
TrackPoint with Enhanced Controls .............. 1-14
Chapter 2. Fine-Tuning Your Computer ............ 2-1
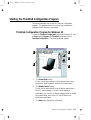
Starting the ThinkPad Configuration Program .......... 2-3
ThinkPad Configuration Program for Windows 95 ...... 2-3
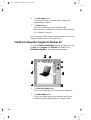
ThinkPad Configuration Program for Windows NT ...... 2-4
ThinkPad Configuration for DOS ................ 2-5
Switching Screens . . . . . . . . . . . . . . . . . . . . . . . . . 2-7
Switching between the External Display and Television ... 2-7
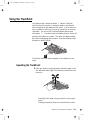
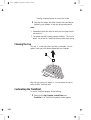
Using the TrackPoint ......................... 2-9
Operating the TrackPoint ..................... 2-9
Cleaning the Cap ........................ 2-10
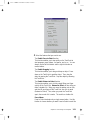
Customizing the TrackPoint .................. 2-10
Using the ThinkPad Online Book ................. 2-15
Using the Security Features .................... 2-16
Using Passwords . . . . . . . . . . . . . . . . . . . . . . . . 2-16
Using the Personalization Editor ............... 2-24
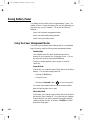
Saving Battery Power ....................... 2-26
Using the Power Management Modes ............ 2-26
Using Other Battery Saving Methods ............. 2-30
Checking the Battery Status .................. 2-31
Using the Fuel Program .................... 2-32
Using the Audio Features ..................... 2-35
Using the 3D Sound Retrieval System (SRS) Function .. 2-36
Copyright IBM Corp. 1997 iii
Title: C79DMMST CreationDate: 07/16/97 13:09:22

Using the MIDI Features .................... 2-37
Using the ThinkPad Modem .................... 2-39
Using the ThinkPad Modem in Windows 95 and Windows
NT . . . . . . . . . . . . . . . . . . . . . . . . . . . . . . . . 2-41
Using the ThinkPad Modem in OS/2 ............. 2-41
Using the 56 Kbps Modem ................... 2-41
Telephony Features . . . . . . . . . . . . . . . . . . . . . . . 2-43
Using the DVD and Enhanced Video Adapter ......... 2-44
Using the DVD Enhanced Video Adapter with Windows 95 2-45
Using the Enhanced Video Features in OS/2 ........ 2-51
Using Easy-Setup . . . . . . . . . . . . . . . . . . . . . . . . . 2-54
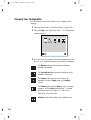
Knowing Your Configuration .................. 2-56
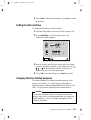
Setting the Date and Time ................... 2-57
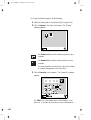
Changing the Drive Startup Sequence ............ 2-57
Chapter 3. Installing Options . . . . . . . . . . . . . . . . . . 3-1
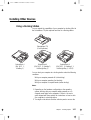
Installing IBM Options ........................ 3-2
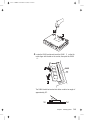
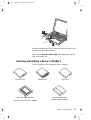
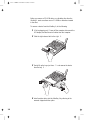
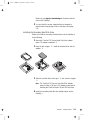
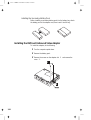
Installing a Memory Option .................... 3-2
Replacing the Hard Disk Drive in the HDD Bay ........ 3-5
Installing the Battery Pack .................... 3-6
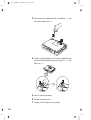
Removing and Installing a Device in UltraBay II ....... 3-7
Installing the DVD and Enhanced Video Adapter ...... 3-10
Replacing the Backup Battery ................. 3-11
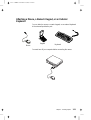
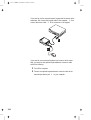
Attaching a Mouse, a Numeric Keypad, or an External
Keyboard . . . . . . . . . . . . . . . . . . . . . . . . . . . . 3-13
Inserting or Removing a PC Card ............... 3-15
Installing Other Devices ...................... 3-17
Using a Docking Station .................... 3-17
Using the Security System Lock ............... 3-21
Attaching a Television to Your Computer .......... 3-22
Chapter 4. Solving Computer Problems ............ 4-1
Frequently Asked Questions .................... 4-2
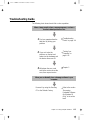
Troubleshooting Guide . . . . . . . . . . . . . . . . . . . . . . . . 4-3
Troubleshooting Charts . . . . . . . . . . . . . . . . . . . . . . . 4-4
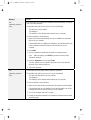
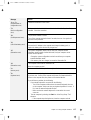
Error Codes or Screen Messages ................ 4-5
No Error Codes or Screen Messages ............ 4-10
An Input Problem ........................ 4-11
A Suspend or Hibernation Problem .............. 4-12
An LCD Problem ........................ 4-16
iv
Title: C79DMMST CreationDate: 07/16/97 13:09:22

An Indicator Problem ...................... 4-17
A Battery Problem ........................ 4-17
A CD-ROM Drive Problem ................... 4-18
A DVD Problem ......................... 4-20
An Infrared Communication Problem ............. 4-21
An Enhanced Video/MPEG Problem ............. 4-22
An Audio or a Telephony Problem .............. 4-22
A Universal Serial Bus (USB) Problem ............ 4-23
A Modem Problem ....................... 4-23
Other PC Card Problems .................... 4-26
A SelectaDock Problem .................... 4-26
A Printer Problem ........................ 4-27
An External Display Problem ................. 4-27
A Television Problem ...................... 4-29
Other Option Problems ..................... 4-29
A Software Problem ....................... 4-31
Other Problems . . . . . . . . . . . . . . . . . . . . . . . . . 4-31
Testing Your Computer ...................... 4-32
Chapter 5. Getting Service . . . . . . . . . . . . . . . . . . . . 5-1
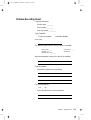
Information on Your ThinkPad ................... 5-2
Option List . . . . . . . . . . . . . . . . . . . . . . . . . . . . . 5-2
Identification Numbers . . . . . . . . . . . . . . . . . . . . . . 5-2
Problem Recording Sheet .................... 5-3
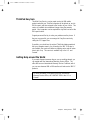
How to Receive Customer Support and Service ......... 5-4
Help by Telephone ........................ 5-4
ThinkPad EasyServ . . . . . . . . . . . . . . . . . . . . . . . . 5-5
Getting Help around the World ................. 5-5
Online Housecall . . . . . . . . . . . . . . . . . . . . . . . . . 5-6
Fax Information . . . . . . . . . . . . . . . . . . . . . . . . . . 5-6
Electronic Support Services ................... 5-6
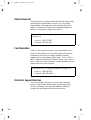
Purchasing Additional Services ................... 5-8
Enhanced PC Support Line ................... 5-8
Network and Server Support Line ................ 5-8
Ordering Support Line Services ................. 5-9
Warranty and Repair Services ................. 5-10
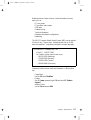
Obtaining IBM Operating System Updates ........... 5-11
Getting Update Diskettes .................... 5-11
Ordering Publications . . . . . . . . . . . . . . . . . . . . . . 5-11
About Your Warranty ...................... 5-11
Contents v
Title: C79DMMST CreationDate: 07/16/97 13:09:22

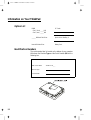
Appendix A. Operating Requirements . . . . . . . . . . . . . A-1
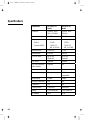
Specifications . . . . . . . . . . . . . . . . . . . . . . . . . . . . . A-2
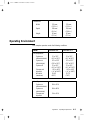
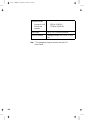
Operating Environment . . . . . . . . . . . . . . . . . . . . . . . A-3
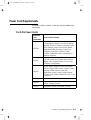
Power Cord Requirements ..................... A-5
For 2-Pin Power Cords ...................... A-5
For 3-Pin Power Cords ...................... A-6
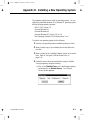
Appendix B. Installing a New Operating System ...... B-1
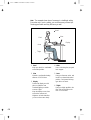
Appendix C. Ergonomics Information . . . . . . . . . . . . . C-1
Appendix D. Product Warranty . . . . . . . . . . . . . . . . . D-1
Appendix E. Notices . . . . . . . . . . . . . . . . . . . . . . . . E-1
Trademarks . . . . . . . . . . . . . . . . . . . . . . . . . . . . . . E-1
Electronic Emission Notice ..................... E-2
Federal Communications Commission (FCC) Statement .. E-2
Canadian Department of Communications Compliance
Statement . . . . . . . . . . . . . . . . . . . . . . . . . . . . . E-2
Avis de conformité aux normes du ministère des
Communications du Canada .................. E-3
European Community Directive Conformance Statement .. E-3
Telecommunication Notice . . . . . . . . . . . . . . . . . . . . . E-4
Industry Canada Requirements ................... E-6
Notice . . . . . . . . . . . . . . . . . . . . . . . . . . . . . . . . E-6
Caution . . . . . . . . . . . . . . . . . . . . . . . . . . . . . . . E-6
Notice . . . . . . . . . . . . . . . . . . . . . . . . . . . . . . . . E-7
Avis . . . . . . . . . . . . . . . . . . . . . . . . . . . . . . . . . E-7
Avertissement . . . . . . . . . . . . . . . . . . . . . . . . . . . E-8
Index . . . . . . . . . . . . . . . . . . . . . . . . . . . . . . . . . . X-1
vi
Title: C79DMMST CreationDate: 07/16/97 13:09:22

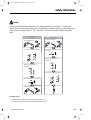
Safety Information
Danger:
Electrical current from power, telephone, and communication cable is hazardous. To avoid shock
hazard, connect and disconnect cables as shown below when installing, moving, or opening the covers
of this product or attached devices. The 3-pin power cord must be used with a properly grounded
outlet.
Turn everything OFF.
Turn everything OFF.
First, attach all cables to devices. First, remove the power cord from
the outlet.
Attach the signal cables to
receptacles.
Remove signal cables from
receptacles.
Attach the power cord to an outlet.
Remove all cables from devices.
Turn the device ON.
To Connect To Disconnect
In the U.K., by law:
The telephone line cable must be connected after the power cord.
The power cord must be disconnected after the telephone line cable.
Copyright IBM Corp. 1997 vii
Title: C79DMMST CreationDate: 07/16/97 13:09:22

Danger:
Do not disassemble, incinerate, or short-circuit the rechargeable
battery pack. Do not put it in trash that is disposed of in
landfills. Dispose of it as required by local ordinances or
regulations. In the United States, call IBM at 1-800-IBM-4333 for
information on disposal.
Caution:
The fluorescent lamp in the liquid crystal display (LCD) contains
mercury. Do not put it in trash that is disposed of in landfills.
Dispose of it as required by local ordinances or regulations.
The LCD is made of glass, and rough handling or dropping the
computer can cause the LCD to break. If the LCD breaks and the
internal fluid gets into your eyes or on your hands, immediately wash
the affected areas with water for at least 15 minutes; then get
medical care if any symptoms are present after washing.
viii
Title: C79DMMST CreationDate: 07/16/97 13:09:22

Laser Compliance Statement
The optional CD-ROM and DVD drives in the IBM ThinkPad 770 are
laser products. The drives' classification label (shown below) are
located on the top of these drives.
CLASS 1 LASER PRODUCT
LASER KLASSE 1
LUOKAN 1 LASERLAITE
APPAREIL A LASER DE CLASSE 1
KLASS 1 LASER APPARAT
The CD-ROM and DVD drives are certified in the U.S. to conform to
the requirements of the Department of Health and Human Services
21 Code of Federal Regulations (DHHS 21 CFR) Subchapter J for
Class I laser products.
In other countries, the drives are certified to conform to the
requirements of EN60825.
Caution:
Do not open the CD-ROM or DVD drive; no user adjustments or
serviceable parts are inside.
Use of controls, adjustments, or the performance of procedures other
than those specified may result in hazardous radiation exposure.
Class I (1) laser products are not considered to be hazardous. The
CD-ROM and DVD drives have an internal, Class I (1), 0.5-milliwatt,
aluminum gallium-arsenide laser that operates at a wavelength of
760 to 810 nanometers. The design of the laser system and the
CD-ROM and DVD drives ensure that there are no exposure to laser
radiation above a Class I (1) level during normal operation, user
maintenance, or servicing conditions.
Safety Information ix
Title: C79DMMST CreationDate: 07/16/97 13:09:22

x
Title: C79DMMST CreationDate: 07/16/97 13:09:22

Chapter 1. Getting to Know Your Computer
Thank you for purchasing the IBM ThinkPad Computer. The
ThinkPad 770 series of computers incorporates the latest in
hardware technology. The high-end models have a larger screen
than the low-end models and are equipped with an internal modem.
A digital versatile disk is available as an option for playing
off-the-shelf DVD titles and movies.
You can use this book to find out how to use the various software
bundled with your computer and also about the hardware features.
You can also refer to the online book which is in your hard disk, to
find out on more technical matters. See “Using the ThinkPad Online
Book” on page 2-15 for details.
Knowing the Indicators on the LCD Indicator Panel ....... 1-7
Using the Fn Key Function ..................... 1-9
Using the Numeric Keypad .................... 1-11
Knowing the LED Color Indications ............... 1-12
Functional Highlights . . . . . . . . . . . . . . . . . . . . . . . . 1-13
DVD . . . . . . . . . . . . . . . . . . . . . . . . . . . . . . . . 1-13
Audio . . . . . . . . . . . . . . . . . . . . . . . . . . . . . . . 1-13
Audio with 3D Stereo Sound .................. 1-13
Video Capture . . . . . . . . . . . . . . . . . . . . . . . . . . 1-13
Infrared . . . . . . . . . . . . . . . . . . . . . . . . . . . . . . 1-14
Video Phone Features ..................... 1-14
System Management Features ................ 1-14
TrackPoint with Enhanced Controls .............. 1-14
Copyright IBM Corp. 1997 1-1
Title: C79DMMST CreationDate: 07/16/97 13:09:22

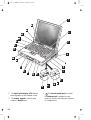
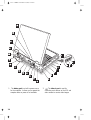
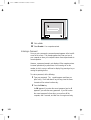
1The liquid crystal display (LCD) displays
text and graphics on the computer screen.
2The numeric keypad is used for typing
numbers in NumLk mode.
3 The internal modem port (also called
the telephone jack), equipped on some
models, is used for connecting your computer
to a telephone line.
1-2
Title: C79DMMST CreationDate: 07/16/97 13:09:22

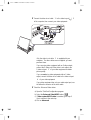
4The legs can be extended to angle the
keyboard for more comfortable typing.
5 The PC Card slots support the following
type of PC cards: PCMCIA (Type I, Type II,
and Type III), CardBus, and Zoomed Video
(ZV) card. The eject buttons 6 eject the
PC cards from the slots.
7The UltraBay II is used for inserting various
devices such as a CD-ROM drive, diskette
drive, DVD drive, a secondary hard disk
drive, and a secondary battery pack.
8The emergency eject hole is used to eject
the optional DVD or CD-ROM tray when it
does not open with the eject button 9.
Insert a pin to eject the tray.
9The eject button ejects the tray from the
optional CD-ROM or DVD drive.
1 The drive-in-use lamp goes on when data
is being read from a CD-ROM or a DVD disc
in the optional CD-ROM or DVD drive. Do
not enter suspend mode or eject a disc when
this lamp is on.
11 The diskette eject button ejects a diskette
from the diskette drive.
12 The diskette drive-in-use lamp goes on
when data is being written to or is being read
from a diskette. Do not enter suspend mode
or eject a diskette when this lamp is on.
13 The left and right cover release latches
release the cover for operation.
14 The left and right internal speakers
generate stereo sound.
15 The left and right release latches release
the left and right bay eject levers 16 which
release any device in the battery bay or the
UltraBay II, respectively. The right release
latch contains an LED that indicates when
you can safely remove a device from the
UltraBay II. See page 1-12 for details of the
lamp color indications.
17 The left click, right click, and center click
buttons are used to select items on the
screen, double-click and bring up context
menus. They work like mouse click buttons.
The center click button (below the other
buttons) is used to activate the enhanced
TrackPoint functions. See page 2-9.
18 Press the Fn key with certain function keys
(F1–F12) to activate special ThinkPad
functions (shown with blue-gray icons on the
function keys). See page 1-9.
19 The TrackPoint is a built-in pointing stick
that functions like a mouse. It also has
enhanced features that a mouse does not
have. See page 2-9.
2 The function keys are used for activating
various functions.
21 The built-in microphone is used for sound
recording and telephony.
22 The LCD indicator panel shows the current
status of the computer and battery power
with indicators and numeric information. See
page 1-7.
23 The brightness control lever adjusts
the brightness of the screen.
Chapter 1. Getting to Know Your Computer 1-3
Title: C79DMMST CreationDate: 07/16/97 13:09:22

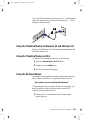
1The battery pack is a built-in power source
for the computer. It allows you to operate the
computer when ac power is not available.
2 The video-in port is used for
connecting such devices as the VCR and
video camera to receive video images.
1-4
Title: C79DMMST CreationDate: 07/16/97 13:09:22

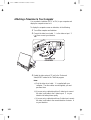
3 The video-out port is used for
connecting your computer to a television or a
VCR to send video images to these devices.
4 Reserved.
5 The volume control adjusts the sound
level of the built-in speakers.
6 The microphone/line-in jack is where
you connect a stereo microphone or external
audio device.
7 The headphone jack is where you
connect a stereo headphone or external
speakers.
8 The power switch turns the computer on
and off.
9 The reset switch resets the system in an
emergency.
1 The security keyhole is used with a
security lock. See page 3-21.
11 The AC power jack is where you
connect the AC Adapter cable.
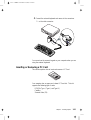
12 The external-input-device port allows
you to attach a mouse, an external keyboard,
or an external numeric keypad.
13 The serial port (9-pin) is where you
connect a serial-device cable.
14 The universal serial bus (USB)
allows you to connect any device that
conforms to this new interface. Many recent
digital devices comply to this new standard.
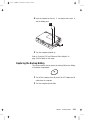
15 The fan louvers are for circulating air within
the computer.
Do not place any object in
front of these louvers.
16 The system-expansion port (240-pin)
allows you to connect the IBM ThinkPad
SelectaBase 770 port replicator.
17 The rear infrared port allows your
computer to communicate with other devices
that have infrared data-transfer capabilities.
18 The external-display port (15-pin) is
where you attach an external display.
19 The parallel port (25-pin) is where you
usually connect a parallel-printer signal cable.
2 The external-diskette-drive port is
where you attach an external-diskette-drive.
21 The power-on lamp indicates that the
computer power is on, regardless of whether
the computer is in suspend mode.
22 The suspend lamp indicates that the
computer is in suspend mode.
Green: The computer is in suspend
mode.
Blinking green: The computer is in the
process of changing modes.
23 The charge lamp shows the charge
status of your battery.
Green: Enough battery power is left for
operation.
Orange: The battery pack is being
charged.
Blinking orange: The battery pack
needs to be charged.
You will hear three beeps the moment this
lamp starts blinking if you had set the alarm
in the ThinkPad Configuration program.
Chapter 1. Getting to Know Your Computer 1-5
Title: C79DMMST CreationDate: 07/16/97 13:09:22

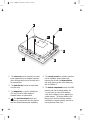
1The coin screw can be changed to a normal
screw shipped with your computer to prevent
others from gaining access to the hard disk in
the hard disk bay.
2The hard disk bay houses the replaceable
hard disk drive.
3The adapter bay is a slot for installing the
DVD and Enhanced Video Adapter
, a
standard feature on some models.
4 The front infrared port allows your
computer to communicate with other devices
that have infrared data-transfer capabilities.
5The security screws are normal screws that
can be installed to prevent others from
releasing the left and right release latches
and easily gaining access to the battery bay
and the UltraBay II.
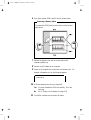
6The bottom compartment houses the DIMM
memory slots and the backup battery slot.
You can insert up to two DIMM memory
cards into the memory slots to upgrade your
system memory. The backup battery in the
battery slot is used for retaining computer
information in computer memory and also for
running the time-of-day clock.
1-6
Title: C79DMMST CreationDate: 07/16/97 13:09:22

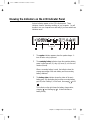
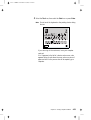
Knowing the Indicators on the LCD Indicator Panel
Various indicators appear on the LCD indicator panel. These
indicators show the operating conditions of your computer. You will
be able to use your computer more efficiently if you know what these
indicators mean.
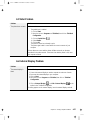
1The speaker indicator appears when the speaker beeps. It
turns off when a key is pressed.
2The remaining battery indicator shows the remaining battery
power in either percent (
%
), days (
d
), hours (
h
), or hours and
minutes (
hh:mm
).
When a secondary battery is used, the indicator shows the
average percentage of the main battery and the secondary
battery combined.
3The battery status indicator shows the status of the main
battery pack 1 (in the battery bay) and the secondary battery
pack 2 (in the UltraBay II) in five levels, from empty to full
.
The indicator on the right shows the battery charge status;
charging ( ) and discharging ( ). A blank indicates no
battery activity.
Chapter 1. Getting to Know Your Computer 1-7
Title: C79DMMST CreationDate: 07/16/97 13:09:22

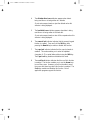
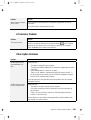
4The diskette drive in-use indicator appears when data is
being read from or is being written to a diskette.
Do not enter suspend mode or eject the diskette when this
indicator is being displayed.
5The hard disk in-use indicator appears when data is being
read from or is being written to the hard disk.
Do not enter suspend mode or turn off the computer when this
indicator is being displayed.
6The numeric lock indicator indicates that the numeric keypad
function is enabled. Press and hold the Shift key while
pressing the NumLk key to enable or disable this function.
7The caps lock indicator indicates that the caps lock mode is
enabled. This mode enables you to enter the alphabet
characters (
A
–
Z
) in capital letters without using the Shift key.
The Caps Lock key enables and disables this mode.
8The scroll lock indicator indicates that the scroll lock function
is enabled. This function enables you to use the Arrow keys
to scroll the screen. However, you will not be able to move
the cursor with these keys when this function is enabled. The
ScrLk key enables and disables this function. Not all
application programs support this function.
1-8
Title: C79DMMST CreationDate: 07/16/97 13:09:22

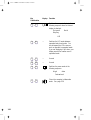
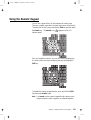
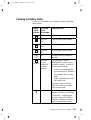
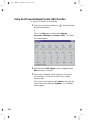
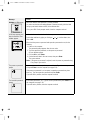
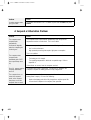
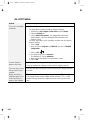
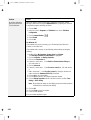
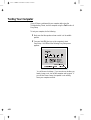
Using the Fn Key Function
The Fn key allows you to change the operating conditions of your
computer instantly. To use the ThinkPad functions, press and hold
the Fn key 1; then press the appropriate function key 2 (F1 to
F12).
Key
Combination Keytop Function
Fn + F1 — Unused
Fn + F2 Displays the battery power status
indicator or erases it when it is being
displayed. The Fuel program must be
activated before you can use this
function. See page 2-32.
Fn +
F3
Places the computer in standby mode.
See page 2-26.
Fn + F4 Places the computer in suspend mode.
See page 2-26.
Fn + F5 — Unused
Fn + F6 — Unused
Chapter 1. Getting to Know Your Computer 1-9
Title: C79DMMST CreationDate: 07/16/97 13:09:22

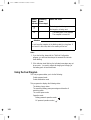
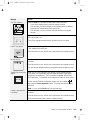
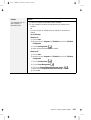
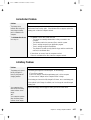
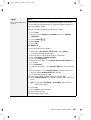
Key
Combination Keytop Function
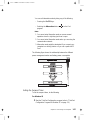
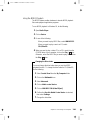
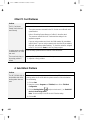
Fn + F7 Switches the computer display in the
following sequence when an external
display is attached.
External Both
Display
LCD
Fn + F8 — Switches the LCD mode between
expanded and shrunk mode. You
should expand the LCD screen as
much as possible in expanded mode.
If you are displaying in full colors, your
display area will be smaller even in
expanded mode.
Fn + F9 — Unused
Fn +
F10
— Unused
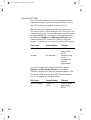
Fn +
F11
Switches the power mode in the
following sequence:
High Auto
Customized
Fn +
F12
Places the computer in hibernation
mode. See page 2-26.
1-10
Title: C79DMMST CreationDate: 07/16/97 13:09:22
Page is loading ...
Page is loading ...
Page is loading ...
Page is loading ...
Page is loading ...
Page is loading ...
Page is loading ...
Page is loading ...
Page is loading ...
Page is loading ...
Page is loading ...
Page is loading ...
Page is loading ...
Page is loading ...
Page is loading ...
Page is loading ...
Page is loading ...
Page is loading ...
Page is loading ...
Page is loading ...
Page is loading ...
Page is loading ...
Page is loading ...
Page is loading ...
Page is loading ...
Page is loading ...
Page is loading ...
Page is loading ...
Page is loading ...
Page is loading ...
Page is loading ...
Page is loading ...
Page is loading ...
Page is loading ...
Page is loading ...
Page is loading ...
Page is loading ...
Page is loading ...
Page is loading ...
Page is loading ...
Page is loading ...
Page is loading ...
Page is loading ...
Page is loading ...
Page is loading ...
Page is loading ...
Page is loading ...
Page is loading ...
Page is loading ...
Page is loading ...
Page is loading ...
Page is loading ...
Page is loading ...
Page is loading ...
Page is loading ...
Page is loading ...
Page is loading ...
Page is loading ...
Page is loading ...
Page is loading ...
Page is loading ...
Page is loading ...
Page is loading ...
Page is loading ...
Page is loading ...
Page is loading ...
Page is loading ...
Page is loading ...
Page is loading ...
Page is loading ...
Page is loading ...
Page is loading ...
Page is loading ...
Page is loading ...
Page is loading ...
Page is loading ...
Page is loading ...
Page is loading ...
Page is loading ...
Page is loading ...
Page is loading ...
Page is loading ...
Page is loading ...
Page is loading ...
Page is loading ...
Page is loading ...
Page is loading ...
Page is loading ...
Page is loading ...
Page is loading ...
Page is loading ...
Page is loading ...
Page is loading ...
Page is loading ...
Page is loading ...
Page is loading ...
Page is loading ...
Page is loading ...
Page is loading ...
Page is loading ...
Page is loading ...
Page is loading ...
Page is loading ...
Page is loading ...
Page is loading ...
Page is loading ...
Page is loading ...
Page is loading ...
Page is loading ...
Page is loading ...
Page is loading ...
Page is loading ...
Page is loading ...
Page is loading ...
Page is loading ...
Page is loading ...
Page is loading ...
Page is loading ...
Page is loading ...
Page is loading ...
Page is loading ...
Page is loading ...
Page is loading ...
Page is loading ...
Page is loading ...
Page is loading ...
Page is loading ...
Page is loading ...
Page is loading ...
Page is loading ...
Page is loading ...
Page is loading ...
Page is loading ...
Page is loading ...
Page is loading ...
Page is loading ...
Page is loading ...
Page is loading ...
Page is loading ...
Page is loading ...
Page is loading ...
Page is loading ...
Page is loading ...
Page is loading ...
Page is loading ...
Page is loading ...
Page is loading ...
Page is loading ...
Page is loading ...
Page is loading ...
Page is loading ...
Page is loading ...
Page is loading ...
Page is loading ...
Page is loading ...
Page is loading ...
Page is loading ...
Page is loading ...
Page is loading ...
Page is loading ...
Page is loading ...
Page is loading ...
-
 1
1
-
 2
2
-
 3
3
-
 4
4
-
 5
5
-
 6
6
-
 7
7
-
 8
8
-
 9
9
-
 10
10
-
 11
11
-
 12
12
-
 13
13
-
 14
14
-
 15
15
-
 16
16
-
 17
17
-
 18
18
-
 19
19
-
 20
20
-
 21
21
-
 22
22
-
 23
23
-
 24
24
-
 25
25
-
 26
26
-
 27
27
-
 28
28
-
 29
29
-
 30
30
-
 31
31
-
 32
32
-
 33
33
-
 34
34
-
 35
35
-
 36
36
-
 37
37
-
 38
38
-
 39
39
-
 40
40
-
 41
41
-
 42
42
-
 43
43
-
 44
44
-
 45
45
-
 46
46
-
 47
47
-
 48
48
-
 49
49
-
 50
50
-
 51
51
-
 52
52
-
 53
53
-
 54
54
-
 55
55
-
 56
56
-
 57
57
-
 58
58
-
 59
59
-
 60
60
-
 61
61
-
 62
62
-
 63
63
-
 64
64
-
 65
65
-
 66
66
-
 67
67
-
 68
68
-
 69
69
-
 70
70
-
 71
71
-
 72
72
-
 73
73
-
 74
74
-
 75
75
-
 76
76
-
 77
77
-
 78
78
-
 79
79
-
 80
80
-
 81
81
-
 82
82
-
 83
83
-
 84
84
-
 85
85
-
 86
86
-
 87
87
-
 88
88
-
 89
89
-
 90
90
-
 91
91
-
 92
92
-
 93
93
-
 94
94
-
 95
95
-
 96
96
-
 97
97
-
 98
98
-
 99
99
-
 100
100
-
 101
101
-
 102
102
-
 103
103
-
 104
104
-
 105
105
-
 106
106
-
 107
107
-
 108
108
-
 109
109
-
 110
110
-
 111
111
-
 112
112
-
 113
113
-
 114
114
-
 115
115
-
 116
116
-
 117
117
-
 118
118
-
 119
119
-
 120
120
-
 121
121
-
 122
122
-
 123
123
-
 124
124
-
 125
125
-
 126
126
-
 127
127
-
 128
128
-
 129
129
-
 130
130
-
 131
131
-
 132
132
-
 133
133
-
 134
134
-
 135
135
-
 136
136
-
 137
137
-
 138
138
-
 139
139
-
 140
140
-
 141
141
-
 142
142
-
 143
143
-
 144
144
-
 145
145
-
 146
146
-
 147
147
-
 148
148
-
 149
149
-
 150
150
-
 151
151
-
 152
152
-
 153
153
-
 154
154
-
 155
155
-
 156
156
-
 157
157
-
 158
158
-
 159
159
-
 160
160
-
 161
161
-
 162
162
-
 163
163
-
 164
164
-
 165
165
-
 166
166
-
 167
167
-
 168
168
-
 169
169
-
 170
170
-
 171
171
-
 172
172
-
 173
173
-
 174
174
-
 175
175
-
 176
176
-
 177
177
-
 178
178
-
 179
179
-
 180
180
-
 181
181
-
 182
182


Ask a question and I''ll find the answer in the document
Finding information in a document is now easier with AI
Related papers
-
IBM C79EGMST User manual
-
-
Lenovo ThinkPad 560Z User manual
-
 EXP Computer 19K4206PT1 User manual
-
-
-
-
-
-

Other documents
-
-
-
-
Lenovo ThinkPad Z60t Series Hardware Maintenance Manual
-
-
Lenovo THINKPAD T61 Hardware Maintenance Manual
-
-
Lenovo ThinkPad SL300 Hardware Maintenance Manual
-
Lenovo ThinkPad 770E Setup Manual
-