Page is loading ...

IMPORTANT SAFETY INSTRUCTIONS
LIGHTED BULB IS HOT!
WARNING: To reduce the risk of FIRE or INJURY TO PERSON:
• Turn off and allow to cool before replacing bulb.
• Bulb gets HOT QUICKLY! Contact switch only when turning off.
• DO NOT remain in light if skin feels warm. (Light is intense,
may cause “sunburn”)
• DO NOT look directly at lighted bulb.
• Keep materials away from bulb that may burn.
• Use ONLY with wattage specied or lower.
• DO NOT touch bulb at any time, use a soft cloth. Oil from skin
may damage bulb.
• DO NOT operate xture with missing or damaged glass.
1) TURN OFF POWER.
IMPORTANT: Before you start, NEVER attempt any work
without shutting off the electricity until the work is done.
a) Go to the main fuse, or circuit breaker, box in your
home. Place the main power switch in the “OFF”
position.
b) Unscrew the fuse(s), or switch “OFF” the circuit breaker
switch(s), that control the power to the xture or room that
you are working on.
c) Place the wall switch in the “OFF” position. If the xture
to be replaced has a switch or pull chain, place those in
the “OFF” position.
2) Find the appropriate threaded holes on mounting strap.
Assemble mounting screws into threaded holes.
3) Attach mounting strap to outlet box. (Screws not provided).
Mounting strap can be adjusted to suit position of xture.
4) Make wire connections (connectors not provided.) Reference
chart below for correct connections and wire accordingly.
5) Push xture to wall, carefully passing mounting screws
through holes in canopy.
6) Thread threaded balls onto mounting screws. Tighten
threaded balls to secure xture to wall.
7) Insert recommended bulb. CAUTION: DO NOT touch bulb
with bare hands. If this happens, clean bulb with denatured
alcohol and a lint free cloth.
8) Lower glass down over socket.
9) Fit bottom edge of glass into cup on xture.
10) Carefully turn glass to secure glass in place. (DO NOT over
tighten.)
INSTRUCTIONS FOR MOUNTING FIXTURE OUTDOORS AND/
OR IN WET LOCATIONS.
11) Mounting surface should be clean, dry, at and 1/4” larger
that the canopy on all sides. Any gaps between the mounting
surface and canopy exceeding 3/16” should be corrected as
required.
12) With silicone caulking compound, caulk completely around
where back of canopy meets the wall surface to prevent
water from seeping into outlet box.
Connect Black or
Red Supply Wire to:
Connect
White Supply Wire to:
Black White
*Parallel cord (round & smooth)
*Parallel cord (square & ridged)
Clear, Brown, Gold or Black
without tracer
Clear, Brown, Gold or Black
with tracer
Insulated wire (other than green)
with copper conductor
Insulated wire (other than green)
with silver conductor
*Note: When parallel wires (SPT I & SPT II)
are used. The neutral wire is square shaped
or ridged and the other wire will be round in
shape or smooth (see illus.)
Neutral Wire
Date Issued: 09/20/17
IS-49149-CB
INSTRUCTIONS
For Assembling and Installing Fixtures in Canada
Pour L’assemblage et L’installation Au Canada
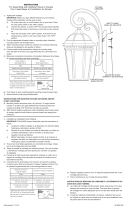
MOUNTING STRAP
BARRETTE DE MONTAGE
THREADED BALL
BOULE FILETÉ
GLASS
VERRE
BULB
AMPOULE
SOCKET
DOUILLE
CUP
COUPELLE
We’re here to help 866-558-5706
Hrs: M-F 9am to 5pm EST
SEE OTHER SIDE FOR CANADIAN FRENCH TRANS-
LATIONS.
VOIR L’AUTRE CÔTÉ POUR LES CANADIENS TRA-
DUCTIONS EN FRANÇAIS.

IMPORTANTES CONSIGNES DE SÉCURITÉ
UNE AMPOULE ALLUMÉE EST BRÛLANTE !
AVERTISSEMENT: Pour réduire les risques D’INCENDIE ou DE
BLESSURE:
• Éteindreetlaisserrefroidiravantderemplacerl’ampoule.
• LesampouleschauffentTRÈSRAPIDEMENT!N’éteindrequ’à
l’aidedel’interrupteur.
• NEPASresterdanslalumièresiunesensationdechaleurest
ressentiesurlapeau.(Lalumièreestintenseetpeutprovoquer
descoupsdesoleil).
• NEJAMAISregarderdirectementuneampouleallumée.
• Tenirlesmatériauxàl’écartd’uneampoulepouréviterqu’ils
nebrûlent.
• UtiliserUNIQUEMENTdesampoulesàlapuissancenominale
indiquée(watts)ouàunepuissanceinférieure.
• NEJAMAIStoucherl’ampouleàmainnue,seservird’untissu
doux.L’huiledelapeaupeutendommagerl’ampoule.
1) COUPERL’ALIMENTATIONSECTEUR.
IMPORTANT:TOUJOURScouperl’électricitéavantde
commencerletravail.
a) Localiserlecoffretàfusiblesouledisjoncteurdu
domicile.Mettrel’interrupteurprincipalenposition
d’Arrêt.
b) Dévisserleoulesfusibles(oumettreledisjoncteursur
Arrêt)quicontrôlentl’alimentationversleluminaireoula
piècedanslaquelleletravailesteffectué.
c) Mettrel’interrupteurmuralenpositiond’Arrêt.Sileluminaire
àremplacerestdotéd’uninterrupteuroud’unechaîne
connectéeàl‘interrupteur,placercesélémentsen
positiond’Arrêt.
2) Trouverlestrousletésappropriéssurlabarrettedemontage.
Vissezlesvisdemontagedanslestrousletés.
3) Visserlabarrettedemontageàlaboitedejonction.(Visnon
fournies).Labarrettedemontagepeutetreajustéepour
conveniràlapositiondel’applique.
4) Connecterlesls(connecteursnonfournis).Sereporterau
tableauci-dessouspourfairelesconnexions.Plaquer
l’appliquecontrelemur,enpassantsoigneusementlesvis
demontagedanslestrous.
5) Plaquezl’appliquecontrelemur,enpassantsoigneusement
lesvisdemontagedanslestrous.
6) Fixerl’appliqueconrelemuraveclesboulesletées.
7) Introduirel’ampoulerecommandée.ATTENTION :NEPAS
toucherl’ampouleàmainnue.Silapeauentreencontact
avecl’ampoule,nettoyerl’ampouleavecdel’alcooldénaturé
etuntissunonpelucheux.
8) Abaisserleverresurladouille.
9) Placerlebordinférieurduverredanslacoupellesurle
luminaire.
10) Tournersoigneusementleverrepourlexer.(NEPASserrer
avecexcès).
INSTRUCTIONS DE MONTAGE DE LUMINAIRE À L’EXTÉRIEUR
ET/OU DANS DES LIEUX HUMIDES.
11) Lasurfacedemontagedoitêtrepropre,sèche,plateetde
0,6cmplusépaissequelecachesurtouslescôtés.Tout
écartentrelasurfacedemontageetlecachedépassantde
0,5cmdoitêtrerectiéselonlesbesoins.
12)Àl’aidedematériauxd’étanchéitéàlasilicone,calfeutrer
bienautouroùl’arrièreducacheentreencontactavecle
murpourempêcherl’eaudepasserdanslaboîtede
raccordement.
DateIssued:09/20/17
IS-49149-CB
INSTRUCTIONS
For Assembling and Installing Fixtures in Canada
Pour L’assemblage et L’installation Au Canada
Connecter le fil noir ou
rouge de la boite
Connecter le fil blanc de la boîte
A Noir A Blanc
*Au cordon parallèle (rond et lisse)
*Au cordon parallele (à angles droits el strié)
Au bransparent, doré, marron, ou
noir sans fil distinctif
Au transparent, doré, marron, ou
noir avec un til distinctif
Fil isolé (sauf fil vert) avec
conducteur en cuivre
Fil isolé (sauf fil vert) avec
conducteur en argent
*Remarque: Avec emploi d’un fil paralléle
(SPT I et SPT II). Le fil neutre est á angles
droits ou strié et l’autre fil doit étre rond ou
lisse (Voir le schéma).
Fil Neutre
We’reheretohelp866-558-5706
Hrs:M-F9amto5pmEST
SEE OTHER SIDE FOR ENGLISH TRANSLATIONS.
VOIR L’AUTRE CÔTÉ DES TRADUCTIONS EN ANGLAIS.
THREADEDBALL
BOULEFILETÉ
GLASS
VERRE
BULB
AMPOULE
SOCKET
DOUILLE
CUP
COUPELLE
MOUNTINGSTRAP
BARRETTEDEMONTAGE
/