KitchenAid 5KHB3581 Instructions Manual
- Category
- Blenders
- Type
- Instructions Manual
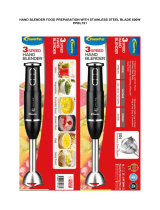
KitchenAid 5KHB3581 is a versatile and powerful hand blender that makes food preparation quick and easy. With its range of attachments, including a blending arm, whisk, and chopper, you can blend, crush, puree, shred, mince, froth, mix, whip, emulsify, and aerate a variety of ingredients. Enjoy delicious soups, smoothies, sauces, baby food, and more with the S-Blade and pan guard. Create fluffy whipped cream, mayonnaise, and vinaigrettes with the frother/beater. Use the whisk attachment to whip egg whites, make hollandaise sauce, and more.
KitchenAid 5KHB3581 is a versatile and powerful hand blender that makes food preparation quick and easy. With its range of attachments, including a blending arm, whisk, and chopper, you can blend, crush, puree, shred, mince, froth, mix, whip, emulsify, and aerate a variety of ingredients. Enjoy delicious soups, smoothies, sauces, baby food, and more with the S-Blade and pan guard. Create fluffy whipped cream, mayonnaise, and vinaigrettes with the frother/beater. Use the whisk attachment to whip egg whites, make hollandaise sauce, and more.


-
 1
1
-
 2
2
-
 3
3
-
 4
4
-
 5
5
-
 6
6
-
 7
7
-
 8
8
-
 9
9
-
 10
10
-
 11
11
-
 12
12
-
 13
13
-
 14
14
-
 15
15
-
 16
16
-
 17
17
-
 18
18
-
 19
19


KitchenAid 5KHB3581 Instructions Manual
- Category
- Blenders
- Type
- Instructions Manual
KitchenAid 5KHB3581 is a versatile and powerful hand blender that makes food preparation quick and easy. With its range of attachments, including a blending arm, whisk, and chopper, you can blend, crush, puree, shred, mince, froth, mix, whip, emulsify, and aerate a variety of ingredients. Enjoy delicious soups, smoothies, sauces, baby food, and more with the S-Blade and pan guard. Create fluffy whipped cream, mayonnaise, and vinaigrettes with the frother/beater. Use the whisk attachment to whip egg whites, make hollandaise sauce, and more.
Ask a question and I''ll find the answer in the document
Finding information in a document is now easier with AI
Related papers
-
KitchenAid 5KHB3581 Owner's manual
-
-
-
-
-
Whirlpool 5KHB2571ESX User manual
-
-
-
-
Other documents
-
 Myria MY4107 User manual
-
 PowerPac PPBL191 Food Hand Blender User manual
-
Transolid SBC-BS Installation guide
-
Transolid TPH-BS Installation guide
-
 K&H Thermal-Bowl Heated Outdoor Water Bowl User manual
-
Sencor SHB 4330WH User manual
-
Sencor SCB 6150SS User manual
-
-
Cuisinart CSB-77A User manual
-
Cuisinart CSB-77 User manual


