Page is loading ...

Form No. 70204A 3/00 WAP TECHNOLOGY Printed in the U.S.A.
READ THIS BOOK
This book has important information for the use and safe operation of this machine. Failure to read
this book prior to operating or attempting any service or maintenance procedure to your ALTO
machine could result in injury to you or to other personnel; damage to the machine or to other property
could occur as well. You must have training in the operation of this machine before using it. If your
operator(s) cannot read English, have this manual explained fully before attempting to operate this
machine.
All directions given in this book are as seen from the operator’s position at the rear of the machine.
For new books write to: ALTO U.S. Inc., 2100 Highway 265, Springdale, Arkansas 72764.
Wet/Dry
Vacuum
aero / SQ
Operator's
Manual

Page -2- WAP TECHNOLOGY Wet/Dry Vacuums Operator's Manual
Table of Contents
Important Safety Instructions .................................................................................... 3
Specifications and Accessories .............................................................................. 5
Grounding Instructions ............................................................................................. 6
How To Assemble the Machine ................................................................................ 7
How To Prepare The Machine For Operation ........................................................... 7
Machine Operation .................................................................................................. 8
Maintenance and Repair ......................................................................................... 9
Troubleshooting ....................................................................................................... 10
Section II Parts and Service Manual
Assembly Drawing for aero 5 Gallon and aero 7 AS/E ............................................ 12
Parts List ....................................................................................................... 13
Assembly Drawing for SQ 10 and 15 Gallon ............................................................ 14
Parts List ....................................................................................................... 15
Assembly Drawing for SQ 17 Gallon ....................................................................... 16
Parts List ....................................................................................................... 17

Page -3-
WAP TECHNOLOGY Wet/Dry Vacuums Operator's Manual
IMPORTANT SAFETY INSTRUCTIONS
WARNING AVERTISSEMENT ADVERTENCIA
DANGER: Failure to read and observe all DANGER statements could result in severe
bodily injury or death. Read and observe all DANGER statements found in
your Owner's Manual and on your machine.
WARNING: Failure to read and observe all WARNING statements could result in injury
to you or to other personnel; property damage could occur as well. Read
and observe all WARNING statements found in your Owner's Manual and on
your machine.
CAUTION: Failure to read and observe all CAUTION statements could result in damage
to the machine or to other property. Read and observe all CAUTION
statements found in your Owner's Manual and on your machine.
WARNING: To reduce the risk of fire, electric shock, or injury:
1. Do not leave machine when plugged in. Unplug from outlet when not in use and
before servicing.
2. To reduce the risk of electric shock use indoors only.
3. Do not allow to be used as a toy. Close attention is necessary when used by or
near children.
4. Use only as described in the manual. Use only manufacturer's recommended at-
attachments.
5. Do not use with damaged cord or plug. If machine is not working as it should, has
been dropped, damaged, left outdoors, or dropped into water, return it to a service
center.
6. Do not pull or carry by cord, use cord as a handle, close a door on cord, or pull cord
around sharp edges or corners. Do not run machine over cord. Keep cord away
from heated surfaces.
7. Do not unplug by pulling on cord. To unplug, grasp the plug, not the cord.
8. Do not handle plug or machine with wet hands.
9. Do not put any object into openings. Do not use with any opening blocked; keep
free of dust, lint, hair and anything that may reduce air flow.
10. Keep hair, loose clothing, fingers, and all parts of body away from openings and
moving parts.
11. The following materials must not be picked up with the machine: Hot materials
(glowing cigarettes, hot ashes, etc.); Inflammable, explosive or aggressive fluids (e.g.
gasoline, solvents, acids, alkalines, etc.); Inflammable, explosive dusts (e.g.
magnesium or aluminum dust, etc.).
12. Do not use without dust bag and/or filters in place. Use the machine only with an
undamaged filter element.
13. Turn off all controls before unplugging.
14. Use extra care when cleaning on stairs.
16. Connect to properly grounded outlet. See "Grounding Instructions".
SAVE THESE INSTRUCTIONS

Page -4- WAP TECHNOLOGY Wet/Dry Vacuums Operator's Manual
DANGER: Failure to read the Owner's Manual prior to operating or attempting any service or
maintenance procedure to your Wap Technology machine could result in injury to
you or to other personnel; damage to the machine or to other property could
occur as well. You must have training in the operation of this machine before
using it. If your operator(s) cannot read English, have this manual
explained fully before attempting to operate this machine.
DANGER: Operating a machine that is not completely or fully assembled could result in
injury or property damage. Do not operate this machine until it is completely
assembled. Inspect the machine carefully before operation. Use only as
described in this manual. Use only Wap Technology's recommended
attachments and replacement parts.
WARNING: Operating a machine without observing all labels, decals, etc., could result in
injury or damage. Read all machine labels before attempting to operate the
machine. Make sure all of the labels are attached or fastened to the machine.
Get replacement labels and decals from your Wap Technology distributor.
WARNING: Before connecting any appliance to the appliance plug socket, the machine must
always be switched off. If appliances are connected to the appliance plug
socket, ensure that these appliances are also switched off when being
connected to the appliance plug socket. See "Appliance Plug Socket" in the
"Grounding Instructions" section in of this manual.
CAUTION: Making technical modifications to the machine could endanger your safety. Do
not make any technical modifications to the machine.
CAUTION: Never spray the top section of the machine with water. Can cause danger to
persons or danger of short circuits.
CAUTION: Wrap cord around handle when machine is not in use. Use caution not to run
over cord while machine is in use.
CAUTION: This machine is not suitable for picking up health endangering dust.
CAUTION: If foam/liquid comes out, switch off immediately.

Page -5-
WAP TECHNOLOGY Wet/Dry Vacuums Operator's Manual
Model SQ 10 Gal. SQ 15 Gal. SQ 17 Gal. aero 5 Gal. aero 7 Gal.
Voltage 120 V 120 V 120 V 120 V 120 V
Frequency 60 Hz 60 Hz 60 Hz 60 Hz 60 Hz
Power 1200 Watts 1200 Watts 1200 Watts 1200 Watts 1200 Watts
Connected load for 600 Watts 600 Watts 600 Watts NA 600 Watts
appliance plug socket
Volume Flow (air) 120 CFM 120 CFM 120 CFM 120 CFM 120 CFM
Static Water Lift 90" 90" 90" 65" 65"
Filter Surface Area 3.5 sq. ft. 3.5 sq. ft. 3.5 sq. ft. 3.5 sq. ft. 3.5 sq. ft.
Sound Level 58 db(A) 58 db(A) 58 db(A) 62 db(A) 62 db(A)
Cord Length 22' 22' 22' 15' 15'
Tank Volume 10 gal. 15 gal. 17 gal. 5 gal. 7 gal.
Width 18" 17" 23" 14.5" 14.5"
Depth 17" 17" 22" 14" 14"
Height 20" 26" 37" 18" 21"
Weight 26 lbs. 33 lbs. 55 lbs. 13 lbs. 14 lbs.
Order # for bag-type 29739 14895 47429 61156 60910
filter elements
(pack of 5 elements)
Order # for filter 29747 29747 29747 11753 11753
element
H.E.P.A. Filter 40181 40181 40181 40181 40181
Clothe Filter Liner / 17081 17081 8726 NA NA
Washable
Filter Element Cover 11801 11801 11801 NA NA
Squeegee Floor Tool 5149 5149 5149 60908 60908
Replacement 6114 6114 6114 NA NA
Squeegee Blades (set of 2) (set of 2) (set of 2)
NA = Not available
SPECIFICATIONS & ACCESSORIES

Page -6- WAP TECHNOLOGY Wet/Dry Vacuums Operator's Manual
GROUNDING INSTRUCTIONS
This appliance must be grounded. If it should malfunction or
breakdown, grounding provides a path of least resistance for
electric current to reduce the risk of electric shock. This
appliance is equipped with a cord having an equipment-
grounding conductor and grounding plug. The plug must be
plugged into an appropriate outlet that is properly installed
and grounded in accordance with all local codes and ordi-
nances.
WARNING: Improper connection of the equipment-
grounding conductor can result in a risk of electric
shock. Check with a qualified electrician or service
person if you are in doubt as to whether the outlet
is properly grounded. Do not modify the plug
provided with the product - if it will not fit the
outlet, have a proper outlet installed by a qualified
electrician.
This appliance is for use on a nominal 120-volt circuit and
has a ground plug that looks like the plug illustrated in figure
1. Make sure that the appliance is connected to an outlet
having the same configuration as the plug. No adapter
should be used with this appliance.
WARNING: To prevent possible electric shock, protect
the machine from rain. Keep the machine in a dry
building.
WARNING: To prevent possible electric shock, always
use a 3-wire electrical system connected to the elec-
trical ground. For maximum protection against elec-
trical shock, use a circuit that is protected by a ground
fault circuit interrupter. Consult your electrical con-
tractor.
WARNING: Do not cut, remove or break the ground
pin. If the outlet does not fit the plug, consult your
electrical contractor.
WARNING: Have worn, cut or damaged
cords replaced by an authorized service person.
EXTENSION CORDS
Use only an approved extension cord with three conductors,
a plug with three terminals, and a connector body with three
holes. The machine has a power cord with wire size 16
AWG (AWG means American Wire Gauge).
WARNING: If you use an extension cord, use an
extension cord with minimum wire size 14 AWG.
Do not use an extension cord longer than 50 feet.
Do not join two extension cords.
APPLIANCE PLUG SOCKET
Before connecting any appliance to the appliance plug
socket, the machine must always be switched off. If appli-
ances are connected to the appliance plug socket, ensure
that these appliances are also switched off when being
connected to the appliance plug socket.
CAUTION: The operating instructions and the safety
precautions contained therein must be observed
when using appliances connected to the appliance
plug socket of the machine.
Grounding
Pin
Grounded
Outlet
Grounded
Outlet
Box
Figure 1
(A)

Page -7-
WAP TECHNOLOGY Wet/Dry Vacuums Operator's Manual
HOW TO ASSEMBLE THE MACHINE
CAUTION!
On delivery, the accessories - are lying in the tank and
must be removed before the machine is used for the first
time. See figure 2.
To assemble the machine, remove the machine top
section:
The power cord must not yet be inserted into a plug
socket.
1. Open the retaining clamps and lift off the machine top
section (Figure 3).
2. Place a bag-type filter into the tank as described in the
instructions printed on the filter.
3. Fit the machine top section back on the tank, and close
the retaining clamps.
4. Connect the suction hose. The "Wap Multifit" enables
any Wap Technology suction hoses (27, 32, 36, 50 mm
diameter) to be connected to the machine (Figure 4).
HOW TO PREPARE THE MACHINE FOR OPERATION
Electrical Compressed Air Connection
The operating voltage shown on the rating plate must
correspond to the voltage of the main power supply.
Ensure that the machine is switched off and insert the
plug of the power cord into a properly installed and fused
plug socket with ground.
Connecting Electric Tools
aero 7 AS/E:
Connect the electric tool to the appliance plug socket on
the control panel (Figure 5).
Before connecting a tool, ensure that both the machine and
the tool are switched off.
For maximum power consumption of the electric tool to be
connected, see the Specification Table on page 5.
Figure 2
Figure 3
Figure 4
Figure 5

MACHINE OPERATION
Picking Up Dry Substances
Before picking up dry substances, the bag-type filter
should always be installed in the tank. It is then easy
to dispose of the material picked up and the service life
of the main filter element is significantly increased. Dry
cleaning without bag-type filter is also possible.
WARNING: Inflammable substances must not
be picked up with the machine!
After picking up liquids, the filter element is damp.
Damp filter elements can clog more quickly when dry
substances are picked up. For this reason, the filter
element should be dried or replaced before picking up
any dry substances.
Picking Up Liquids
Before picking up liquids, the bag-type filter must
always be removed from the tank.
WARNING: Inflammable liquids must not be
picked up with the machine!
If foaming is observed, stop work immediately and
empty the tank.
Switching On The Machine (SQ 10/15/17 & aero 5)
Turn the switch to position "I" (Figure 6).
Switching On The Machine (aero 7 AS/E)
Two operating modes are possible.
1. Switch position "I":
The machine motor starts immediately.
2. Switch position "auto":
The machine motor starts only when the tool
connected to the appliance plug socket is switched
on (Figure 7).
CAUTION: Before turning the switch to position
"auto", ensure that the tool connected to the
appliance plug socket is switched off.
The motor speed and thus the suction power can be
varied at the suction force regulator. This permits a
precise adaptation to different substances to be picked
up (Figure 7).
After Finishing Work
1. Switch off the machine and pull the plug of the
power cord out of the plug socket.
2. Wind up the power cord around the handle (Figure
8).
Figure 6
Figure 7
Figure 8
Page -8- WAP TECHNOLOGY Wet/Dry Vacuums Operator's Manual

Page -9- WAP TECHNOLOGY Wet/Dry Vacuums Operator's Manual
MACHINE OPERATION
Changing The Bag Type Filter
1. Close the bag-type filter sleeve with the slide
(Figure 9).
2. Pull the bag-type filter sleeve off the inlet fitting.
3. Dispose of the used bag-type filter in accordance
with the local waste disposal regulations.
4. Place a new bag-type filter into the tank as de-
scribed in the instructions printed on the filter.
IMPORTANT!
Push the bag-type filter sleeve completely
onto the inlet fitting.
Replacing The Filter Element
1. Switch off the machine and pull the plug of the
power cord out of the plug socket.
2. Remove the machine top section from the dirt tank
and place to one side with the filter element facing
upwards (Figure 10).
3. Unscrew the filter retaining nut (1) and remove
together with the retaining washer (2).
4. Pull off the filter element (3).
5. Push on a new filter element.
6. Fit the filter retaining washer and tighten the
retaining nut.
7. Dispose of the used filter element in accordance
with the local waste disposal regulations.
MAINTENANCE AND REPAIR
CAUTION: Before cleaning and servicing the
machine, always remove the power cord.
Carry out only maintenance operations described in
these operating instructions. Use only original Wap
Technology spare parts.
CAUTION: Do not make any technical
modifications to the machine. Your safety
could be endangered as a result!
For all other maintenance and repair work,
please contact and authorized Wap
Technology Service department.
Figure 9
Figure 10

Page -10- WAP TECHNOLOGY Wet/Dry Vacuums Operator's Manual
TROUBLESHOOTING
ActionCause
Problem
1. Reset the fuse
2. Allow the machine to cool down approximately
5 minutes; if the machine does not start again
automatically, contact the Service Dept.
1. Replace bag-type filter.
2. Clean suction hose.
3. Clean and replace filter element.
1. Empty tank.
1. The fuse or plug socket has blown.
2. Overload protection switch has tripped.
1. Bag-type filter full.
2. Suction hose clogged.
3. Filter element clogged.
1. Tank full (float switch closing off the
suction opening).
Motor does not start.
Reduced suction power.
No suction power during
wet cleaning.
NOTES

Page -11-
WAP TECHNOLOGY Wet/Dry Vacuums Operator's Manual
aero / SQ
Wet/Dry Vacuum
Section II
Parts and Service
(70204A)
Page -11- WAP TECHNOLOGY Wet/Dry Vacuums Operator's Manual

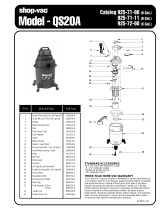
Page -12- WAP TECHNOLOGY Wet/Dry Vacuums Operator's Manual
aero 5 Gallon
aero 7 AS/E
Assembly Drawing 3/00
WAP TECHNOLOGY
1
2
3
4
5
6
7
9
8
10
16
11
12
15
14
13
17
18
19
20
21
20
33
32
31
22
23
24
23
25
26
27
28
29
30

Page -13-
WAP TECHNOLOGY Wet/Dry Vacuums Operator's Manual
aero 5 Gallon
aero 7 AS/E
Assembly Parts List 3/00
WAP TECHNOLOGY
Ref. Part No. Description Qty
1 11753 Filter Element, Short 1
2 60606 Float 1
3 60607 Cage, Float 1
4 61156 Filter Bag, aero 5 (pkg. of 5) 1
60910 Filter Bag, aero 7 (pkg. of 5) 1
5 2364 Cap Nut 4
6 2793 U-Disc 8.4mm Zinc 4
7 65246 Canister, aero 5 1
65247 Canister, aero 7 1
8 61276 Washer 4
9 60608 Caster 4
10 60897 Hose, vac 1
11 60609 Wand Holder 1
12 40696 2 pc. Wand Ext., Plastic 1
13 60916 Cuff, Powertool 1
14 14295 Universal Nozzle 1
15 6084 Crevice Tool 9.5" 1
16 60911 Curved Wand, Plastic 1
17 62352 Floor Tool, 36mm 1
18 11253 Screw 50 x 20
19 60605 Bottom Housing 1
20 60610 Motor Ring, Vac 2
21 60933 Vac Motor, 120V 1000W 1
22 Automatic Start 1
23 46248 Screw 1
24 46297 Plug Cover, aero 7 1
25 49267 Plug Socket 1
26 60867 Switch, aero 5 1
11992 Switch Complete 1
27 48338 Screening Filter, aero 5 1
28 60603 Handle 1
29 60601 Top Cover, aero 5 1
60602 Top Cover, aero 7 1
30 26797 Clamp 2
31 60604 Upper Housing 1
32 60285 Power Cord 1
33 60611 Foam 1

Page -14- WAP TECHNOLOGY Wet/Dry Vacuums Operator's Manual
SQ 10 & 15 Gallon
Assembly Drawing 3/00
WAP TECHNOLOGY
47
48
1
2
3
4
5
12
6
7
9
11
10
8
12
13
14
15
16
17
18
19
24
23
20
21
22
25
26
27
30
29
28
32
31
33
34
35
36
5
46
37
38
39
45
44
43
42
41
41
40

Page -15-
WAP TECHNOLOGY Wet/Dry Vacuums Operator's Manual
SQ 10 &15 Gallon
Assembly Parts List 3/00
WAP TECHNOLOGY
Ref. Part No. Description Qty
1 47014 Ring, Foam Rubber 1
2 47006 Silencer 1
3 44239 Lower Housing, SQ. 1
4 26792 Ground Contact SQ. 10 1
5 11253 Screw, 50mm x 20mm 1
6 11222 Packing Ring, Gasket 1
7 11256 Screw, 35mm x 18mm 1
8 48421 Terminal Block 1
9 11835 Float, Short 1
10 45692 Deflector 1
11 46418 Filter Frame 1
12 11565 Screw, 50 x 18 1
13 29747 Fleece Filter, SQ. 1
14 47025 Covering 1
15 29753 Filter Holder Disc, SQ. 1
16 31972 Rubber Seal, Vac Motor 2
17 29739 Filter Bags, 10 Gallon
14896 Filter Bags, 15 Gallon
18 65243 Canister, SQ 10 Blue 1
100006 Canister, SQ 15 Blue 1
19 29191 Packing Ring SQ 1
20 26797 Clamp 2
21 43975 Retaining Pin (Wheel) 2
22 43435 Cap (Wheel) 2
23 43433 Wheel 2
24 46298 Cater Swivel
25 15102 Swivel, Hose 1
26 15805 Suction Hose 1.5" x 10' 1
27 11597 Hose Cuff 1
28 29758 Wand Bracket Set 1
29 5103 Curved Wand, Chrome 1
30 15546 Straight Wand EXT. (2 Pcs.) 1
31 26774 Carbon Brush (Pair) 1
32 26785 Vac, Motor Complete 1
33 47035 Rubber Seal, Vac Motor 1
34 44240 Upper Housing, SQ 1
35 47015 Motor Ring 1
36 25700 Air Diverter, SQ. 1
37 29989 Rotary Switch, SQ. 1
38 48338 Screening Filter 1
39 29755 Control Panel 1
40 46297 Plug Cover 1
41 46248 Screw 1
42 49267 Plug Socket 1
43 243606 Knob, SQ. 1
44 9868 O Ring 10 x 2.5 mm 1
45 18274 Screw
46 11254 Screw
47 26801 Handle 1
48 26803 Cover SQ. 1

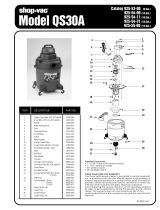
Page -16- WAP TECHNOLOGY Wet/Dry Vacuums Operator's Manual
SQ 17 Gallon
Assembly Drawing 3/00
WAP TECHNOLOGY
68
69
1
70
64
63
62
67
67
66
65
61
59
58
57
56
41
41
41
55
53
52
51
50
48
49
41
46
44
45
43
42
41
40
38
36
39
37
35
33
36
34
31
3229
30
28
29
28
27
26
25
25
24
23
21
23
22
21
20
19
18
17
16
15
14
13
12
11
10
9
8
5
4
6
7
32
60
54
30

Page -17-
WAP TECHNOLOGY Wet/Dry Vacuums Operator's Manual
SQ 17 Gallon
Assembly Parts List 3/00
WAP TECHNOLOGY
Ref. Part No. Description Qty
1 5103 Curved Wand, Chrome
2 5067 Rubber Nozzle
3 47429 Filter Bag, SQ. 17 (5 pcs.)
4 15365 Hose, Vac 13' x 36 mm 1
5 11597 Hose Cuff 1
6 15102 Swivel, Hose 1
7 60738 Belt, Front 1
8 60737 Belt, Rear 1
9 17847 Screw, 6mm x 20mm
10 17849 Washer, 6.4 x 1.6
11 11565 Screw, 50 x 18
12 46073
13 46223
14 29191 Packing Ring SQ 1
15 19880 Clamp 2
16 15889 Rivet 4
17 60739 Canister 17 Gal. 1
18 46134 Handle Bar SQ. 1
19 17737 Screw, Countersunk
20 12496 Nut
21 60767 End Cap 2
22 60746 Panel, Side R.H. 1
23 60771 Screw, Self Threading 4
24 60744 Panel, Side L.H. 1
25 7895 End Cap, Carriage Frame 2
26 60741 Frame 2
27 46301 Bracket, Frt. Carriage 1
28 2758 Nut M8 1
29 30738 Screw, M8 x 30
30 11474 Caster, Locking 2
31 46490 Cap, Wheel 2
32 48647 Wheel 2
33 29753 Filter Holder Disc 1
34 47025 Covering 3
35 29747 Fleece Filter 1
Ref. Part No. Description Qty
36 11565 Screw, 50 x 18
37 46418 Filter Frame 1
38 45692 Deflector 1
39 11835 Float, Short 1
40 11222 Packing Ring Gasket 1
41 11253 Screw, 50 x 20
42 26792 Ground Contact 1
43 44239 Lower Housing 1
44 48414 Plug 2
45 46640 Washer
46 47014 Foam Ring 1
47 28875 Motor Seal 2
48 26774 Carbon Brushes (Pair) 1
49 26785 Vacuum Motor Complete 1
50 47036 Rubber Ring 1
51 5697 Strain Relief 1
52 11256 Screw 35 x 18
53 48421 Terminal Block 1
54 44240 Upper Housing SQ 1
55 60285 Power Cord 1
56 25700 Air Diverter 1
57 24738 Screw
58 29989 Rotary Switch 1
59 48338 Screening Filter 1
60 29755 Control Panel 1
61 11254 Screw
62 18274 Screw
63 9868 O Ring 10 x 2.5 1
64 243606 Knob, SQ. 1
65 46297 Plug Cover, SQ 1
66 49267 Plug Socket 1
67 46428 Screw
68 26801 Handle SQ. 1
69 26803 Cover SQ. 1
70 10029 EJOT - Screw 5.0 x 25

Page -18- WAP TECHNOLOGY Wet/Dry Vacuums Operator's Manual
NOTES

Page -19-
WAP TECHNOLOGY Wet/Dry Vacuums Operator's Manual
ALTO
®
PRODUCT SUPPORT BRANCHES
PRODUCTION FACILITIES
ALTO Danmark A/S, Aalborg
Blytaekkervej 2
DK-9000 Aalborg
+45 72 18 21 00
ALTO Danmark A/S, Hadsund
Industrikvarteret
DK-9560 Hadsund
+45 72 18 21 00
SALES SUBSIDIARIES
ALTO Canada Ltd., Rexdale Ontario
24 Constellation Ct.
(416) 675-5830
ALTO Overseas Inc., Sydney (Australia)
1B/8 Resolution Drive
Caringbah NSW 2229
+61 2 9524 6122
ALTO Cleaning Systems Asia Pte Ltd., Singapore
271 Bukit Timah Rd.
#04-11 Balmoral Plaza
Singapore 259708
+65 8366 455
ALTO Deutschland GmbH, Frondenberg (Germany)
Ardeyer Str. 15
D-58730 Frondenberg
+49 2373 754 200
ALTO Cleaning Systems (UK) Ltd., Penrith
Gilwilly Industrial Estate
Penrith
Cumbria CA11 9BN
+44 1768 868 995
ALTO France S.A. Strasbourg
B.P. 44, 4 Place d’Ostwald
F-67036 Strasbourg
Cedex 2
+33 3 8828 8400
ALTO Nederland B.V. Vianen
Stuartweg 4C
NL-4131 NJ Vianen
+31 347 324000
ALTO Sverige AB, Molndal (Sweden)
Aminogatan 18
Box 4029
S-431 04 Molndal
+46 3127 1600
ALTO Norge A/S, Oslo (Norway)
Bjornerudveien 24
N-1266
+47 2275 1770
U. S. A. Locations European Locations
HEAD OFFICE
ALTO U.S. Inc., St. Louis, Missouri
390 S. Woods Mill Rd., Suite 300
Chesterfield, Missouri 63017-3433
PRODUCTION FACILITIES
ALTO U.S. Inc., Springdale, Arkansas
2100 Highway 265
Springdale, Arkansas 72764
(501) 750-1000
Customer Service - 1-800-253-0367
Technical Service - 1-800-356-7274
ALTO U.S. Inc., Bowling Green, Ohio 43402
1100 Haskins
ALTO U.S. Inc., Clearwater, Florida 33765
1500 N. Belcher Road
SERVICE FACILITIES
ALTO U.S. Inc., Carlstadt, New Jersey 07072
150 Commerce Road
(201) 460-4774
ALTO U.S. Inc., Elk Grove, Illinois 60007
2280 Elmhurst Road
(847) 956-7900
ALTO U.S. Inc., Denver, Colorado 80211
4640 Lipan
(303) 455-2413
ALTO U.S. Inc., Houston, Texas 77040
7215 North Gessner Road
SALES AND SERVICE FACILITIES
ALTO U.S. Inc., Madison Heights, Michigan 48071-0158
29815 John R.
(810) 544-6300
ALTO U.S. Inc., Marietta, Georgia 30062
1355 West Oak Common Lane
(770) 973-5225
WAP TECHNOLOGY
Customer Service Headquarters
1500 N. Belcher Road
Clearwater, FL 33765
Technical Service
1-877-322-2586

Page -20- WAP TECHNOLOGY Wet/Dry Vacuums Operator's Manual
WAP TECHNOLOGY WARRANTY
This Wap Technology Industrial/Commercial Product is warranted to be free from defects in materials and
workmanship under normal use and service for a period of two years from the date of purchase, when
operated and maintained in accordance with Wap Technology's Maintenance and Operations instructions.
This warranty is extended only to the original purchaser for use of the product. It does not cover normal
wear parts such as electrical cable, rubber parts, hoses and motor brushes.
If difficulty develops with the product, you should:
(a). Contact the nearest authorized Wap Technology repair location or contact the Wap Technology Service
Operations Department, 1500 N. Belcher Road, Clearwater FL 33765, for the nearest authorized Wap Tech-
nology repair location. Only these locations are authorized to make repairs to the product under this warranty.
(b). Return the product to the nearest Wap Technology repair location. Transportation charges to and from
the repair location must be prepaid by the purchaser.
(c). Wap Technology will repair the product and or replace any defective parts without charge within a
reasonable time after receipt of the product.
Wap Technology's liability under this warranty is limited to repair of the product and/or replacement of parts
and is given to purchaser in lieu of all other remedies, including INCIDENTAL AND CONSEQUENTIAL
DAMAGES.
THERE ARE NO EXPRESS WARRANTIES OTHER THAN THOSE SPECIFIED HEREIN. THERE ARE NO
WARRANTIES WHICH EXTEND BEYOND THE DESCRIPTION OF THE FACE HEREOF. NO WARRANTIES,
INCLUDING BUT NOT LIMITED TO WARRANTY OF MERCHANTABILITY, SHALL BE IMPLIED. A warranty
registration card is provided with your Wap Technology product. Return the card to assist Wap Technology in
providing the performance you expect from your new floor machine.
WAP TECHNOLOGY reserves the right to make
changes or improvements to its machine without notice.
Always use genuine Wap Technology Parts for repair.
WAP TECHNOLOGY
1500 N. Belcher Road
Clearwater, FL 33765
/